You work transactions through several phases in the Orders web module before they transition to billing orders in the IDI platform as described below. Transaction flow steps and page/button labeling may vary depending on whether you are set up to use starting blocks and web sales or direct invoicing.
Note for New Customer Transactions: To add a new customer account, first create the customer in the Customer Care application. From there you can jump into the Orders application to complete the transaction.
Starting a New Transaction
You can do this either directly in the Orders web module or in Customer Care. The type of transactions you can start in Customer Care will depend on whether starting block functionality is enabled in that application. In the Orders web module you start a new transaction via the main menu (Apps tray). The button image depends on whether or not you're set up for starting blocks (>START with blocks enabled or +NEW when not enabled).
Show Picture

Starting Blocks Enabled:
When you're set up for starting blocks, clicking Start displays a dialog for selecting a starting block. This form lists any existing starting blocks (default and custom) configured for availability by date range and location (Orders web module or Account- and/or Service-level in Customer Care). You can browse through the list using the forward (>) and backward (<) buttons or enter a string to search on.
Show Picture

In either case, initiating a new transaction lands you on the New Transaction page where you enter basic information including customer and order type.
Note
If starting blocks are enabled, the labeling on this page will depending on whether you start the transaction as a, order, cart/sale or direct invoice.
In Customer Care, the mechanics for starting a new order depends on whether starting blocks is enabled for Customer Care.
More
With Starting Blocks Enabled in Customer Care
In Customer Care a Start Transaction button is provided on an Account page (all views) in the upper right next to the icon bar. This button is intended to display starting blocks configured to be available for account-level transactions in Customer Care. This may include orders for new services and features.
A Start Transaction button is also displayed on the Services and Features page in the right-hand Service Views panel when you select a service in the left-hand panel. This button is intended to display starting blocks configured to be available for service-level transactions in Customer Care.
With Starting Blocks Not Enabled in Care
In this case you can initiate an order to modify a selected service (e.g. Hotline, restore, disconnect, etc..) via the Actions drop-down menu on the Services and Features page.
In either case, clicking this button displays the form for selecting a starting block. Once you select a starting block, the Orders web module opens in a new tab and the transaction proceeds based on the selected block.
Starting a transaction in Customer Care opens the Orders web module to the New Transaction page in a separate tab with the customer auto-selected.
Basic Information and Save
Basic Information is entered on the New Order/Cart page. With starting blocks, for cart/sale transactions, the icon in the upper left corner indicates you’re starting a new cart.
Show Picture

Entering basic information involves selecting the Customer and Order Type. You may also choose to assign a sales associate or disconnect the selected customer.
Customer - This is required. If you know the customer's name, enter it in the Customer field. Or click the Use Enhanced Search link to display additional criteria.
More
A customer must be specified. If you know the customer's name, enter it in the Customer field. Or click the Use Enhanced Search link to display additional criteria. Clicking this link displays three additional fields for searching on:
Customer Name/Account Number – Same as the Customer field.
Service Number – Requires an exact match. The field accepts alpha characters so you can enter X’s to search on temporary service numbers.
Social Security Number – Requires an exact match on the complete nine-digit number or the last four digits.
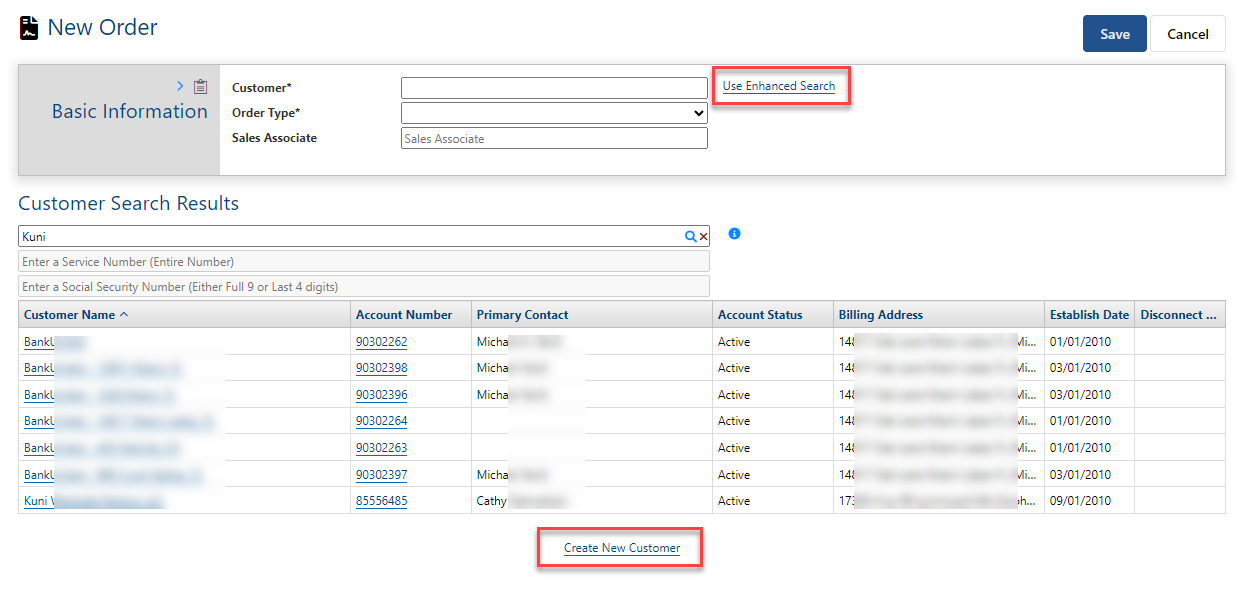
If you enter a value in the Customer field and then click Use Enhanced Search, the search will use that value to find matching accounts.
You can specify Order Type, Sales Associate and Disconnect Customer prior to initiating an enhanced search or defer until after performing the search.
You can use one enhanced search option at a time. When you start to enter a value in one field, the other fields will be disabled. If you enter a value in one field and then decide to use a different option, you can clear the current entry using the associated red x.
After you enter a value for an enhanced search field, click the associated search icon. This displays a list of matches based on the criterion you chose to use. Select a customer from the list and then click Save.
Seamless Navigation to/from Customer Care for Add Customer Transactions
The enhanced search lets you navigate directly to Customer Care from the Enhanced Customer Search to create a new customer and then return to the transaction seamlessly. This functionality is supported with or without starting blocks enabled. The Create New Customer link is presented only after you do an enhanced customer search. This helps prevent creating a new account when you should use an existing account.
Clicking the link opens Customer Care to the New Customer view in a separate browser tab.
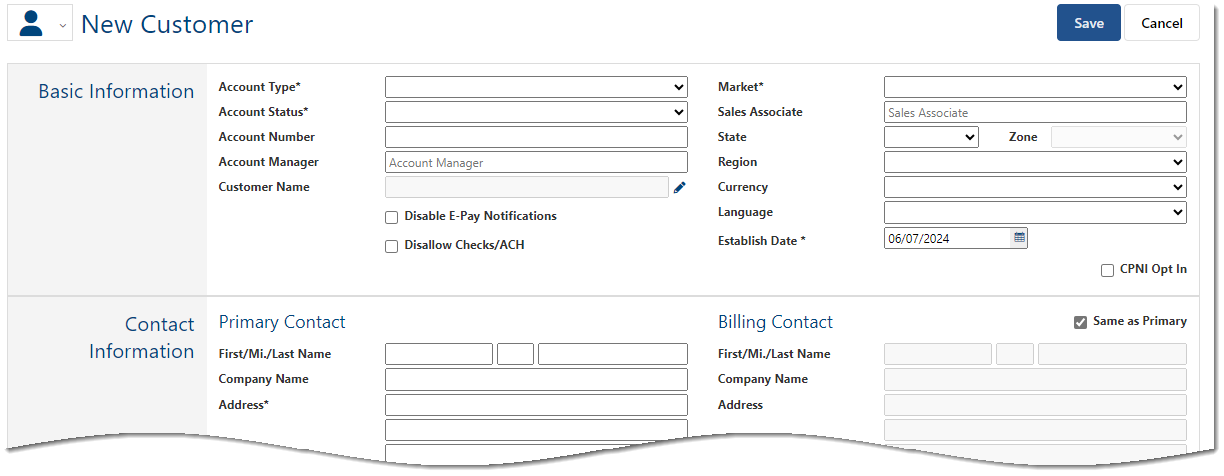
Saving the new customer closes the Customer Care browser tab and returns you to the transaction with the new customer selected in the Customer field.

Note
If you initiate the transaction from Customer Care, the customer name is auto-populated and can be edited as needed.
Order Type - This is required. The Order Type drop down is populated with the Order Types for your system as defined in Admin Console. Order Type may be auto-populated if you start the transaction from a starting block and Order Type is specified on the block.
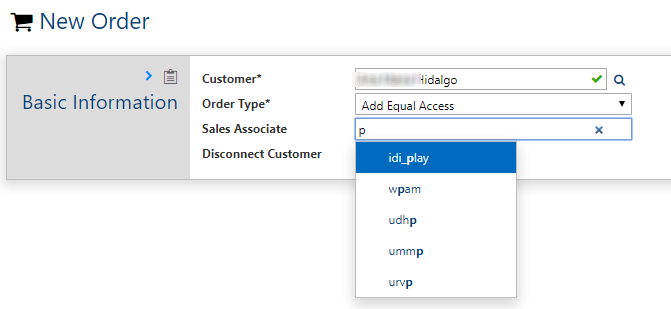
Sales Associate is optional. If the Auto-populate Sales Associate on Orders setting is enabled and the user (or customer) has a sales channel assigned, you’ll see the value auto-populated in this field. If neither has an assigned sales channel, or if you want to change the auto-populated value you can use this field to enter a value directly. This is a type-ahead field that auto-filters available choices based on the text you enter. Simply begin entering a value and the field will display a list of choices matching the entered text.
Show Picture
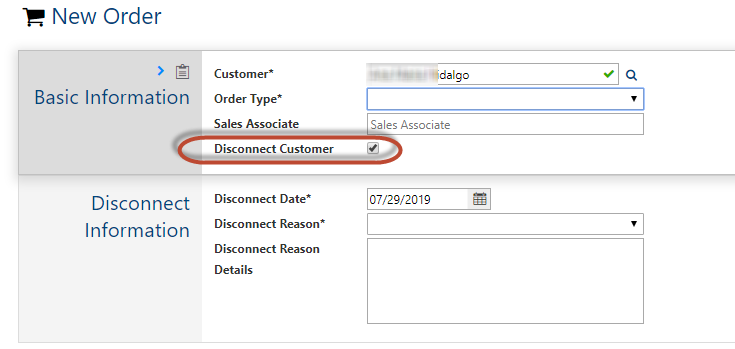
Disconnect Customer - You can use the Disconnect Customer check box as needed to initiate a Disconnect Order.
Show Picture
Note
Additional fields are presented on the New Transaction form for refresh service orders, returns, voids, and bill payments as described in the respective topics.
When you're done entering basic Information, click Save. At this point you can continue with assembly and other phases below to finish the transaction, or leave and continue later using the Omni Search. You may be required to select a register before proceeding to assembly when applicable.


Assigning a Register
A POS location and register is required for retail transactions.
For remote applications where associates are not required to use a specific location and register, these specifications are typically set on the selected starting block.
For transactions where each sales associate is required to use their specific location and register, you can ensure this in two ways:
Register assignments can be made in advance through Register Management available via the LOCATION > My Registers slide out in the Orders main menu. This method saves users from having to manually select a register for each transaction.
Note
When location and register are set on the starting block, those settings will take precedence over location/register settings configured via LOCATION > My Registers. More on using Locations is provided in .
Register Management
Orders provides the following register management functions for registers you are authorized to use (registers in locations where you are an assigned user as configured in IDI Desktop Client POS Back Office > Locations):
Select a register to use for POS transactions.
Perform a float to open a register at the start of a day or shift with the required cash amount.
View current amounts for each tender type in a register.
Reconcile the expected and actual tender amounts in their registers.
Clear the current user from a register to make it available for a different user.
Note
Some of these functions depend on user permissions, POS Back Office Register Policy settings, and other conditions.
Where to Go From Here
Or, if you want to force users to select a register on each transaction:
Do not assign those users registers via Register Management.
Configure a starting block with Require Register to Start Transaction enabled and leave location and register undefined. In this case, the Select Register dialog will always be displayed after saving the transaction's Basic Information. The Location and Register menus in the Select Register dialog are populated based on user’s Location access configuration in the IDI Desktop Client POS Back Office.
This is covered in more detail in the example flow for a new transaction with starting blocks enabled (see Example Transaction Flows below).
Assembly
Assembly involves selecting services and features to include in the transaction and apply actions as required such as add a new item or modify an existing item. Modifying refers to taking such actions as activating, disconnecting, etc. Assembly occurs on the Details page. This page is when you click Save on the New Transaction page. Depending on the transaction status you can also access the Details page from the corresponding Summary, or the Omni Search results.
The Details page has three main areas. The left panel lists items currently in the transaction (if any). The icons above the left panel let you select the transaction's purpose: add a new service, modify and existing service, add a new feature, or modify an existing feature.
Show Picture

| Add Service |
| Add Feature |
| Modify Service |
| Modify Feature |
| Bulk Select Services |
| Add Deposit - Requires Deposit Permission & Deposit action when using Starting Blocks |
| Bulk Update Provisioning Properties |


Note
When you use starting blocks, the configuration of the selected block may limit the available actions, for example, it may not allow adding a new service.
The right panel provides a staging area where you enter/edit the details for transaction items. For example when adding a service you can enter service details and manage service addresses. When adding a retail product you can manage discounts, tax information, and installment plans.
For links to instructions on completing assembly procedures (for example adding a service), see Transaction Details - Managing Content (Assembly).
When you’re finished assembling the transaction, click the Review Cart/Order button in the upper right corner.
Note
With starting blocks, the button label varies depending on whether you start the transaction as an order/cart/sale or direct invoice transaction.
Show Picture

This takes you to the next page where you can review, tender (when applicable), and finalize the transaction.
Review/Tender/Finalize
The functionality available in this phase varies for orders and cart/sale transactions.
For cart/sale transactions the Review button takes you to a page where you can review billing and tendering charges with the customer prior to finalizing the transaction. From this page you can Proceed to Checkout for tendering the sale when you're ready, and then proceed to a summary page where you finalize the sale.
More
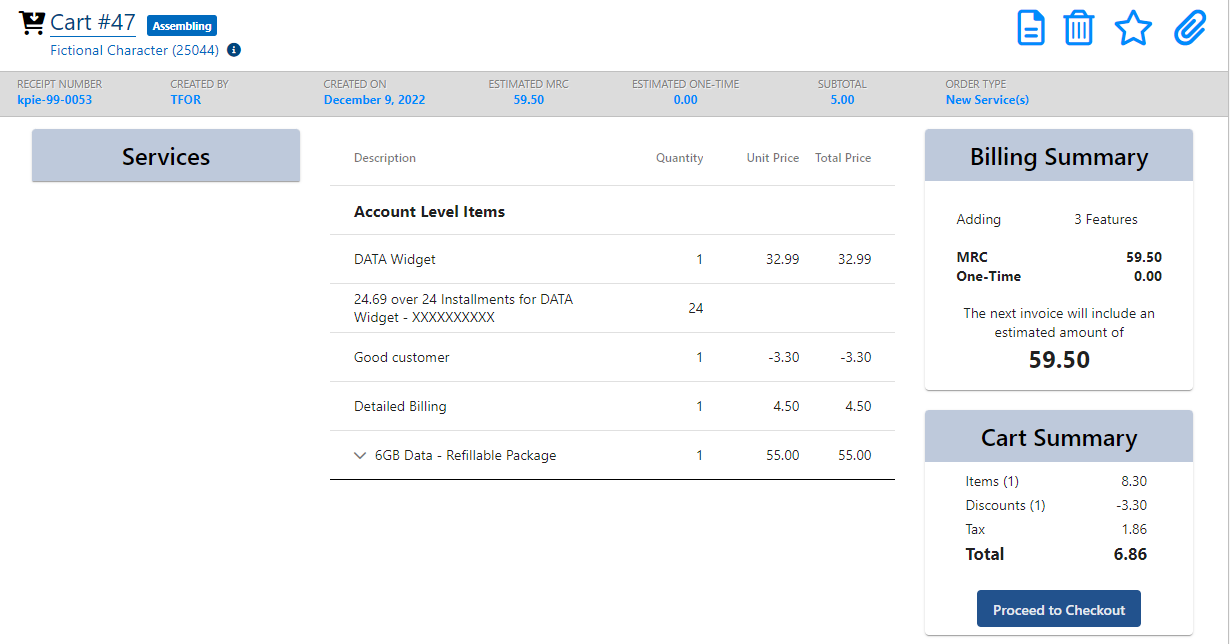
Clicking Review Cart on the transaction assembly page displays the Cart Summary page.
Show Picture
Note
For sales transactions, this displays the summary view that lets sales associates review transaction details with the customer prior to moving to checkout. For order transactions, this summary view is not shown.
The Billing Summary section provides the following information:
A simple summary of service- and account-level items. There are no service-level items in the below example.
Separate sums for billing recurring and one-time (non-recurring) charges for the transaction items.
A simple summary of the total (sum of recurring and one-time charges) and the resulting increase or decrease on the next invoice; for example: The next invoice will include an estimated amount of 59.50.
The Cart Summary section provides totals for the following:
Item (count) Subtotal – The sum of the extended price from all retail product line items. The label contains a count of the unique items (SKUs) involved.
Retail Discounts – The sum of the retail discounts applied.
Taxes – The sum of the calculated sales taxes to be paid by the consumer/subscriber.
Total Amount Due – This is the net of the above listed sums.
On clicking Proceed to Checkout, the page for tendering (if applicable) and finalizing the sale is displayed. (
Show Picture
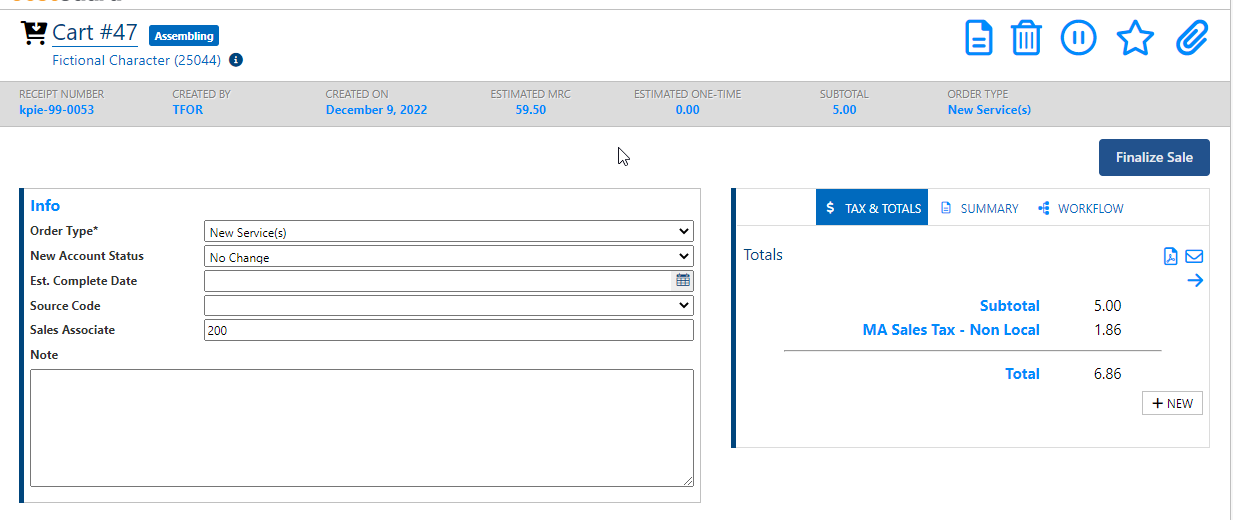
Notes:
When modifying any information on this page you are no longer required to redo the checkout process.
Tendering steps are covered in Example - Completing a Transaction From Start to Finish.
From this page, clicking FINALIZE submits the Cart and converts it to a Sale. This updates the left panel of the Finalize/Submit page with pertinent transaction information. The two badges at the top indicate transaction status (InProcess) and the amount tendered.
This sequence is illustrated in the example new transaction flow with starting blocks (See Example Transaction Flows below).
For orders, you proceed directly to an order summary page where you can:
Place an assembling Order on hold or resume an on hold Order
Navigate back to the Order Details page if changes are required
Submit the Order


About Orders and Billing Orders
An Order is what you create, edit and manage in the Orders web module to add/disconnect/modify Services and Features on an account. A Billing Order is what actually updates the Services and Features on the customer account such that the account can be billed accordingly. Billing Orders have their own management processes and tools as described in Working With Billing Orders.
Direct Invoicing Orders
Direct Invoicing is for Service Providers who need to immediately bill an account for a purchase or charge when the business prefers to not wait for invoicing dictated by the bill cycle. Direct Invoicing Orders requires additional setup and there are additional procedures to be completed when assembling the order. See Working with Direct Invoicing Orders.
Example Transaction Flows
With Starting Blocks Enabled
New Transaction Flow with Starting Blocks.
Also refer to the article on Web Sales in the IDI Knowledge Center.
Without Starting Blocks Enabled