The Journal Types table lets you specify journal types in the IDI platform and Accounts Receivable (Payment Import Settings).
To set up and maintain this table:
In Admin Console, under Data Management, expand the Journals folder and double-click Journals Types. This displays the Journal Types window.
(Show Picture)
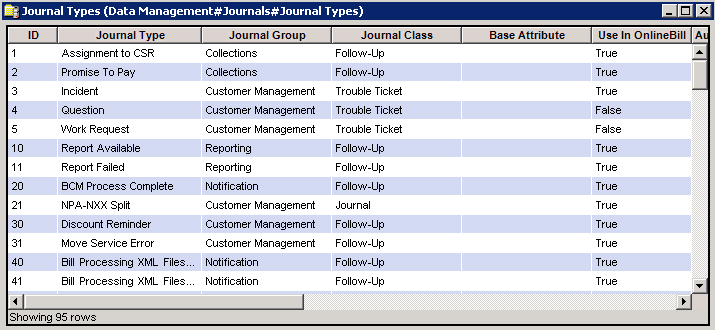
The Journal Types window contains the following information:
Journal Type ID
(read only)System-generated identifier that uniquely identifies the journal type record.
Note
Journal Type ID numbers 1-1000 are system defined and read-only. If you add a new journal description, journal ID numbers will be greater than 1000.
Journal Type
Journal type name.
Journal Group
Journal group name. Valid Journal Groups: Collections, Customer Management, Notification, Personal, Provisioning, Reporting, and Task Management.
Journal Class
Journal class:
Journals = 0
Follow-Ups = 1
Troubles = 2
Note
The journal class cannot be changed if a journal of that class exists.
Severity
The level of severity that was established for Trouble Tickets (if applicable).
Escalation Group
The designated group that receives a follow-up when the Trouble Ticket is escalated (if applicable).
Escalation Hours
Number of hours since the Opened Date of the Trouble before it is escalated (if applicable)
Base Attribute
Base attribute associated with the journal type.
Use in OnlineBill
This applies to Legacy OnlineBill only. If allowing subscribers to add trouble tickets in OnlineBill, you can set up specific trouble types ( journal types with Journal Class = Trouble Ticket) to appear in the drop-down for their (subscriber) use only.
Auto-Assign Group
This is only applicable for Follow-ups. This drop-down menu is populated with all user groups defined in the system.
When you select a user group from this drop-down menu, the default behavior for any Follow-up of this type is to be auto-assigned to the designated group. The Assign To field in the New Follow-up window is disabled, and the Assign To user group is displayed in it. In this case the IDI platform will assign the follow-up to the next available person in the designated user group (user group selected when the Journal Type was created).
There is a check box on a Follow-up, which if unchecked removes the auto assign group and the user can then add either a group or an individual to the item.
This is only true when the ‘Is Available’ option is turned on in Security for any users in the group and they are logged into the system. Otherwise any member of that group can assign that item to themselves.
The default setting is Do Not Auto-Assign.
Start Date
The first date that this journal type can be assigned.
End Date
The last date that this journal type can be assigned (if applicable).
User Groups
This lets you limit the selection of this Type to a specific class(or classes) of users. Select one or more User Groups to determine which class(es) of users will be permitted to select this type when adding a journal. Not selecting any group makes the Type available to all users.
Enable Round-Robin
For Follow-ups and Trouble Tickets assigned to a User Group, either through Journal Type configuration or when the item is created in Customer Management, the default functionality is to assign the item to the next available User belonging to the assigned Group on a round-robin basis. This check box lets you choose whether to apply round-robin functionality on a Journal Type basis. Un-check the check box if you don't want round-robin functionality to apply. In this case, the item will be assigned to the User Group rather than the next available user, and users belonging to the Group will be required to determine responsibility.
Notes:
For Follow-ups, to make the Enable Round-Robin check box editable, you must configure the Journal Type with an Auto-Assign Group (select one from the drop down menu). The check box is always editable for Trouble Tickets as Auto-Assign does not apply to Trouble Tickets.
Round-robin assignment is only supported in the IDI Desktop Client. Follow-ups and Tickets created in web modules do not use this functionality.
The shortcut menu for this table lets you add, edit and delete journal types. See Working with Data Management Tables.
See also: