About
This article describes how to automate IDI platform systems and functions through actions and triggers. Actions can be embedded in workflows or be initiated independent of a workflow via a trigger. It provides a listing of available actions and triggers and describes how to use actions with triggers outside of workflows. How to use actions in workflows is covered in the Workflow web module help.
Triggers
A Workflow trigger provides capability to pair a system event with a configurable system action. Workflow is delivered with a large library of trigger events (left side) and actions (right side) that can be paired together to automate your business processes. For example, when an adjustment is created, send an email. The library of supported trigger events and actions continues to grow as IDI continues to expand IDI platform capabilities.
The example below shows a trigger that will create a workflow when a workflow definition is modified (and the specific conditions are met).
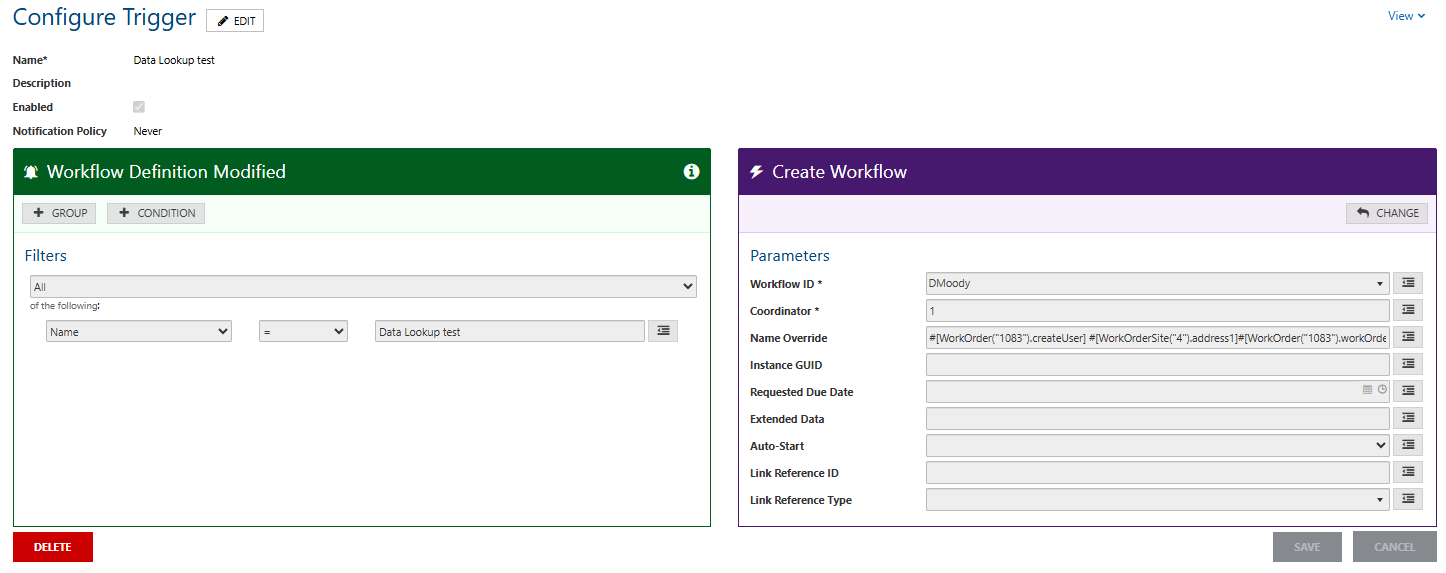
Note: Triggers must be created first before the action can be added. Actions inherit the properties of the trigger and are used as parameters for further defining the action.
Triggers are processed independent of your user-defined Workflows. Note: While triggers run independent of workflows, they are configured and managed via the Workflow web module. This is summarized below and is also covered in Workflow help.
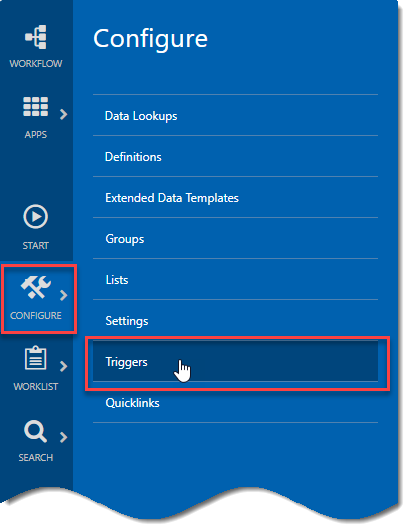
Accessing Triggers
In the Workflow web module, select CONFIGURE > Triggers on the menu bar.
This opens the Triggers page. The upper section provides fields for performing a trigger search and links for creating a new trigger and for showing a trigger history. The lower section lists existing triggers with links to open the respective triggers to edit or delete.
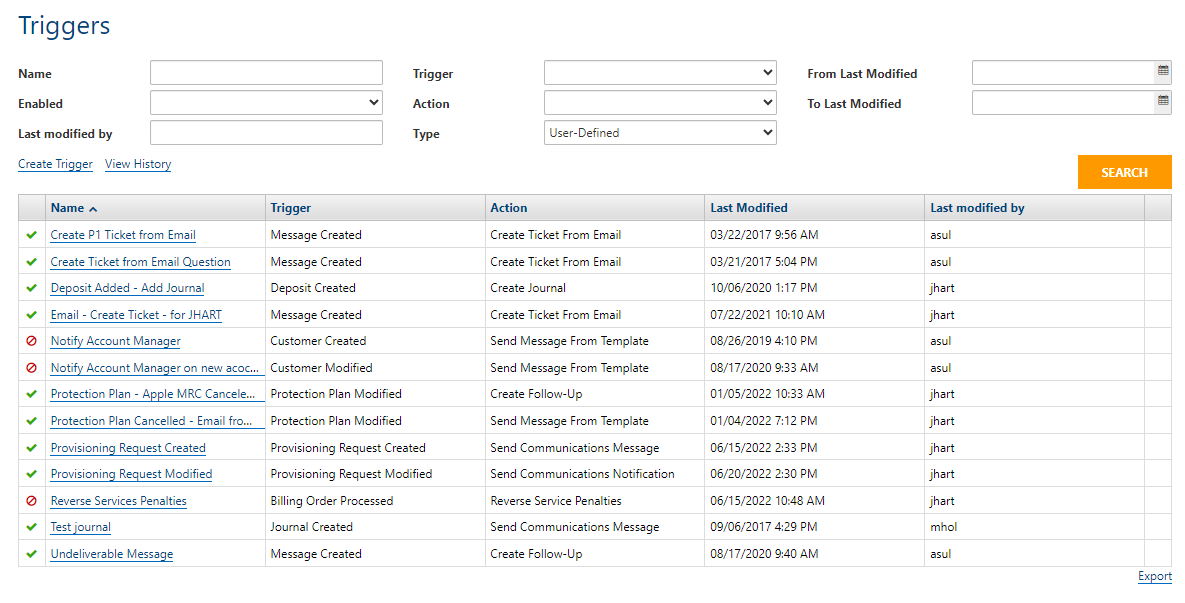
All existing triggers are listed by default. You can filter this list (limit the Triggers displayed) using one or more search criteria and clicking SEARCH.
The Type drop down menu lets you search for user defined triggers, system defined triggers or both (All option). Note: Access to editing system-defined triggers is restricted to IDI associates. Submit a service request to remove this restriction. The first (left) column distinguishes between user defined (check mark) and system defined (shield icon). This column also indicates whether the trigger is enabled (green) or disabled (red).
Creating a New Trigger
Select a Trigger
- Click Create Trigger.
This displays a view for selecting and configuring a trigger and then selecting and configuring the paired action.

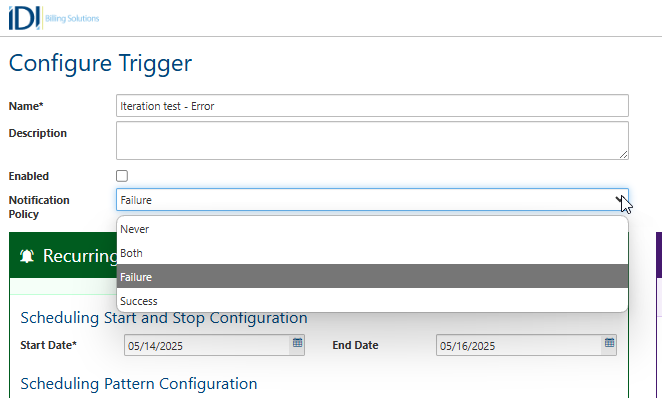
- Enter a Name (required) and Description (optional).
- Use the Enabled check box to choose whether to create the trigger as initially Enabled or Disabled. This setting defaults to unchecked (disabled). You may want to create a trigger as initially disabled to prevent it from running until you’re ready. If you choose to create it as disabled, you can enable it when you’re ready by editing the trigger.
- Notification Policy only applies when used in combination with the Trigger Completed functionality (See Triggering an Action When a Trigger Completes).
- Click Select Trigger. This displays the triggers gallery on the right side of the page.
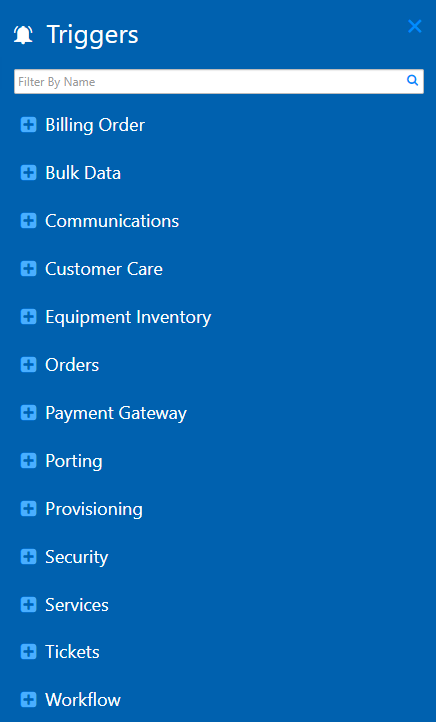
The triggers gallery organizes the triggers into categories to facilitate finding a trigger. A Search field is also available to help you find a trigger, and you can now bookmark your most commonly used triggers.
- Choose a trigger from the gallery. A list of available triggers is provided in the Trigger Gallery section below. Note: If you need to change your selection, the CHANGE button reopens the trigger gallery to let you replace the current selection trigger with a new one.

Add Trigger Filters (Rules)
Add one or more filters to determine when the trigger fires to initiate the paired action. A filter comprises one or more conditions to be evaluated. Conditions can be grouped to be evaluated together or ungrouped to be evaluated individually. You can add as many filters as needed. Note: The All/Any selector lets you choose to have the filters evaluated as an AND statement (fire if All filters are true), or as an OR statement (fire if Any of the filters are true).
- To add conditions upgrouped, simply click + CONDITION. Then define the condition:
- Select a field to evaluate.
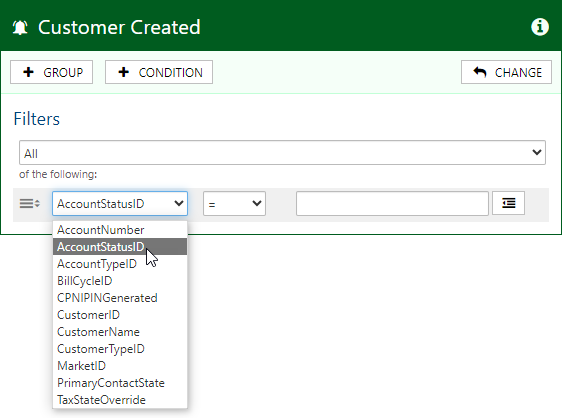
- Select an operator.

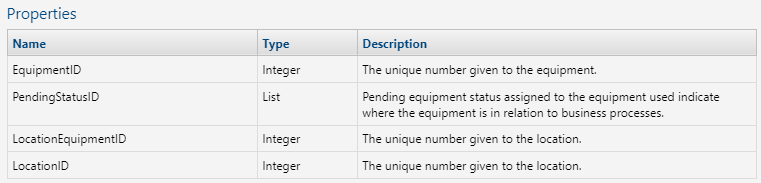
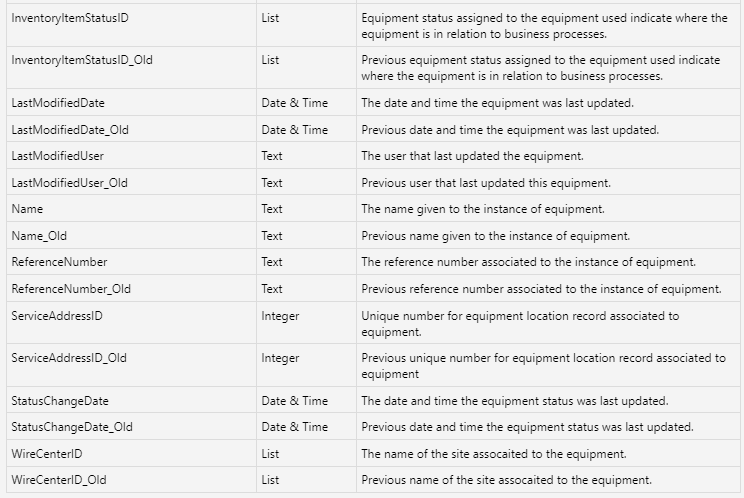
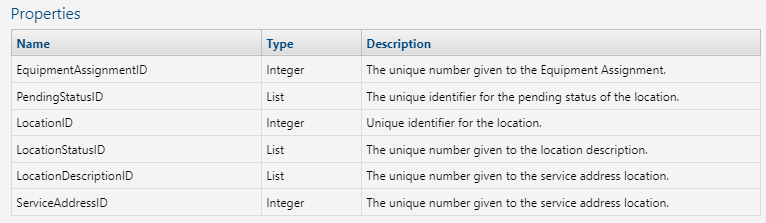
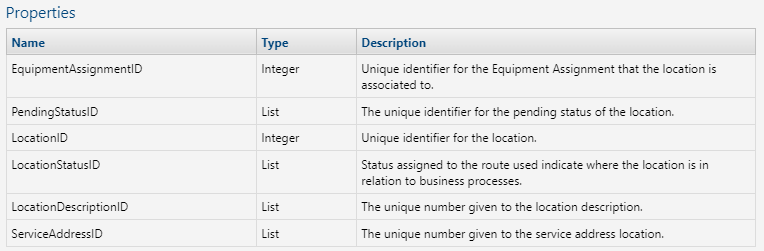
- Enter a value. Note: For fields that represent an object type (e.g. AccountStatus), depending on the selected trigger, you may need to enter the numeric object type ID (e.g. for Account Status 2 = Disconnected as set in the Admin Console Data Management table).

For some triggers, a selector (drop-down menu) that shows values in text is provided to to save you from having to know the ID.

One way to know whether a number value is required is the presence or absence of the value selector. Also if you click the information (i) icon to display trigger details, the Type column will be Integer when a numeric value is required and List when values are listed in text.
- To group conditions, click +GROUP to add a new group and then click + CONDITION to add conditions to the group. Each click adds another condition to that group until you choose to add another new group. Note: Each new group has its own All/Any selector that applies to the conditions in the group. The top level All/Any selector still applies to the upgrouped conditions and groups you’ve added.

- To manage a filter on a group- or condition-level:
- To delete a filter hover over the row to display the delete icon (red X).
- To move a group or condition up or down, click the icon on the left side of the row.
- The Smart Data button at the right lets you define a value as a Data Replacement parameter (Data Lookup). Data Lookups may be useful on triggers that involve a modify, and when the action should take place when a value has changed (for example City <> City_Old). Details for setting up and using Data Lookups are provided in Workflow web help in the section on Configuring Ancillary Data Elements.

Associate an Action with the Trigger
When you are done configuring the trigger, click Select Action. This process is similar to adding the trigger, except that instead of configuring trigger rules, you configure the action’s parameters. See the Actions Gallery section for details.
Note: The available list of actions is based upon the corresponding applications. The list cannot be modified but will continue to grow with the application through future enhancements.
Triggering an Action When a Trigger Completes
This is supported by the Trigger Completed trigger available under the Workflow category in the Trigger gallery. You can configure the trigger to listen for a selected Subscription, Action, Trigger, Result, Result Message or Error message. You can use this functionality in combination with the Notification Policy setting for triggers to send a notification based on the completion status: Success, Failure, Both, or Never.
Configuring the Trigger
When you set up a condition for the trigger and make a selection in the left selector, the available options in the right selector change accordingly. You can also select an operator (=, <, >, etc.). Then pair the trigger with the action you want to fire when the specified condition occurs.

The following smart data values are available in the left selector:
- SubscriptionID: A specific configured trigger (all instances).
- Subscription Name: Name of configured subscription.
- TriggerID: The id of the trigger from the trigger gallery.
- Trigger Name: Name of trigger from the trigger gallery.
- ActionID: The id of the action from the action gallery.
- Action Name: Name of action from the action gallery.
- ResultID: The result ID of the fired subscription instance.
- Result Name: Name of result: Completed Successfully, Errored, Disabled, Filter Did Not Match.
- Resultmessage: Result message for a specific subscription instance.
- ErrorMessage: Error message for a specific subscription instance.
Tip: If configuring a communications message, you can create a link to the configured subscription using smart data values. For example: https://@[Domain]/workflow/@[Environment]/Trigger/AddEditTrigger?triggerID=@[SubscriptionID]
Notification Policy
Notification Policy only applies when used in combination with the Trigger Completed functionality. Policies are not set up on the Trigger Completed trigger, but rather, the trigger the Trigger Completed condition is listening for. The policy can be set to notify on success, failure, both, or never. If you need to notify when the trigger completes, set the value to Success, Failure, or Both. If you do not need to notify when the trigger is completed, set the value to Never.
- Success: Notifies the system when the subscription instance has been completed successfully.
- Failure: Notifies the system when the subscription instance fails.
- Both: Notifies the system when the subscription instance completes successfully or fails.
- Never: Does not alert the system when the subscription instance is completed.
Note: The default value is set to Never to minimize system events.
Recurring Triggers
A recurring trigger will deliver an action based on the configured scheduling pattern. You can configure when to start and end the recurring pattern. End dates are inclusive of the date configured. The scheduling pattern options are seconds (30 seconds minimum), minutes (5 minutes minimum), hourly, daily, weekly, monthly and yearly. You also have the option to Run Now. The Run Now option lets you execute the trigger immediately rather than waiting for the scheduled interval.

Note: To ensure optimal performance, the system requires a minimum value of 30 if you’re using Seconds, and 5 if you’re using Minutes.
Managing Existing Triggers
To view the configuration for an existing Trigger, click the Trigger’s Name in the list. This displays the Configure Trigger page in Read-only mode. To edit the configuration click EDIT. This opens the fields for editing.
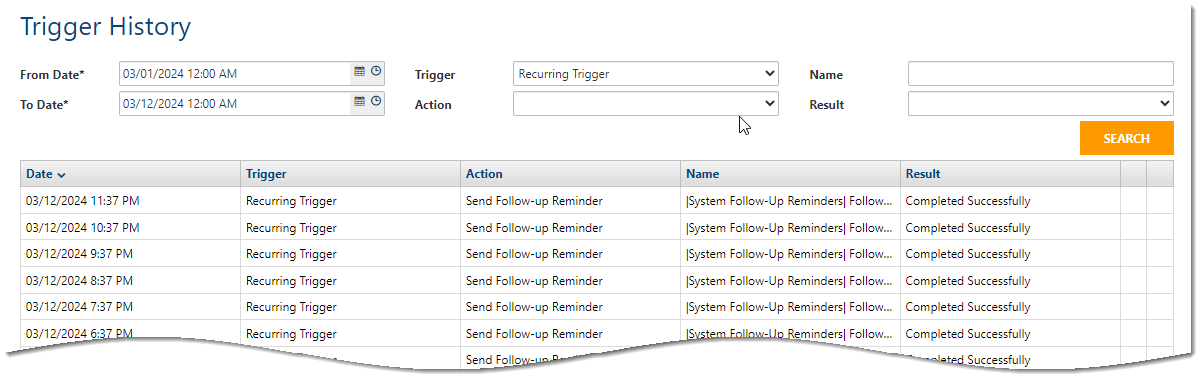
To view Trigger History, click the View History link. This displays a page that lets you search existing triggers by a date range and other search criteria.
You can also view a trigger-specific history view from the Configure Trigger form.

The default search filters are for the current day; however, you can increase the date timeframe to up to 30 days. Specifying additional criteria will help narrow down your search. It is recommended to apply as many filters as practical.
The Trigger History displays all instances of that trigger with start/end dates, subscription results, any result messages. The two far right columns provide access to details (Info icon), and the ability to download a log file (Download icon). The download requires the Download Log File permission. There is also an option to export the history.

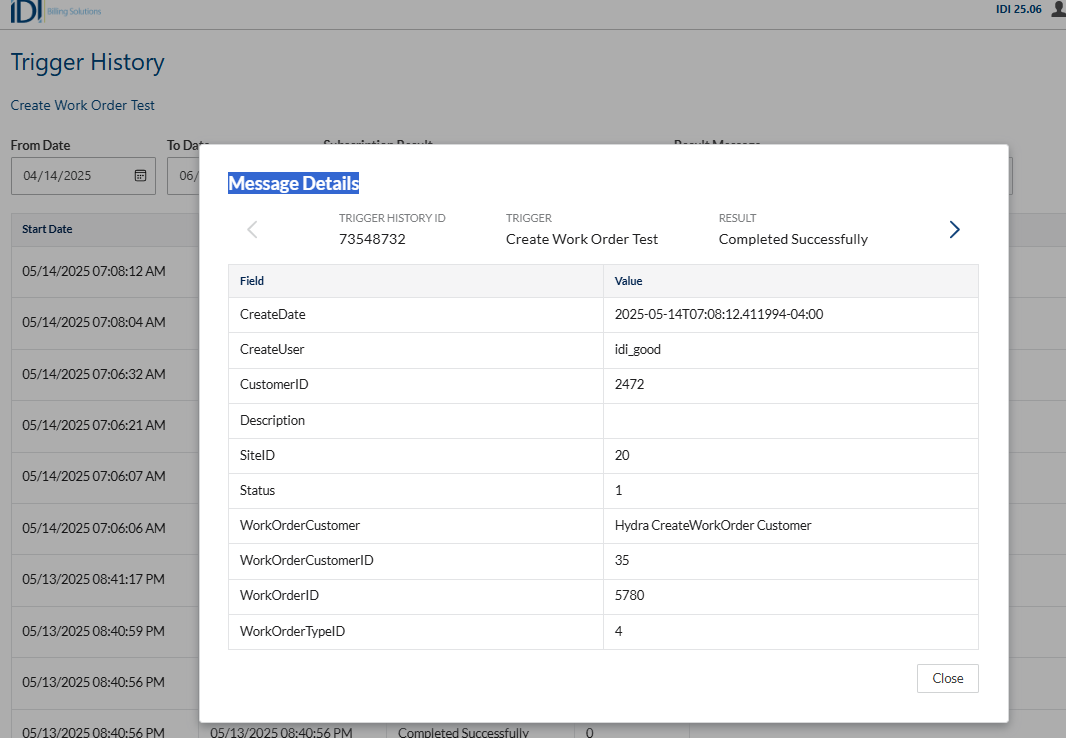
Message Details:
Troubleshooting Tips
The Results field contains several values that can help you determine what happened when the system ran your automation.
| Completed Successfully | The trigger filters match and the system ran the configured action. |
| Errored | The trigger filter matched but the action could not run successfully. |
| Filter Did Not Match | A trigger is configured for the event that occurred but the filters did not match so the system did not run an action. |
| Trigger Disabled | A trigger is configured for the event that occurred but the trigger is disabled. |
The search results will display by descending dates. To assist with troubleshooting the last three columns will provide helpful information – starting with the results.

Completed Successfully
You configured your trigger and did not receive the expected results so why does the system display Completed Successfully? When in this situation, it might be that the trigger configuration and action are valid but the action configuration may need adjusted.
For example, when an adjustment is created by CCOA and the amount is less than $25.00 the system will send a templated email to that person. The trigger history would produce a result of Completed Successfully; however, the email will not contain the smart data replacements as expected because the configuration of the data field in the action is not valid.

Errored
![]() When the system cannot execute your trigger the error result, plus access to the error message will be available to help correct the issue. The error message will provide information as to which business rules caused the error. The logging message ID is made available so that you can further research using the Web API documentation.
When the system cannot execute your trigger the error result, plus access to the error message will be available to help correct the issue. The error message will provide information as to which business rules caused the error. The logging message ID is made available so that you can further research using the Web API documentation.
Filter Did Not Match
A trigger is configured for the event that occurred but the filters did not match so the system did not run an action. You will want to look at the filters within your trigger and make sure the message details from your event contains the values that match your filter. When you hover over a row within the results, the message detail icon will display
![]() . Click the icon to see details.
. Click the icon to see details.
For example, using the trigger filters from above, if a $100.00 adjustment was created by CCOA and the trigger history result was that the filter did not match, the message details will help explain why.

In the message details above, I can conclude that I selected adjustment type was for a credit adjustment; therefore, the adjustment amount is a negative causing the filters to not match.
Trigger Disabled
A trigger is configured for the event that occurred but the trigger is disabled. This is a simple fix, just enable the trigger.
Triggers Gallery
Triggers are organized by functional areas, for example: Billing Order, Bulk Data or Communications. This gallery lists the available triggers and indicates the data type for each property you can use when you add a condition to evaluate.
Note: As described earlier, condition properties that represent an object type are assigned an object type ID (by the system for system-provided object types, or by you for customer-defined object types). For example, for the system-defined Account Status of Disconnected, the system-assigned ID = 2. For some triggers, values for these object type properties must be entered by their numeric value. In other cases, a selector (drop-down menu) with textual values is provided to facilitate selection. In cases where the trigger requires a numeric ID, the trigger description will indicate this requirement.
Note: Not all triggers fire from IDI Desktop Client per below.
Additional details regarding how these triggers fire are provided in the trigger descriptions in the following sections.
Billing Order
- Billing Order Processed – Fired when a billing order is submitted, or when its state/status of a billing order changes in the Orders web module, APIs, or IDI Desktop Client.

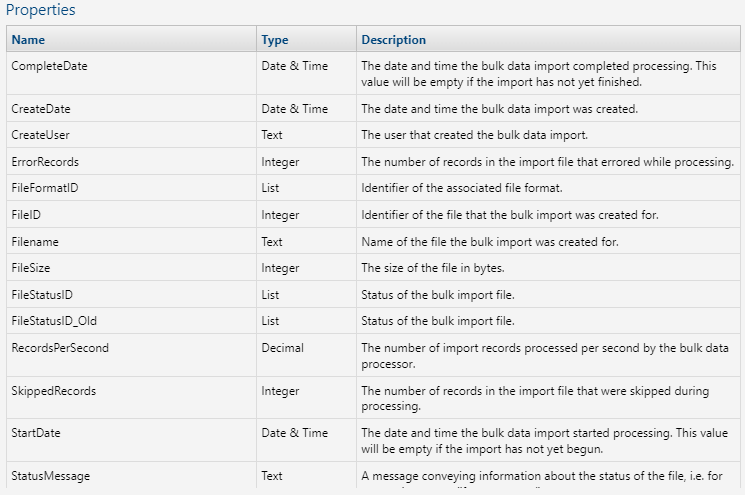
Bulk Data
Note: These triggers only apply when managing bulk data via the Bulk Data web module or API and not IDI Desktop Client.
- Bulk Data Import Created – Fires when a file is imported.

- Bulk Data Import Modified – Fires when the file status for a Bulk Data import file changes.

Communications
Note: These triggers only apply when managing communications via web applications and not IDI Desktop Client.
- Message Created – Fires when a Communications 2-way email (Message) is sent or received.

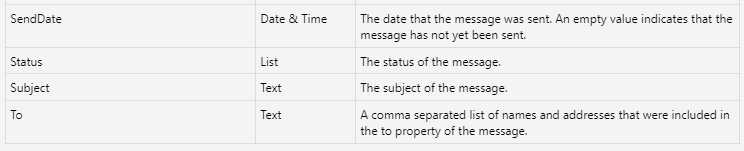
- Message Deleted – Fires when an existing Communications message (2-way email) is deleted. Note: This is intended for Communications administrators to use in the rare case where messages get deleted.

- Message Modified – Fires when a Communications message (2-way email) is modified. Note that this is an Admin function done via the Communications module.


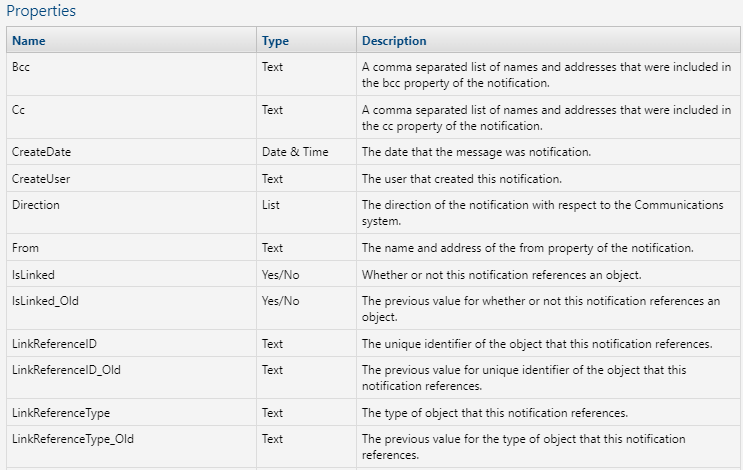
- Notification Created – Fires when a Communications Notification is sent.

- Notification Deleted – Fired when a notification is deleted. Fires when a Communications Notification is deleted. Note: This is intended for Communications administrators to use in the rare case where notifications get deleted.

- Notification Modified – Fires when a Communications Notification is modified. Note: This is intended for Communications administrators to use in the rare case where notifications are modified.

Customer Care
- Accounts Receivable Batch File Processed – Fires when a background accounts receivable file is processed in IDI Desktop Client. There is no web processing of batch files. More information can be found here: https://help.idibilling.com/?ht_kb=trigger-for-background-payment-processing

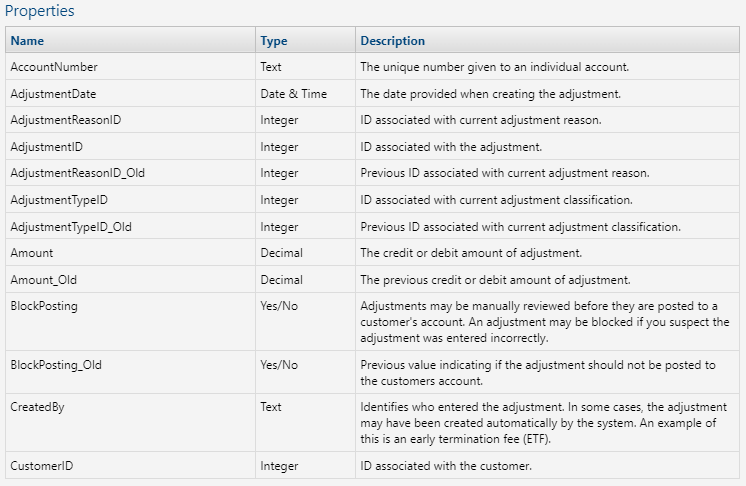
- Adjustment Created – Fires when a new adjustment is created using Customer Care, APIs, or IDI Desktop Client.

- Adjustment Deleted – Fires when an adjustment is deleted using Customer Care, APIs, or IDI Desktop Client.

- Adjustment Modified – Fires when an adjustment is modified using Customer Care, APIs, or IDI Desktop Client.
- Collection Information Modified – Fires when collection information on an account is modified using Customer Care, APIs, or IDI Desktop Client.

- Contact Created – Fires when a new customer contact is created using Customer Care, APIs, or IDI Desktop Client. This applies to customer contacts only.

![]()
- Contact Modified – Fires when a customer contact is modified using Customer Care, APIs, or IDI Desktop Client. This applies to customer contacts only.


- Corporate Account Added – Fires when creating a new corporate structure or adding an account into an existing corporate structure, using Customer Care, APIs or IDI Desktop Client. See the related knowledge article here: https://help.idibilling.com/?ht_kb=workflow-triggers-for-corporate-account-changes
- Corporate Account Deleted – Fires when a customer is removed from a corporate account from Customer Care, using Customer Care, APIs, or IDI Desktop Client. See the related knowledge article here: https://help.idibilling.com/?ht_kb=workflow-triggers-for-corporate-account-changes

- Corporate Account Modified – Fires when invoice responsibility on an account in a corporate structure is toggled, or when reparenting an account, or when modifying the market of the corporate structure using Customer Care, APIs, or IDI Desktop Client. See the related knowledge article here: https://help.idibilling.com/?ht_kb=workflow-triggers-for-corporate-account-changes

- CPNI Information Updated – Fires when CPNI information is modified using Customer Care or APIs (not IDI Desktop Client). Auto-created via CPNI setup in Customer Care.

- Customer Created – Fires when a new account or prospect is created using Customer Care, APIs, or IDI Desktop Client.
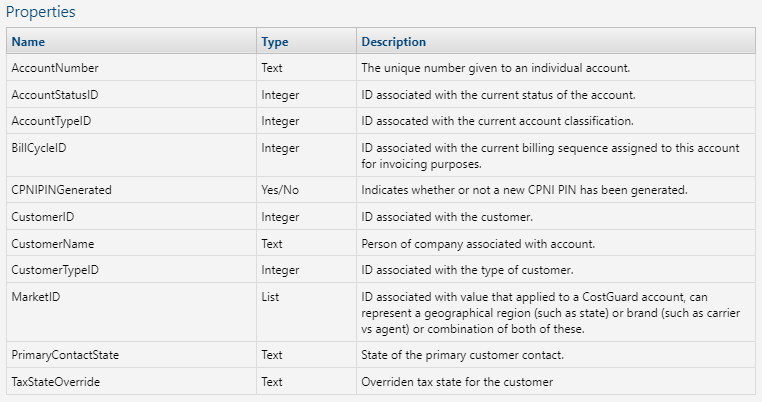
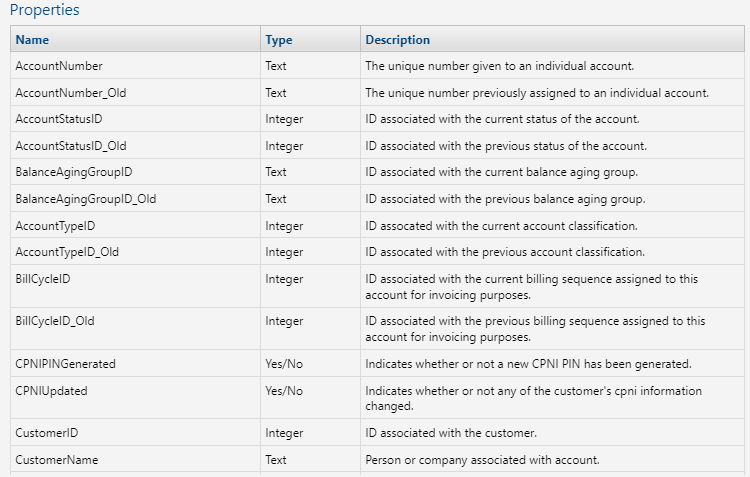
- Customer Modified – Fires when an account or prospect is modified using Customer Care, APIs, or IDI Desktop Client.

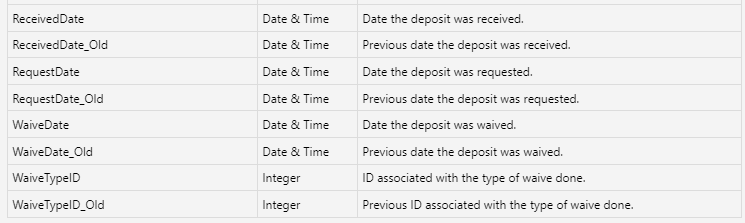
- Deposit Created – Fires when a new deposit is created using Customer Care or APIs (not IDI Desktop Client)

- Deposit Deleted – Fires when a deposit is deleted using Customer Care or APIs (not IDI Desktop Client).
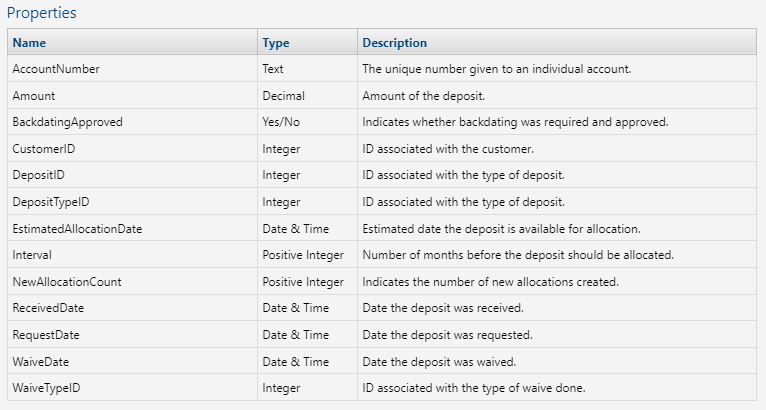
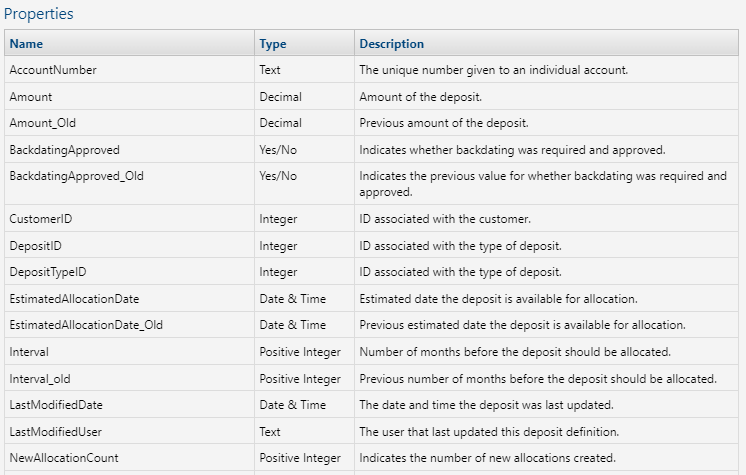
- Deposit Modified – Fires when a deposit is modified using Customer Care or APIs (not IDI Desktop Client).
- Dispute Created – Fires when a new dispute is created using Customer Care or APIs (not IDI Desktop Client).
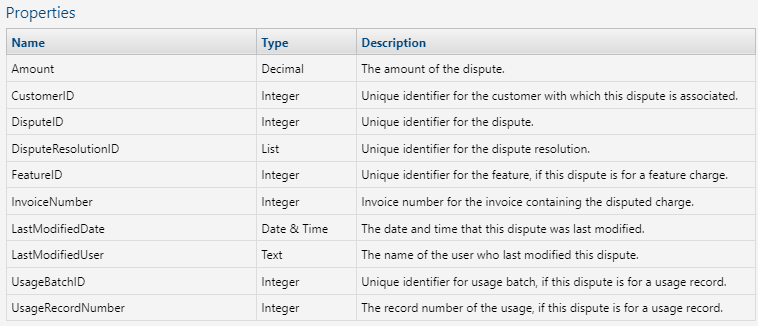
- Dispute Modified – Fires when a dispute is modified using Customer Care or APIs (not IDI Desktop Client).

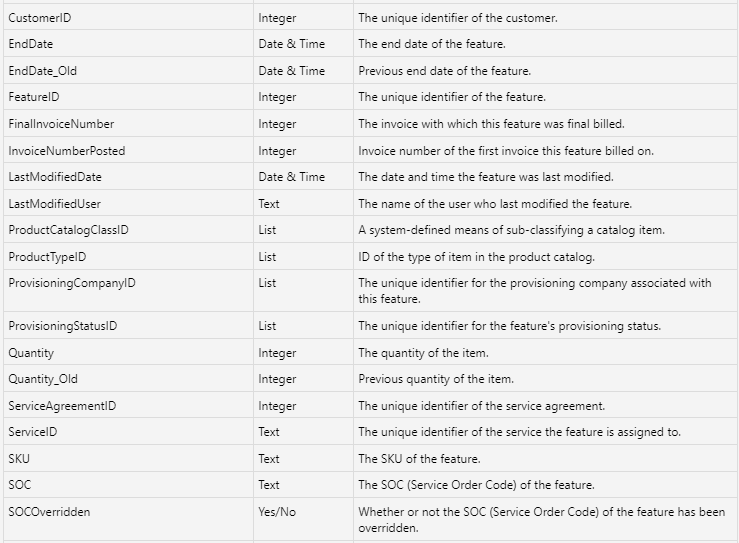
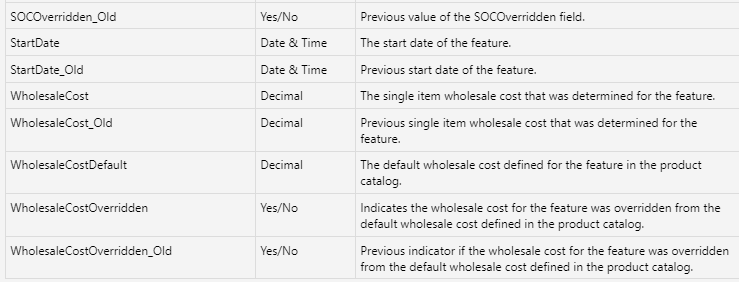
- Feature Modified – Fires when a feature is modified using web module or APIs (not IDI Desktop Client).

- Follow-up Created – Fires when a new follow-up is created using Customer Care, APIs, or IDI Desktop Client.
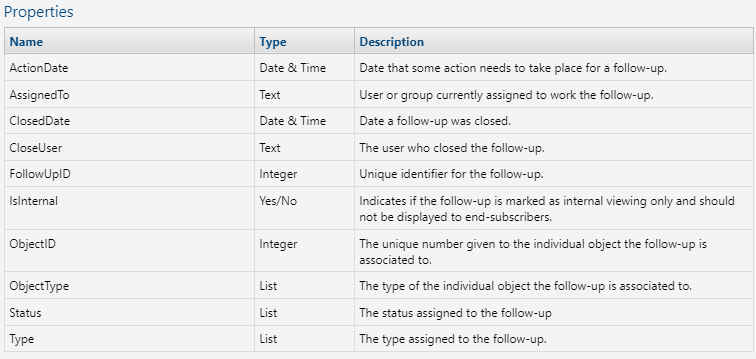
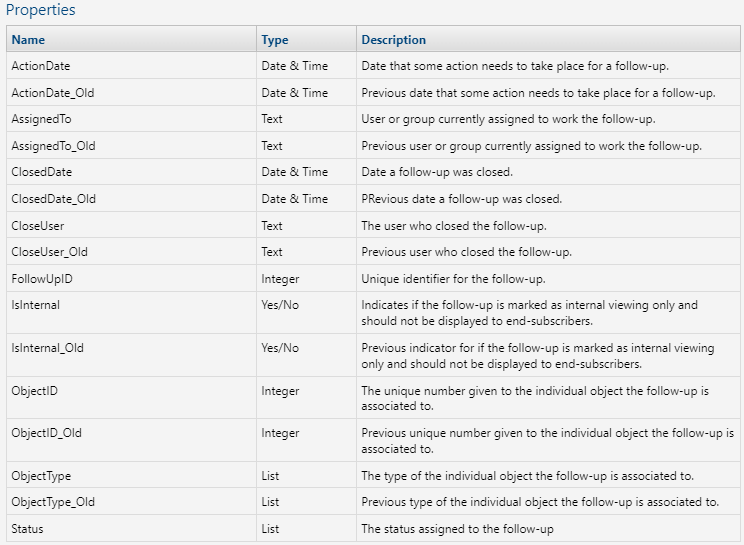
- Follow-up Modified – Fires when a follow-up is modified using Customer Care, APIs, or IDI Desktop Client.

- Invoice Preview Request Created – Fires when an invoice preview request is created using Customer Care or API (applies to web applications only).

- Journal Created – Fires when a new journal is created from any of the web modules or API (not IDI Desktop Client).

- Journal Item Attributes Modified – Fires when the attributes (extended information) of a journal, follow-up or ticket are modified (not IDI Desktop Client).

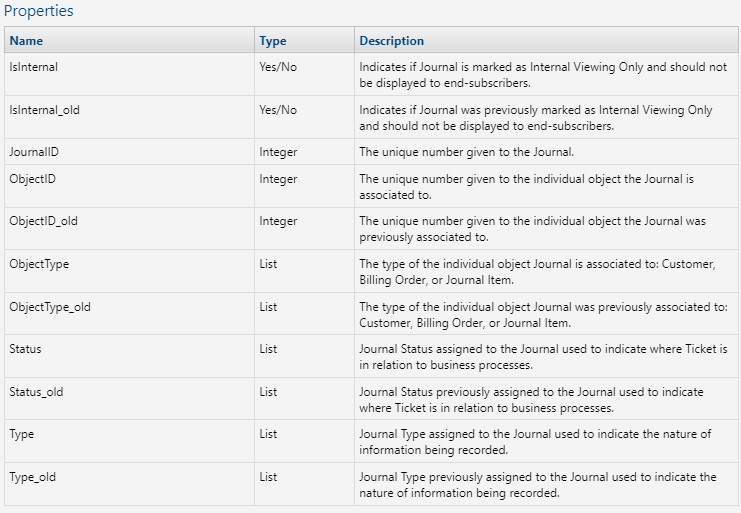
- Journal Modified – Fires when a journal is modified from any of the web modules or via API (not IDI Desktop Client).
- Payment Created – Fires when a new payment is created using any method – Customer Care, APIs, batch file, or IDI Desktop Client.

- Payment Deleted – Fires when a payment is deleted using any method – Customer Care, APIs, or IDI Desktop Client.

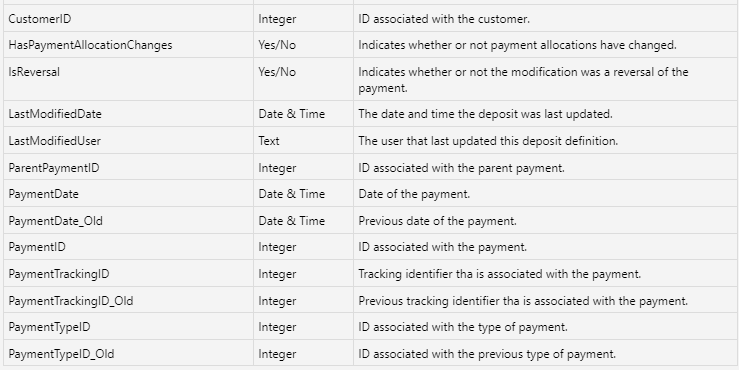
- Payment Modified – Fires when a payment is modified using Customer Care, APIs or IDI Desktop Client.

- Payment Plan Created – Fires when a new payment plan is created using Customer Care.

- Payment Plan Modified – Fired when a payment plan is modified using Customer Care.

- Protection Plan Created – Fires when a new protection plan is created using Customer Care (not IDI Desktop Client).

- Protection Plan Modified – Fires when a protection plan is modified using Customer Care (not IDI Desktop Client).

- Service Address Modified – Fires when a service address is modified using Customer Care or IDI Desktop Client.


Equipment Inventory
Note: These triggers apply when using the Inventory web module and do not fire when managing inventory using IDI Desktop Client.
- Equipment Added to Location – Fires when an equipment is added to a location.
- Equipment Attributes Modified – Fires when extended information of an equipment object are modified.

- Equipment Created – Fires when a new equipment object is created.

- Equipment Deleted – Fires when an equipment object is deleted.

- Equipment Modified – Fires when an equipment object is modified.

- Equipment Removed from Location – Fires when an equipment object is removed from a location.

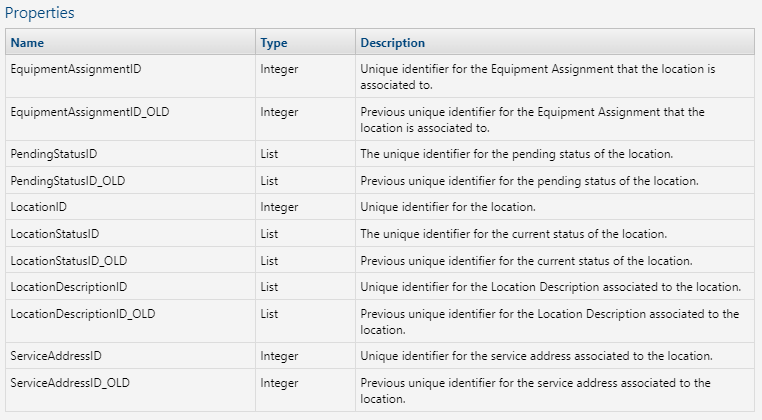
- Location Created – Fires when a new location is created.
- Location Deleted – Fires when a location is deleted.
- Location Modified – Fires when a location is modified.
Orders
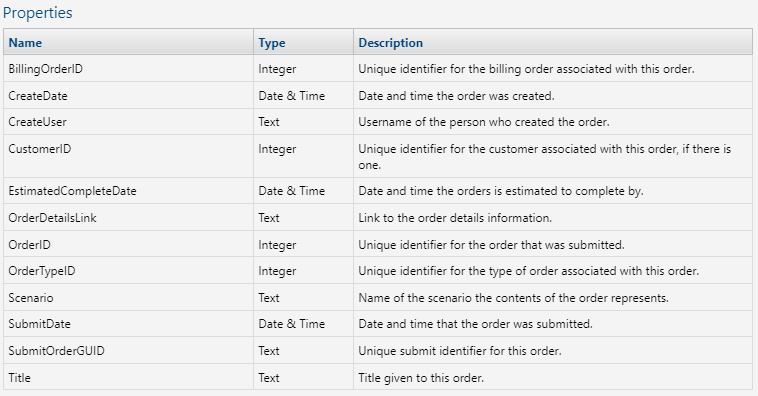
- Order Submitted – Fires when an order is submitted using web Orders (not IDI Desktop Client).
Payment Gateway
Note: These triggers fire when managing E-Pay and payments using Customer Care or IDI Desktop Client (with the exception of Payment Provider Transaction Error which applies to IDI Desktop Client only).
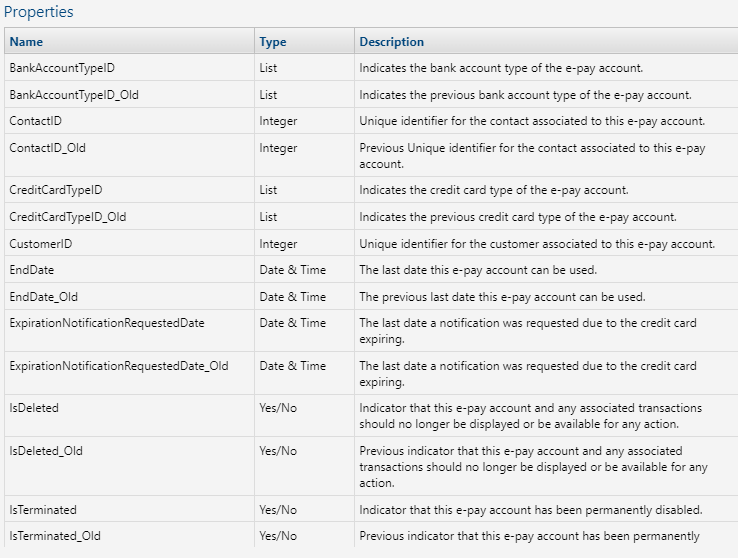
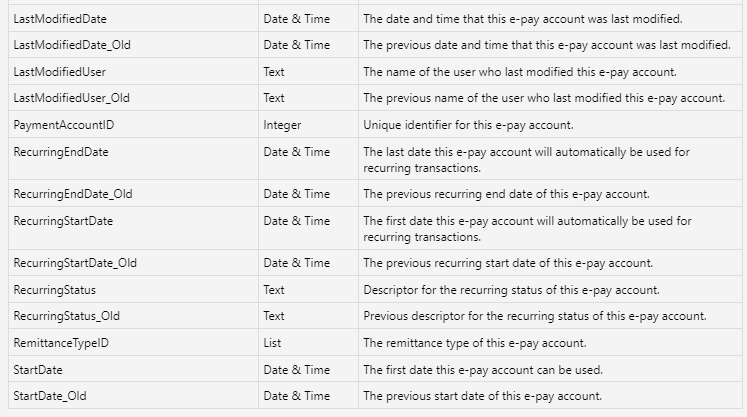
- E-Pay Account Created – Fires when a new E-Pay account is created.

- E-Pay Account Modified – Fires when an E-Pay account is modified.
- Payment Account Transaction Created – Fires when a new E-Pay account transaction is created.
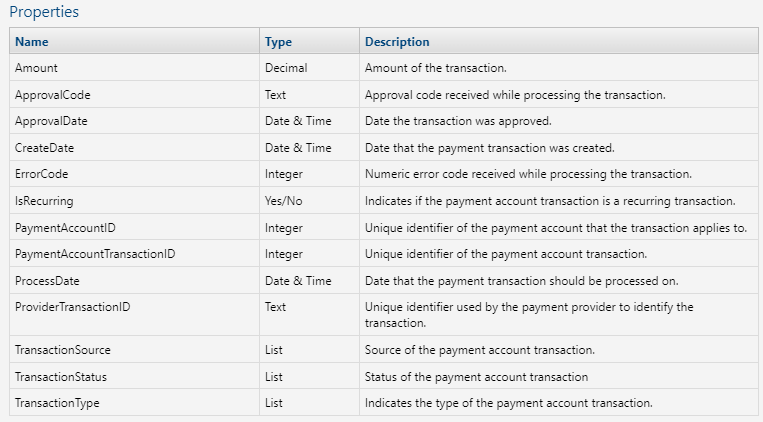
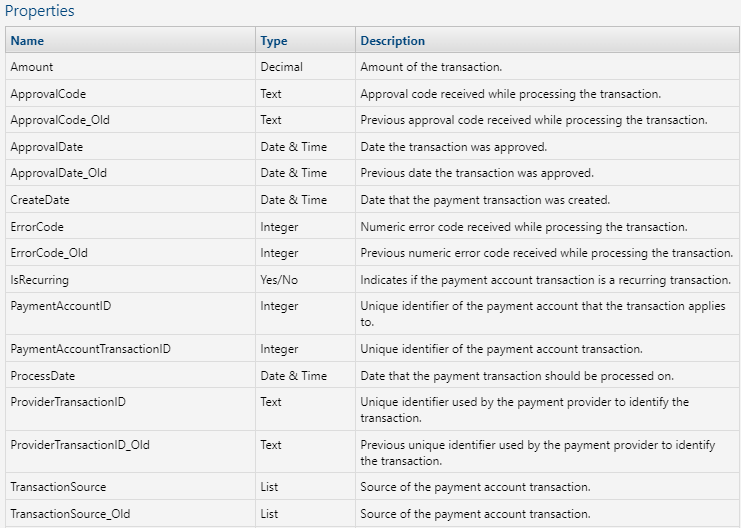
- Payment Account Transaction Modified – Fires when an E-Pay account transaction is modified.

- Payment Provider Transaction Error – Fires when a payment provider transaction is in error in IDI Desktop Client and web applications. This trigger is not appliable for Paymentus.

Porting
Note: These triggers are fired when managing porting using Customer Care or IDI Desktop Client.
- Port Request Created – Fires when a port request is created.
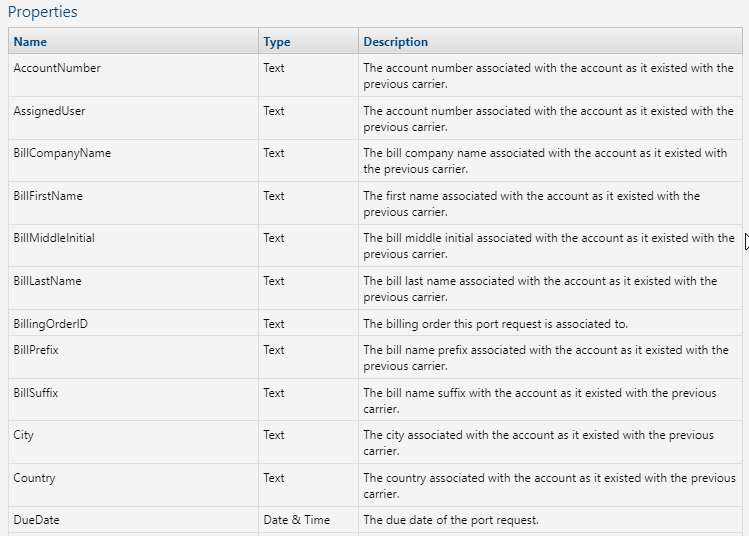

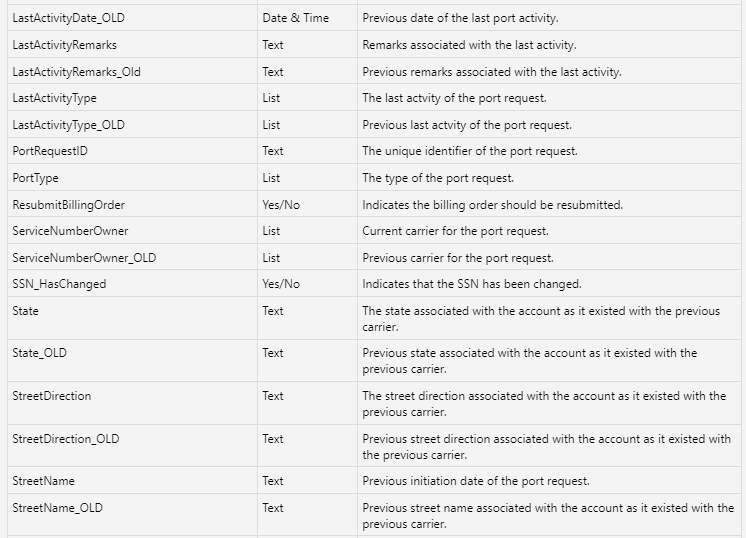
- Port Request Modified – Fires when a port request is modified.


Provisioning
Note: These triggers apply when using the Provisioning web module and do not fire when using IDI Desktop Client.
- Create Provisioning Command – Fires when a provisioning command is created from a provisioning Command template.

- Provisioning Request Created – Fires when a provisioning request is created.
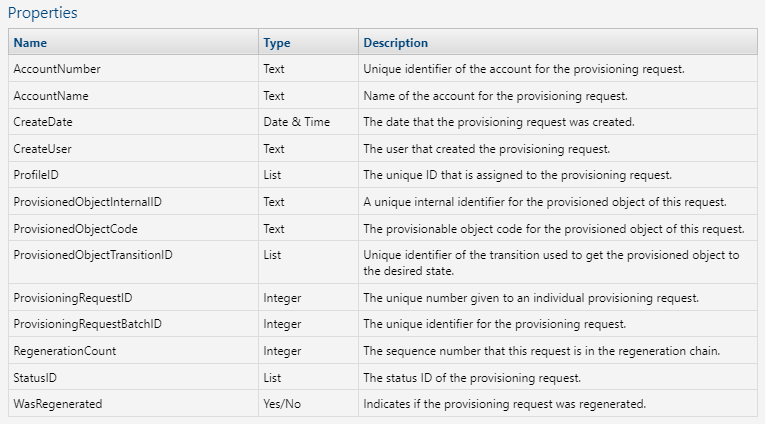
- Provisioning Request Modified – Fires when a provisioning request is modified.


Security
Note: These triggers apply when managing users via the Security web module and do not fire when managing users via IDI Desktop Client.
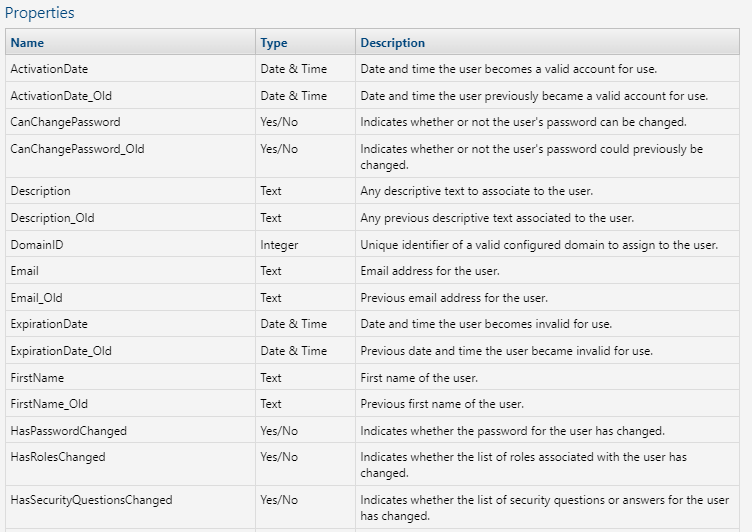
- User Created – Fires when a new user is created.

- User Modified – Fires when an existing user is modified.

Services
- Device Disassociated – Fires when a device is disassociated from a service using web applications and does not apply when using IDI Desktop Client.

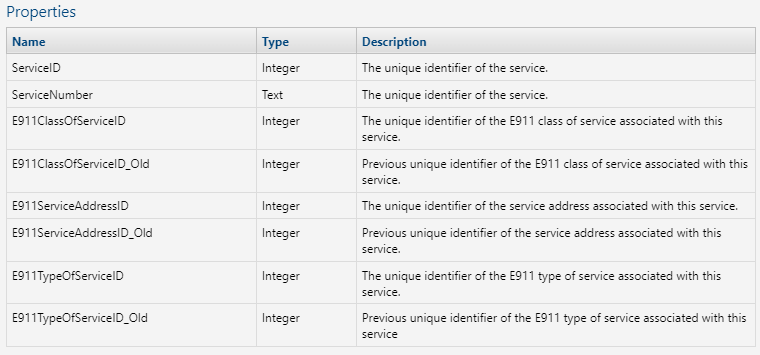
- E911 Service Modified – Fires when an E911 service is modified using web applications. This function is no longer available in IDI Desktop Client.
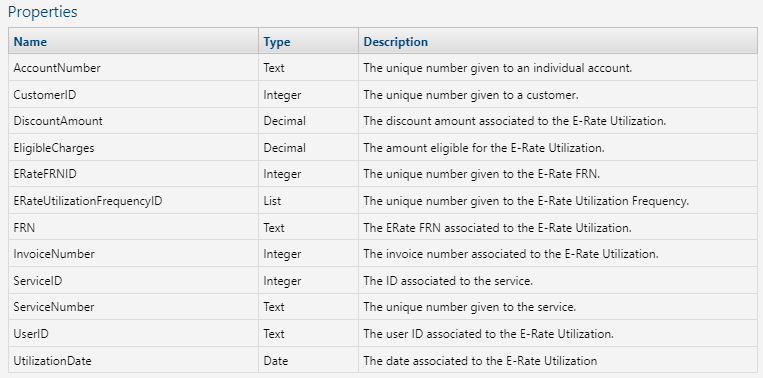
- E-Rate Utilization Manually Created – Fires when E-Rate utiolization is manually created. E-Rate functionality is only available via web applications.
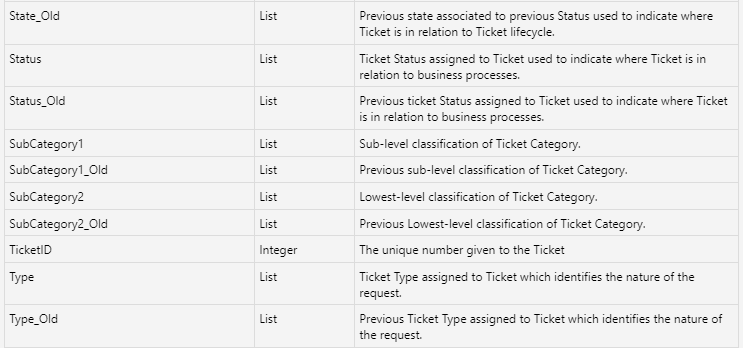
Tickets
- Ticket Created – Fires when a ticket is created using web applications (not IDI Desktop Client).
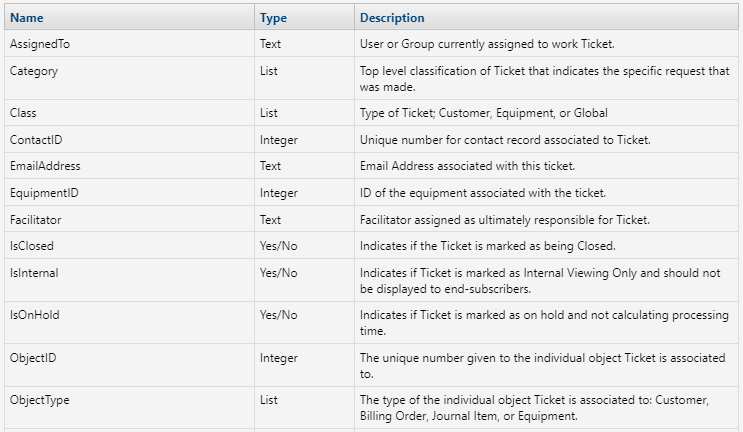

- Ticket Modified – Fires when a ticket is modified using web applications (not IDI Desktop Client).


Workflow
- Recurring Trigger – A recurring trigger fires based on a configured recurring pattern. You can specify when you want the pattern to start and end. End dates are inclusive of the specified date.

- Trigger Completed – Delivered when the Action for a Subscription completes that has a Notification Policy which is not set to Never. This trigger runs a follow up action. For more on this see Triggering an Action When a Trigger Completes,

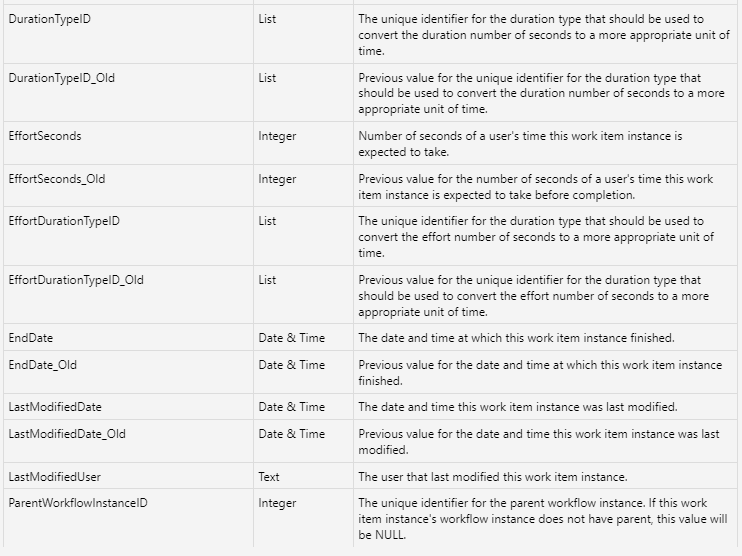
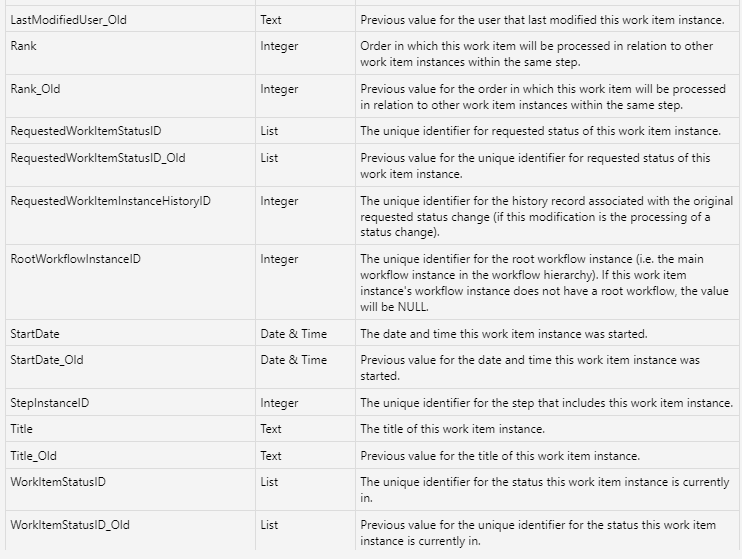
- Work Item Instance Modified – Fires when a workflow instance is modified.


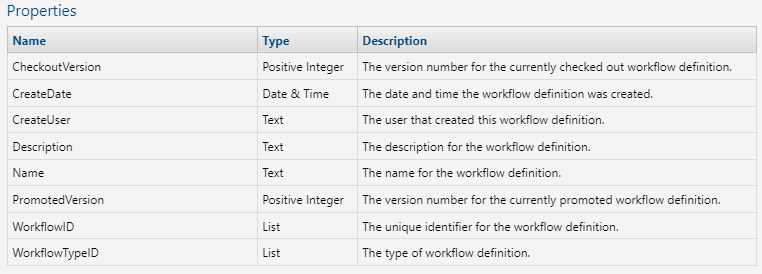
- Workflow Definition Created – Fires when a workflow definition is created.
- Workflow Definition Deleted – Fires when a workflow definition is deleted.

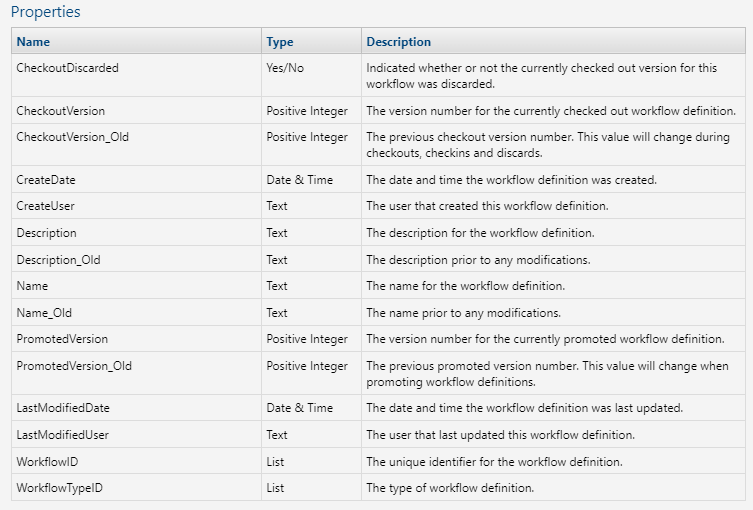
- Workflow Definition Modified – Fires when a workflow definition is modified.
- Workflow Instance Created – Fires when a workflow instance is created.
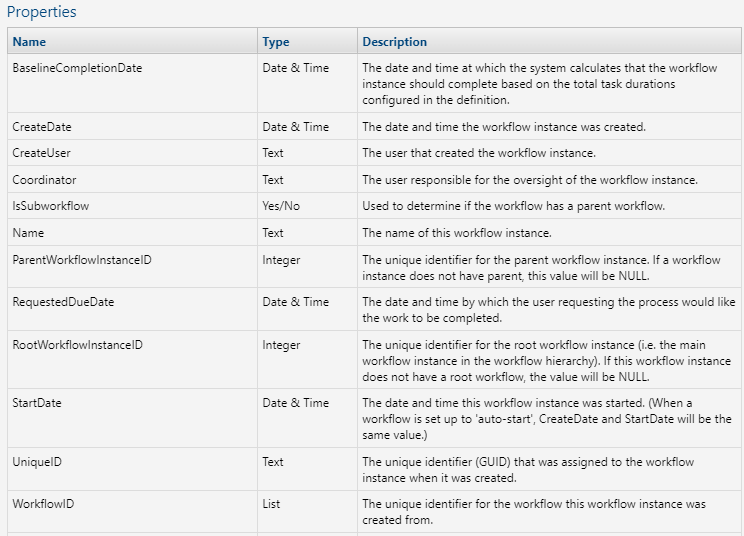

- Workflow Instance Modified – Fires when a workflow instance is modified.


Actions Gallery
The Actions gallery organizes the available actions into categories to minimize having scroll to find an Action, for example: Communications, Customer Care, etc.
A Search field is available to help users find an action, and users can bookmark their most commonly used Actions. To search, enter a text string. The Search tool will find all actions whose name contains the text string. To bookmark, click on the associated star. A solid star indicates the action is bookmarked. Unfilled indicates not bookmarked. Actions are listed by category below and are listed alphabetically following the category breakout.
- Communications:
Notifications are different from email messages in that they are not intended to have a reply. A reply to a notification will not be processed and will not be visible in CostGuard. Notifications are not included in users’ monthly 2-way message quota, and so will not contribute to exceeding the quota which could result in a monthly charge.- Archive Linked Messages
- Send Communications Message
- Send Communication Notification
- Send Message from Template
- Send Notification from Template
- Customer Care:
- Archive Linked Messages
- Create E-Pay Transaction
- Create E911 Batch Detail
- Create Follow-up
- Create Journal
- Create PGA Refund Transaction
- Credit Recurring Charges
- Handle Contact CPNI Compliance
- Handle Customer CPNI Compliance
- Modify Adjustment
- Modify Customer
- Modify Follow-up
- Modify Journal
- Send CPNI PIN Notification
- Send Notification
- Equipment Inventory:
- Create/Resolve Equipment Ticket from Email
- Remove Locations from Service
- Update Equipment Status
- Orders:
- Billing System Update
- Complete Order
- Resubmit Billing Order
- Force Complete Billing Order
- Reverse Service Penalties
- Set End Date
- Set Start Date
- Update Billing Status
- Process BTA Adjustments
- Porting:
Note: These actions are auto-implemented when automated Syniverse integration is enabled in your system. They are not intended for use outside the scope of automated porting integration with Syniverse and should not be modified.- Initiate Scheduled Port Request
- Send Port In Request
- Provisioning:
- Provision From Order
- Tickets:
- Archive Linked Messages
- Create Reminder
- Create Ticket
- Create Ticket from Email
- Modify Ticket
- Send Follow-up Reminder
- Ticket Communication Notification
- Workflow:
- Add Wait Time
- Archive Linked Messages
- Create Workflow
- Delete Subscription History – Deletes the subscription history (no parameters)
- Make Http Request
- Send Email
- Web API
Note: In the following descriptions, parameters marked with an asterisk are required.
Add Wait Time
This action is installed by the Workflow web module. This action lets you add wait time to delay a workflow. Use Add Wait Time in a Workflow Definition when the workflow requires a delay before the next ranked task should go to an In-Progress status. For example, a customer satisfaction survey should be sent via email five days after a ticket is closed. You can configure the workflow to have the Add Wait Time action immediately after the close ticket task in a workflow. This will ensure that the survey is sent 5 days later. Note: This action is not intended to be paired with a trigger and is only used in the context of (embedded in) a workflow.
For more, see the related article in the IDI Knowledge Center here: https://help.idibilling.com/?ht_kb=workflow-action-add-wait-time.

Parameters:
| Interval – Duration | The interval fields work together. Use these fields to specify how long to delay before the next ranked task should go to In-Progress status. Duration is an integer value to indicate the number of units as specified by Time Interval (Days, Hours, Minutes, Seconds). |
| Interval – Time Interval | |
| Wait Time End | Enter the exact date and time that you want the Workflow system to complete this item. |
| Recompute on Resume | When a Workflow instance was placed on hold and the Add Wait Time action has an’ In-Progress’ status, the system will use this parameter value to determine if the wait time evaluation should start over or continue with the time already elapsed when In Progress status. This field can be populated with a value of Yes or No. If left blank the system evaluates the fields as a No value. |
Archive Linked Messages
Four actions in Workflow automatically remove message body text from the search index for aged messages related to Workflow, Customer Care, Communications and Tickets after a set number of days. When a body text search is performed against an aged message it will return no results. Instead, users will get a warning indicating body text search is not available for aged messages.
Notes:
- These actions are set up specifically for Data Lifecycle Management. They are not intended for any other purpose and do not require any configuration by IDI platform users.
- Users will be unable to find notifications and aged messages when searching the body text, however, the original message and notification body text is still intact. Users can navigate to items using other search criteria to see full body text.
- For more, see the related article in the IDI Knowledge Center here https://help.idibilling.com/?ht_kb=communications-message-and-notification-storage-enhancements
Billing System Update
This action is installed by the Orders web module. It adds or updates items in the billing system based upon the contents of the specified Order. Note: This action is not intended to be paired with a trigger and is only used in the context of (embedded in) a workflow. Refer to the related article in the IDI Knowledge Center here: https://help.idibilling.com/?ht_kb=billing-system-update-action.

Parameters:
| CartID | This is the OrderID available in the Orders web module via the Order Search Results, Order Summary page or Order Details page. Also available in Customer Care via the Orders tab on the Order History page. |
Complete Order
This action is installed by the Orders web module. It sets the status of the specified Order to Completed.
Notes:
- The Complete Order action is for the web Order, not to be confused with completing the actual (IDI Desktop Client) Order.
- This action is not intended to be paired with a trigger and is only used in the context of (embedded in) a workflow.

Parameters:
| CartID | This is the OrderID available in the Orders web module via the Order Search Results, Order Summary page or Order Details page. Also available in Customer Care via the Orders tab on the Order History page. |
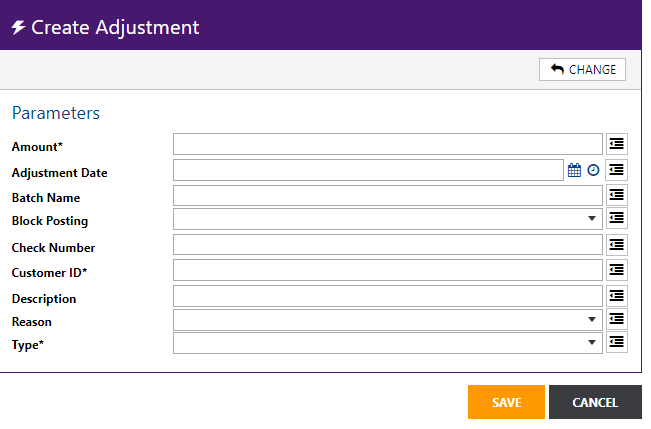
Create Adjustment
This action is installed by Customer Care. It creates an adjustment. The parameters are basically the same as when creating an adjustment via the user interface. Note: Invoice Number and Category (available via the user interface, but not required) are not supported by this action.
Refer to the related article in the IDI Knowledge Center here: https://help.idibilling.com/?ht_kb=customer-care-new-workflow-actions
Parameters:
Note: Parameters marked with an asterisk are required.
| Amount* | Adjustment amount (unsigned). The adjustment type determines if it is a credit or debit amount. |
| Adjustment Date | Adjustment date. If blank, the current date/time will be used. |
| Batch Name | Batch name for the adjustment. This is a free form text field. |
| Block Posting | Select Yes or No. if No, the adjustment will be created as unblocked. |
| Check Number | Check number for the adjustment. This is a free form text field (10 characters). |
| Customer ID* | Customer ID (account number) for the adjustment. |
| Description | Description for the adjustment. |
| Reason | Adjustment Reason. Available reasons are configured in the Admin Console Data Management table. |
| Type* | Adjustment Type. Available types are configured in the Admin Console Data Management table. |
Create E-Pay Transactions
This action is installed by Customer Care. It creates an E-Pay Transaction. Refer to the related article in the IDI Knowledge Center here: https://help.idibilling.com/?ht_kb=customer-care-new-workflow-actions.

Parameters:
Note: Parameters marked with an asterisk are required.
| Customer ID* | Customer ID for the transaction. |
| Epay Account ID | Numeric ID for the E-Pay account to use. IDs are available via E-Pay account search.
If no value is provided, the action will use the active recurring account. If no active recurring account exists, the active account with the oldest start date will be used. If no active E-Pay account is found, the action will error. |
| Amount* | Transaction amount (unsigned). The Transaction Type will determine if it is a credit or debit amount. |
| Originating Transaction ID | Originating E-Pay transaction ID (numeric) when creating a credit transaction. When provided, the transaction ID must be valid. IDs are available via E-Pay transaction search. |
| Transaction Type* | Credit/Debit. |
| Transaction Description | A value can be selected from the drop down. |
| Process Immediately* | Yes/No. When Yes is selected, the transaction will be processed immediately. When No is selected, the transaction will be processed when the payment gateway transaction job runs. |
Create E911 Batch Detail
This action is installed by Customer Care. It’s used in combination with a system-defined trigger as described in the related knowledge article here: Auto-creating E911 Batch Records – Knowledge Center (idibilling.com).
Create Follow-up
This action is installed by Customer Care. It creates follow-up that can be associated to a Customer, Ticket, Journal, Billing Order, Dispute or Equipment Inventory. Refer to the related article in the IDI Knowledge Center here: https://help.idibilling.com/?ht_kb=customer-care-new-workflow-actions.

Parameters:
| Assigned To* | User or group the Follow-Up is assigned. |
| Description* | Description for the Follow-Up. |
| Follow-Up Date* | The Follow-Up date is calculated based on:
If Override Date is left blank, the Follow-Up Date is calculated as the current date time plus the duration entered. If Override Date is populated, the Follow-Up date is calculated as the Override Date/Time plus the duration entered. |
| Object Type | Select a value from the drop down. Notes:
|
| Object ID | Populate based on the Object Type selected. Find object IDs in their respective object searches. |
| Status* | Follow-Up Status. Available statuses are configured in the Admin Console Data Management table. |
| Type* | Follow-Up Type. Available types are configured in the Admin Console Data Management table. |
| Attributes | If there is an attribute definition associated with the Follow-Up type, the attribute properties and values can be entered as a JSON string.
Example (attribute with one property called ‘Address Type’: {“Address Type”:”Residential”} |
Create PGA Refund Transaction
This action lets you refund a credit card transaction through the IDI platform Payment Gateway Application. Within the action you may choose to create or not create an E-Pay transaction in the IDI platform. The provider transaction ID from the original credit card transaction is used along with the customer account and refund amount to request a refund.
Note: You’ll need to create a PGA profile for your payment processor to establish the Gateway Profile KeyName used in this action. Refer to the Payment Gateway help for details.
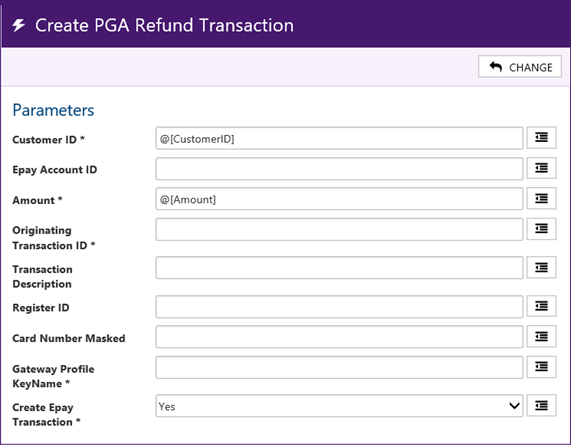
Parameters:
- Customer ID: Customer ID for the account being refunded
- Epay Account ID: IDI platform E-Pay account ID.
- Amount: Refund amount.
- Originating Transaction ID: Original transaction ID with payment provider.
- Transaction Description: Text field for transaction description.
- Register ID: A field that can be passed to the payment processor for reporting.
- Card Number Masked: Last 4 digits of the credit card used on the original transaction. This may or may not be required, depending on your payment processor.
- Gateway Profile KeyName: Set to the KeyName of the PGA profile.
- Create Epay Transaction:
- Yes – Refund transaction is processed through the payment provider and a corresponding E-Pay transaction will be posted on the customer account.
- No – Refund transaction is processed through the payment provider, but no transaction is posted on the customer account.
This action returns the following extended data:
- PGA Response: Approved, Canceled, Declined, Error, or Exception
- PGA Response Message: text describing the result of the transaction
- PGA Provider Transaction ID: the ID for the transaction at the payment processor.
Create Reminder
This action is installed by the Tickets web module. A possible use case for this action would be when a follow-up is created within a specific business or automated process, a reminder can be created to notify the assigned user the follow-up is due. Refer to the related knowledge article here: workflow-action-to-create-reminder-on-follow-up.
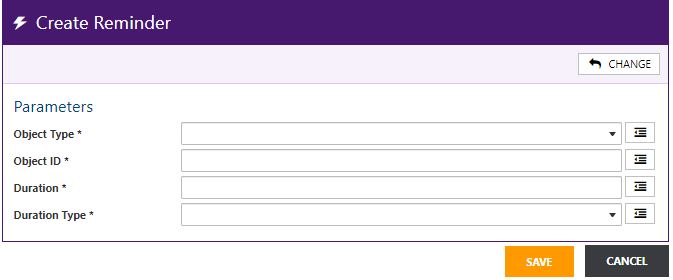
Parameters (all required):
| Object Type* | Follow-up |
| Object ID* | Follow-up ID (Find via Follow-up search). |
| Duration* | Integer value for days or hours (duration type) to send the reminder before the follow-up is due. |
| Duration Type* | Days or Hours |
Create Journal
This action is installed by Customer Care. It creates a journal that must be associated to a Customer, Ticket, Follow-Up, Billing Order, Dispute or Equipment. Refer to the related knowledge article here: https://help.idibilling.com/?ht_kb=customer-care-new-workflow-actions.

Parameters:
| Object Type* | Select the type of object the journal will be associated to: Customer, Ticket, Follow-Up, Billing Order, Dispute or Equipment.
Notes:
|
| Object ID* | Populate based on the Object Type selected. IDs are available via the respective object searches. |
| Description* | Description for the Journal. |
| Status | Journal Status – Available statuses are configured in the Admin Console Data Management table. |
| Type* | Top-level classification for logical grouping based on business purpose. This drop down is populated by the corresponding table in Admin Console Data Management. |
| Attributes | If there is an attribute definition associated with the Journal type, the values for the attribute properties can be entered as a JSON string.
Example: Attribute definition with 2 properties ‘Address Type’ and ‘County’: Syntax: {“Address Type”:”Residential”,”County”;”Washington”} |
| Is Retained | Yes/No – This exposes the journal/follow-up/tickets in the Customer Summary view (IDI Desktop Client) and InfoCenter (Tickets web application). |
Create NetSuite Journal Entry
This action applies when your system is integrated with the NetSuite Enterprise Resource Planning (ERP) application. Refer the the NetSuite article in the IDI Knowledge Center for details.
Create Ticket
This action is installed by the Tickets web module and used by Workflow. It creates a Ticket.

Action:
|
Use these fields to specify an offset from when the trigger fires to populate the Ticket’s Action Date field. This is the time by which the Ticket should be moved from Open status, to another status that indicates the issue is receiving attention (for example In Progress). To illustrate, if company policy requires non-priority issues to be acted on withing 24 hours of being opened, such Tickets should be assigned an action date of open date + 24 hours.
|
| Assigned To* | Person or group assigned to resolve the ticket. |
| Attributes | If there is an attribute definition associated with the ticket type, the attribute properties and values can be entered as a JSON string.
Example (attribute with one property called ‘Address Type’: {“Address Type”:”Residential”} |
| Category | This menu is populated based on the selected type which may or may not have categories defined (in Admin Console). |
| Type* | Top-level classification for logical grouping based on business purpose. This drop down is populated by the corresponding table in Admin Console Data Management. |
Commit
|
Use these fields to specify an offset from when the trigger fires to populate the Ticket’s Commit Date field. This is the date and time the customer was told the problem would be resolved.
|
| Customer ID* | For a Customer or Global ticket, enter the CustID. |
| Contact | Enter the contact. |
| Description* | Enter a description. |
| Facilitator | Person or group responsible for managing the assigned user. |
| Impact/Urgency | Impact is a measure of the effect it has on the customer. Select from the drop-down menu. Urgency is a measure of the extent to which the Ticket’s resolution can bear delay. These drop downs are populated by the corresponding tables in Admin Console Data Management. The combination of selected Impact and Urgency may determine Ticket Priority if so configured. |
| Priority* | Priority is used to identify the relative importance of a Ticket and may be used to guide how quickly a Ticket should be resolved. This drop down is populated by the corresponding table in Admin Console Data Management. |
| Status* | This indicates the point where the Ticket has progressed in your resolution process. This drop down is populated by the corresponding table in Admin Console Data Management. |
| Subcategory 1 & 2 | Enter as may be applicable. |
| Title* | Enter a title. |
| Type* | Top-level classification for logical grouping based on business purpose. This drop down is populated by the corresponding table in Admin Console Data Management. |
| Wait for Ticket to Close* | Yes/No/False – This only applies if the action is used in a Workflow (not a trigger). This can be used to pause the workflow until the ticket closes (when Yes is selected). No = False. False is the default. |
Create Ticket From Email
This action is installed by the Tickets web module and is intended to be used by a system trigger created when you turn on Unsolicited Email from Tickets > Manage > Settings > Advanced. Refer to the related knowledge article here: https://help.idibilling.com/?ht_kb=657.

Parameters:
Action:
|
Use these fields to specify an offset from when the trigger fires to populate the Ticket’s Action Date field. This is the time by which the Ticket should be moved from Open status to another status that indicates the issue is receiving attention (for example In Progress). To illustrate, if company policy requires non-priority issues to be acted on withing 24 hours of being opened, such Tickets should be assigned an action date of open date + 24 hours.
|
| Assigned To* | Person or group assigned to resolve the ticket. |
| Category | This drop down is populated based on the selected type which may or may not have categories defined (in Admin Console) |
Commit
|
Use these fields to specify an offset from when the trigger fires to populate the Ticket’s Commit Date field. This is the date and time the customer was told the problem would be resolved.
|
| Facilitator | Person or group responsible for managing the assigned user. |
| MessageID* | Identifies the email that creates the Ticket. |
| Priority* | Priority is used to identify the relative importance of a Ticket and may be used to guide how quickly a Ticket should be resolved. This drop down is populated by the corresponding table in Admin Console Data Management. |
| Status* | This indicates the point where the Ticket has progressed in your resolution process. This drop down is populated by the corresponding table in Admin Console Data Management. |
| Subcategory 1 & 2 | |
| Title* | Enter a title. |
| Type* | Top-level classification for logical grouping based on business purpose. This drop down is populated by the corresponding table in Admin Console Data Management. |
Create Work Order
This action applies when your system is integrated with the Zinier Field Management Service application. Refer to the Field Service Management article in the IDI Knowledge Center for details.
Create Workflow
This action is installed by the Workflow web module. It creates a work item that will create workflow and optionally start it.

Parameters:
| Workflow ID* | Name of the Workflow definition.
Note: Only checked in Definitions will be available for selection. |
| Coordinator* | ID/name of the individual who will be coordinating this instance. |
| Name Override | Actual name of this definition. This is a free text field. You can enter a unique name to set it apart from another instance. |
| Instance GUID | This can be assigned to the workflow to uniquely identify it. Systems use this to give workflow an ID, so it can lookup the workflow later. |
| Requested Due Date | Date and time for instance to be completed. |
| Extended Data | Ties into user defined extended data in the Workflow definition. |
| Auto-Start | Enter Yes or No. |
| Link Reference ID | This field and Link Reference Type are used to establish the linkage between a workflow and its related customer or ticket.
Enter the specific customer or ticket ID based on the selected Link Reference Type. |
| Link Reference Type | Select Customer or Ticket. |
Create/Resolve Equipment Ticket from Email
This action is installed by the Tickets web module. It creates or resolves an Equipment Ticket for network monitoring integration.
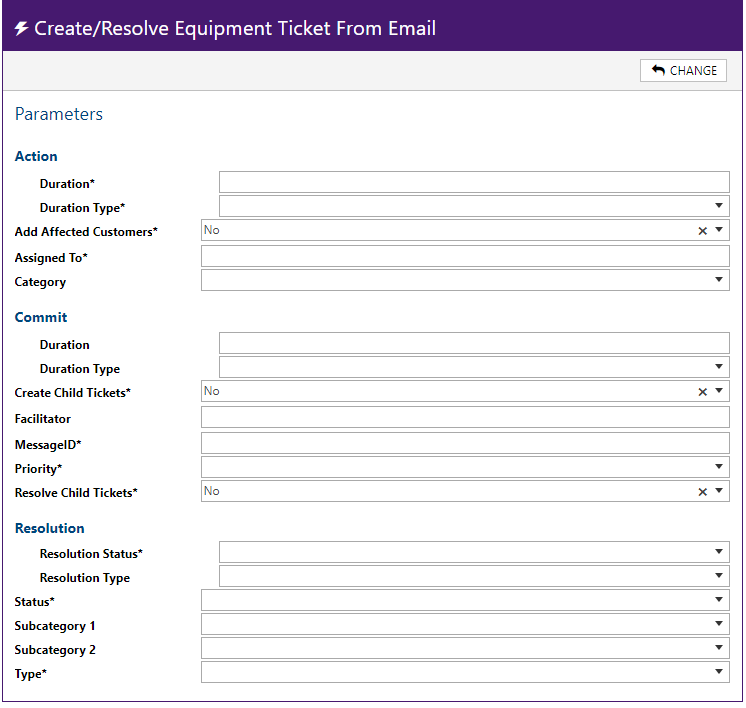
Parameters:
Action:
|
Use these fields to specify an offset from when the trigger fires to populate the Ticket’s Action Date field. This is the time by which the Ticket should be moved from Open status to another status that indicates the issue is receiving attention (for example In Progress). To illustrate, if company policy requires non-priority issues to be acted on withing 24 hours of being opened, such Tickets should be assigned an action date of open date + 24 hours.
|
| Add Affected Customers* | Populates Affected Customer information on the Ticket as needed. This is used to associate customers the Equipment Ticket based on the equipment assignments for the selected equipment. Only customers that have the equipment assigned to them can be associated to an Equipment Ticket. |
| Assigned To* | Person or group assigned to resolve the ticket. |
| Category | This drop down is populated based on the selected type which may or may not have categories defined (in Admin Console) |
Commit
|
Use these fields to specify an offset from when the trigger fires to populate the Ticket’s Commit Date field. This is the date and time the customer was told the problem would be resolved.
|
| Create Child Tickets | Yes/No – When affected customers are added to an Equipment Ticket, you have the option to create Child Tickets for them.
False = No |
| Facilitator | Person or group responsible for managing the assigned user. |
| MessageID* | Identifies the email that creates the Ticket. |
| Priority* | Priority is used to identify the relative importance of a Ticket and may be used to guide how quickly a Ticket should be resolved. This drop down is populated by the corresponding table in Admin Console Data Management. |
| Resolve Child Tickets* | Yes/No
False = No |
| Resolution – Status | This is the Status to use when the Ticket is resolved. Options are based on the corresponding table in Admin Console Data Management. |
| Resolution Type | This is the Type to use when the Ticket is resolved. |
| Status* | This indicates the point where the Ticket has progressed in your resolution process. This drop down is populated by the corresponding table in Admin Console Data Management. |
| Subcategory 1 & 2 | How are these used? I don’t see them in tickets GUI |
| Type* | Top-level classification for logical grouping based on business purpose. This drop down is populated by the corresponding table in Admin Console Data Management. Not a documentation issue but seems weird type and category are so far removed from each other in the GUI is category options are based on type selection |
Delete Subscription History
This action deletes the workflow subscription history. There are no parameters.
Force Complete Billing Order
This action has been added to Workflow to force complete a billing order. It uses Billing Order Management (BOM) to update the status of the billing order. The force complete will then mark all billing order line items as complete, cancel any execution plans, and write to the history table.
This action:
-
-
- Forces the order to complete or cancel
- Completes or cancels all order line items
- Then cancels the execution plans
-
This new action can be added as a task in the Step Details of the Workflow.
Note: This action should be used in Workflow instead of using the Auto Complete configuration in Config Console.

| BillingOrderID* | Populate based on the BillingOrderID – Available via Billing Order Search. |
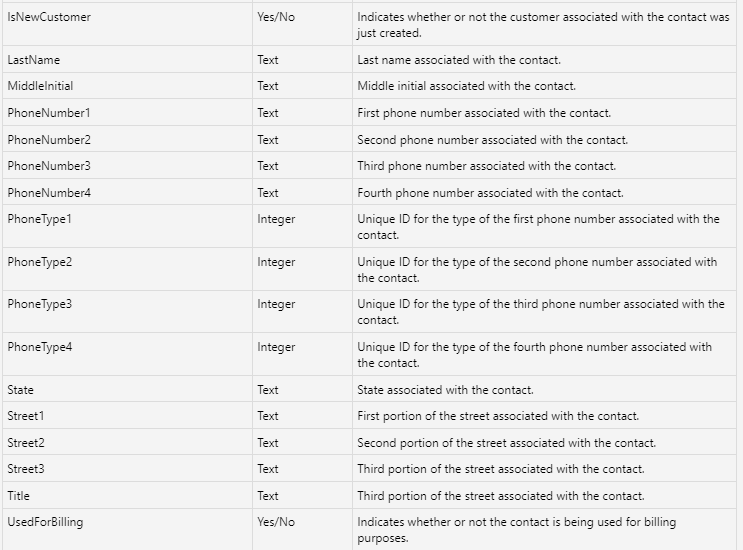
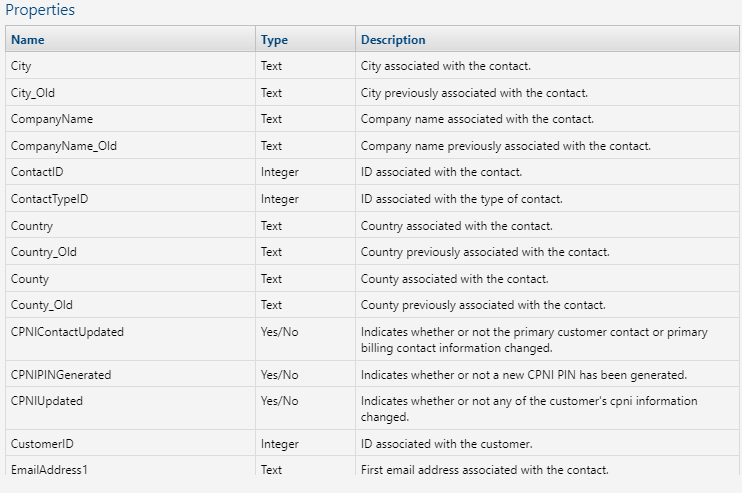
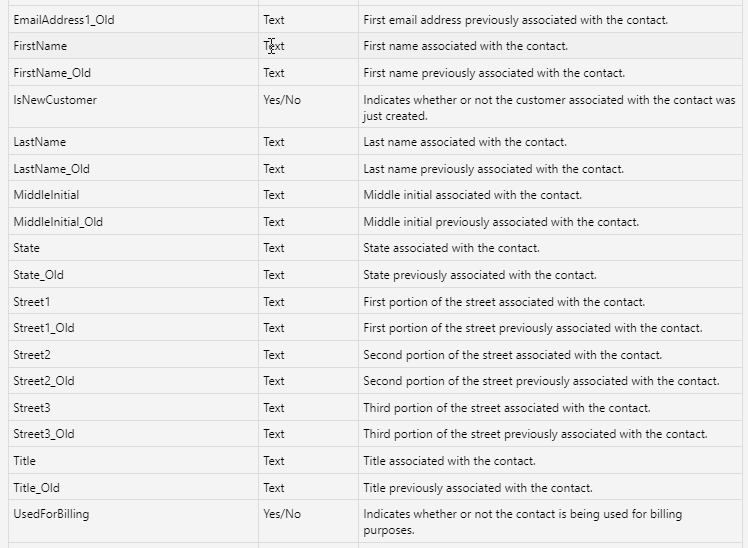
Handle Contact CPNI Compliance
This action is used in a system trigger (|System CPNI| Contact CPNI Handler). The system trigger is created when CPNI notifications are enabled from Customer Care Manage > Settings page and handles sending CPNI notifications based on changes.
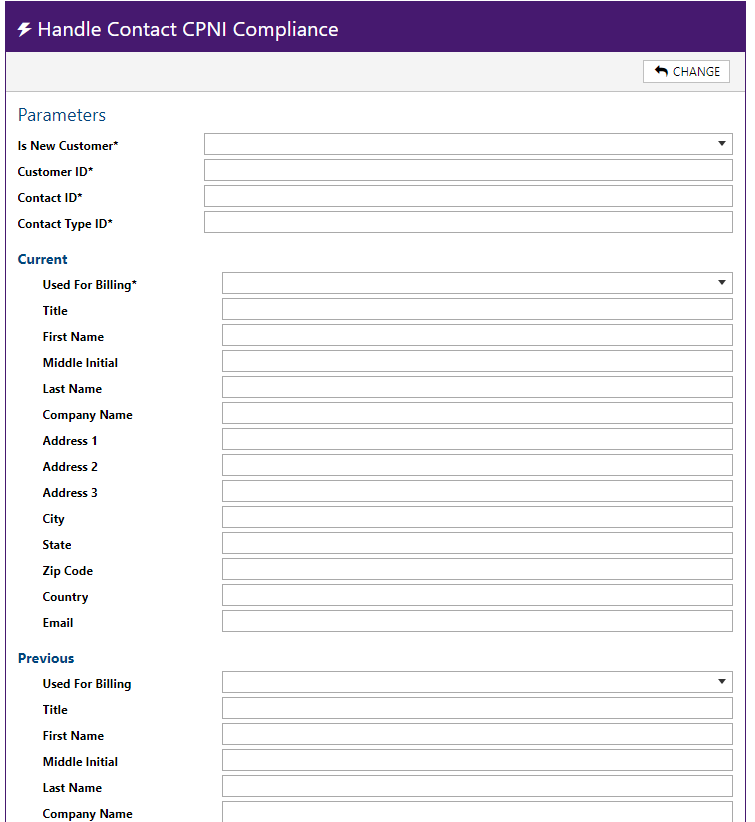
Parameters:
| Is New Customer* | Yes/No. |
| Customer ID* | This is the account number. |
| Contact ID* | Available via contact search. |
| Contact Type ID* | System-generated ID associated to a Contact Type as indicated in the Contact Type table in Admin Console Data Management |
| Current/Previous | The values in these fields are for use by the notification that is sent. |
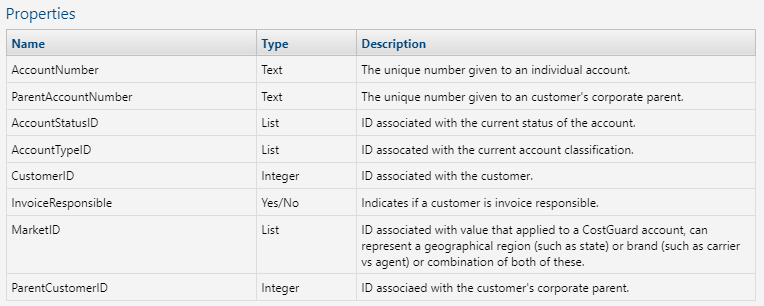
Handle Customer CPNI Compliance
This action is used in a system trigger (|System CPNI| Customer CPNI Handler). The system trigger is created when CPNI notifications are enabled from Customer Care Manage > Settings page and handles sending CPNI notifications based on changes.
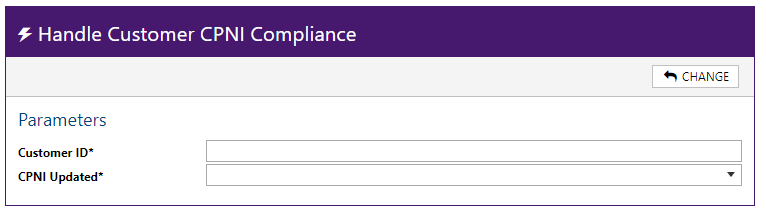
Parameters
| Customer ID* | This is the account number. |
| CPNI Updated* | Drop down menu – Yes/No |
Make Http Request
Use this action when you want to call an HTTP endpoint. With this action, you can communicate with arbitrary, existing HTTP endpoints by providing the address, method, and request body. Authorization headers can be configured in the event the endpoint requires authorization. The IDI Security Token (SWT) can be included on the request to allow for integration to IDI platform web services. Refer to the related knowledge article here: https://help.idibilling.com/?ht_kb=make-http-request-action.

Modify Adjustment
This action is installed by the Customer Care web module. It lets you toggle the Unblocked status of an existing Adjustment. Refer to the related knowledge article here: https://help.idibilling.com/?ht_kb=using-workflow-to-approve-adjustments.

Parameters:
| AdjustmentID* | ID of the Adjustment. Available via Customer Care Adjustment Search or Adjustment Details page. |
| Unblock Adjustment | Select Yes (unblock the adjustment) or No (leaves it blocked). |
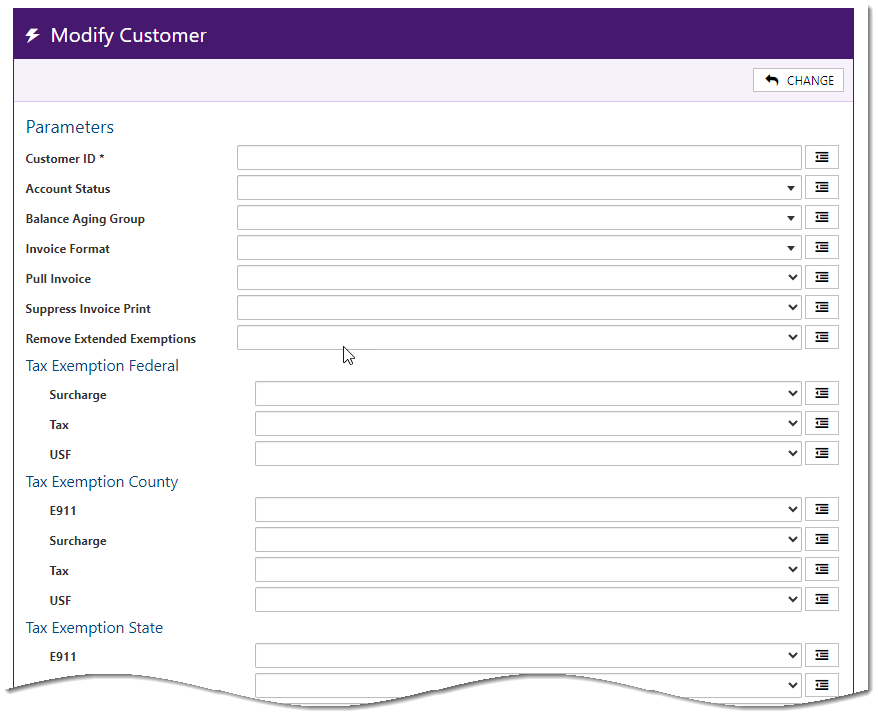
Modify Customer
This action is added by Customer Care. It lets you manipulate selected customer parameters as shown below when the Action is launched by a Workflow Trigger or Task.
Modify Follow-up
This action is installed by Customer care. This lets you modify certain parameters for an open follow-up (closed follow-ups can’t be modified). Refer to the related knowledge article here: https://help.idibilling.com/?ht_kb=customer-care-new-workflow-actions.

Parameters:
Note: Parameters marked with an asterisk are required.
| Action Date | When the follow-up is expected to be completed. |
| Assigned To | User or group the Follow-Up is assigned. |
| Close | Yes/No. Yes closes the follow-up |
| Description | Description for the Follow-Up. |
| Follow-up ID* | Identifies the follow-up to be modified. |
| Status | Follow-Up Status. Available statuses are configured in the Admin Console Data Management table. |
| Attributes | If there is an attribute definition associated with the Follow-Up type, the attribute properties and values can be entered as a JSON string.
Example (attribute with one property called ‘Address Type’: {“Address Type”:”Residential”} |
Modify Journal
This action is installed by Customer Care. It lets you modify certain journal parameters as described below. Refer to the related knowledge article here: https://help.idibilling.com/?ht_kb=customer-care-new-workflow-actions.

Parameters:
| Journal ID* | Numeric ID of the Journal to be modified – available via Journal Search. |
| Description | When provided, the Description will be updated to this value. |
| Status | Menu populated via corresponding Admin Console Data Management table. |
| Type | This drop down is populated by the corresponding table in Admin Console Data Management. |
| Attributes | If there is an attribute definition associated to the journal, the values for the attribute properties can be modified as a JSON string.
Example: Attribute definition with 2 properties ‘Address Type’ and ‘County’: Syntax: {“Address Type”:”Residential”,”County”;”Washington”} |
Modify Ticket
This action is installed by the Tickets web module. It modifies specified parameters for a specified Ticket. One intended use case is covered this a related knowledge article here: https://help.idibilling.com/?ht_kb=modify-ticket-action-to-automate-closing-or-modifying-a-ticket.
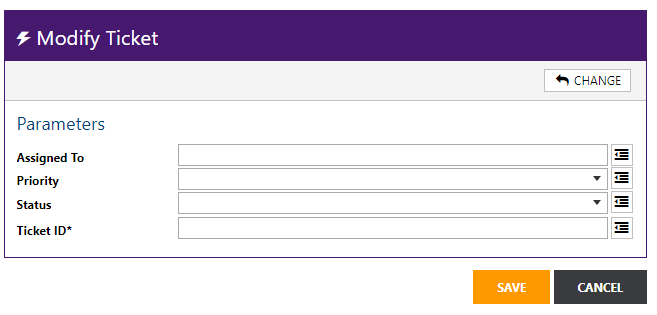
Parameters:
Note: parameters marked with an asterisk are required.
| Assigned To | Populates the Ticket’s Assigned To field (User responsible for handling this Ticket). |
| Priority | Priority is used to identify the relative importance of a Ticket and may be used to guide how quickly a Ticket should be resolved. Options are based on the corresponding table in Admin Console Data Management. |
| Status | Ticket Status indicates the point where the Ticket has progressed in your resolution process. Options are based on the corresponding table in Admin Console Data Management. |
| Ticket ID* | Identifies the ticket to be modified. |
Porting
Note: These actions are auto-implemented when automated Syniverse integration is enabled in your system. They are not intended for use outside the scope of automated porting integration with Syniverse and should not be modified.
-
-
- Initiate Scheduled Port Request
- Send Port In Request
-
Process BTA Adjustments
This action is installed by the Orders web module and is related to Direct Invoicing functionality. It gives you the flexibility to have a Bill-To-Account (BTA) Adjustment) (Direct Invoice Revenue) apply to an account prior to the Billing System Update action completing. Prior to this new action, if you wanted to have the revenue applied to the account, you needed to run the Billing System Action which would prevent you from modifying in flight orders.
Updates to Billing System Update action let you run this action within your Split Groups AND modify inflight orders for items that have not been pushed to the account.
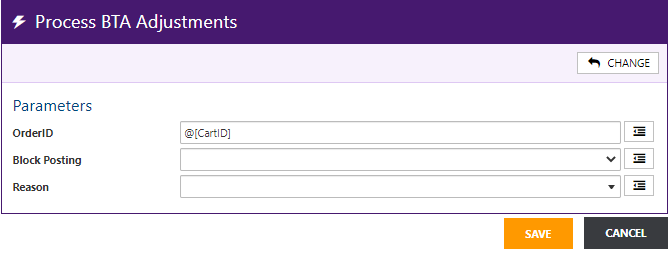
Parameters:
| OrderID | Available in the Orders web module via the Order Search Results, Order Summary page or Order Details page. Also available in Customer Care via the Orders tab on the Order History page. |
| Block Posting | Yes or No |
| Reason | Select the Adjustment Reason. These are defined in Admin Console Data Management. |
Provision from Order
This action is installed by the Provisioning web application. It applies the Profile(s) needed to fulfil provisioning requests on a Provider. A separate instance of the action is required per provisioning request. This action is not intended to be paired with a trigger and is always embedded in a workflow.

You need to specify the Order and Profile IDs. The Filter fields can generally be left at their default values and may be edited as needed. You want them to look at the workflow instance to determine if a splitter step is applicable. The only time you will edit them is if you want to override the splitter step that was assigned on the workflow instance.
Parameters
| Service Processing Actions | Optional filtering parameter can be used to selectively specify service(s) on the order to be impacted by the action. |
| Service Catalogs | Optional filtering parameter can be used to selectively specify service(s) on the order to be impacted by the action. |
| Service Items | Optional filtering parameter can be used to selectively specify service(s) on the order to be impacted by the action. |
| Order ID* | Available in the Orders web module via the Order Search Results, Order Summary page or Order Details page. Also available in Customer Care via the Orders tab on the Order History page. |
| Profile ID* | Select any one of the available Profiles as configured in the Provisioning web application. |
Remove Locations from Service
This action is installed by the Equipment Inventory web module.
When a service is disconnected the location must be removed from the service to return inventory to the proper status. This action lets you automate removal of locations from services as part of order processing rather than relying on doing it manually. This can eliminate manual overhead and ensure proper processing on orders where locations and equipment must be removed from services.
The automation removes the location(s) and assigned equipment to the appropriate status based on configuration. Users are informed of the updates that were made. If an error occurs when the automation attempts to complete, users are made aware of the reasons why the automation failed. The system logs the updates to Inventory history. This history displays when viewing the equipment.
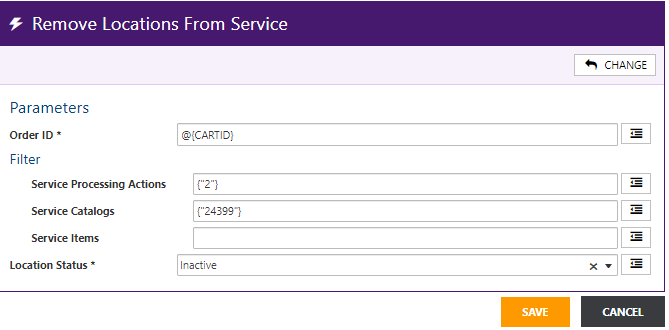
Parameters:
Order ID and Location Status are required. The action sets all Active Locations linked to services in the order to the specified Location Status (Inactive or Left-in).
Filtering parameters are optional and can be used selectively specify which services on the order are impacted by the action. If no filters are specified all services on the order are impacted.
| Order ID* | Order ID can be found in the Orders via Order Search Results, Order Summary page or Order Details page, and in Customer Care on the Order History Page Orders tab.
Note: As the purpose of this action is to remove locations on a disconnected service, this is generally set to “2” (Disconnect). |
| Service Processing Actions | Optional filtering parameter can be used to selectively specify service(s) on the order to be impacted by the action. |
| Service Catalogs | Optional filtering parameter can be used to selectively specify service(s) on the order to be impacted by the action. |
| Service Items | Optional filtering parameter can be used to selectively specify service(s) on the order to be impacted by the action. |
| Location Status* | Select the applicable Location Status:
Inactive Left-in |
Reverse Service Penalties
This action is installed as part of an IDI platform software installation. It supports reversing penalties applied during final billing when reconnecting an account or service.
The action is designed to work in conjunction with the Billing Order Processed trigger. The system will look up the services assigned to the reconnection order and perform the following updates:
-
-
- Reverse contract penalties associated with services assigned to the reconnect order. The system will look up the contract penalties invoiced to the services on the reconnect order and apply an adjustment to the invoice that generated the penalty.
- Reverse the fees associated with the installment plan balance. The system will look up the installment plan balance fees associated with services on the reconnect order and apply an adjustment to the invoice that generated the penalty.
-
Restore the installment plan with the number of months left at the time of disconnection. Missed installments are moved to the end of the original installment plan. For example, if the service is being reconnected after being disconnected for two months, the system will add two months to the end of the installment plan.
Refer to the related knowledge article here: https://help.idibilling.com/?ht_kb=restoring-disconnected-customers-and-services.

Resubmit Billing Order
This action is installed by the Customer Care web module. It resubmits the specified billing order when an initiate is done on a Port -In request.

Parameters:
| Billing Order ID* | Available in Customer Care via the Billing Orders tab on the Order History page and Billing Order Search in Orders. |
Send CPNI PIN Notification
This action is only intended to be used by a system trigger created when CPNI notifications are enabled. It sends a PIN change notification to the specified customer.
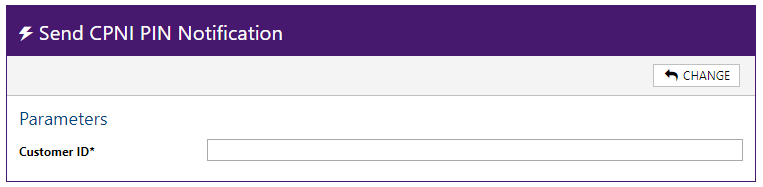
Parameters:
| Customer ID* | Account number |
Send Email
Note: This action was delivered prior to the existence Communications module. It is recommended that you use the Send Message and Send Message from Template actions when possible (or Send Communications Notification, Send Notification from Template)
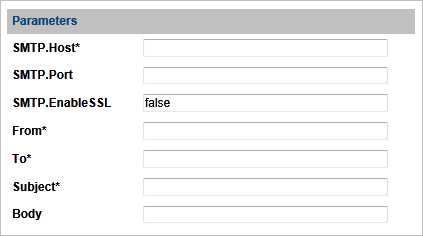
Parameters:
| SMTP. Host* | SMTP server. |
| SMTP.Port | SMTP port number. |
| SMTP.Enable SSL | Whether the connection is secured by SSL (true) or not (false). |
| From* | Email address of the sender. Multiple senders must be separated by a semicolon. Do not include a space between the addresses. Example: email1@idibilling.com;email2@idibilling.com;email3@idibilling.com |
| To* | Email address recipient. Multiple recipients must be separated by a semicolon. Do not include a space between the addresses. Example: email1@idibilling.com;email2@idibilling.com;email3@idibilling.com |
| Subject* | Subject of the email. |
| Body | Text included in the body of the email. |
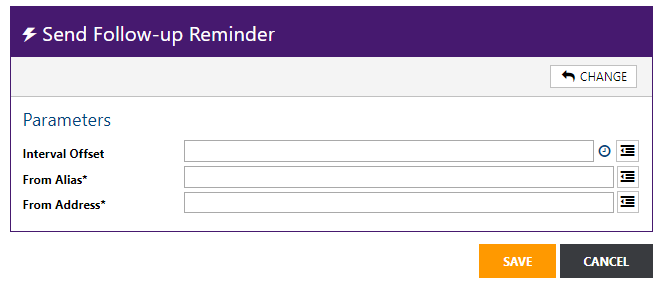
Send Follow-up Reminder
This action is installed when the Enable Follow-up Reminders setting is enabled (checked) in the Tickets web module: Manage > Settings > Basic (tab) > General. Enabling the setting adds a recurring workflow trigger with this action and makes the Add/Remove Reminder icon available on the Follow-up Details view. When fired it sends the email for all existing reminders. Disabling the setting removes the trigger and icon. See the related knowledge article here: https://help.idibilling.com/?ht_kb=follow-ups-and-reminders-on-tickets
Send Notification
This action is installed by the Customer Care web module. It sends a notification using the items specified for the work item. Note: This action supports legacy IDI Desktop Client notifications; not Communications.

Parameters:
| Template Name* | Name of the template to be used to create the notification. |
| Type* | Type of template to be used to create the notification. The first field contains the name of the Template Type. The second field contains the object ID of the Template Type using the format @[orderid].
Valid types: Order, Account, Other |
| ObjectID | When Type = Order, this is the OrderID, when it is Account, it is a CustID; when Type = Other, this can be other IDs (PaymentAccountTransactionID, EPayTransactionID,PaymentAccountID are examples). |
| Delivery Method* | Method to be used to deliver the notification.
Valid entries: Email, SMS_SMTP, SMS_SMPP |
Note: This Action automates the Send Notification functionality from within the client. The notification is sent through the account, using the templates within the IDI platform. This is not the Workflow user.
Send Communication Message
This action is installed by the Communications web module. It sends an email with the Communications system with the values specified.
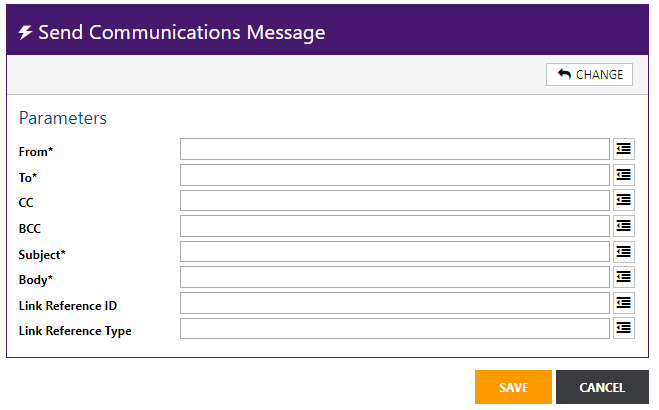
Parameters:
Note: parameters marked with an asterisk are required.
| From* | Email address of the sender. Multiple senders must be separated by a semicolon. Do not include a space between the addresses. Example: email1@idibilling.com;email2@idibilling.com;email3@idibilling.com |
| To* | Email address recipient. Multiple recipients must be separated by a semicolon. Do not include a space between the addresses. Example: email1@idibilling.com;email2@idibilling.com;email3@idibilling.com |
| CC | Carbon copy recipient |
| BCC | Blind carbon copy recipient |
| Subject* | Subject of the email |
| Body* | Body of the email |
| Link Reference ID | Depending on what is put in Link Reference Type, this is a CustID or a Ticket ID. |
| Link Reference Type |
Send Communication Notification
This action is installed by the Communications web module. It sends a one-way notification. Notifications are different from email messages in that they are not intended to have a reply. A reply to a notification will not be processed and will not be visible in the IDI platform. Notifications are not included in users’ monthly 2-way message quota, and so will not contribute to exceeding the quota which could result in a monthly charge.
.

Parameters:
Note: Parameters marked with an asterisk are required.
| From Alias | Optional alias. |
| To* | Recipient address. Multiple recipients must be separated by a semicolon. Do not include a space between the addresses. Example: email1@idibilling.com;email2@idibilling.com;email3@idibilling.com |
| CC | Carbon copy recipient |
| BCC | Blind carbon copy recipient |
| Subject* | Subject of the email |
| Body* | Body of the email |
| Link Reference ID | Depending on what is put in Link Reference Type, this is a CustID or a Ticket ID. |
| Link Reference Type |
Send Message from Template
This action is installed by the Communications web module. It sends an email with the Communications system from a template with the values specified.

Parameters:
Note: Parameters marked with an asterisk are required.
| From* | Email address of the sender. Multiple senders must be separated by a semicolon. Do not include a space between the addresses. Example: email1@idibilling.com;email2@idibilling.com;email3@idibilling.com |
| To* | Email address recipient. Multiple recipients must be separated by a semicolon. Do not include a space between the addresses. Example: email1@idibilling.com;email2@idibilling.com;email3@idibilling.com |
| CC | Carbon copy recipient |
| BCC | Blind carbon copy recipient |
| Template* | Template used to send the email |
| Data* | |
| Link Reference ID | Depending on what is put in Link Reference Type, this is a CustID or a Ticket ID. |
| Link Reference Type |
Send Notification From Template
This action is installed by the Communications web module. It sends a one-way notification with the Communications system from a template with the values specified. Notifications are different from email messages in that they are not intended to have a reply. A reply to a notification will not be processed and will not be visible in the IDI platform. Notifications are not included in users’ monthly 2-way message quota, and so will not contribute to exceeding the quota which could result in a monthly charge.

Parameters:
Note: Parameters marked with an asterisk are required.
| From Alias | Optional alias |
| To* | Recipient address. Multiple recipients must be separated by a semicolon. Do not include a space between the addresses. Example: email1@idibilling.com;email2@idibilling.com;email3@idibilling.com |
| CC | Carbon copy recipient |
| BCC | Blind carbon copy recipient |
| Template* | Template used to send the email |
| Data* | |
| Link Reference ID | Depending on what is put in Link Reference Type, this is a CustID or a Ticket ID. |
| Link Reference Type |
Set End Date
This action is installed by the Customer Care web module. It sets the Service and Feature End Date using the values specified for a work item. Note: This action is not intended to be paired with a trigger and is only used in the context of (embedded in) a workflow.

Parameters:
| CartID | OrderID
Available in the Orders web module via the Order Search Results, Order Summary page or Order Details page. Also available in Customer Care via the Orders tab on the Order History page. |
| Clear End Date | Yes (clears the current end date) or No |
| Set Date | Enter the date.
Note: You can use a dynamic injection variable or static date that will not change. |
| Interval | Enter X number of days into the future that the end date of the item should be set. If left blank, will default to today’s date or date of the set date/start date.
This field is not required. |
Filters:
| Exclude Canceled Items | Yes excludes canceled line items during the execution of this action.
No includes canceled line items during the execution of this action. Leaving this value blank includes canceled line items during the execution of this action. |
| Exclude Completed Items | Yes excludes completed line items during the execution of this action.
No includes completed line items during the execution of this action. Leaving this value blank includes completed line items during the execution of this action. |
| Service Processing Actions | Optional filtering parameter can be used to selectively specify service(s) on the order to be impacted by the action. |
| Service Catalogs | Optional filtering parameter can be used to selectively specify service(s) on the order to be impacted by the action. |
| Service Items | Optional filtering parameter can be used to selectively specify service(s) on the order to be impacted by the action. |
Set Start Date
This action is installed by the Customer Care web module. It sets the Service and Feature Start Date using the values specified for a work item. Note: This action is not intended to be paired with a trigger and is only used in the context of (embedded in) a workflow. Refer to the related knowledge article here: https://help.idibilling.com/?ht_kb=order-action-set-start-date.
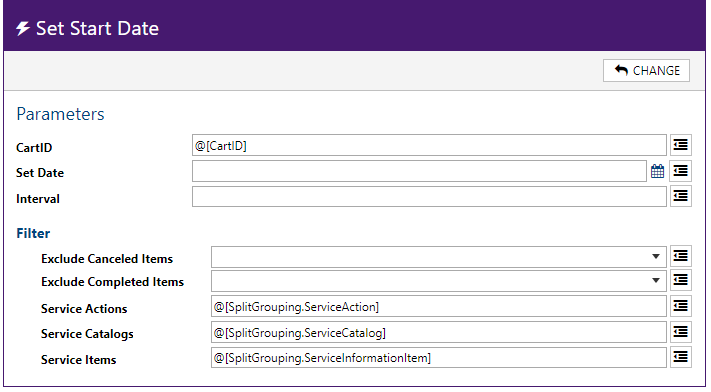
Parameters:
| CartID | OrderID.
Available in the Orders web module via the Order Search Results, Order Summary page or Order Details page. Also available in Customer Care via the Orders tab on the Order History page. |
| Set Date | Enter the date.
Note: You can use a dynamic injection variable or static date that will not change. |
| Interval | Enter X number of days into the future that the start date of the item should be set. If left blank, will default to today’s date or date of the set date/start date.
This field is not required. |
Filters:
| Exclude Canceled Items | Yes excludes canceled line items during the execution of this action.
No includes canceled line items during the execution of this action. Leaving this value blank includes canceled line items during the execution of this action |
| Exclude Completed Items | Yes excludes completed line items during the execution of this action.
No includes completed line items during the execution of this action. Leaving this value blank includes completed line items during the execution of this action. |
| Service Processing Actions | Optional filtering parameter can be used to selectively specify service(s) on the order to be impacted by the action. |
| Service Catalogs | Optional filtering parameter can be used to selectively specify service(s) on the order to be impacted by the action. |
| Service Items | Optional filtering parameter can be used to selectively specify service(s) on the order to be impacted by the action. |
Set Extended Tax Exemption
Refer the article on automating setting extended tax exemptions on an account in the IDI Knowledge Center.
Set Work Order Extended Data
This action applies when your system is integrated with the Zinier Field Management Service application. Refer to the Field Service Management article in the IDI Knowledge Center for details.
Ticket Communication Notification
This action is installed by the Tickets web module. It forwards an email to the To Address, using the From Address as the sender. It is designed to work with an incoming email that has been received for a Ticket. It notifies the user assigned to the Ticket that an email has been received. This action is intended to be used with a specific System Trigger: Notify Assigned To Email Handler. This Trigger is created when the option in MANAGE > Settings … Email Notifications – Ticket Email Received is enabled in the Tickets web module.
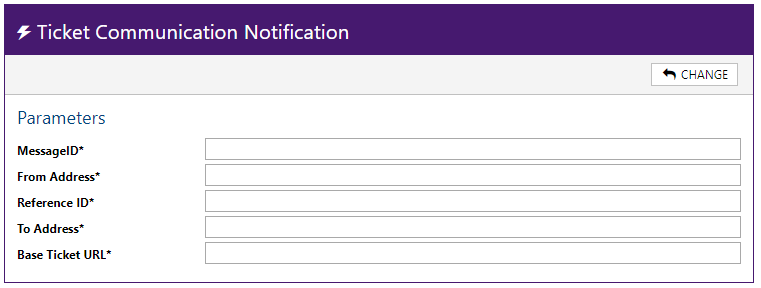
Parameters:
| MessageID* | Identifies the email to be forwarded. |
| From Address* | Address the email from which the email was originally sent. |
| Reference ID* | Ticket ID that the email is linked to. Available via the Tickets web module, Tickets Search Results or Ticket view. |
| To Address* | Email address that the message will be forwarded to. |
| Base Ticket URL* | Email address that will be used as the sender on the forwarded email. |
Update Billing Status
This action is installed by the Orders web module. It updates the Feature’s Billing status using the values specified for the work item. Note: This action is not intended to be paired with a trigger and is only used in the context of (embedded in) a workflow. Refer to the related knowledge article here: https://help.idibilling.com/knowledge-base/billing-system-update-action/
.

Parameters:
| CartID | OrderID
Available in the Orders web module via the Order Search Results, Order Summary page or Order Details page. Also available in Customer Care via the Orders tab on the Order History page. |
| Ignore Activations | Yes – Do not update status on activation or No. |
| Ignore Disconnects | Yes – Do not update status on disconnect or No. |
Filters:
| Exclude Canceled Items | Yes excludes canceled line items during the execution of this action.
No includes canceled line items during the execution of this action. Leaving this value blank includes canceled line items during the execution of this action. |
| Exclude Completed Items | Yes excludes completed line items during the execution of this action.
No includes completed line items during the execution of this action. Leaving this value blank includes completed line items during the execution of this action. |
| Service Processing Actions | Optional filtering parameter can be used to selectively specify service(s) on the order to be impacted by the action. |
| Service Catalogs | Optional filtering parameter can be used to selectively specify service(s) on the order to be impacted by the action. |
| Service Items | Optional filtering parameter can be used to selectively specify service(s) on the order to be impacted by the action. |
Update Equipment Status
This action is installed by the Inventory web module. It updates the status of a piece of Equipment when the Enforce Equipment Status when Open Tickets property is enabled for the Equipment Type in the Inventory web module.
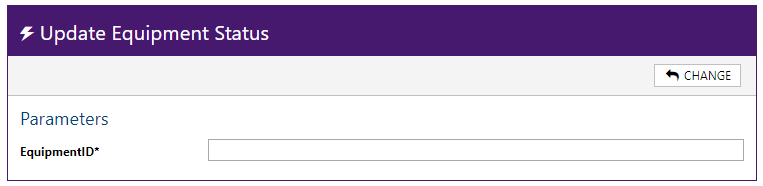
Parameters:
| EquipmentID* | Identifies the equipment whose status will be updated. This is available from equipment searches. |
Update Payment Restrictions
Refer to the article on restricting ACH payments by account type in the IDI Knowledge Center.
Web API
This action sends a POST request to the specified URL.
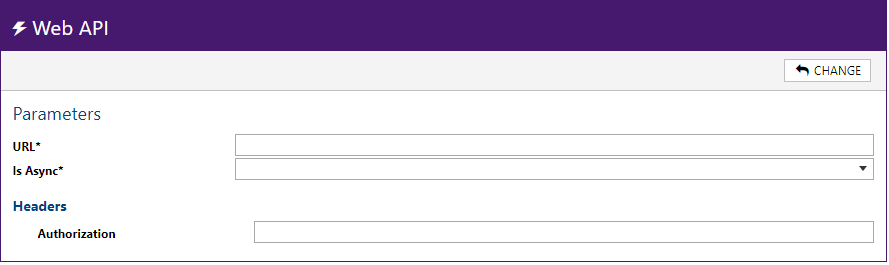
Parameters:
| URL * | The complete URL path. |
| Is Async* | Whether the process is async (1) or not (0). |
| Headers – Authorization | Authorization value to be included in the HTTP request. |
Adding Dynamic Parameters, Data Injections and Dynamic Variables
Automated Tasks can contain parameters whose values are populated when the coordinator enters the information for a new Workflow.
Dynamic Parameters
To add a dynamically populated parameter:
- In the parameter field, enter the appropriate string to tell the system it should get the information from Extended Data. The string has the following format:
@[extended data name]
where extended data name is a Field Label in the Definition’s User-Defined Extended Data.
Note: To include a dynamically populated parameter, the field name must exist as Extended Data in the Definition.
Data Injections
- Data injections always use the following format of @[string].
- Entering a string of text means that the variable is dynamic, and the variable will be different each time it is used.
Note: Extended data or global ext data can be used within the brackets.
Dynamic Variables
- Dynamic Variables use a link that comes from other IDI platform web apps.
The string entered reuses a parameter that is injected into the variable.