About Web Sales
Web Sales is an ongoing development effort to provide a complete web-based solution for initiating the full scope of front office transactions including billing orders, tendered retail sales and direct invoice transactions. This supports convergent selling of wireless and wireline services and products on the same transaction. Leveraging this functionality, you can use a transaction in the Orders web module to either sell, order, or direct invoice any post-paid billing and/or retail catalog item for any service or account.
Web sales functionality is based on configurable starting blocks that facilitate order entry by defining certain defaults and limitations to streamline the order entry process. Note: If the starting block and/or direct invoicing solutions are not currently enabled in your system, functionality described in this article will not be visible in your system.
Where to Go for More on Web Sales
Starting Simple – Non-retail Applications
If your business uses a billing order model exclusively (no retail), refer to the abbreviated article that covers just what you need to know about leveraging starting blocks for billing (non-retail) applications. This article lets you start simple, and learn the basics. If you need to integrate direct invoicing and/or the Paymentus payment vendor with you billing order application, you can consult these more targeted articles:
If your business deals in retail sales and billing orders
Continue in this article. It covers the full range of web sales functionality that supports selling billing and retail products in the same transaction, and other POS applications that require a register. This includes:
- Tendering retail transactions via the Paymentus payment vendor.
- Returns and voids.
- Direct invoicing.
- Managing service and installment agreements.
Web Sales Release History
Functional milestones will be deployed over a series of IDI solution software releases where each subsequent release builds on the prior one. For details regarding the overall goal, objectives, and planned future deliverables for this project, refer to the IDI Knowledge Center > IDI solution Updates > Upcoming Features page.
- Current Release Version 26.1 – This release provides support for viewing and managing AdvancePay products on accounts in Customer Care.
- Version 25.12 – This release provides the following additional functionality in support of AdvancePay:
- Returning AdvancePay products.
- Enforcing exclusivity where only one AdvancePay product within a Catalog Group can be assigned to a service at a time.
- Support for all modify service and modify feature actions.
- Version 25.10 – This release supports selling and renewing AdvancePay products, and voiding transactions with AdvancePay products.
- Version 24.11 – This release supports searching on No Sale transactions.
- Version 24.10 – This release supports using Paymentus for tendering web sales transactions. This includes:
- Tendering amount due with or without a Paymentus peripheral device. Paymentus-supported payment methods include credit or debit card, ACH, Paypal, Venmo, Google Pay, and Apple Pay channel.
- Tendering a refund (via return) on transactions tendered through Paymentus.
- Voiding transactions tendered through Paymentus.
This new functionality is supported through POS registers set up via the IDI Desktop Client.
- Version 24.7 – This release provides an enhanced user experience for performing credit checks on web transactions. Also, not strictly related to web sales, this deliverable provides:
- The ability to manually add deposits to a transaction.
- The ability to navigate directly to Customer Care from the Orders Enhanced Customer Search to create a new customer and then return to the order seamlessly.
- Version 24.6 – This release provides an enhanced user experience for managing POS registers, including the following on registers you are authorized to use (registers in locations where you are an assigned user as configured in IDI Desktop Client POS Back Office > Locations):
- Select a register to use for POS transactions.
- Perform a float to open a register at the start of a day or shift with the required cash amount.
- View current amounts for each tender type in a register.
- Reconcile the expected and actual tender amounts in their registers.
- Clear the current user from a register to make it available for a different user.
Note: Some of these functions depend on user permissions, POS Back Office Register Policy settings, and other conditions.
- Version 24.3 – This release provides an enhanced user experience for staging non-serialized and serialized retail products that are for fulfillment, including:
- Performing a retail inventory search
- Displaying the on-hand quantity during assembly
- Adding a shipping contact to a retail item being fulfilled
- Calculating and applying retail taxes based on the shipping contact
- Completing the fulfillment of retail products
- Version 23.12 – This release provides support for service/installment agreements. This lets you add and manage service/installment agreements on web order/sales transactions. With this enhancement, when a contract with an agreement is added to a transaction at the service level, associates can:
- See that one or more service/installment agreements are present on the transaction, and be alerted when action is required (skip, sign, or verbal acknowledgement).
- Capture signatures or initials per agreement template configuration for remote transactions (without a client-based peripheral).
- View and email completed agreement documents during order assembly.
- Access agreements within the Document Storage web module.
This release also includes some button and banner labeling improvements.
- Version 23.10 – This release provides the following enhancements:
- Bill payments on order transactions
- Return items
- Void transactions
- Behavior options to order pages when not applicable for the current transaction (for instance, a disconnect customer or hotline service). You can choose to skip one or both of the following pages when the starting block’s and/or Order Field configuration provide the required information:
- Skip New Transaction (Basic Information) page and begin on the Details (Assembly) page.
- Skip New Transaction and the Details pages and begin on the summary (either the Review Cart or the Summary page).
- Display New Transaction page and then skip Details page. After saving the basic information, the transaction resumes at either the Review Cart or Summary page.
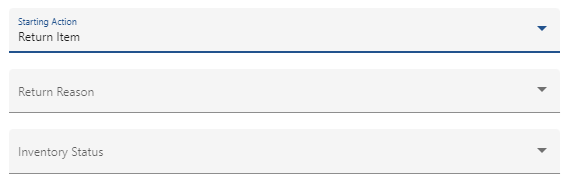
- Additional starting block options for certain starting actions – Additional options are presented for starting block configuration when applicable for the selected starting action. This lets you prepopulate the required information on the order to streamline the process and potentially avoid errors. The options depend on the selected starting action. For example, when Starting Action = Return Item, drop-down menus are provided for selecting a return reason and inventory status.
- Version 22.12 This release provides an enhanced web transaction experience and new starting block functionality. You can initiate an order, sale, or direct invoice transaction that requires a retail location and register. You can do this by either:
- Configuring the specific register and location on the starting block. In this case, the selected starting block sets the register and location for the transaction without any user involvement.
- Applying the location and register from the user’s specified My Location as set via the Orders web module application tray.
- Version 22.4 – This release provides an enhanced direct invoicing solution aligned with Web Sales and starting block functionality. With this release, you’ll use a starting block to begin the direct invoice transaction that is tailored for that user experience by page labeling, icon, and button names. Prior direct invoice functionality required you to begin a direct invoice transaction as either an order or cart/sale where it would be converted to a direct invoicing experience by adding a direct invoicing item. With this release, direct invoice transactions are initiated via a direct invoice starting block, so this conversion is no longer needed.
- First Deliverable – Version 22.1 – This release introduces configurable Starting Blocks. Starting block configuration and maintenance is done in the Product Catalog web module. Leveraging starting block configuration, you can initiate either a front office sale transaction (remote customer presence) or back office order transaction (no customer presence) in the Customer Care and/or Orders web modules. The type of transaction you initiate drives order or sale-oriented functionality from assembly to completion.
When you configure a starting block, you can also define parameters to streamline transaction assembly by setting default values and/or limiting options. For sale transactions, you can assemble, review, and finalize a remote sale containing billing items that can be assigned to either an account or to any type of service.
In addition, this milestone enhances Orders web pages to support desktop- and mobile-friendly presentation/usability.
Terminology
| Order | Typically, providers that function exclisively in billing orders will use starting blocks set up to start order transactions. Orders follow the assembly and billing order phases of the traditional (pre-web sale) orders. |
| Cart/Sale | The cart/sales model supports a transaction flow where sales associates can review the transaction content with their customer (in person or over the phone.
A cart is the assembly phase when you select a starting block configured as a sale transaction. This is a transient phase where items are selected for eventual checkout (purchase). Carts also provide a review cart page where you can review the result (change in customer’s invoice) based on the cart content. Carts do not persist after being finalized. At this point the cart transitions to a sale. A sale is the result of a finalized cart. The cart/sale scenario fits retail sales, but may also be of value in billing order scenarios where sales associates handle over-the-phone orders would benefit from the opportunity to review the transaction with the customer prior to submitting. |
| Transaction | This term is used in this article as a generic reference to carts, sales, and orders. |
Setup
Setup involves:
- Granting permission for managing starting blocks in the web Product Catalog.
- setting permissions related to bill payment, return, void transactions, register management, skipping required credit checks, and manually adding deposits in the Security web module.
- enabling starting block functionality in your system (disabled by default) and configuring starting blocks in the Product Catalog web module.
- enabling or disabling enforcing register management in the Orders web module.
- setup for locations and registers in IDI Desktop Client POS Back Office. This is required to support register management and certain tender types (especially if you use Paymentus as your payment vendor).
- setup for service/installment agreements in IDI Desktop Client Product Catalog.
- setup for credit checking (if you need to use that functionality).
- optional Order Field Configuration for overriding register policy rules for returns, installment plans, and to restrict skip and verbal options for agreements.
Note for Direct Invoicing users: If your system is already set up for direct invoicing, starting block functionality will automatically be enabled when you upgrade to IDI solution version 22.4 or later. If you’re not currently set up for direct invoicing and you enable it, starting blocks will be enabled as well.
Security – Permissions
Managing Starting Blocks in the Product Catalog
This requires Allow Log On and Manage Starting Blocks permissions under Product Catalog. These are provided with the Product Catalog Admin role. The Product Catalog User role provides the Allow Log On permissions which lets users view, but not manage, starting blocks.

Permissions for Retail and Register Management
Permissions are required for bill payment, return item, void transactions, certain register management functions, skipping required credit checks, and manually adding deposits to a transaction. These permissions are included in the following roles:
- Orders Admin
- Orders Manager
- Orders User
These permissions are listed under Orders for the selected user and environment in the Security web application.
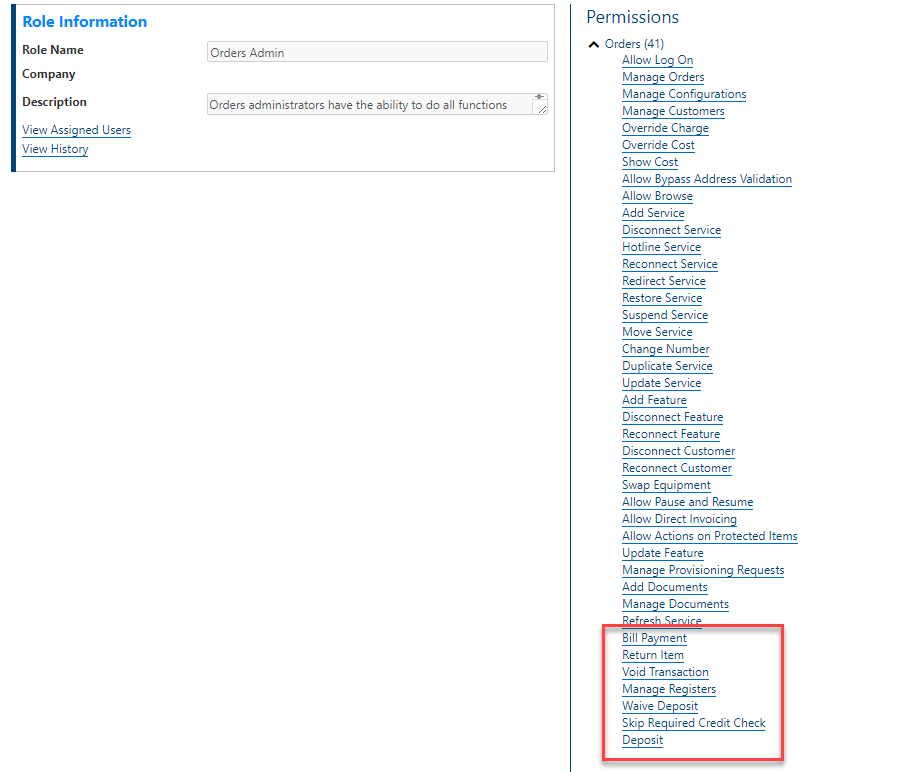
The Manage Registers permission grants access to:
- See all registers you are authorized to manage and use on the My Registers view. Authorized means all registers at POS Locations where you are an authorized user. Without this permission you are only able to see registers that match your Username.
- Edit registers – This lets managers edit the current Username and Machine Name to make the register available for another user.
- See current tender amounts, expected tender amounts, and over/short amounts on register reconciliation, regardless of the corresponding Register Policy setting.
- Override out of variance restrictions (as set in Register Policy) on reconciliation.
- Bypass forced reconcile when this is set in the Register Policy.
Enabling/Disabling Starting Block Functionality
There are two settings for enabling this functionality – one in Orders and one in Customer Care. You must enable the Orders setting to use this functionality. The setting in Customer Care is also required if you want to use this functionality in Customer Care.
- Enabling Starting Blocks in Orders
- When disabled (default), there is no change to the current user experience in Orders and Customer Care. Also, starting blocks cannot be configured in Product Catalog web module.
- When enabled, the Product Catalog web module supports starting block configuration. Also, the NEW (+) button in Orders is relabeled as START > and clicking it displays a dialog for selecting a starting block as a means to start a sale/order. Also, starting block functionality is supported in Customer Care if the corresponding setting is enabled there as well.

- Enabling Starting Blocks in Customer Care
- When disabled (default), starting block functionality and sale transactions are not supported in Customer Care. In this case you can enable the functionality in Product Catalog web module and Orders using the Orders setting and leave it disabled in Customer Care.
- When enabled a Start Transaction button is provided on the Account Summary page (all views) to initiate account-level transactions. A button is also provided on Services and Features page when a service is selected to support service-level transactions. In both cases, clicking Start Transaction displays the dialog for selecting a starting block.
Enforce Register Management
In the Orders web module, MANAGE > Settings provides a new Enforce Register Management setting in the General section. The setting is intended for in-store (brick-and-mortar) applications. It enforces the rule for one user per register as well as no sale rules, and governs the operation of the Assign Register dialog:
- When enabled, the Register selector in the Assign Register dialog only presents registers you are authorized to use (registers located in a POS location where you are an assigned user) and where the Username matches your Username or no Username and Machine Name are assigned.
- When disabled, you can assign yourself any register where you are authorized, regardless of Username and Machine Name.

The setting defaults to disabled. To toggle the setting click the edit (pencil) icon for general settings and toggle the associated button (shown disabled below).

Register Policy and Location Setup in IDI Desktop Client
This setup is required to support several aspects of retail transactions. Location and Register Policy setup is covered fully in IDI Desktop Client Online help. Below provides some quick guidelines:
- Register Management – POS locations and registers, including register policies, must be configured in the IDI Desktop Client with users assigned for them to have the ability to assign themselves to registers in the Orders web module.
- Support for Paymentus payment vendor – This is covered in the next section.
- Credit card tendering if you are not using Paymentus – Credit Card tender type must have payment gateway configured for Authorize.net. ACH tenders require a valid routing number.
Support for Paymentus Payment Vendor
As a prerequisite, your IDI solution must be integrated with Paymentus. This is covered in the Paymentus Integration article in the IDI Knowledge Center.
With this done, you need to configure POS locations (stores) and registers via IDI Desktop Client POS Back Office. Register policy setup lets you select Paymentus as a tender type and then configure the Paymentus Payment Gateway details. Also, store setup lets you specify a Paymentus ID to support payments through a Paymentus peripheral device. Access to this setup is via IDI Desktop Client Applications > POS Back Office > Locations.

Register Policy Setup
This is required if you intend to use a Paymentus payment method or peripheral device. Note: Equivalent setup is done in Customer Care > MANAGE > Paymentus Configuration. The Customer Care setup applies when tendering bill payments and E-Pay for a selected account in Care. The register policy setup in IDI Desktop Client applies when you select a specific register to tender a web sales transaction.
To set up a register policy:
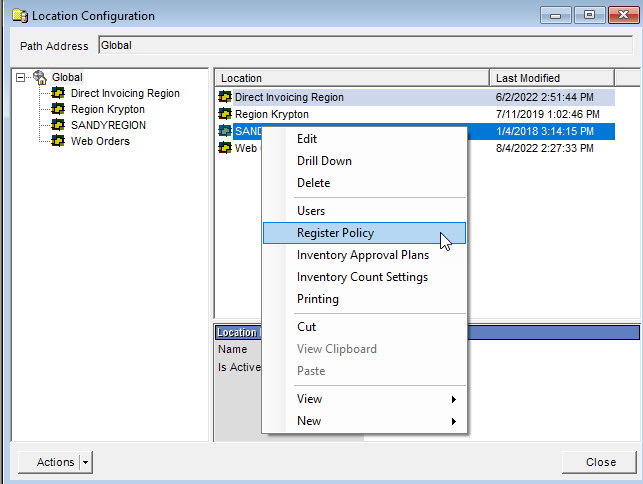
- Right-click on a location and select Register Policy from the context menu.
- On the Register Policies form choose to Override the global register policy if applicable, then on the Tender tab, right-click in the Tender Types Accepted area and select Choose.

- Select the Paymentus tender type.

- After adding the Paymentus tender type, right-click on it and choose Payment Gateway > Configure from the context menu.

- Select Paymentus.
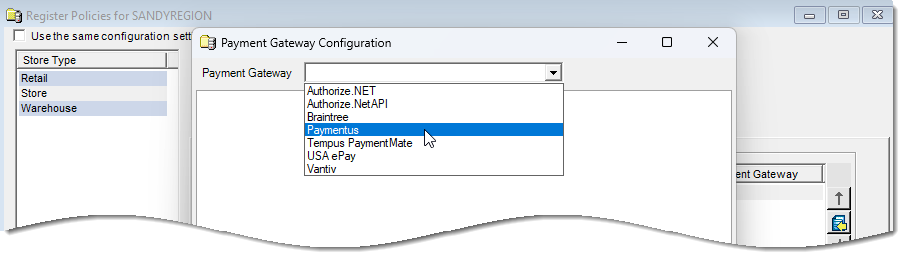
- Configure the Paymentus payment gateway details.
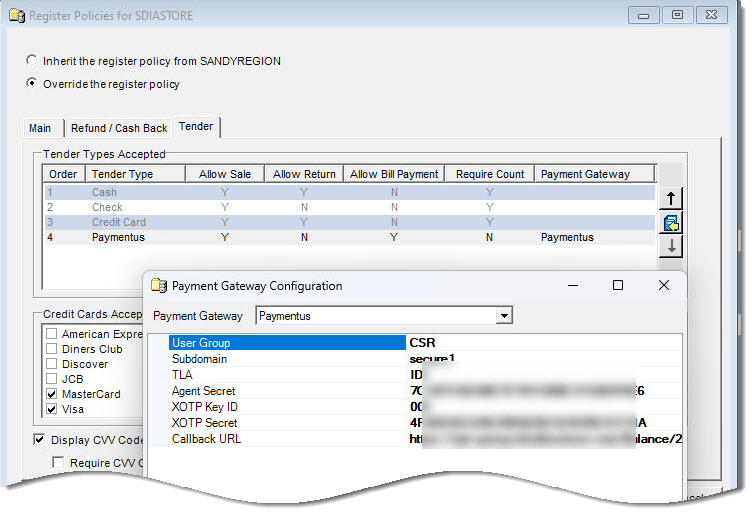
-
- User Group – Enter the User Group provided by Paymentus to grant access to functionality applicable to IDI Desktop Client and OnlineBill users.
- Paymentus Subdomain and TLA – These values are provided by Paymentus and map Paymentus to a single IDI platform environment.
- SSO Encryption Secrets – The Paymentus Agent Dashboard (for Customer Care) and Customer Portal (for IDI Customer Portal or OnlineBill) each require a different SSO Secret. These secrets are unique per IDI environment and are provided by Paymentus.
- XOTP Key ID and Secret – These are unique per IDI environment and are provided by Paymentus.
Setting Up Paymentus Location for a Store
This is required if you intend to tender transactions using a Paymentus peripheral device. The Location ID and device(s) that will be available for that location are determined though setup coordinated by your organization and Paymentus. To specify the Paymentus Location-id on a store-by-store basis:
- Select the store in IDI Desktop Client via Applications > POS Back Office > Locations.
- On the Add/Edit Store form, Store Info tab, enter the Paymentus location-id provided by Paymentus.

Prerequisites for Service/Installment Agreements
As a prerequisite, your IDI Desktop Client Product Catalog must have contracts and/or retail products with service agreements/installment plans available to include on web transactions.
A service agreement is associated to a contract via the Add/Edit Contract Specification form in IDI Desktop Client Product Catalog.

An installment agreement is associated to a serialized retail product by first associating an agreement to an installment plan profile in Product Management > Installment Plan Profiles.

And then associating an installment plan profile to the retail product in the IDI Desktop Client Product Catalog.

Prerequisites for Credit Checking
This article provides a quick overview. Complete setup details are provided in the Setup for Credit Scoring and Deposits article in the IDI Knowledge Center.
Getting Started/Prerequisites
Establish a relationship with TransUnion and work with them to set up an account for your company. Contact your IDI Project Manager for advice on how to do this. Then submit a work order to have IDI set up credit scoring logic as described above. Include your specific requirements for an IDI specialist to assess.
Credit Scoring
- Assign permissions in Admin Console Security and Web SaaS Security.
- Configure credit scoring settings in IDI Desktop Client.
- Configure credit classes in Admin Console > Data Management.
- Configure one or more starting blocks in the Product Catalog web module.
Deposits
- Assign permissions in Web SaaS Security.
- Configure tables related to deposits in Admin Console > Data Management. This includes:
- Allocation Types
- Deposit Types
- Waive Types
- Interest Rates
Order Field Configuration
Order field configuration can be used to restrict:
- Overriding register policy on return transactions
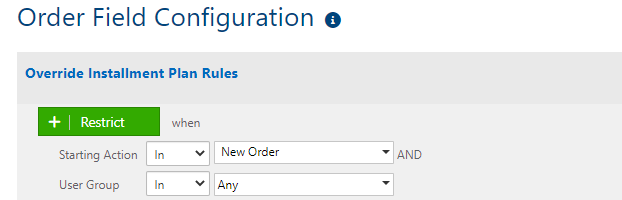
- Overriding installment plan rules
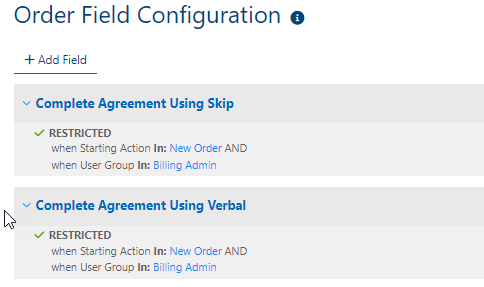
- Using Skip and Verbal options on service/installment agreements
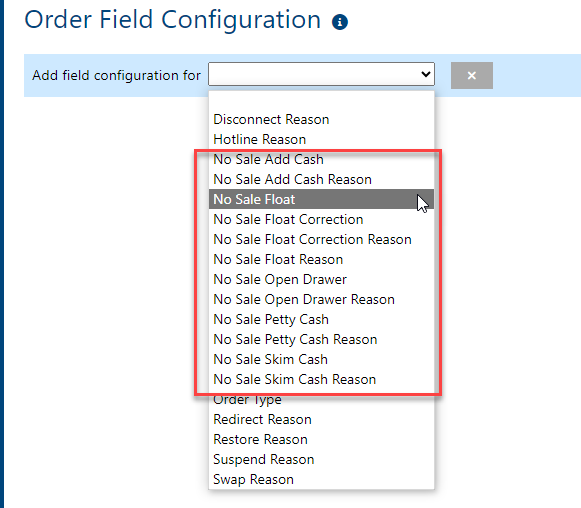
- Access to certain register management functions

Restricting Override Register Policy on Return Transactions
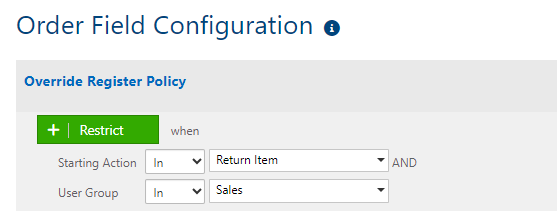
During a return transaction, items selected for return are evaluated against the register policy return rules based on the transaction’s location. If any items violate a rule, those items are presented in a dialog with options for overriding the register policy. Typically, these options are available to any user authorized to return items. You can restrict the ability to use these options on a user group basis by adding and configuring the Override Register Policy field.
Select Return Item as the action and select the user group(s) to restrict. This is not set up by default and must be added if you need to restrict override capability for some users (restricting access to Sales user group shown below).
Restricting Override Installment Plan Rules
To do this add and configure the Override Register Policy field.
Restricting Skip and Verbal Options
The Skip and Verbal options for completing agreements are permitted by default, but you can optionally restrict access based starting block starting action and user group.
Restricting Access to Register Management Functions
Order Field Configuration lets you restrict access to functions shown below by user group. For functions that end in Reason you can also specify a default value and specify whether to require a value before letting users proceed.
Example:

Setting Up Starting Blocks in the Product Catalog Web Module
Authorized users can create and maintain starting blocks in the Product Catalog. The following starting blocks are provided out-of-the-box when the Orders setting is enabled:
- New (Basic) Order
- New (Basic) Sale
- Disconnect Customer
- Disconnect Service*
- Hotline Service*
- New Feature*
- New Service
- Reconnect Service*
- Redirect Service*
- Restore Service*
- Suspend Service*
- Swap Equipment*
- Bill Payment
- Return Item
- Void Transaction
In addition, for systems on IDI solution version 22.4 or later, the Direct Invoice Experience starting block is provided when direct invoicing is enabled.
Notes:
- Starting blocks marked with an asterisk (*) replace the equivalent options available in the Actions drop-down menu (available when starting blocks are disabled).
- The out-of-the-box starting blocks listed above can be used as is or be modified as needed. You can also create custom starting blocks as needed.
To create/edit a starting block, in the Product Catalog web module choose MANAGE > Starting Blocks.

This displays the Starting Blocks page listing existing starting blocks. The Name link for each block lets you open the block to view and edit its current configuration. You can also use this form to create custom starting blocks to meet your specific requirements.

To create a new starting block, click New Starting Block in the upper right corner. Then use the New Starting Block dialog to configure the block’s behavior.
Note: In IDI solution 22.12 and later, the New/Edit Starting Block form presents configuration options on two tabs – Main and Policy. In earlier releases, all fields are presented on one comprehensive form, and some fields are not available at all.
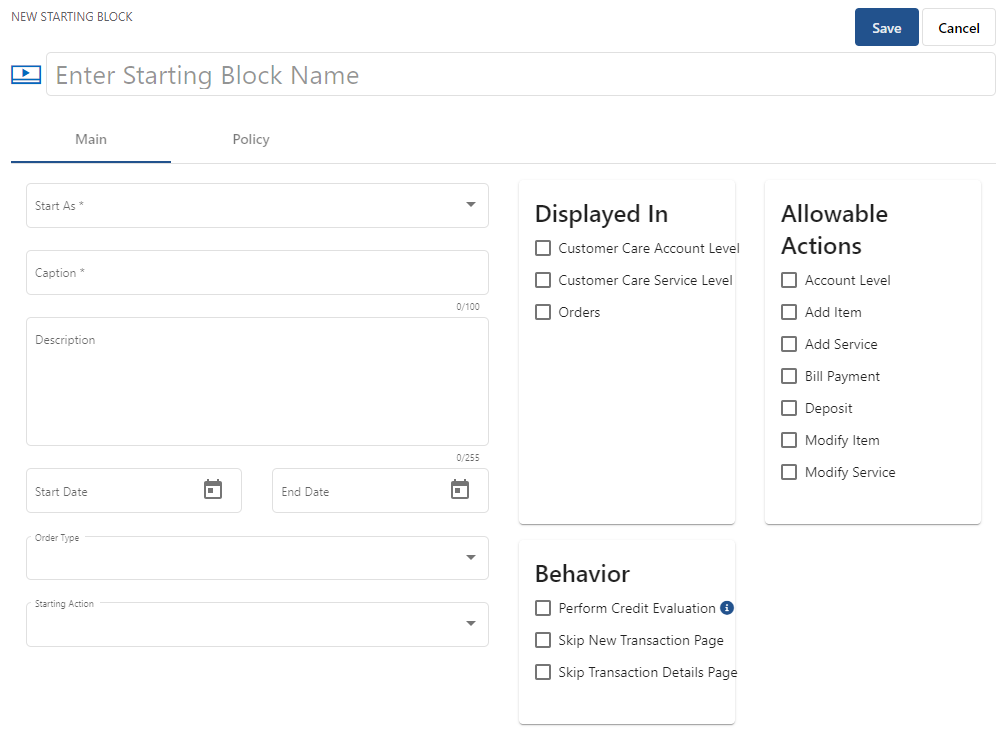
- The fields presented on the Main tab (shown above) are described below.
- The fields presented on the Policy tab are shown and described below.

| Location Options |
These options are only applicable when the block is intended to start a retail or direct invoice web transaction. This can be handled in two ways: For remote (not in-store) sale applications where sales associates are not required to use a specific location/register, you can specify a global Location & Register using the respective drop-down menus. These menus are populated with locations and registers as configured in IDI Desktop Client POS Back Office. For in-store sale applications where sales associates must use their individual locations/registers you’ll typically leave the Location and Register undefined. In this case, check the Is Register Required check box. This will require sales associates to select their location and register at the start of each transaction (as long as they are not pre-assigned to a register via Register Management). For Direct Invoice applications, you must set Location and Register specifications on the starting block. The My Locations option is not applicable for direct invoice transactions |
|---|---|
| Email Options |
These options support emailing a receipt or service/installment agreement for the transaction. The drop-down menu defaults to No Email. In this case, all related fields are disabled and there will be no options to email a receipt on completing the transaction. If you want to email a receipt, select one of these options:
|
| Receipt/Invoice Configuration |
This area is labeled Receipt Configuration when Start As on the Main tab = Sale or Order. In this case you can use this area to:
This area is labeled Invoice Configuration when Start As = Direct Invoice. In this case you can use this area to:
|
Considerations for Tender Bill Payment Starting Blocks
The default Bill Payment starting block is predefined with the following parameters on the Main tab:
- Start As = Sale
- Starting Action = Tender Bill Payment
- Displayed in is set to Customer Care Account Level and Orders
- Allowable Actions Account level and Bill Payment are enabled (checked)
- Behavior = Skip Transaction Details Page
The Policy tab setup has not changed, except that Require Register to Start Transaction is preselected and cannot be disabled.
Considerations for Return Item Starting Blocks
The default Return Item starting block is predefined with the following parameters on the Main tab:
- Start As = Sale
- Starting Action = Return Item – This provides two additional drop-down menus:
- Return Reason
- Inventory Status
- Displayed in is set to Customer Care Account Level and Orders
- Allowable Actions all are enabled (checked)
- No Behavior to skip pages are predefined
The Policy tab setup has not changed. Note: As rules that govern returns are set on a register policy basis, the Location options can be used to set up additional starting blocks to enforce different return rules for different locations. Also, Require Register to Start Transaction is preselected and cannot be disabled.
Considerations for Void Transaction Starting Blocks
When Void Transaction is selected as the starting action:
- The Start As drop-down menu is set to Order and cannot be changed. This ensures voids can only be performed on order transactions.
- The Allowable Actions options are disabled and cannot be changed.
- Displayed In defaults to Customer Care Account level and Orders; however, Customer Care Service level may be selected if you want.
On the Policy tab, Location, Email and Receipt configuration options are disabled and cannot be changed.
Considerations for Service/Installment Agreements – Email Options
If you want the ability to email agreement documents during a web transaction, set up the starting block to support email options accordingly.
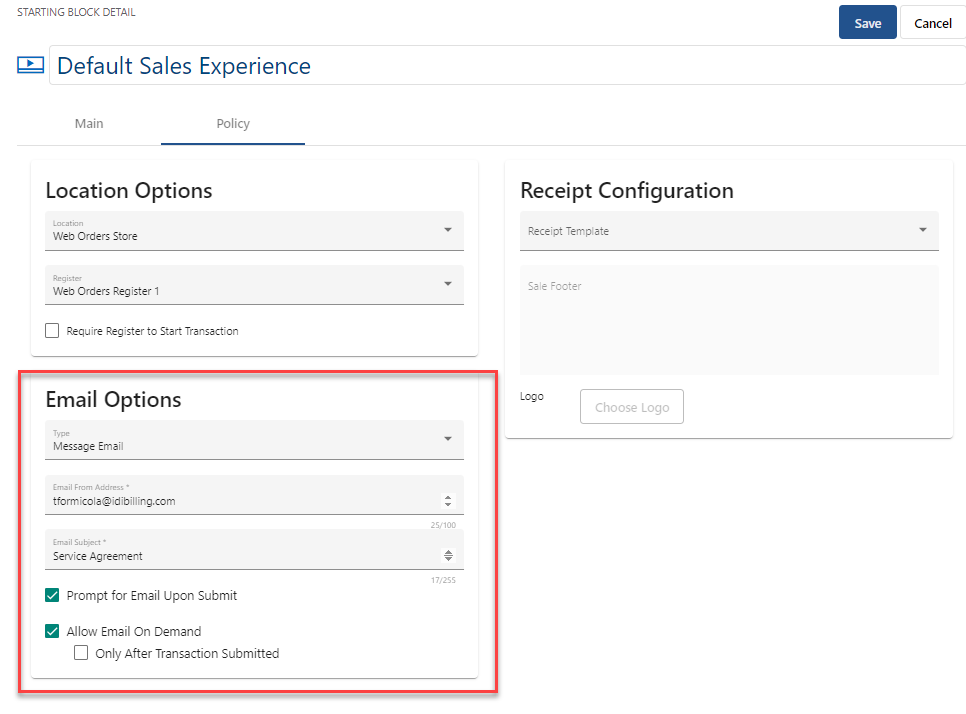
Considerations for Credit Checking and Manual Deposits
This functionality requires you to select the Perform Credit Evaluation Behavior and Deposit Allowable Action. This action toggles the ability to manually add a deposit to the transaction, independent of the credit scoring logic. This setting does not impact automatically adding deposits to a transaction as dictated by your credit scoring logic. Note: With proper setup, manual deposits can also be supported without starting blocks.
Web Sales Look and Feel
This section covers:
- starting a web sales transaction from the Orders web module or Customer Care. This includes starting:
- an Order transaction
- a Cart/Sale transaction
- a Direct Invoicing transaction
Starting a Transaction from the Orders Web Module
From the Orders APPS tray click START >.
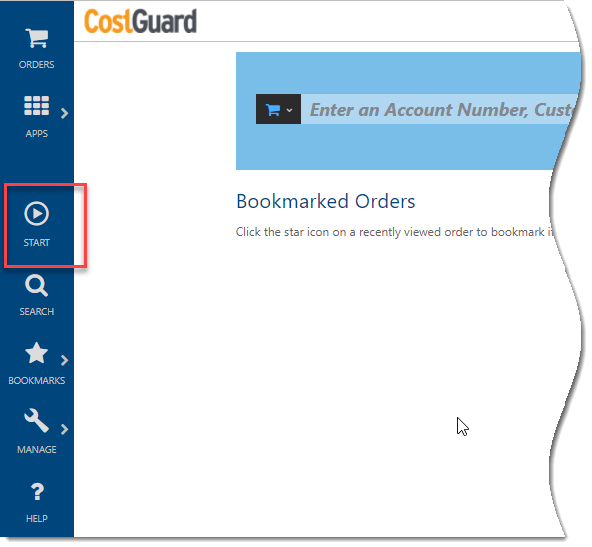
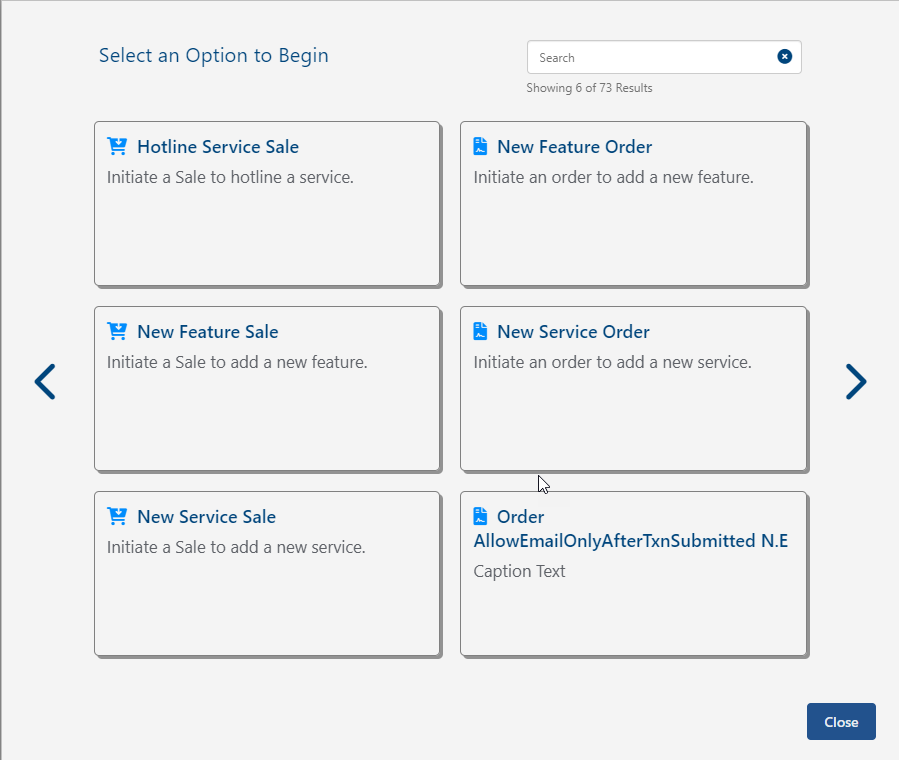
This displays the dialog for selecting a starting block. It lists existing starting blocks configured for availability by location (Orders, Customer Care account-level and Customer Care service-level) and date range. You can browse through the list using the forward (>) and backward (<) buttons or enter a text string to search (for example new order).
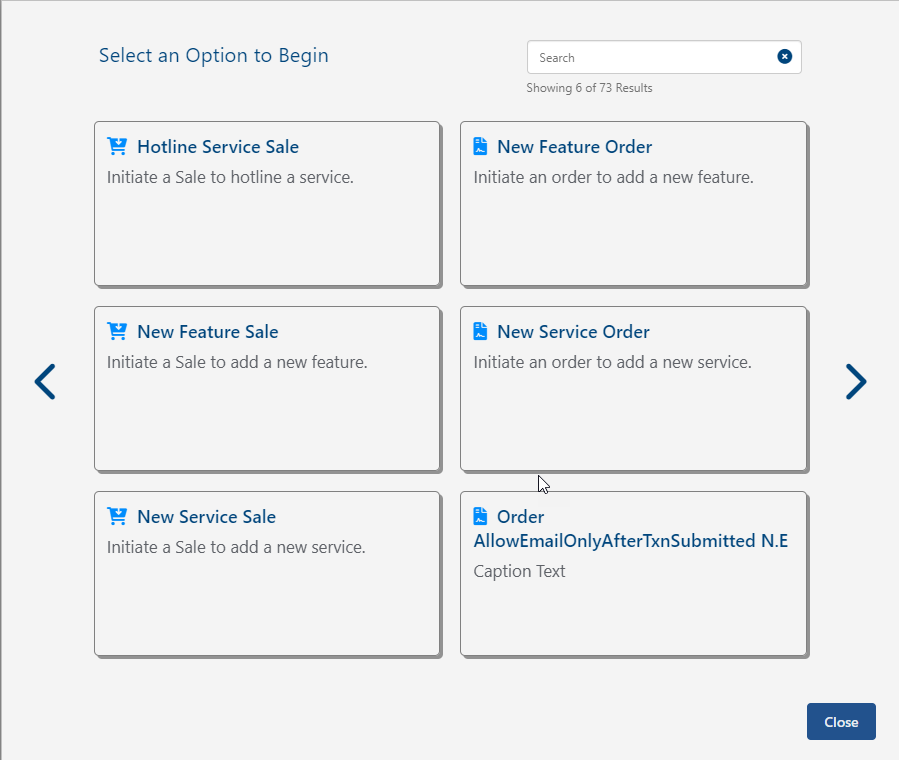
The following sections briefly describe the look and feel of the order and cart/sale transaction types.
Order Transaction
Selecting a block configured as an order transaction displays the familiar New Order Basic Information page. Note: If the block is configured with a specific Order Type, that Order Type will supersede any existing Order Field Configuration (OFC) and will be automatically selected. If no Order Type is configured on the selected block, the solution observes the Order Field Configuration, if set. If neither the block nor the OFC have been set to select a specific Order Type, the Order Type must be selected, as currently supported.

On specifying the customer and saving the basic information, the familiar order assembly page is displayed. From here the order proceeds as any other order transaction in the Orders web module.

Cart/Sale Transaction
Selecting a block configured as a sale transaction displays the same basic information page, except that the icon in the upper left corner indicates you’re starting a New Cart. Note: As with Order flows described above, if the block is configured with a specific Order Type, that Order Type will supersede any existing Order Field Configuration (OFC) and will be automatically selected.

On specifying the customer and saving the basic information, the order assembly page is displayed. With this release, the basic flow is similar to a billing order except that certain elements have different labels consistent with a cart/sale transaction as opposed to a billing order. Also, the presentation of certain screen elements has been improved, and the assembly phase for cart/sales provides an additional page for reviewing the sale with the customer prior to finalizing the sale.

Clicking Review displays the Summary page. This page is unique to Sale transactions. It provides sales representatives an opportunity to review the transaction with their customer to ensure it meets the customer’s expectations prior to finalizing.

The Billing Summary section provides the following information:
- A simple order summary statement – in the above example, Adding one service and two features.
- Separate sums for billing recurring and one-time (non-recurring) charges.
- A simple summary of the total (sum of recurring and one-time charges) and the resulting Increase/Decrease on the next invoice; for example: The next invoice will include an estimated amount of 15.00
The Retail Summary section provides totals for the following:
- Item (count) Subtotal – The sum of the extended price from all retail product line items. The label contains a count of the unique items (SKUs) involved.
- Retail Discounts – The sum of the retail discounts applied.
- Taxes – The sum of the calculated sales taxes to be paid.
- Total Amount Due – This is the net of the above listed sums.
Note: For IDI solution version 22.1, the Retail Summary only supports direct invoice items.
Clicking Proceed to Checkout displays the page for tendering (if applicable) and finalizing the transaction. The left panel provides miscellaneous transaction information and the right panel has four tabs:
- TAX & TOTALS shows a breakdown of the retail charges to be tendered, icons for viewing and emailing the receipt, and a +NEW button for adding tender types/amounts.
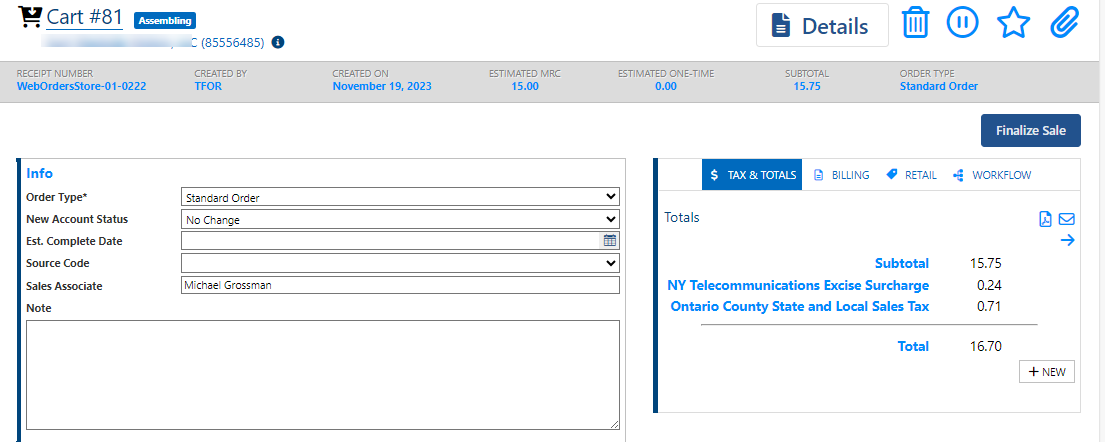
Note: Tendering options are based on Register Policy setup in the IDI Desktop Client (see Setup). If your system is integrated with the Paymentus payment vendor, you’ll have an option for Paymentus tender type. Using Paymentus is demonstrated the section on Tendering a Retail Transaction with Paymentus.
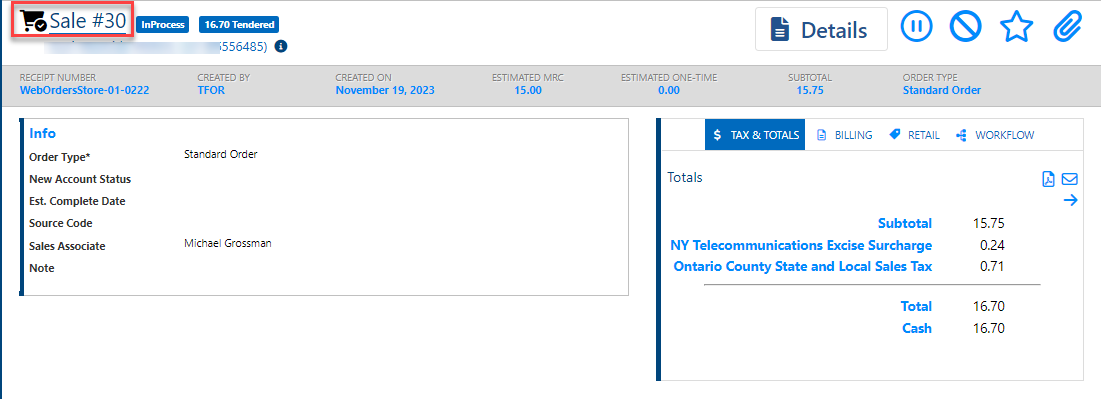
From this page, clicking Finalize Sale submits the cart and converts it to a sale.
Starting a Transaction from Customer Care
In Customer Care a Start Transaction button is provided on the Account page (all views) in the upper right next to the icon bar. This button is intended to display starting blocks configured to be available for account-level transactions in Customer Care.

A Start Transaction button is also displayed on the Services and Features page in the right-hand Service Views panel when you select a service in the left-hand panel. This button is intended to display starting blocks configured to be available for service-level transactions in Customer Care. Note: The account-level Start Transaction button next to the icon bar is still available.

In either case, clicking this button displays the form for selecting a starting block. Once you select a starting block, the Orders web module opens in a new tab and the transaction proceeds based on the selected block (same as when you start via the Orders web module).
Direct Invoice Transactions
Direct invoice transactions can be initiated from both the Orders and Customer Care web modules. The flow (page sequence) for a direct invoice transaction is the same as in past releases:
Basic Information > Details > Summary
Use the system-provided Direct Invoice Experience starting block or another starting block with Start As = Direct Invoice.
Note: The original direct invoice functionality where an order would be converted to a direct invoicing transaction by including a direct invoice item on the order no longer applies.

Selecting a direct invoice starting block displays the Basic Information page that is similar to initiating an order or cart transaction, except that the page is labeled appropriately for a Direct Invoice transaction user experience.

As with other transaction types, you need to specify the Customer. Order Type may or may not be auto-populated based on the starting block configuration. Saving the basic information displays the Details page for assembling the transaction. The page is appropriately labeled to indicate you’re working with a direct invoice transaction.

Similarly, when you’re finished with assembly and ready to submit the transaction, the Summary page is labeled accordingly. The Summary page displays the calculated tax and totals.
Note: If you leave the detail page in assembly phase without clicking Review Direct Invoice, and then return to the transaction via the Direct Invoice OmniSearch, the Summary view will not show the TAX & TOTALS tab and will have a COMPLETE DIRECT INVOICE button (rather than SUBMIT DIRECT INVOICE). In this case, you must click the COMPLETE button to proceed to the Summary with TAX & TOTALS.
If you proceed to the summary directly from the Details view by clicking Review Direct Invoice, the Summary page will have a TAX & TOTALS tab that shows a subtotal, tax, and total amounts stemming from all charges related to the direct invoicing items on the transaction. From here you can bill to account, view the invoice, and then submit the direct invoice.
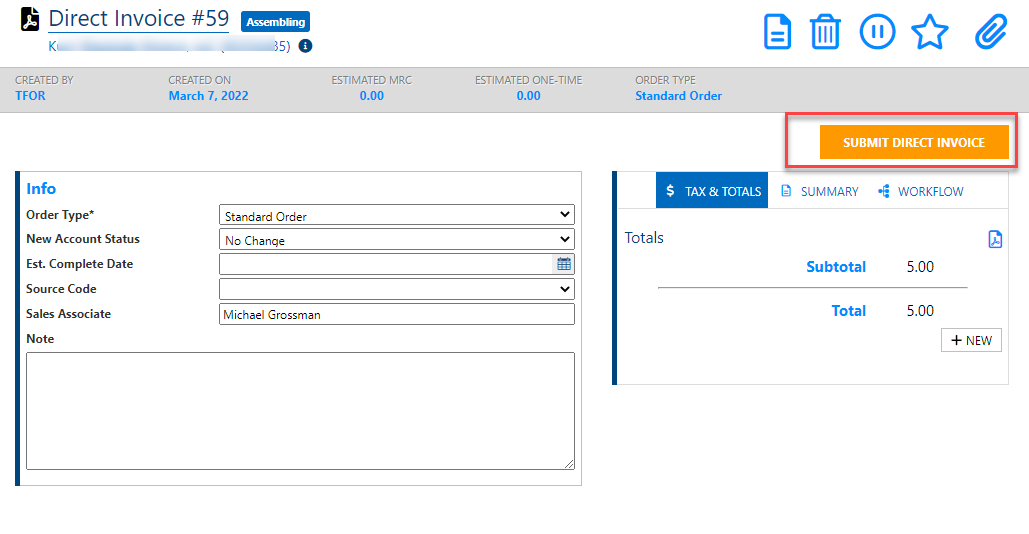
On submitting the transaction, the total amount is billed to account and an invoice is generated as occurred with past direct invoice transactions.
Initiating and Completing a Retail Transaction
This provides a quick walk through a retail transaction from start-to-finish. Details regarding certain procedures such as retail fulfillment, credit checking, and managing service agreements are provided in later sections.
The overall process is like any other transaction, except that additional steps may be required related to retail items:
- Depending on starting block configuration, users may be required to select a POS register.
- During assembly additional steps may apply related to retail items (fulfilment, discounts, taxes, installment plans).
- Tendering the transaction prior to submitting.
Starting the Transaction – Selecting a Starting Block
Based on Displayed In options as set on the starting block you can start a retail transaction from the Orders and/or Customer Care module. Use a starting block that you set up with Location, Email and Receipt options as required for your retail web transaction process. If you initiate the transaction from Customer Care, you’ll be directed to Orders to complete the transaction.
Basic Information
Selecting a starting block displays the Basic Information page. As with any transaction, you need to specify the Customer. Order Type is also required and may be auto-populated based on the starting block configuration. Note: In the example below, this page is labeled New Cart as the selected starting block was set up to start as a sale (as opposed to an order). Labeling for subsequent pages, buttons and so on will reflect this as well.

Selecting a Register
A POS location and register are required for retail transactions. For remote applications where associates are not required to use a specific location and register, these specifications are typically set on the selected starting block. For transactions where each sales associate is required to use their specific location and register, you can ensure this in two ways:
- Register assignments can be made in advance through Register Management avaialble via the LOCATION > My Registers slide out in the Orders main menu. This method saves users from having to manually select a register for each transaction. Note: When location and register are set on the starting block, those settings will take precedence over location/register settings configured via LOCATION > My Registers. For details see the section on Register Management.
- Or, if you want to force users to select a register on each transaction:
- Do not assign those users registers via Register Management.
- Configure a starting block with Require Register to Start Transaction enabled and leave location and register undefined. In this case, the Select Register dialog will always be displayed after saving the transaction’s Basic Information. The Location and Register menus in the Select Register dialog are populated based on user’s Location access configuration in the IDI Desktop Client POS Back Office.

Notes:
- When the user has a current register assigned, the LOCATION icon in the Apps tray indicates this status with a circle around the icon.

- If a user is not authorized at a location, a no locations authorized error is displayed.
Assembly
Saving the basic information displays the Detail page for assembling the transaction. This is where you select one or more retail items for the transaction. Note: The available actions reflect the starting block configuration. In this case the block is configured to permit adding and modifying services and products. Click the Add Items icon.

Choose to add account- and/or service-level items. Then use the search tool to find retail Items.
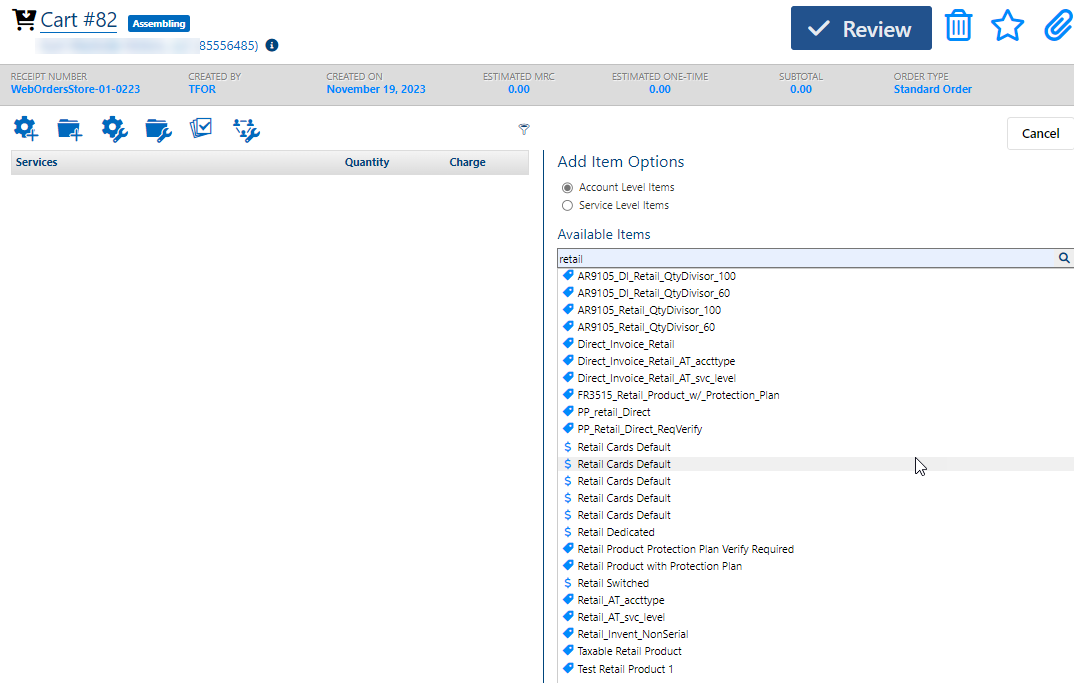
There are several considerations when adding retail items:
- Retail items can be serialized or non-serialized. You’ll need to enter serial numbers for serialized items before adding them to the transaction. If you need to defer specifying the serial number at this point you can click the For Fulfillment check box. This auto-populates the Serial Number field with a temporary serial number (XXXXXXXXXXX). In addition it causes the system to fire a custom workflow down-stream to temporarily pause the order to let you enter the serial number and then resume the order. Note: You are responsible for setting up the workflow. IDI can provide assistance via a work order. For more on this, see the section on Retail Fulfillment.
- The View menu has options related to retail items:
- Discounts lets you apply one or more discounts to the retail item being added.
- Tax Information lets you change tax jurisdiction for the item.
- Installment Plan is only available when the selected retail item requires or allows a retail installment plan. This view is for completing installment plan details.
- The Notes field lets you enter a note for the retail item on the transaction receipt. Clicking in the field expands it to 4000-character capacity. Note: When entering a note, be mindful of how much room it will occupy on the receipt. You may not want to use the full capacity.
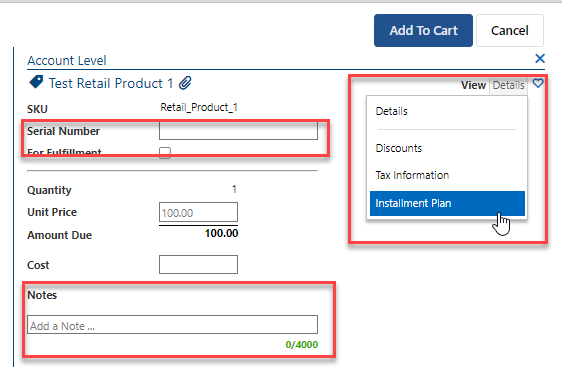
Typically, you’ll defer adding the item (by clicking the ADD TO … button) if you know additional configuration is required to apply discounts, change tax jurisdiction or complete installment plan details. Do this by selecting the applicable option from the View drop-down menu and proceed as described below.
Applying a Discount on a Retail Item
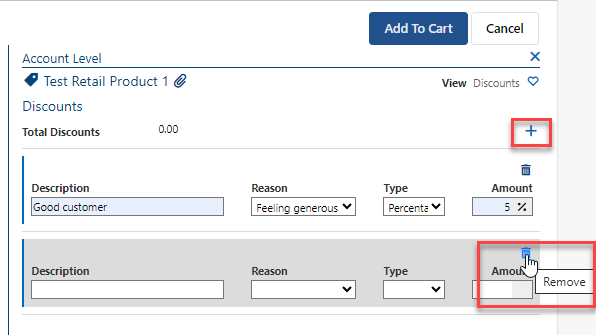
Select Discounts from the View menu. This view lets you apply one or more discounts on-the-fly. To do this:
- Click + to display a row for entering the discount details.
- Enter a Description.
- Select a Reason.
- Choose to apply the discount as a fixed Amount or Percentage.
- Then enter the corresponding amount/percentage value.
- Click the + icon to add another Discount.
- To remove an added Discount, click the
 icon.
icon.
Note: If a Retail Promotion has been configured for the retail item and the eligibility conditions are met, the system will automatically apply the Retail Promotion-driven discount.
Changing Tax Jurisdiction on a Retail Item
If you need to establish a tax jurisdiction other than the configured default for a specific retail item, select Tax Information from the View menu. This view lets you select one of these options for establishing tax jurisdiction:
- Default Taxing Method – Uses the tax jurisdiction for the configured default address (MANAGE -> Settings). This is the default selection when you open this view.
- Primary Customer Contact – Uses the tax jurisdiction from the account’s primary customer contact. Selecting this displays this contact’s address information.
- Service Address – Uses the tax jurisdiction from the selected service address. Selecting this displays a menu for choosing an existing service address on the account.
- Service Contact– Uses the tax jurisdiction from the selected service contact. Selecting this displays a menu for choosing an existing service contact on the account. Or you can click the + icon to add another service contact (using Customer Care).

Completing Retail Installment Plan Details
If the retail item requires (or allows) a retail installment plan, select Installment Plan from the View menu. The fields in this view follow the rules for the installment plan profile assigned to the retail item. Profiles are configured via Product Management > Installment Plan Profiles in IDI Desktop Client, and assigned to the retail item via the Add/Edit Retail Product form (Behavior tab) in the Product Catalog.
You can edit these fields as the profile allows/requires. In the example below, the profile requires you specify the Number of Installments and Down Payment Amount. First Installment Required is pre-selected and can only be changed by overriding this profile rule. You can see additional details for a field by hovering the mouse over the associated information (!) icon.
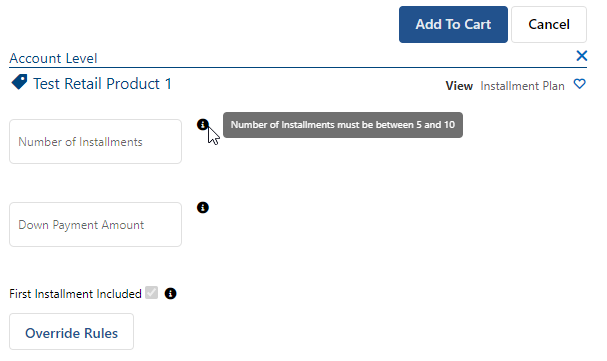
The view indicates when you make an entry that’s not valid. In the example below you can see the current entry of 12 for number of installments is invalid as the allowable range is 5-10.
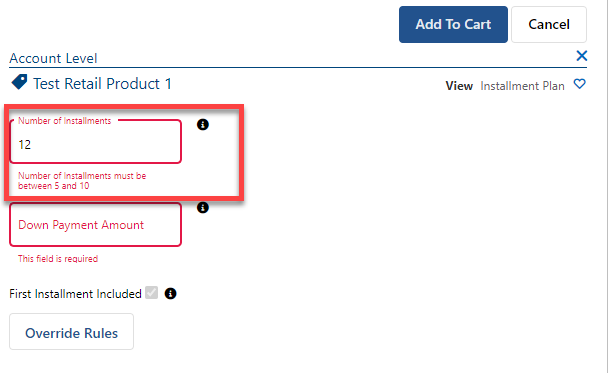
If you need to override one or more rules, click Override Rules and then click again in the confirmation prompt.

In the example below, you can see the First Installment Included checkbox which was pre-selected and not editable can now be edited. You can also make entries in the other fields that exceed the ranges set by the profile rules.

Note: You can restrict the ability to override installment plan profile rules through Order Field Configuration as described later.
Adding Items to the Transaction
When you’re ready, click the ADD TO … button. This adds a row in the left pane showing pertinent information for charge, discounts and installment plan (as applicable).

Hovering the mouse over a particular indicator displays additional detail. For example, the scissors icon indicates one or more discounts have been applied. Hovering over the scissors displays discount details. In the example below, the $100 charge for the product has been discounted by $5. Note: If the item has multiple discounts, the information reflects the cumulative amount for all discounts.
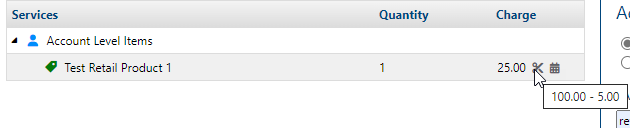
The calendar icon indicates the item has a retail installment plan. Hovering over the calendar displays installment plan details. The example below indicates $70 dollars is owed over 8 installments (first installment is not required on the sale).

The discount and installment plan result in a charge of $25 owed for this item at the time of sale (not including taxes). Note: You can review discount, tax jurisdiction and installment specifications for an item via the Details view.

When you’re ready to move from Assembling to the Review phase, click Review.
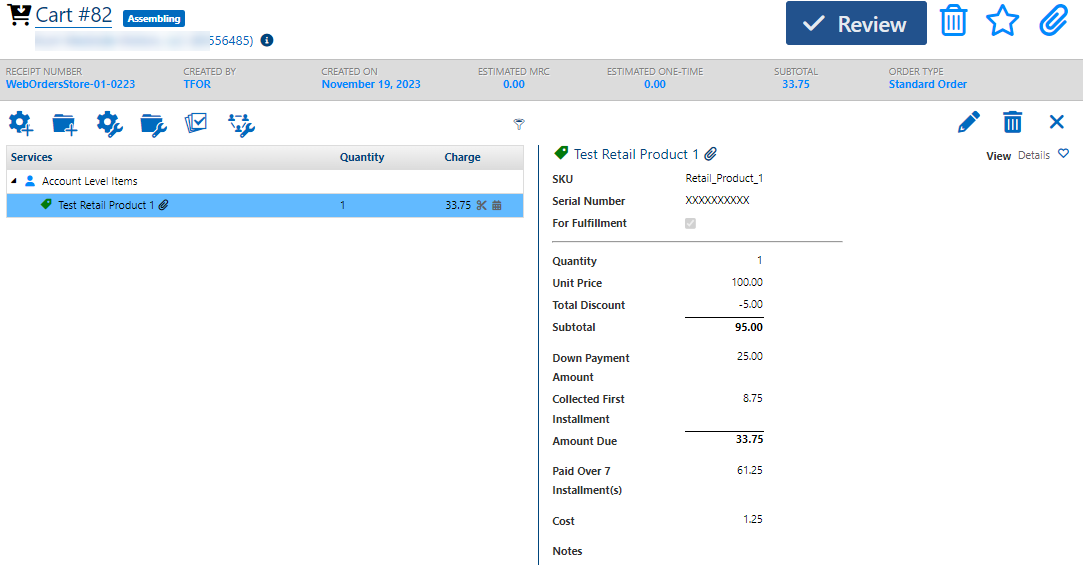
For sales transactions, this displays the Summary page. This lets sales persons review the transactions details with the customer prior to moving to checkout. Note: For order transactions, this summary view is not shown.
The Billing Summary lists any billing charges (in this case none). Also, in this case, the Billing Summary indicates the presence of an agreement that requires action.
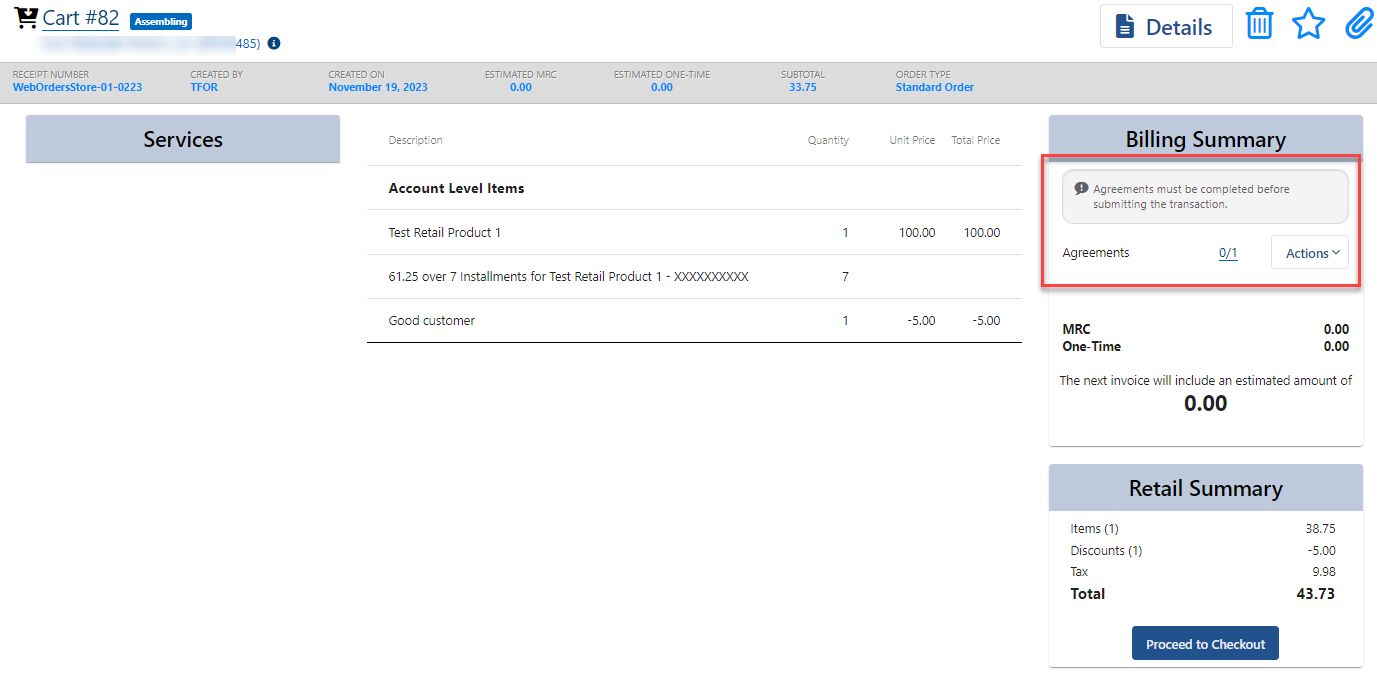
Use the Actions menu to complete and manage agreements as required. Note: This is covered in detail later in this article.

Click Proceed to Checkout when you’re ready to move on to tendering.
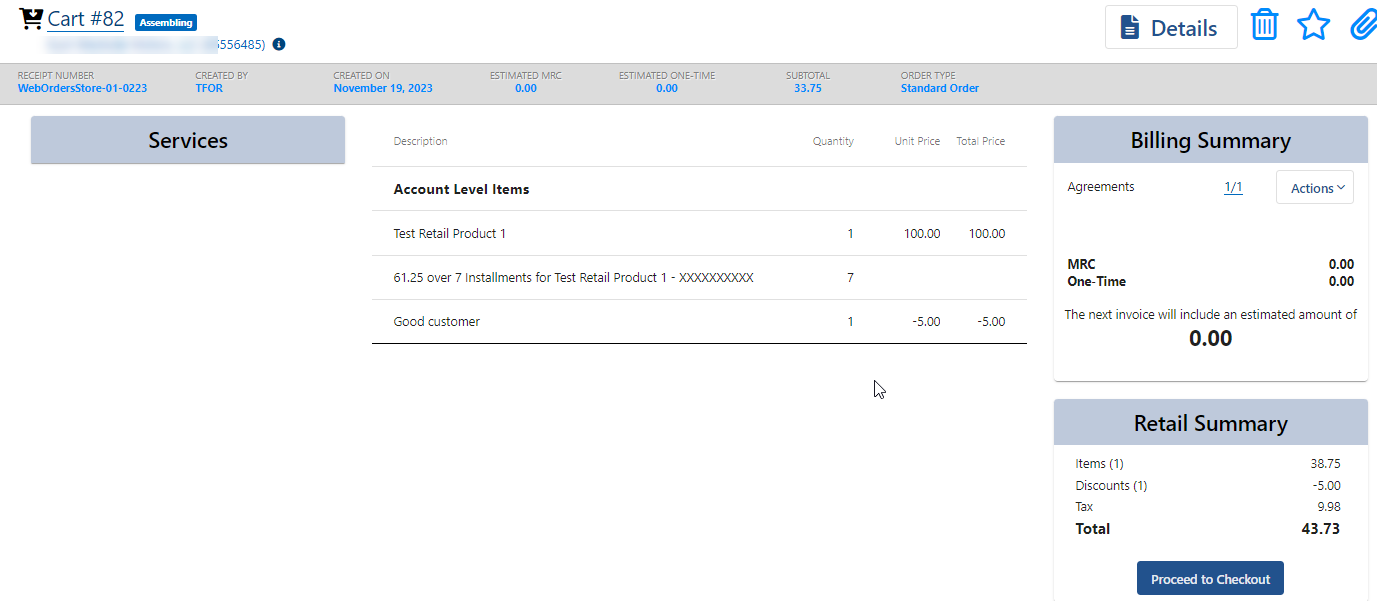
The tendering page is shown below.

Note: If you leave the Detail page in assembly phase without clicking Review, and then return to the transaction via the Order OmniSearch, the tendering page will not be as described below. It will not show the TAX & TOTALS tab and will have a Complete button (rather than Finalize/Submit). In this case, you must click the Complete button to proceed to the presentation with TAX & TOTALS.
If you proceed to the tendering page directly from the Details view by clicking Review, the page will have a TAX & TOTALS tab that shows a subtotal, tax, and total amounts stemming from all charges related to the direct invoicing items on the transaction.
The TAX & TOTALS tab lets you:
- Add one or more tender types (+NEW).
- See a preview of the receipt (document icon).
- Email a receipt on demand (mail icon, if the starting block is configured to support this).

Tendering
Add one or more tendering specifications. To start click +NEW. This displays fields for selecting the tender type and specifying the amount.

The tendering options available in the Types drop-down menu are set by Location > Register Policy configuration in the IDI Client POS Back Office. Notes:
- Details on using Paymentus for tendering are provided in the section on Tendering Retail Transactions Through Paymentus.
- If you’re not using Paymentus, credit card tender type must have payment gateway configured for Authorize.net. ACH tenders require a valid routing number.
After you select a tender type, the fields for additional information depend on the selected type.

Notes:
- When driver’s license number is required its masked after entry; however, you can go back and edit the full number if needed.
- The total amount for all added tenders must match the Total for the transaction.
- For non-Paymentus tenders, when you add a credit card or ACH (check or e-check) tendering type, the Payment Method drop-down menu will be populated with the customer’s E-Pay accounts as configured in IDI Desktop Client if applicable. The New Payment Method option lets you enter credit card or check tendering details on-the-fly (not associated to a specific E-Pay account). This is the only option available when the customer does not have any E-Pay accounts configured. Selecting this option displays a form for entering the credit card or ACH information as required.

Previewing the Receipt
Click the document icon to preview the receipt.


Emailing the Receipt
Your options for emailing receipts are driven by the starting block configuration.
- It may be set up to not email the receipt.
- It may be set up to prompt users whether or not to send when the transaction is finalized/submitted.

- It may be set up to allow sending the email on demand. In this case an email icon will be available next to the preview receipt icon. This displays the same prompt to choose whether or not to send.

- It may be set up to send automatically when the transaction is finalized/submitted (no prompt to choose whether or not to send). In this case, the Email on Demand icon, as shown above, is not available on the TAX & TOTALS tab; however, it will be available once you choose to finalize/submit the transaction.
Finalizing/Submitting
When you’re finished with tendering, receipt preview and emailing options, click Finalize Sale (or Submit Order). This updates the left panel of the tendering page with pertinent transaction information. The two badges at the top indicate transaction status (InProcess) and the amount tendered. Note: For sales transactions, the cart transitions to a sale.

Tendering a Retail Transaction With Paymentus
To tender via Paymentus, select the Paymentus tender type on the checkout TAX & TOTALS tab, then use the Method selector to choose whether to use a Paymentus device set up at the retail location (Use Paymentus Device) or use a Paymentus account set up on the customer’s account (Select Payment Method).

Note: You can use Paymentus tendering in combination with other non-Paymentus tendering options. For example, you can tender part of the transaction with cash and then tender the rest through a Paymentus peripheral device.
Using a Supported Paymentus Payment Method Set Up on the Customer’s Account
This is primarily for not in-store transactions, or when a Paymentus device is not available. Payment methods are set up on an account-basis in Customer Care via Billing > Paymentus.
Start by selecting the Paymentus Type and Select Payment Method in the Method selector.
Note: You can combine multiple Paymentus payment methods (a combination of credit cards, or other methods such as PayPal). The Amount field lets you adjust the amount to apply for each method. Below the amount is adjusted down to $10.00. If you add a tender for a partial amount, you’ll be required to add additional tenders to cover the full amount in order to finalize the transaction.

Clicking Add displays the Paymentus tendering form. This form lets you select a payment method set up for the account and then complete the payment through the form.

After adding the required tenders, the resulting view shows the amount tendered through Paymentus. Below shows the result of using two credit cards to tender the transaction.

Using a Paymentus Peripheral Device
This supports in-store tendering. To do this:
- Select the Paymentus Type, then select Use Paymentus Device and click Add. From here you can use the current device (if any) or choose to use a different device. The first time you do this, a current device will not be specified Current Device = None).

- In this case your only option is to click Choose. This displays a form listing all peripheral devices available at the Paymentus location. This form lets you scroll through multiple pages if there are more devices that can be displayed on the form at one time.
- Select a device and click Use Selected Device.

If the selected device is available, the tender will be added successfully; otherwise, you’ll need to select a different device. From that point, the device you select will become the current device until you choose to clear it. It will be indicated on the Payment Devices form and you can choose to use the current device (Use Current) or choose another (Choose). You also have the option to Clear the current device and choose a different one.

AdvancePay Products
Support for selling and managing AdvancePay products in IDI web modules is the latest enhancement in a continuing effort to provide a complete and robust web front office experience for service providers. This new functionality includes:
- In the Orders web module:
- selling and renewing AdvancePay products on a web transaction.
- voiding transactions with AdvancePay products.
- In Workflow, the Billing System Update (BSU) now supports AdvancePay products and their price point(s) in the above listed transactions.
- Customer Care supports viewing and Managing AdvancePay products and their price Points on an account.
Notes:
- To facilitate advance configuration in support of the above functionality, the ability to configure AdvancePay products with browse tags and assignment templates was added with the IDI platform 25.04 release.
- Additional functionality for managing AdvancePay products in web transactions will be provided in a future release.
Setup
Prerequisites
You must be licensed to use AdvancePay. If you are not already licensed and need to use AdvancePay, contact your IDI account manager. In addition, you need to have a thorough understanding of AdvancePay as supported in the IDI platform. Refer to the applicable topics in IDI Desktop Client help for details.
Permissions
A Renew AdvancePay Feature permission is available in the Security web module under Orders. This permission is required to make the Renew AdvancePay action available in the Modify Item Options drop down menu during order assembly. The permission is provided with the Orders Admin role and can be added to other roles as needed.
Assigning Browse Tags and Assignment Templates
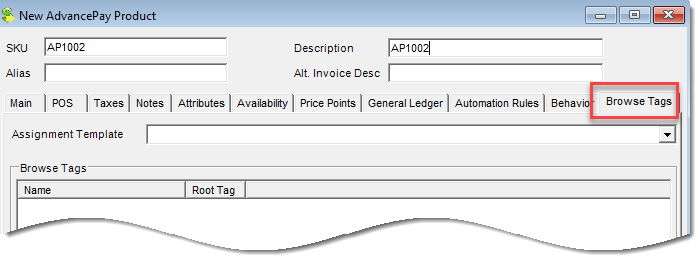
This functionality resides in the IDI Desktop Client Product Catalog with IDI platform release 25.4 or later. The Add/Edit AdvancePay Product form has a Browse tab similar to other products. Browse tags and assignment templates are covered in detail in the related knowledge articles. Start with Getting Started with Browse Tags and Assignment Templates.
Getting Started with an AdvancePay Transaction
This process starts the same as when using browse tags and assignment templates to find and add other products to a transaction. Begin as you normally would, either by initiating a starting block or beginning a new order and selecting the customer. Note: AdvancePay products can only be sold at the service level and are not supported at the account level in web transactions, so you’ll need to either add a new AdvancePay service or select an existing one and add AdvancePay products to it. The following example shows adding a new AdvancePay service.
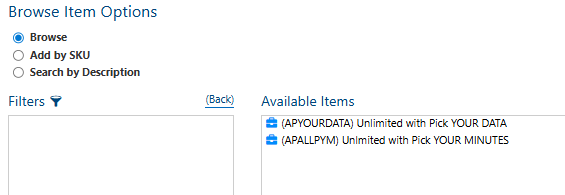
Once you’ve selected the service where the AdvancePay product is being added, you can use any of these methods to find the product – Browse, Add By SKU, or Search by Description. Below shows using the AdvancePay browse tag assigned to AdvancePay products in the Product Catalog.

In this example, you can choose to add a Feature or Plan.

Below shows the available products for Plan.
Managing Price Points on an AdvancePay Product
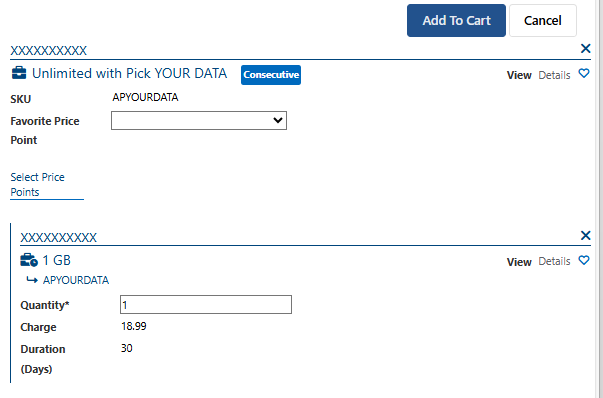
Price points are assigned to AdvancePay products as part of their setup in the Desktop Client Product Catalog. When you add an AdvancePay product to a web transaction, you can select which price points to include at your customer’s request. Clicking an Available Item displays the Select AdvancePay Price Points dialog for this purpose.
All price points assigned to the product in the Product Catalog are listed in ascending alphabetical order by description. A scroll bar is provided as needed to let you browse the complete list. Use the Favorite Price Point selector to designate one as favorite. Note: This is optional. You are not required to designate a favorite.
The name, duration, and charge as configured in the Desktop Client Product Catalog are displayed for each price point. Enter a quantity for each price point to be sold with the AdvancePay product.

On saving the price point specification, the AdvancePay product will be staged as a parent, with the selected price points as the children. From here you can change the designated the Favorite Price Point, and edit the quantity of any of the price point as needed. Clicking the Select Price Points link under the product lets you change the price point selections. Note: In this dialog, items are re-ordered with items having a quantity greater than zero listed alphabetically at the top, and price points having a prior quantity of zero listed alphabetically below.
Discounts and Tax Using method can be viewed and managed at the price point level.
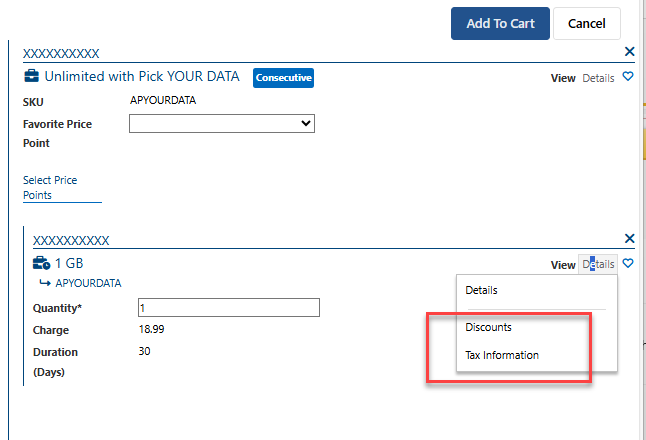
Once added to the transaction, the page will contain the AdvancePay product as a parent to the price point children, with different icons to indicate the AdvancePay product (briefcase) and its price points (briefcase with a clock). These will appear green when being added/sold.

From here you can update the quantity for a price point without having to restage it by selecting the price point and clicking edit.

Clicking the Edit Price Points link on the selected AdvancePay product lets you reselect all price points and the favorite price point without restaging.

Note: There must be at least one price point (quantity greater than 0) under an AdvancePay product in order to proceed past the transaction assembly page; otherwise, an error is thrown upon clicking Review.

Renewals
When you choose to modify a feature, the Action menu in the staging (right) pane provides a Renew AdvancePay option. Note: This option is only available for users with Renew AdvancePay Feature permission. If the specified customer has one or more AdvancePay products, selecting this option will list the AdvancePay products under their respective services.

Selecting a product will display the Edit Price Points dialog for that product, listing all price points that were added in a previous transaction. All price points will have a quantity of 0 initially. From here you can specify the quantity to renew for each price point (or choose not to renew by leaving the quantity 0).
Note: The Unit Balance section can be helpful when discussing renewal options with your subscribers. Expanding this section shows the expiration date and remaining amount for each price point.

Once saved, price points selected for renewal will stage in the cart with black icons (for renew). From here you can proceed through the rest of the transaction as you would any other.
Voids
Voids are now supported for transactions containing AdvancePay products. AdvancePay voids work the same as for other products.
Viewing and Managing AdvancePay Products in Customer Care
This release provides support for viewing and managing AdvancePay products on accounts in Customer Care.
Order History
The Order History page in Customer Care (Orders > Order History) facilitates viewing AdvancePay transaction histories. You can view AdvancePay transaction histories on the Features tab. AdvancePay products that have been added, disconnected, or modified on an order have row entries in the Features table.
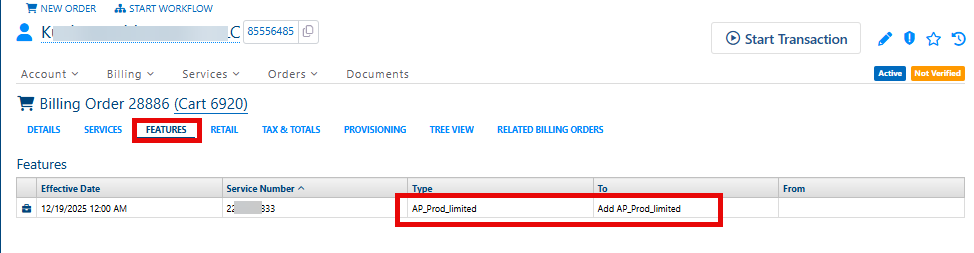
Also, the Retail tab lists AdvancePay products, their respective Price Points, and any applicable retail discounts.

Services and Features
AdvancePay products under services are displayed when viewing Services and Features on an account in Customer Care (Services > Services and Features).

Note: Price points are retail products; therefore, they are not presented in this view.
Upon clicking an AdvancePay product, the details section displays information related to the selected item.

The Start Date, End Date, Billing Status and Favorite Price Point can also be edited from here.

AdvancePay Renewal
The renewal page (Account > AdvancePay Renewal) has been improved with updates to formatting, layout, and titles:
- The page has been renamed AdvancePay Renewal.
- The following caption has been added to the page: The automatic renewal purchase of AdvancePay products requires services assigned to a Payment Method.
- The Wallets selector has been renamed Payment Methods.
- Wallet Types have been renamed as the applicable Payment Method (e.g. Credit Card, Debit Card, etc).
- The Payment Methods column has been renamed as Number (since this displays a Credit Card or Checking account number).
- Services set for Auto Renewal has been renamed Assigned Services.
- The Add Services button has been renamed Assign Services.

Additionally, when you remove an Assigned Service from a Payment Method, the removal dialog has been updated with similar format, layout, and text updates:
- The Delete Auto Renewal Services dialog has been renamed Remove Assigned Service.
- Dialog messaging has been updated to read Please confirm you want to remove service “##########” from being assigned to Payment Method “VISA (####)” for Auto Renewal Purchases.
- The Delete button has been renamed Remove and moved to right side to be consistent with the location of similar buttons in other dialogs

Retail Fulfillment
Searching Inventory
The Search Inventory option in the LOCATIONS slide-out lets you find and confirm the availability of retail inventory at a Location. Note: Retail inventory is managed via IDI Desktop Client > POS Back Office. Clicking Search Inventory displays a search results grid listing retail items based on the selected criteria. By default, the grid lists serialized and non-serialized items for all locations. The grid provides paging functions in the lower right corner.

You can filter the list to show just serialized or non-serialized items, filter by location, and filter by SKU. When filtering by SKU partial strings are allowed. Below shows filtering by a combination of location and SKU.
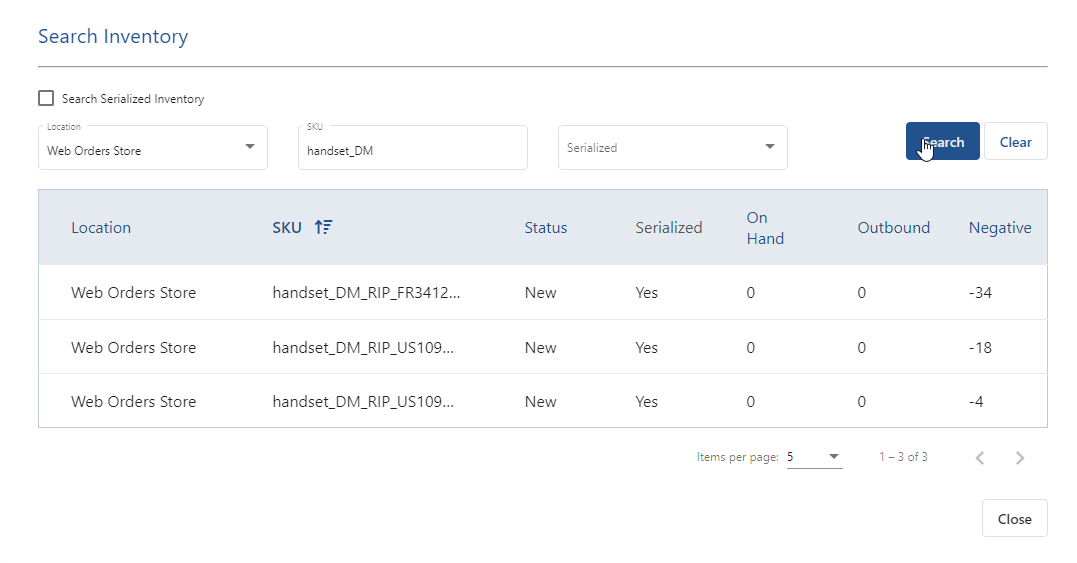
Some columns let you sort the list. You can see which columns support sorting by hovering over the column name. If the mouse changes to a pointing hand symbol, the column name is clickable and it supports sorting.

The Search Serialized Inventory check box lets you set up the grid specifically for this purpose. It provides several columns specific to serialized items.

Staging Retail Products for Fulfillment
Using For Fulfillment lets you add both serialized and non-serialized retail products to your transaction when they are not physically on-hand during assembly. This functionality lets you build the transaction, and then either edit the line item to fulfill them before tendering and finalizing, or tender and finalize now and fulfill it later (depending on your business process).
The Add Item Search for retail products has an Available Items indicator that shows quantity available by sellable inventory status.

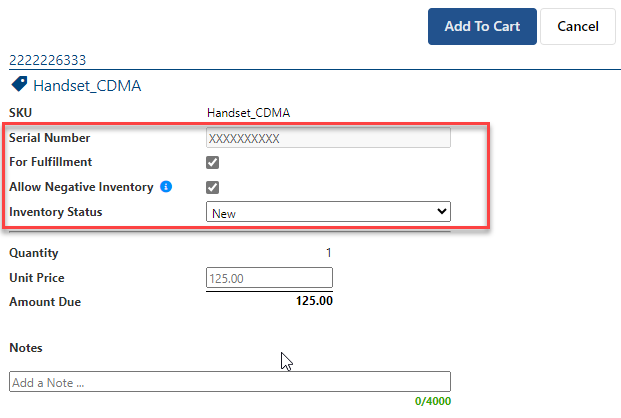
The process for marking a retail product For Fulfillment is similar for both serialized and non-serialized products except there is no field for serial number for non-serialized products. Adding a serialized product is shown below.
You can enable Allow Negative Inventory to allow the sale of a retail product when its available-for-sale quantity is less than or equal to zero. The setting in the Orders web module works in tandem with the equivalent setting for retail products in the IDI Desktop Client Product Catalog. The following rules apply:
- Negative inventory is allowed if:
- The setting is checked in the Orders web module, regardless of the Product Catalog setting.
- The setting is not checked in the Orders web module, but it is checked in the Product Catalog.
- Negative inventory is not allowed if this setting is disabled in both locations. Note: The Allow Negative Inventory checkbox is automatically checked when you check For Fulfillment. You can uncheck Allow Negative Inventory in Orders when it is automatically checked; however, the impact of unchecking in this case will also depend on the client setting as previously described.
Note: When you mark a serialized product for fulfillment, a temporary serial number is entered. This is needed in order to continue staging serialized products. The serial number field is disabled (not edible) at this point.
There is also a drop-down menu for selecting an applicable Inventory Status. The drop-down menu is populated with inventory statuses allowed for sale as configured in IDI Desktop Client POS Back Office Setup.
For items marked for fulfillment, before you add the item to the transaction, you must also link the item to a shipping address. To do this:
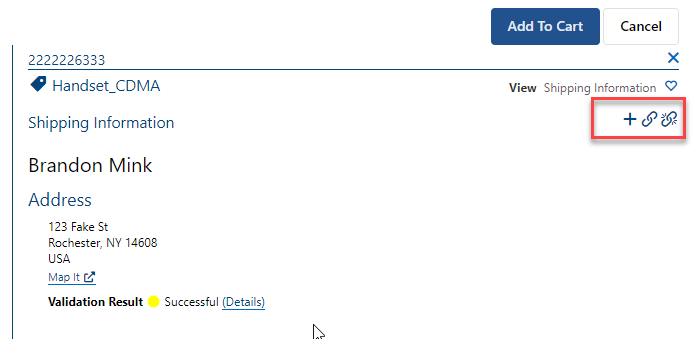
- Select Shipping information from the View menu. For items that do not yet have shipping information specified, this view lets you know shipping information is lacking and provides icons to select an existing shipping contact or add a new shipping contact to use.

- To add a new shipping contact, click the Add option (+). This opens Customer Care in a separate browser window to the page where you manage contacts. Note: In this scenario, the only option is to add a shipping contact.
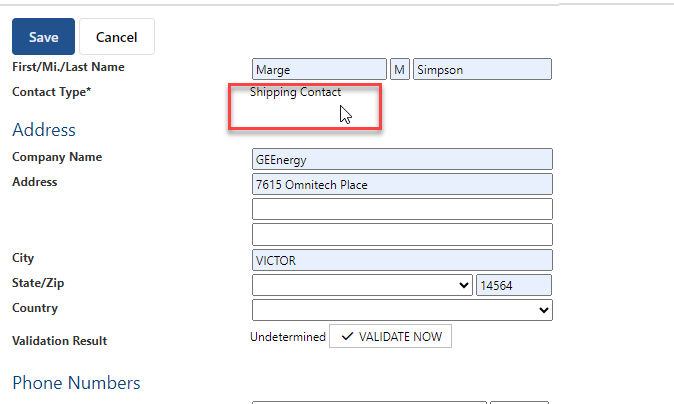
On saving the new shipping contact you’ll return to the order where the shipping contact information will be displayed on the Shipping Information tab. Once a shipping contact has been selected, there will be a third icon that lets you remove the link if necessary.

- To use an existing shipping contact, click the paperclip icon.

This displays a dialog for choosing an existing contact.

Once added, the dialog provides a third icon that lets you remove the link for the current item.
- At this point you can add the item to the transaction.
Note: If you attempt to add an item for fulfillment without linking a shipping address you will not be permitted to add it and you’ll be prompted to link a shipping address.
Viewing Fulfillment Status
After an item marked as for fulfillment is added to the transaction, several transaction views provide an indication of fulfillment status.
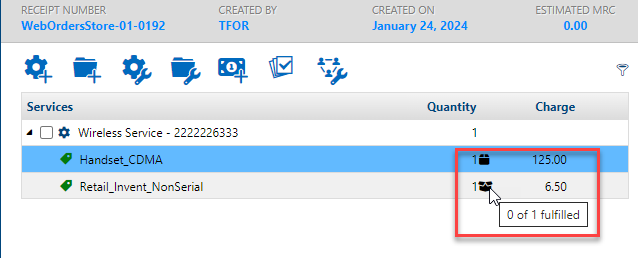
- After adding an item marked for fulfillment, in the left panel, the item’s Quantity column will have a box icon (open box for not fulfilled or closed box for fulfilled). Hovering over the icon indicates how many items have been fulfilled and how many need to be fulfilled.
- When you click Review to proceed from Details to the Summary view, the RETAIL tab provides a transaction-level indication of fulfillment status for all retail items on the transaction. Cautionary text indicates when some items have not been completely fulfilled. There’s also an indication how many items have been fulfilled and how many need to be fulfilled (below shows 1 of 2 items have been fulfilled).

Clicking the link returns you to the Details view where you can fulfill unfulfilled items if needed.
Fulfilling Retail Products
This requires you to select the product in the services and features list in the Details view (left panel) and then edit the staging details in the right panel.
- For serial items, fulfillment requires you to provide the serial number. This field is enabled (editable) when you come back to this view after adding the item.
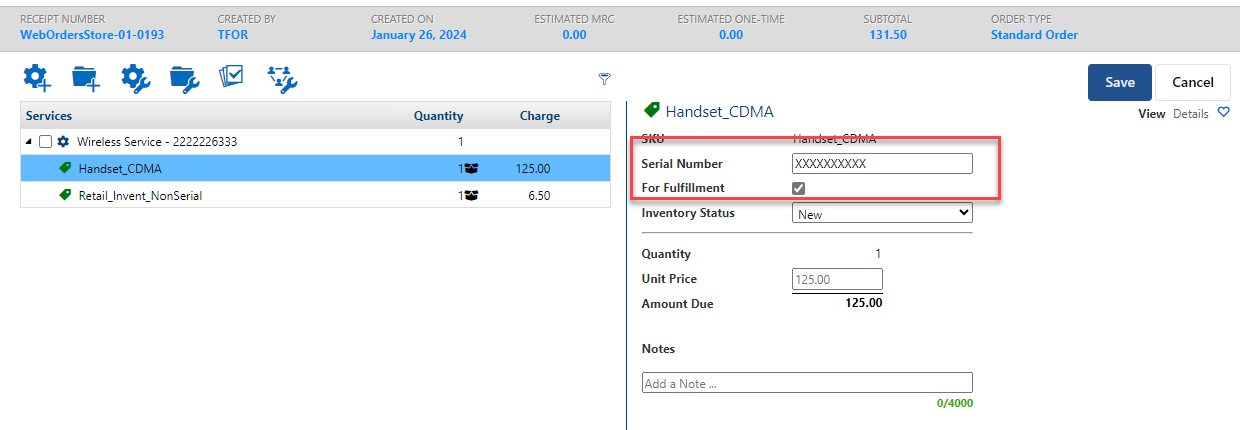
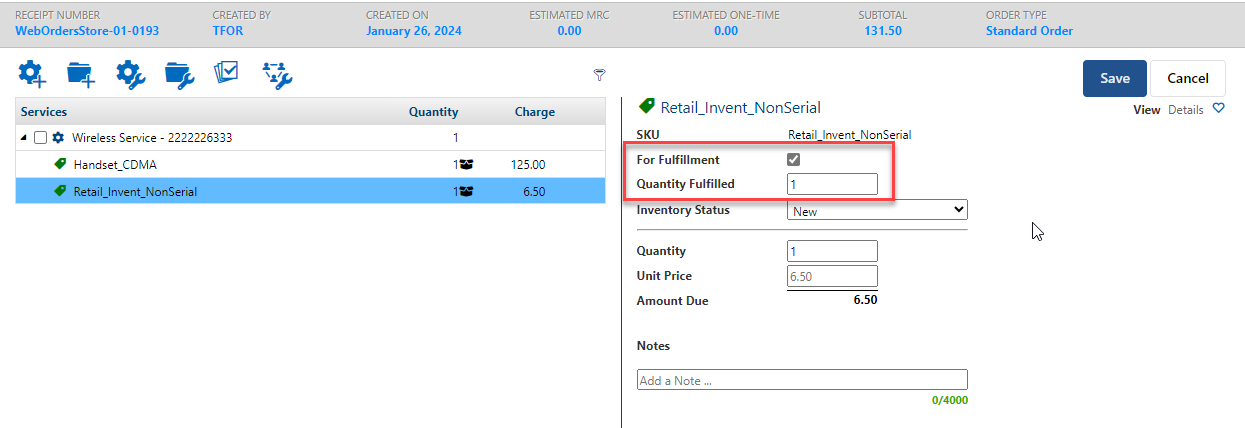
- For non-serialized items, the re-staging dialog provides an additional Quantity Fulfilled field. This value cannot exceed the original quantity value of the line item.
Service/Installment Agreements
This lets you add and manage service/installment agreements on web order/sales transactions. When a contract with an agreement is added to a transaction, associates can:
- See that one or more service/installment agreements are present on the transaction, and be alerted when action is required (skip, sign, or verbal acknowledgement).
- Capture signatures or initials when required without a client-based peripheral.
- View and email completed agreement documents during order assembly.
- Access agreements within the Document Storage web module.
Notes:
- For contracts with service agreements, this only applies when the contract is added at the service-level. Installment agreements can be added at the service- or account-level.
- The following sections take you through the steps for managing service/installment agreements on a transaction. The steps may vary slightly depending upon starting block configuration.
The scenario described here is based on using a starting block configured to start a sale transaction which includes the Summary page. This page is not included in transactions where the starting block is configured to start as an order. The underlying functionality for managing agreements is the same. The only difference is where in the process you see this functionality. This scenario also uses a starting block set up with a register/location and support for emailing transaction documents.
Indicating the Presence of a Service/Installment Agreement
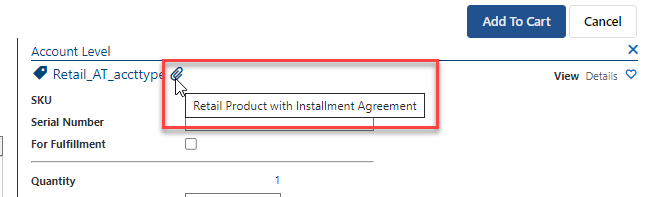
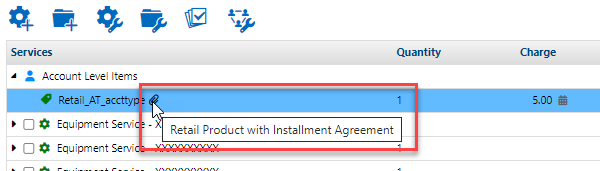
When you add one or more contracts with service or installment agreements to a transaction, those contracts are marked with a paper clip with hover text in three places during transaction assembly:
- On adding the contract or serialized retail product – the hover text indicates the item has a contract or retail product with an agreement.

- By expanding Account Level or Service Level Items in the transaction details (left) panel.

- By viewing the contract/installment plan details in the right panel.


Indicating Action Required for an Agreement
If the transaction has one or more contracts with service/installment agreements and uses a starting block set up for a cart/sale, clicking Review takes you to the Summary page where you can manage the agreements. It lets you know there are agreements that require action before you complete the transaction. It shows you the total number of agreements and the number of agreements where the required action has been completed. For example, below the transaction has five agreements and none have been completed (0/5). It also provides an Actions button to proceed to the steps for completing the agreements. Note: The section formerly labeled as Cart Summary is now labeled Retail Summary. This is where any retail items will be listed.
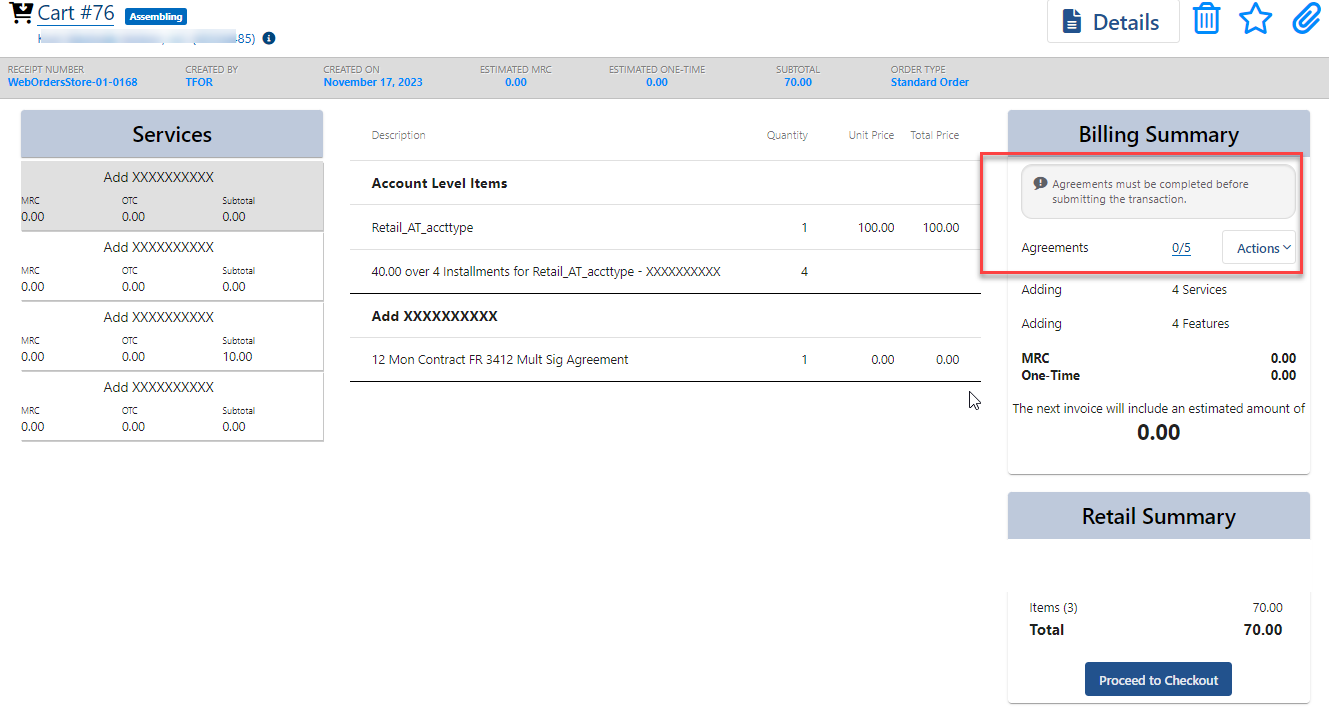
For cart/sale transactions with this Summary page you can choose to deal with the agreements here or defer until after you proceed to checkout. This scenario shows deferring managing agreements until after checkout. On clicking Proceed to Checkout, the tendering page provides another opportunity to manage agreements. Note: From this point, functionality for managing agreements is essentially the same for cart/sale or order transactions.
On this page, if the starting block is set up with a register, the tab formerly labeled as SUMMARY is now split into two tabs: BILLING and RETAIL. The RETAIL tab lists all retail items included in the transaction (if present) and a total cost. The BILLING tab provides a list of the actions being taken on the transaction (Adding, Updating, Disconnecting, etc), MRC and One-Time charges, estimated amount to be included in the next invoice. And the BILLING tab has the same functionality related to agreements as the previous (Summary) page. Note: If the starting block is not set up with a register, the BILLING tab simply replaces the SUMMARY tab.
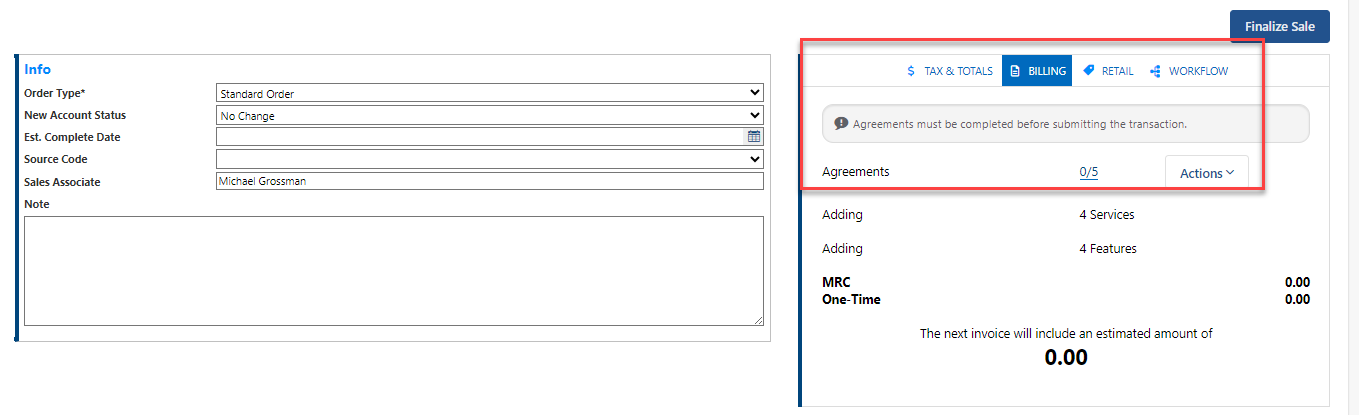
If you leave the BILLING tab without completing all agreements, the red dot will warn you that you MUST return to the BILLING tab to complete those agreements.

Managing Agreements
The Actions drop-down menu provides an option to complete the agreement(s). Note: Options for emailing and viewing documents may also be available at this time, depending on the transaction content. In this case, the email and view options are available but only apply to the network receipt on the transaction by virtue of the retail products included in the transaction. Email and view only apply to contract service agreements once they’re completed, and their respective documents have been generated. Also, the email option is only available if the starting block is set up to permit emailing.
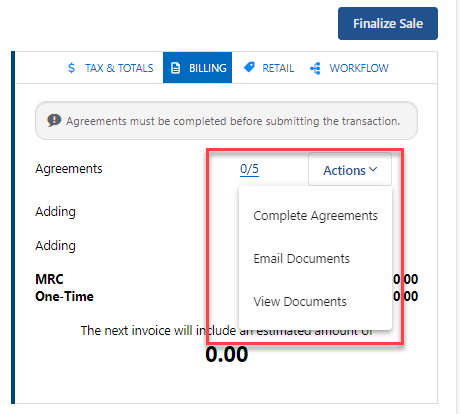
Completing Agreements
Choosing Complete Agreements displays a page that lists all agreements on the transaction. The Status column in each row shows you whether the associated agreement’s action has been addressed (Complete) or not (Incomplete). The Action column provides a drop-down menu for selecting an action. You can also use the Select action for all drop-down menu to select the same action for all agreements and then make adjustments to individual agreements as needed. Note: The Skip and Verbal options below can be restricted through order field configuration. See Setup.
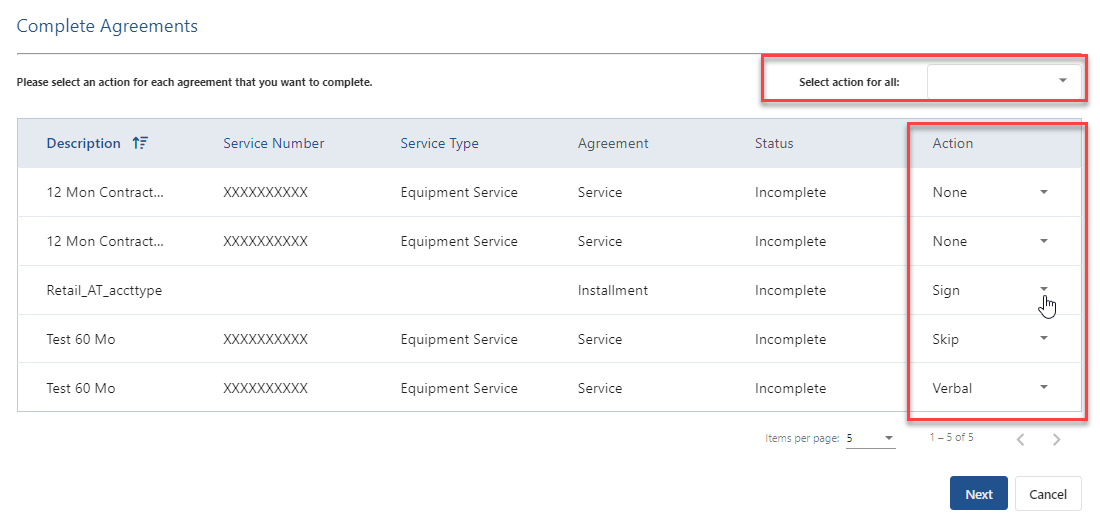
- None – Take no action. This lets you address some agreements at this time and defer others until later. For example, you can capture signatures on one agreement, email to the customer for review, and then pause the transaction to wait for a response from the customer. The agreement status will remain incomplete, and you will not be permitted to complete the transaction until the other agreements have been addressed.
- Sign – Capture required signatures (per the agreement’s design).
- Skip – Complete agreement without signatures or verbal acknowledgement.
- Verbal – Read terms to the customer and get verbal acknowledgement.
Note: If the transaction has multiple instances of the same agreement with the Sign option selected, they would normally be grouped together in the subsequent signing dialog and be signed in bulk; however, you can use the check box below the listed agreements to sign each agreement individually. This check box is only available when you choose to sign two or more agreements that are the same.
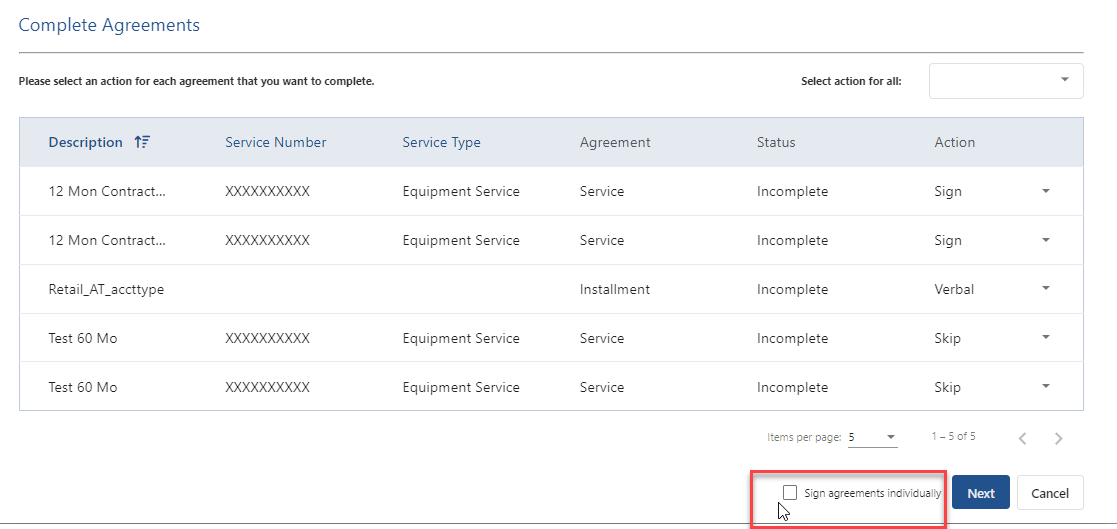
Clicking Next starts the dialog for completing agreements. It lists required steps per the action you selected for each agreement. Below shows four steps are required.
- If you choose to skip one or more agreements, the first step shows you those agreements. Clicking Agree and Continue skips all the listed agreements.

- If you choose the Verbal option for one or more agreements, you’ll be presented with the terms and conditions to read to the customer. Click Agree and Continue to confirm the terms have been read and agreed to by the customer. Note: If there are multiple instances of the same agreement on the order, they are grouped and verbally acknowledged together, so each Agree and Continue step will bulk acknowledge all agreements that are the same.
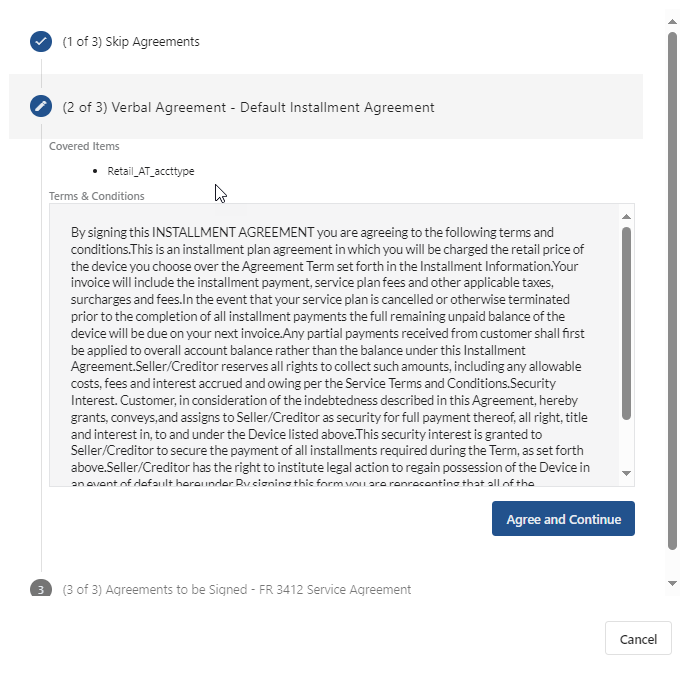
- If you choose to sign one or more agreements, you’ll be presented with a dialog that will require you to initial and/or sign off on terms as dictated by the agreement. Click inside the respective boxes and use the cursor to initial or sign. You can clear a box if you’re not satisfied with the signature. Note: Below shows two instances of the agreement FR 3412 Service Agreement being signed in one step (not individually).
The Agree and Continue button transitions to Agree and Finish once you finished all required steps and successfully completed all agreements.

Below the indicator for number of agreements/agreements completed shows 5 of 5 agreements completed. On completing one or more agreements, the view and email options in the Actions menu will apply to all completed agreements as well as transaction receipt (if applicable). Note: The email option is only available if the starting block is set up to permit emailing.

Viewing Documents
The View Documents option lets you view agreement documents and the transaction receipt (when applicable). Note: Agreements must be completed before they’re available to be viewed. This option will not be available if the transaction has no completed agreements or a receipt.
Use the dialog to select which agreements to view and whether to include the transaction receipt when applicable. Only completed agreements are listed. Options below the agreements list facilitate selecting/unselecting all agreement documents.
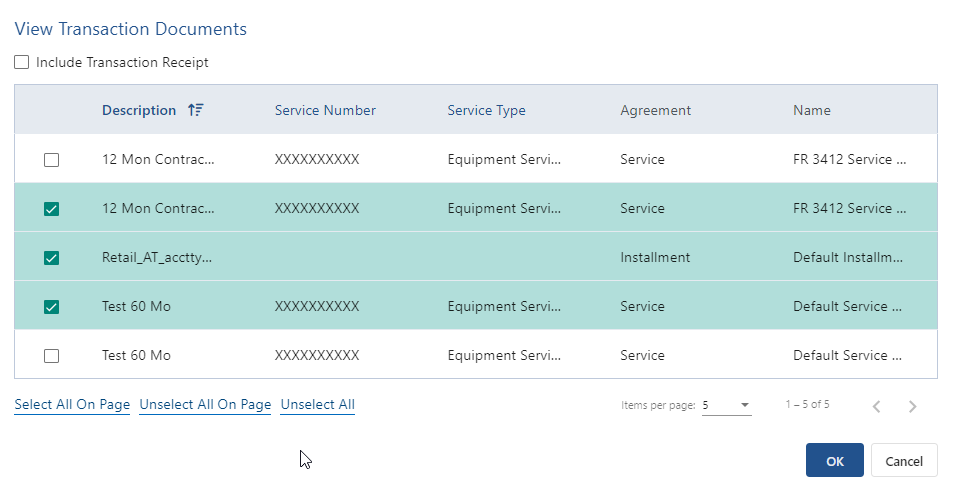
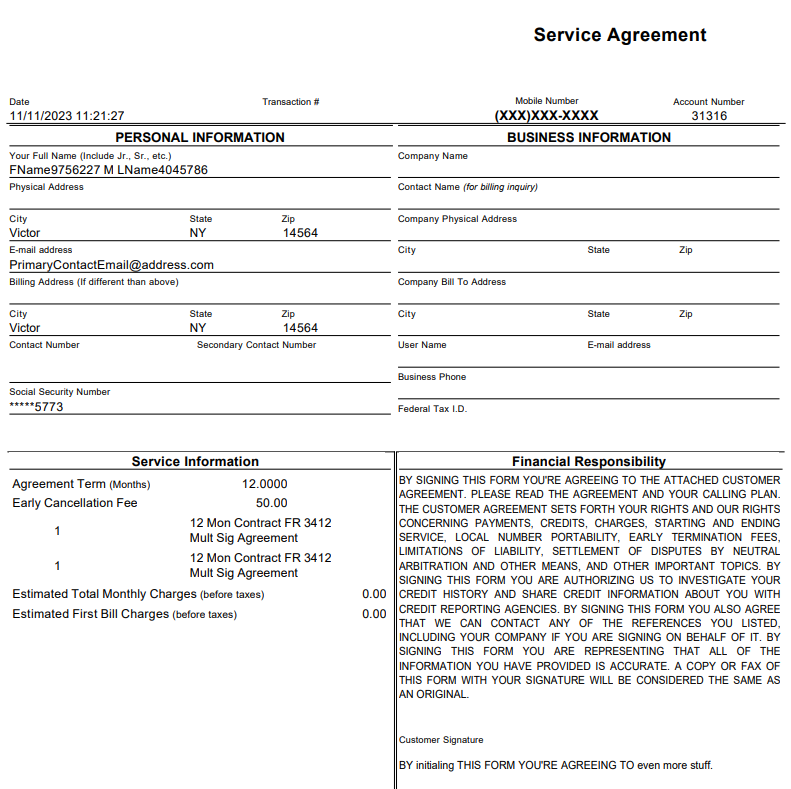
Clicking OK presents each selected document (and receipt if applicable) on a separate tab.
Emailing Agreements
The Email Documents option is available when the starting block is set up to support emailing agreement documents and transaction receipt (when applicable). It displays a dialog for selecting which documents to email. Note: Only completed documents are listed. Options below the agreements list facilitate selecting/unselecting all documents.

Clicking Email displays a dialog for specifying the destination email address.

Note: If the starting block is set up to Prompt for Email Upon Submit, the Email Transaction Documents page will be displayed if you attempt to submit the transaction without emailing completed documents.
Credit Checking
This is supported for transactions initiated by a starting block set up to perform credit evaluations. Also, manually adding deposits is supported when the starting block is set up for this. For details on credit checking and manual deposits, refer to the Credit Evaluations article in the IDI Knowledge Center.
Tendering Bill Payments
You can use a starting block configured for this purpose or choose to tender a bill payment in the assembly phase of an eligible transaction. Access to tendering bill payments is restricted by the Bill Payment permission in Security.
Using a Tender Bill Payment Starting Block
When initiated from Customer Care, the account is provided. When initiated from Orders, use the New Transaction page to select an account. Once the customer is specified, the New Transaction page displays the following account details related to bill payment for the selected account:
- Account Number
- Account Status
- Billing Status
- Total Amount Due
- Days Past Due
- Aging Group
- Account Balance Information, including a breakdown of aged balances.
Enter the amount to be tendered. A description can be entered on an optional basis.

Saving the bill payment information skips the details page and takes you directly to the Summary page, if the starting block’s Skip Transaction Details Page option is selected. Notes:
- This is selected by default on the system-provided (seed) Bill Payment starting block, and when you create a new starting block and select Bill Payment as the starting action.
- You can configure a starting block with starting = Bill Payment that DOES NOT skip the transaction details page, if so desired.

On proceeding to checkout, the finalize page is displayed. From here, you can either finalize the bill payment as is or add more tendering specifications (+NEW).

Tendering a Bill Payment from an Eligible Transaction
During order assembly, the Details page provides a new button for adding a bill payment to an eligible transaction.
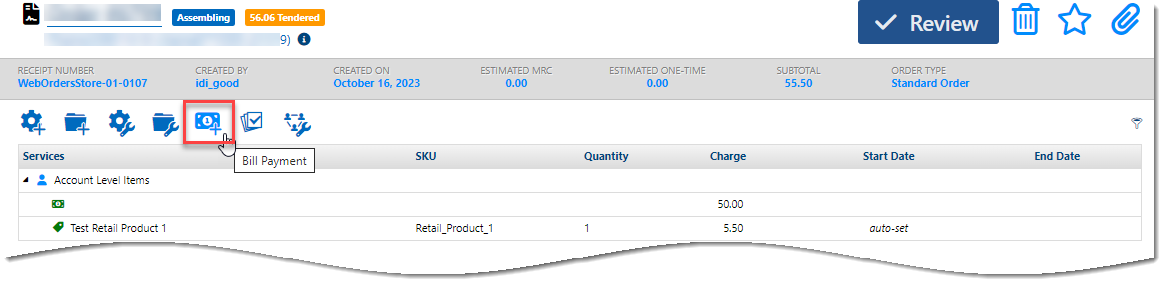
Clicking this button displays bill payment details for the account in the right side assembly pane.

Returns
Returns can be initiated using a starting block configured for this purpose, or during assembly phase of an existing transaction. In either case:
- You’ll be required to provide a Return Reason and Inventory Status. These can be predefined on the starting block or provided on the New Transaction Basic Information page.
- When selected items are added to the order, the details pane shows amount to be refunded
Access to return item functionality is restricted by the Return Item permission in Security. Note: Paymentus supports returning items tendered through Paymentus. An example is provided following this general return walk-through.
Using a Return Item Starting Block
Selecting a starting block with the Return Item starting action displays the New Transaction page. When initiated from Customer Care, the account is provided. When initiated from Orders, use the New Transaction page to select an account. Once the customer is specified, the New Transaction page displays a Return Items section below the Basic Information.
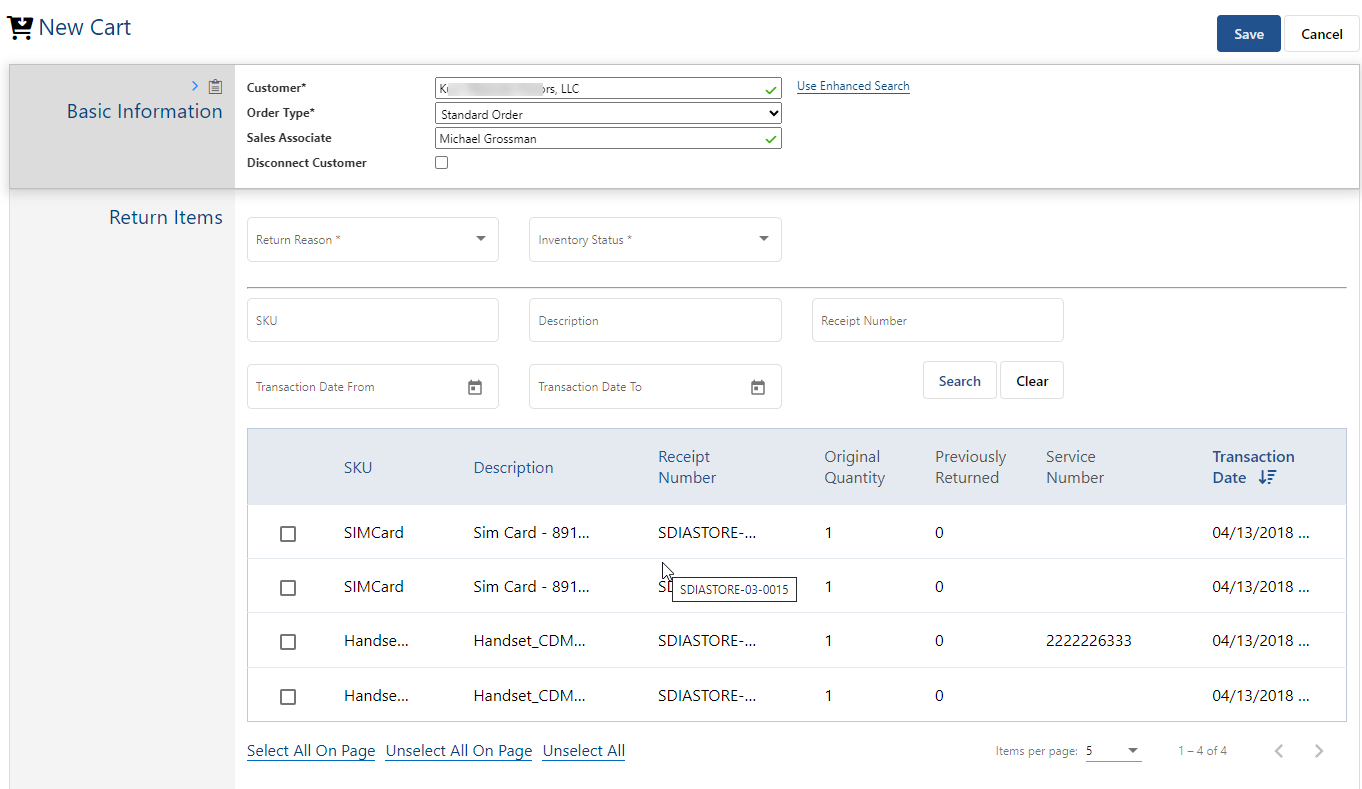
All returnable retail items on the account are available for selection. Items are configured as returnable (or not) in IDI Desktop Client Product Catalog.
- The list includes already returned items. This status is indicated in the Previously Returned column. However, these items cannot be selected.
- You can select items whose return window has expired (with override permission).
The following is indicated for each item:
- SKU & Description
- Receipt Number
- Original Quantity
- How many have previously been returned
- Service where the item was added (if applicable)
- Transaction date (when the item was added)
You can use the search section to present a tailored list of returnable items based on the specified search criteria. The following search criteria are supported:
- Date the Transaction was finalized/submitted (and/or completed)
- Receipt Number
- Product Catalog Item’s SKU
- Product Catalog Item’s Description
Select the item or items to be returned and provide the Return Reason and Inventory Status.
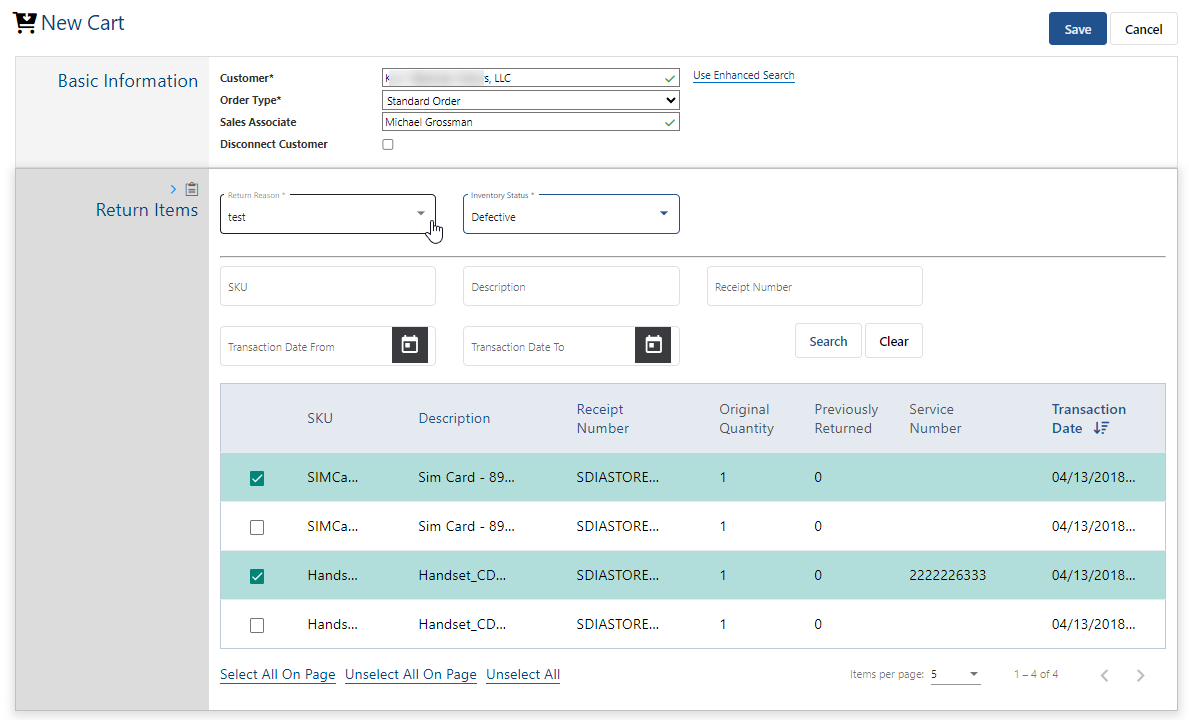
Items selected for return are evaluated against the register policy rules for returns based on the transaction’s location (either the location the user is assigned to or the location configured on the starting block). If any items violate a rule, those items (exceptions) are presented in a dialog with options to override the register policy. Typically, these options are available to any user authorized to return items. You can restrict the ability to use these options on a user group basis through Order Field Configuration. When restricted, the options are visible to all users; however, they’re disabled for users in the specified group(s).
The example below shows a case where the location’s register policy does not permit returns that exceed a specified number of days. The dialog lists the exceptions found and lets you choose to allow a manager to override the policy and return the items with a refund, return the items with no refund, or continue the order but not include the exception items.
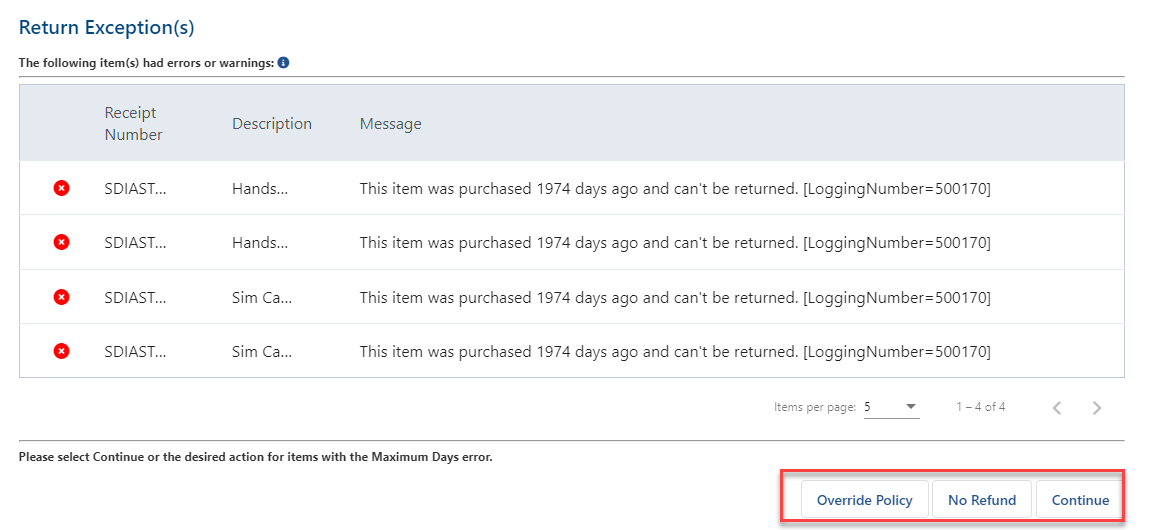
After handling exceptions (if any) and saving your selections, the order proceeds through the Detail, Summary and Submit Order pages. At each step you can review the items to be returned and their respective charges.
The Details page lets you edit and/or remove items. Note: Additional Allowed Actions can be selected at this point as applicable per the starting block configuration.

The Summary also shows a breakdown of items and respective charges.
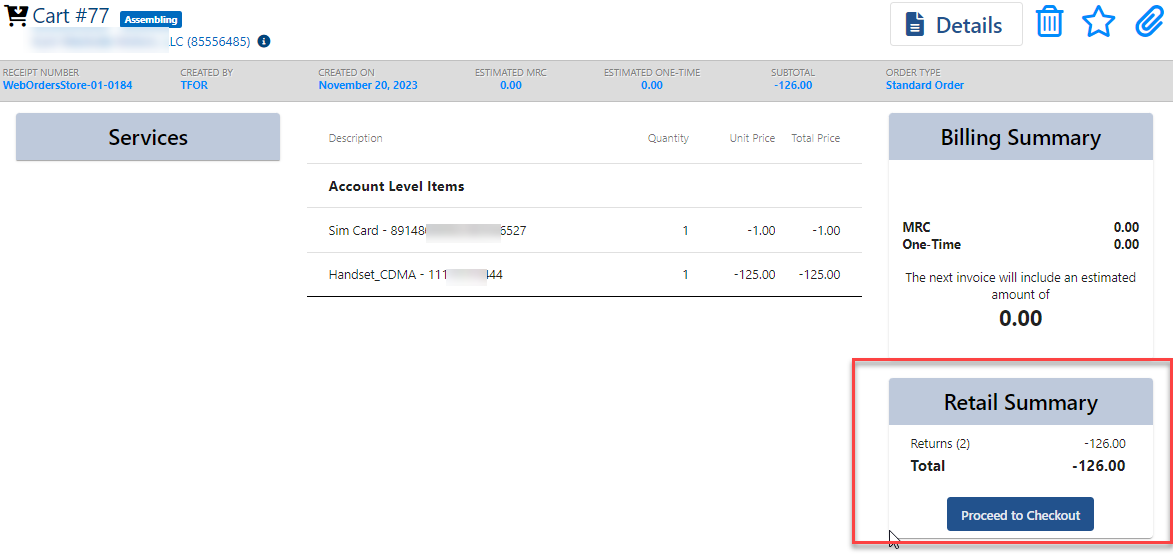
On proceeding to checkout, the finalize page is displayed. From here, you can either finalize the return as is or add more tendering specifications (+NEW). You can also generate a receipt or direct invoice; however, email functions are not supported.
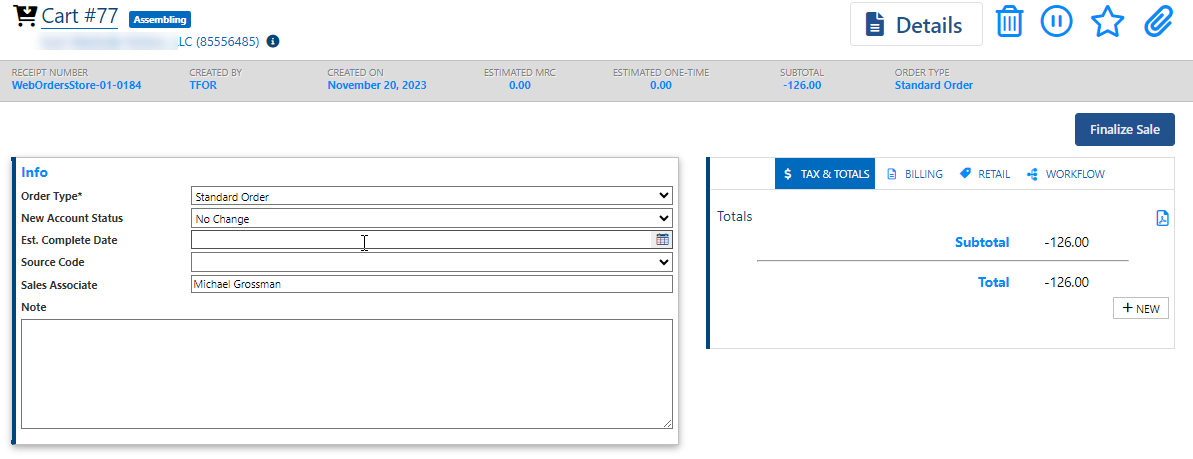
Paymentus Return Example
This shows a return of an item partially tendered through Paymentus where the refund totals $15.00 and requires two tenders – one to cover a transaction paid with cash, and one to cover a $10.00 charge tendered through Paymentus.
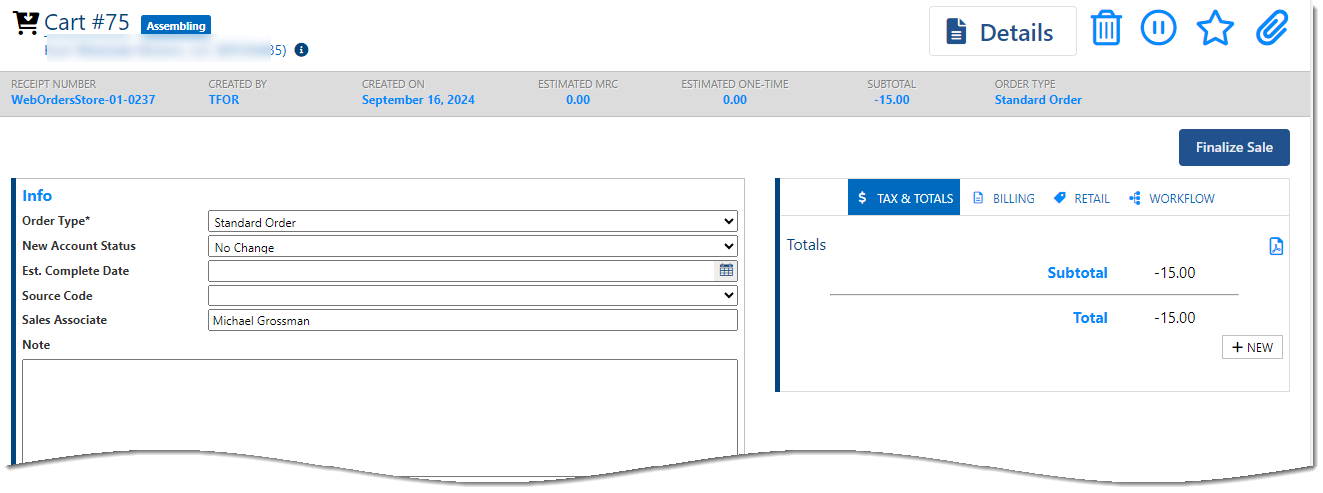
Click + New to add a tender. Click Add to add the Cash tender. Below shows adding a Cash tender with the amount adjusted down to $5.00 to reflect the charge for the item that was paid for with cash.

Then click +New again to add a Paymentus tender type for the refund due on other transaction. When you select the Paymentus tender type, the Payment Method selector provides just one option: Refund Tenders From a Previous Transaction. Note that the amount reflects the remaining amount to be refunded for this return ($10.00).
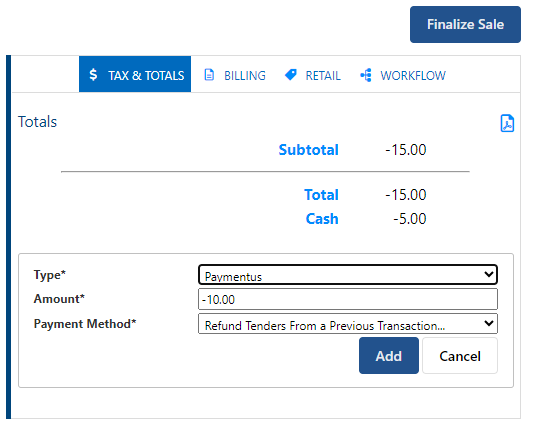
Clicking Add here displays a form listing the Paymentus tenders for the items you chose to return. You’ll see a row for each payment method and/or receipt. Each row shows the transaction’s receipt number, date, the Paymentus account (or device), and the total amount tendered for the payment method or receipt. This may or may not reflect the amount being refunded, depending on the items you chose to return.

Note: If there are multiple rows listed (not the case above) you are only permitted to select one so the full refund must be processed in one tender. Select the row and then click Refund. This displays a form indicating amount to be refunded for this tender. Note: The form also presents a warning indicating the refund amount will be final if you continue by clicking Submit. This is because the IDI platform is communicating with Paymentus in real time. This differs from non-Paymentus returns where the return is not finalized until you finalize the transaction.
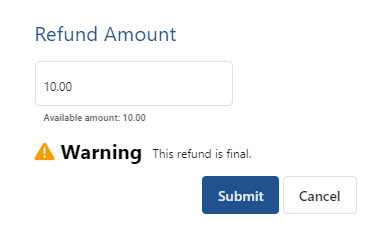
After clicking Submit, you’ll see both the cash and Paymentus tenders.
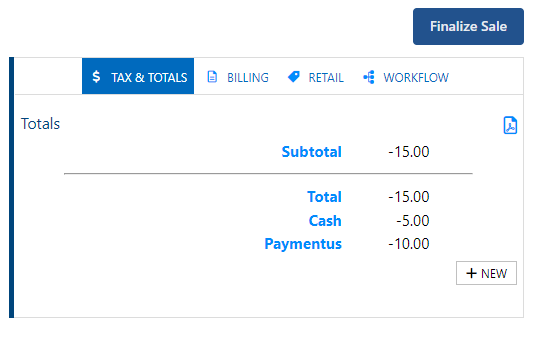
On finalizing you’ll see a summary of the return transaction.

Using Modify Item to Return an Item During Assembly
In the assembly phase of a transaction that was not necessarily initiated as a return, when you click the Modify Item icon, the Action drop-down menu provides a new Return action if a location and register have been specified.

Selecting the Return action begins the process to search for and select available items to be returned. It displays the return items grid, from which point you proceed as previously described.

Void Transaction
Voids can only be performed for unreconciled transactions where a POS register was applied. Also, access to voids is restricted by the Void Transaction permission in Security. The following provides general guidelines. Refer to the section on using Paymentus for specifics when using that payment vendor. Note: Paymentus supports voiding a transaction that was tendered using Paymentus.
Selecting a starting block configured to begin a void displays the New Transaction page. A Void Transaction grid is displayed below the Basic Information upon specifying a customer. This grid lists the transactions eligible for voiding with the following information:
- Store Location Name
- Register Name
- Transaction Type
- Transaction State
- Entered by (user)
- Sales Associate/Sales Channel

You can use the search section to display specific list based on the search criteria you enter: transaction date (submitted from-to range) and/or receipt number.
Select one or more transactions to void. On saving your selections, the order proceeds through the Detail, Summary and Submit Order pages. At each step you can review the items to be canceled and their respective charges.
The Detail shows the items and respective charges taken on the transaction to be voided. Note: You cannot edit or remove items from here.
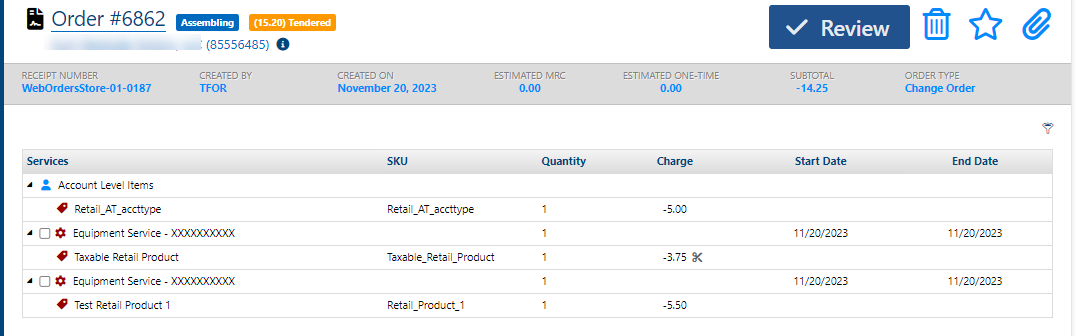
The Summary also shows a breakdown of items and respective charges.

Submit provides a final review opportunity before submitting the order. It does not prompt for adding tenders as this is not needed. You can generate a receipt or direct invoice; however, email functions are not supported.
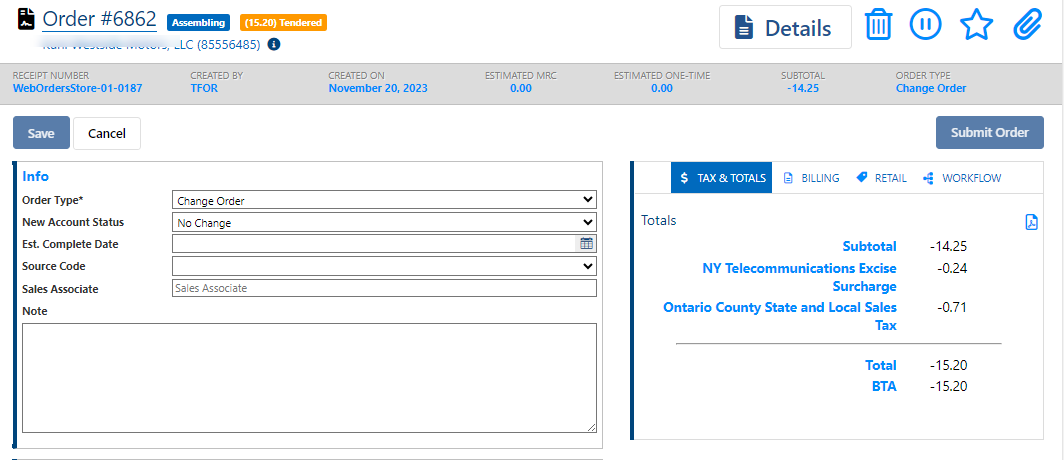
Register Management
In Orders, select LOCATION > My Registers to display the My Registers view.
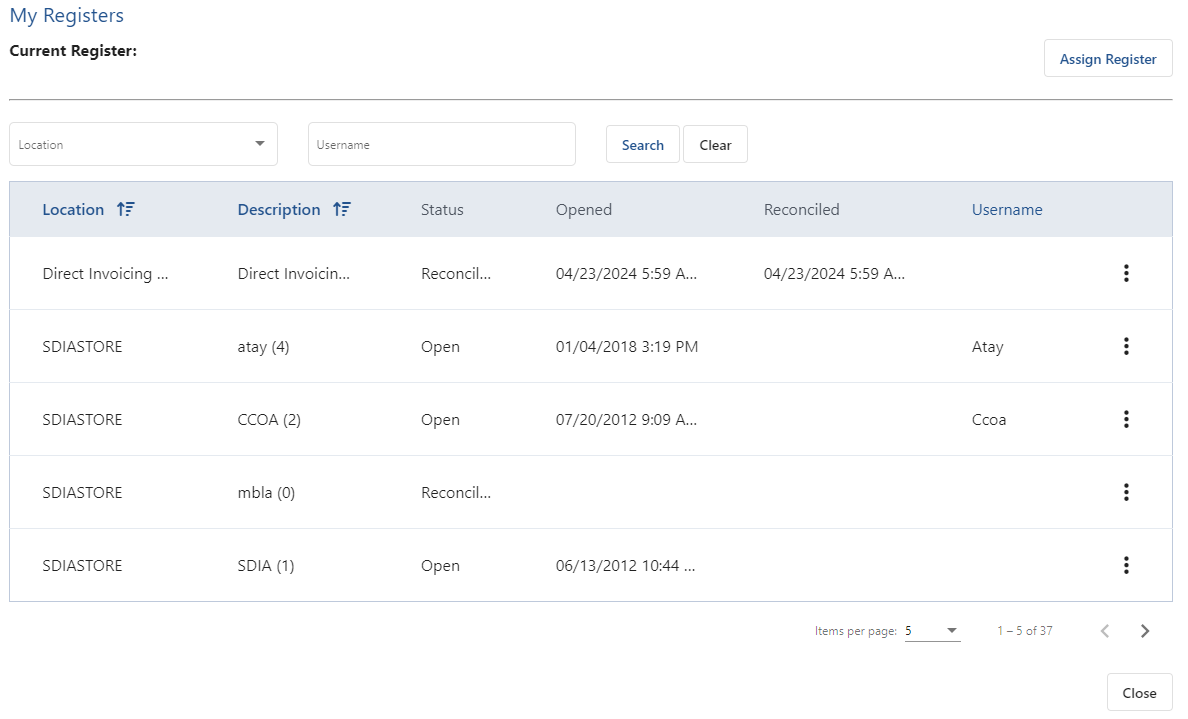
The list of registers shown is based on whether you have Manage Registers permission. If you have this permission, you can see all registers in all Locations where you are assigned as a User (based on Locations configuration in IDI Desktop Client POS Back Office). Without this permission you can only see registers that match your Username.
You can filter the list to show only registers for a specific Location by selecting one from the drop-down menu, and/or by Username by making an entry in that field and then clicking Search. You can also sort the list on Location or Description by clicking the respective column headers.
The kebob (vertical dots) in each row provides access to register functions based on the register’s status and other permissions, settings, and conditions as indicated below.
| Option | Status | Other Permissions/Settings/Conditions |
| Edit Register – Edit Username and/or Machine Name. | Open, Reconciled | Manage Registers permission. |
| View Tender Summary – View current amount for each tender type. | Open, Reconciled |
Always available with Manage Registers permission.
Without this permission, availability depends on the Register Policy Show Current Amounts setting. |
| Set Current Register – Make yourself the current user. | Open, Reconciled |
Available on any register that matches your Username. |
| Reconcile – Reconcile expected and actual tender totals. | Open | Available for all users. Manage Registers permission or Show System Totals setting in Register Policy is required to see expected totals, and over/short amounts. |
| View Reconcile Summary | Reconciled | Available when the reconcile result for the register was saved for later rather than submitted. Manage Registers permission or Show System Totals setting in Register Policy is required to see expected totals, and over/short amounts. |
| Float – Float an initial cash amount to open the register. | Reconciled | No other permissions, settings or conditions apply. |
Example:

Making Yourself the Current User on a Register
You must be the current user on a register to use it for transactions that require a register. The Current Register field indicates the register (if any) where you are the current user. Note: You can have multiple registers with your username at the same time; however, you can only be the current user on one register at a time, and a register can only have one current user at a time.
There are two ways to make yourself the current user on a register:
- Use the Set Current Register option in the register’s kebob menu. This option is available on any register that matches your Username
- Or click the Assign Register button.
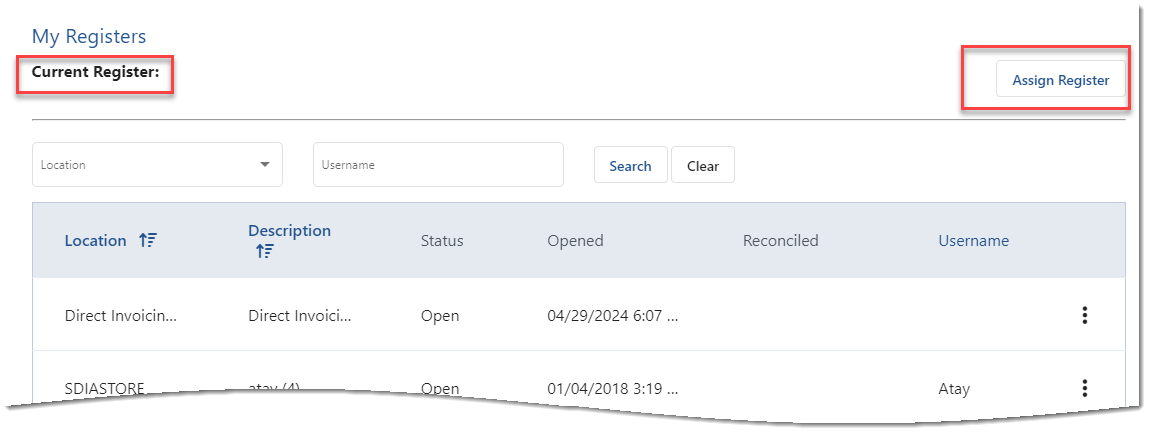
Assign Register Dialog
The Assign Register dialog lets you select a location where you are an authorized user, and then select an available register in that location. Note: The registers presented in the selector depend on the Enforce Register Management setting:
- When disabled, all registers you are authorized for will be presented.
- When enabled, only registers that match your Username or have no Username and Machine Name are presented. Note: Managers can use the Edit Registers dialog to clear a register’s Username and Machine Name to make it available in the selector.

On selecting a register, you’ll see that register in the Current Register field. You can use the Clear link to remove yourself as the current user.
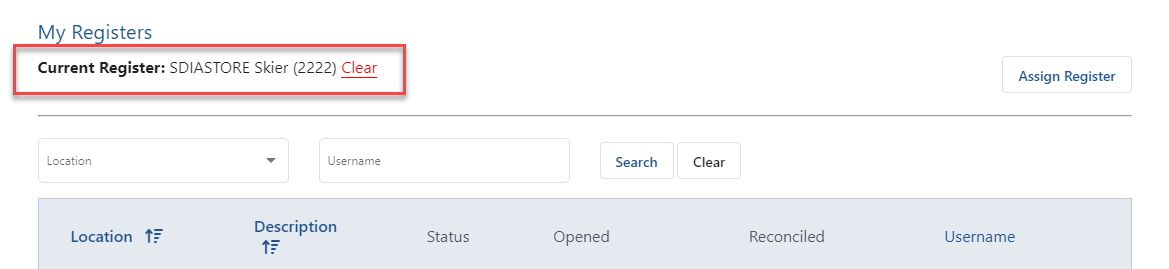
Edit Register
Users with Manage Register permission can use the Edit Register option in a register’s kebob menu to remove the current user and make it available for a different user.
- To make it exclusively available for a specific user, clear the Username and Machine Name fields, and enter the new Username. Leave the Machine Name blank. An example use case would be if a manager wants to reserve a certain register for a new trainee coming in later that day, they would put the trainee’s username on it so no other employees would see that register as available and thus could not be assigned without manager intervention.
- To make the register available for any authorized user, simply clear the Username and Machine Name.

Note: When a user makes a register their current register, the Machine Name will be set to Web Browser, which is a generic Machine Name that works for all web users. If the field shows an actual Machine Name as set in IDI Desktop Client Back Office Management > Locations, and Enforce Register Management is enabled, the actual Machine Name must be cleared before you make the register available for a different user.
Opening a Register at the Start of a Shift or Day
At the start of a business day or shift you open the register by floating an initial amount of cash. The system will not let you perform any other register-related transactions without first performing a float. Note: The Auto Float Register Policy setting lets you set up your system to automatically perform floats; however, you can still perform manual floats as needed using the kebab menu option for any register with a status of Reconciled.
To open a register for business:
- Choose a register where Status = Reconciled (or not already Open).
- Choose Float from the kebob menu to initiate a Float transaction.
- Select a reason as configured in POS Back Office > Setup > Transaction Reasons. This may also default to a reason set via Order Field Configuration.
- Confirm the amount to float. This defaults to the amount specified by the Register Policy. You can adjust the amount if necessary.
- As an option, you can enter a Note and/or choose to view a receipt for the float transaction.
- Click Submit. Once the float transaction is completed and the float is confirmed, the register status changes to Open and the register is ready for business.

Viewing Tender Amounts
The View Tender Summary kebob option displays the amount of each tender type taken on this register since the last reconcile. This option is always available for users with Manage Registers permission and is available for other users when Show System Totals is enabled in the Register Policy. Note: Only Tender Types that have a non-zero (0) amount will display. If no tenders taken on the register since the last reconciliation, the dialog will be empty.

Reconciling a Register
At the end of a business day or shift, or as needed, the Reconcile function lets you compare actual tender amounts in the register with expected amounts as entered through register transactions. This involves counting the actual amounts for each tender type and entering those amounts in the Reconcile dialog. The counted amounts you enter are compared with the expected amounts, taking into account the starting (float) amount, and all sales and return transactions. The dialog presents you with counted, expected, and over/short amounts for each tender type as well as the respective totals. Note: The same conditions that govern showing current tender amounts (above) apply here for expected totals and over/short amounts. This lets you hide these amounts from sales associates to prevent them from adjusting counted amounts to match expected amounts. In this case, expected amounts are masked (******) and over/short is indicated as Exact, Within Variance, or Outside Variance rather than as actual amounts.
Note: You can also use the Register Policy to specify:
- whether to require exact amounts or allow reconciliation to be completed when overages or shortages are within the specified variance.
- the allowed variance for overage and shortage if variance is allowed.
- force daily reconcile transactions. Whether you force or not, you can always perform a manual reconciliation as needed.
- Auto-reconcile via a scheduled job. This is used by locations that take no physical form of payment.
To reconcile a register:
- Choose Reconcile from the kebob menu. This displays the Reconcile dialog.
The tender types that need to be entered are listed on the left as numbered steps. Note: The tender types listed here depend on Register Policy setup for the location. On the Register Policy Tender tab you can specify whether to Require Count for each accepted tender type. Totals, shown on the right side, are automatically entered and listed for tender types that do not require a count. These totals cannot be edited. Below shows totals auto-entered for BTA, Coupon, Gift Card, and Gift Certificate.

- Enter a total for each tender type listed and then click Next to proceed to the next one.

For the Cash tender type, as an option you can choose to enter totals by individual bill and coin values. To do this click Show Bills and Coins to display this alternate view. As you enter amounts in the respective fields you’ll see the amount reflected in the Cash field and on the right side total for Cash.
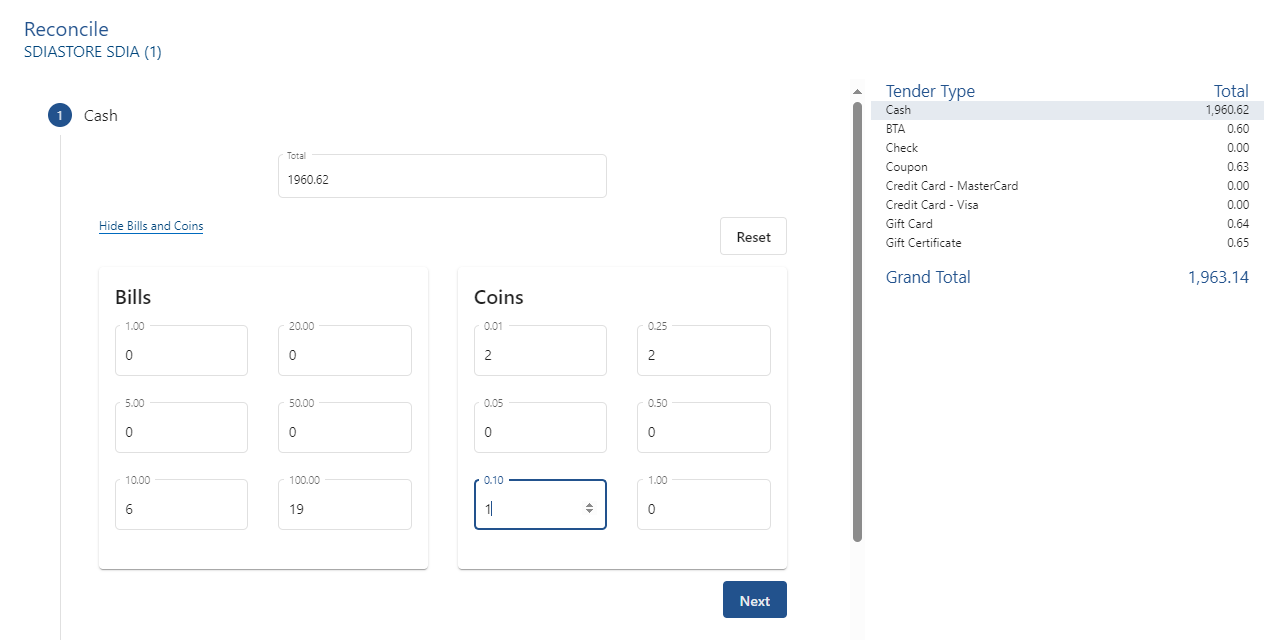
When you’re done, clicking Next returns you to the original reconcile dialog with the cash amount entered and the next tender type queued up.
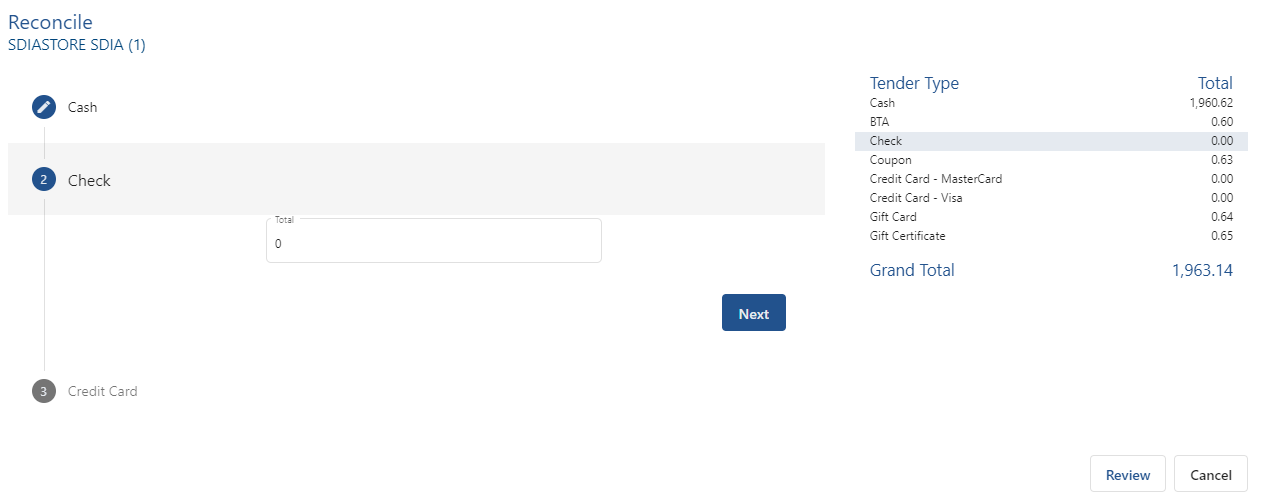
- Clicking Next after entering the total for the last tender type displays the following summary for you to confirm the results. The summary shows you the expected total, counted total, and variance (over/short). Note: As previously mentioned, Register Policy configuration lets you hide expected totals and variance amounts to prevent users from adjusting Counted Totals to match Expected Totals.
See Handling a Variance Between Expected and Counted Totals when a variance is indicated.
- When you’re ready you can choose to Submit or Save For Later.
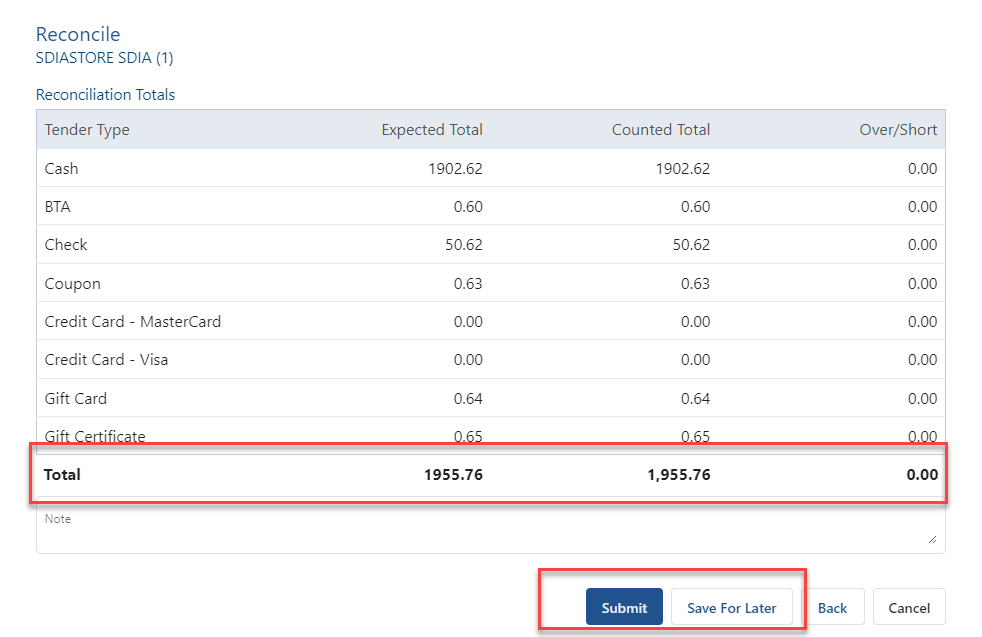
Save For Later creates a snapshot of the totals you’ve entered to this point. You can view the saved result using the View Reconcile Summary kebob option. To make corrections, the saved reconcile must first be deleted as described in Handling Save For Later Results.
Handling a Variance Between Expected and Counted Totals
How this is indicated and how you’re permitted to proceed depends on the Manage Registers permission.
- If the variance is within the allowed range, the summary’s Over/Short Total will show the variance amount (or Within Variance text if amounts are masked) with a yellow caution indicator. Within variance totals may be submitted as desired by managers or sales associates.
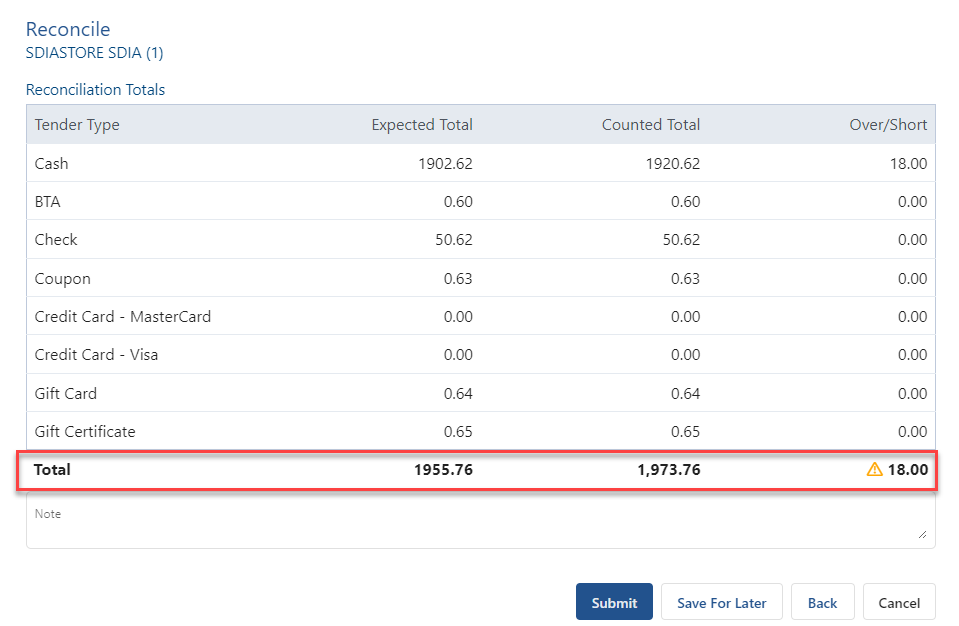
- If the variance exceeds the allowed range, the summary’s Over/Short Total will show the variance amount (or Outside Variance text if amounts are masked) with a red warning indicator. In this case users with Manage Registers permission can choose to override the register policy and submit outside variance totals despite the discrepancy.

Handling Save For Later Scenarios
If a reconcile total has been saved for later rather than submitted, you have two options:
- A view only option is available by choosing View Reconcile Summary from the kebob menu. This lets you see the current totals and who entered them (or variance status in text if actual amounts are masked).
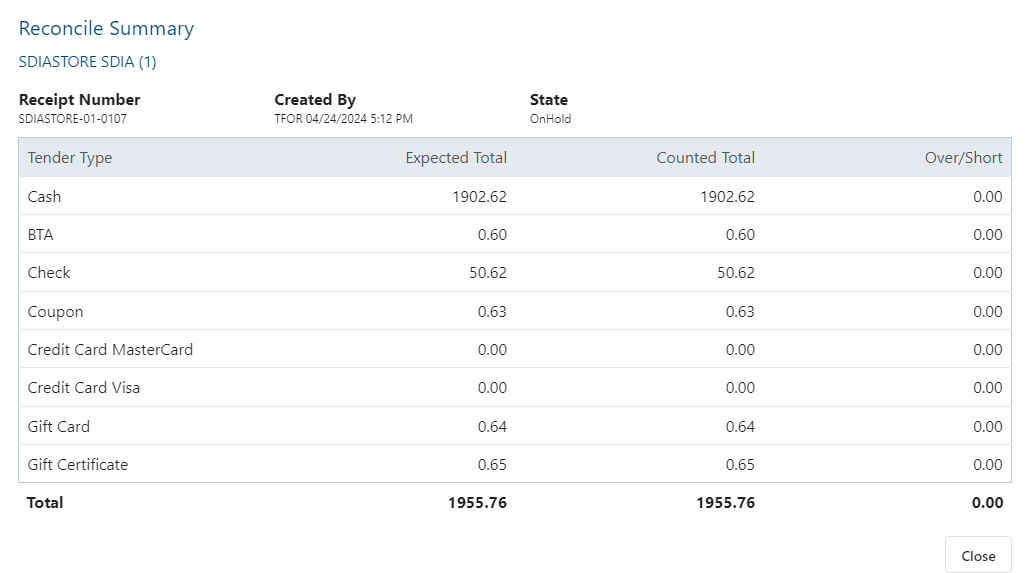
- Or you can choose the Reconcile option. This view shows the same information and lets you either submit or delete the reconcile.
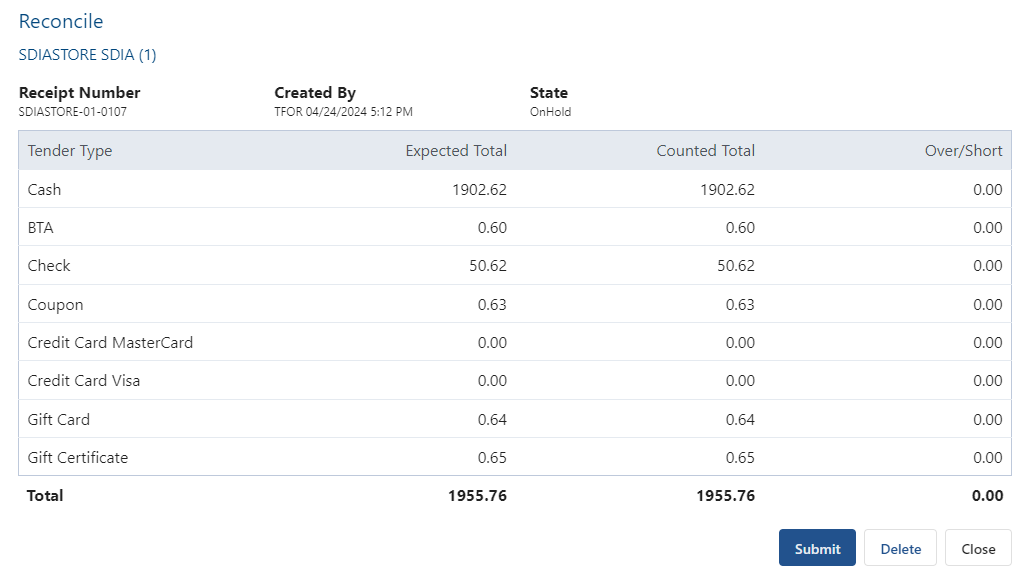
Transaction Search
The OmniSearch in the Orders web module lets you choose whether to search for billing orders, orders (assembly phase), carts, sales and no sale transactions. Orders is the default search.

Selecting any other search option will add Order back to the list.

Cart Search
When Cart Search is selected the main search field lets you search by Account Number, Customer Name or Cart ID. More Options provides the following additional criteria.
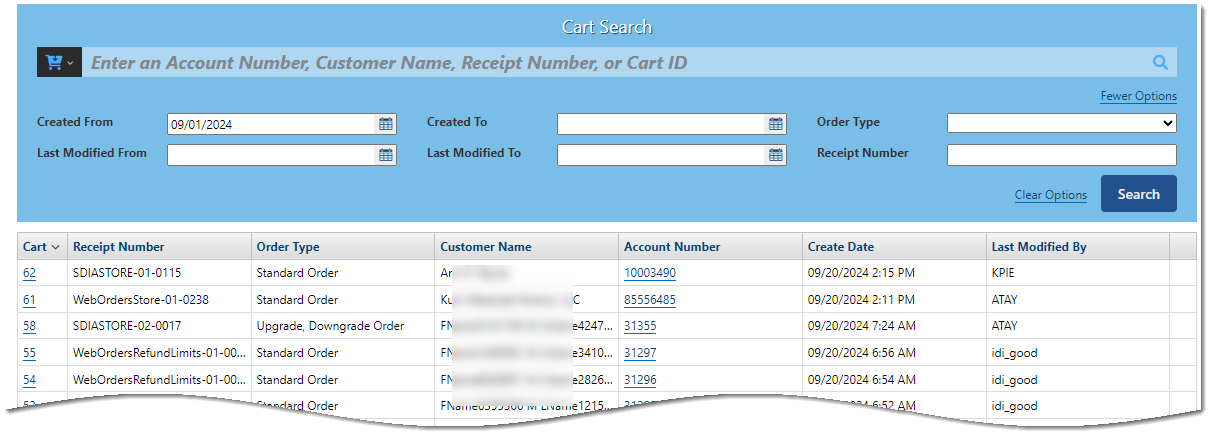
Order Search
When Order Search is selected the main search field lets you search by Account Number, Customer Name or Order ID. More Options provides the following additional criteria.
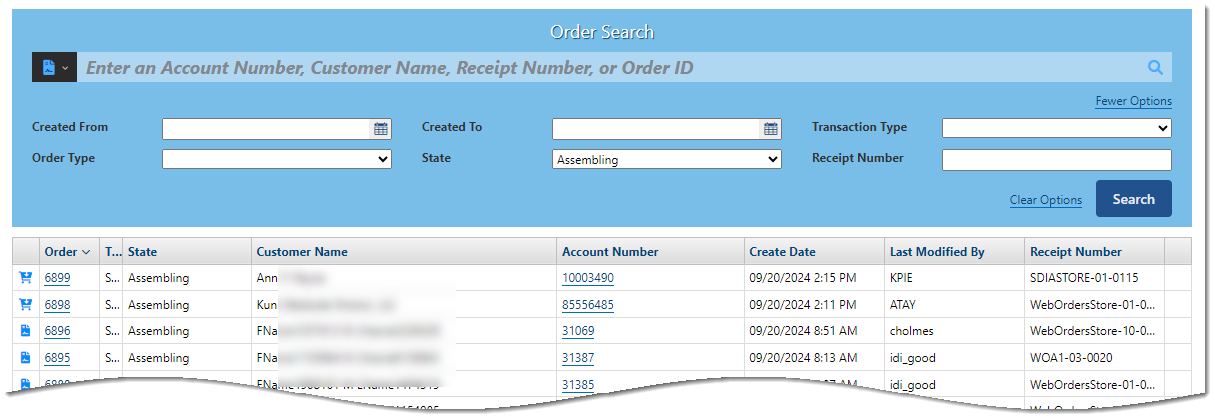
Sale Search
When Sale search is selected the main search field lets you search by Account Number, Customer Name or Cart ID. More Options provides the following additional criteria.
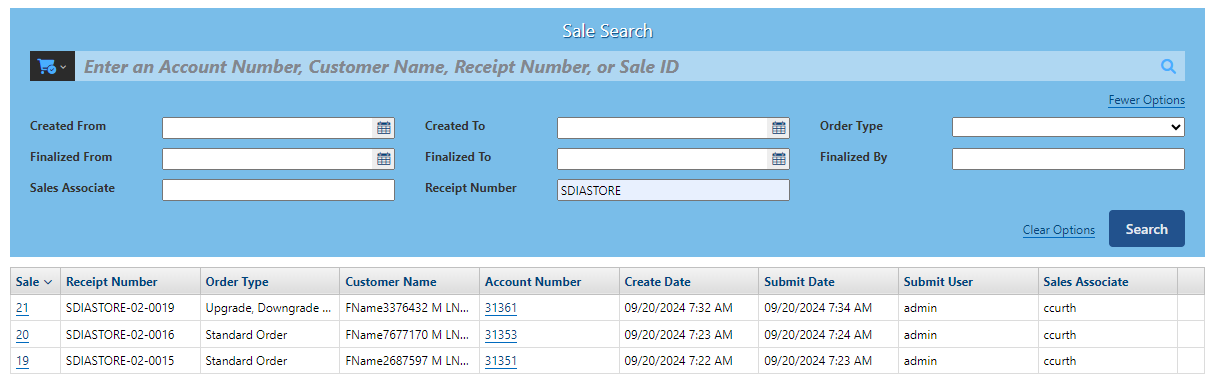
No Sale Search
The OmniSearch bar lets you search on location name, register name, receipt number, or no sale transaction ID. Note: Location Name and Register Name can use wild cards and will return partial matches. Receipt Number and No Sale ID return exact matches only. More Options lets you search by date range, user who created the transaction, no sale type, receipt number, state, location, register, and/or register number, with all text-entered fields using a wildcard search.
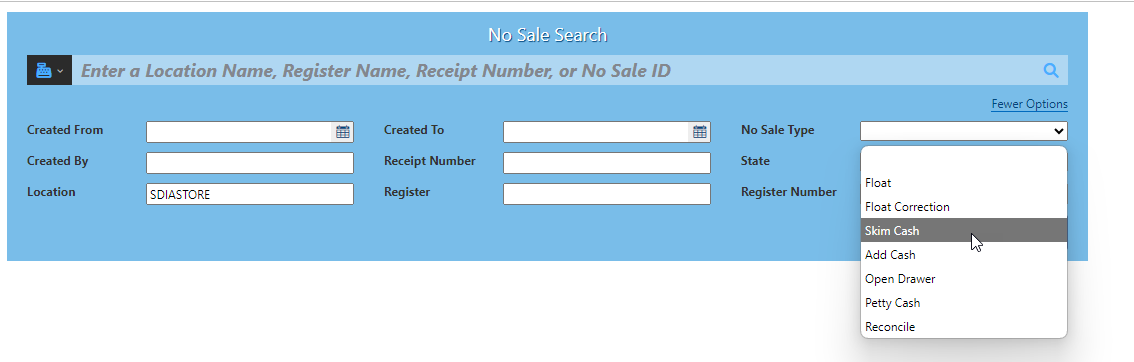
Below shows the result of a search on Skim Cash no sale type.

Note: The No Sale Search will return only those transactions from locations where the current user (doing the search) is authorized. Also, unless that user has the Manage Registers permission, the search will only return No Sale transactions that have Created By user matching the user’s name.
Clicking a link in the left side No Sale column displays details for the sale. Skim Cash details is shown below.
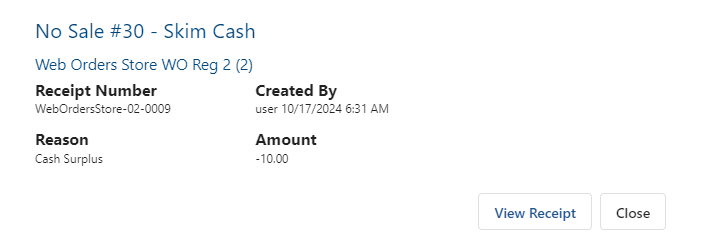
Managing Retail Transactions
For retail web transactions you can search by order, cart or sale (depending on how you set up your starting blocks). For orders, there is a possibility the order has been tendered but not yet submitted. This condition will be indicated by an orange icon in the first (left) column. The icon will turn blue once the order has been submitted.

Note: Tendered transactions CANNOT be deleted.
Direct Invoice Search
When direct invoicing is enabled in systems at version 22.4 or later, the OmniSearch page in Orders provides an option for searching on direct invoicing transactions.
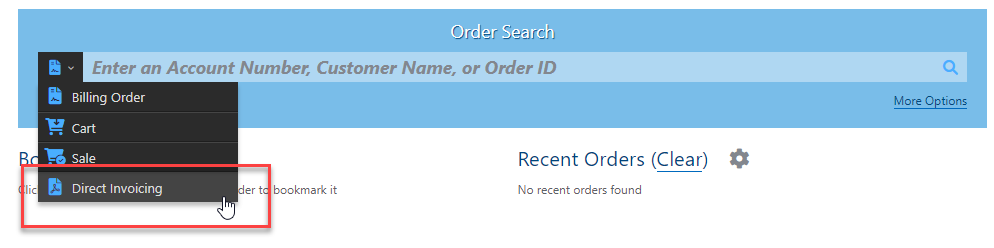
Under More Options, the Direct Invoice search lets you search by receipt number.

Example Search Result:
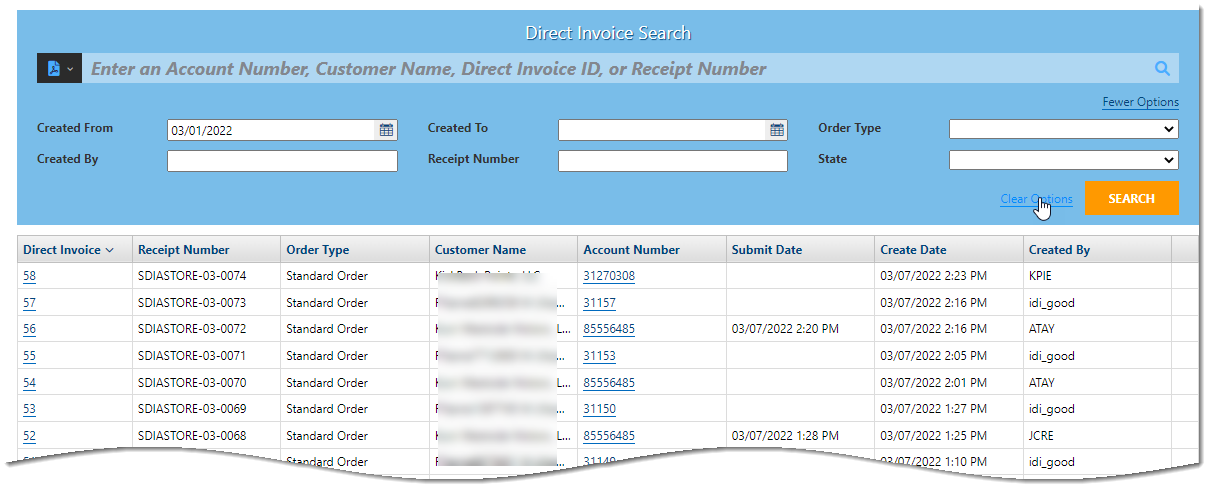
Customer Care – Direct Invoice History
When direct invoicing is enabled in systems at version 22.4 or later, in Customer Care, the Orders menu provides an option for viewing Direct Invoice History.

The functionality on this page is similar to the Order History page in Customer Care. Clicking a Direct Invoice link (far left column) takes you to the transaction on the Orders web module.