Getting Started
Browse tags, browse tag categories, and assignment templates can be used to control what catalog items are available for selection in web transactions (Orders web module). Greater control helps to ensure an orderly and accurate process that complies with your business rules.
This article provides a quick introduction. Related articles with setup details are listed at the end of this article.
Browse tags govern selection options when you use the Browse option (folder with magnifying glass icon) to add items to a transaction. Tags are assigned to SKUs in the IDI Desktop Client Product Catalog to categorize the SKUs by market, manufacturer, color, and other characteristics. For example, a phone may be tagged as: Samsung, Galaxy, and Blue. When you browse available items during transaction assembly, the list is filtered accordingly.
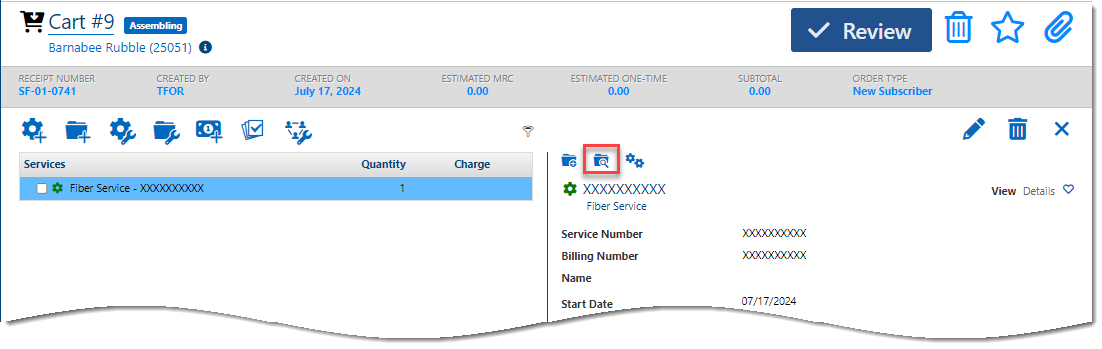
Clicking the Browse icon displays a view with options to Browse, Add by SKU, or Search by Description. The Browse radio button displays a list of Filters. The listed filters are the browse tags you set up.

Selecting a filter displays the browse tag assigned SKUs in the Available Items pane.

Note: Browse tags can be used independently or in combination with assignment templates.
Assignment templates and browse tag categories can be used to provide an additional layer of structure and control on top of browse tags. They establish rules to guide transaction assembly where each selection drives what’s available for subsequent selections. They determine when specific SKUs are required and how many may or must be added (minimum/maximum), whether to transparently auto-assign a SKU, or whether to prevent a SKU from being selected. Each rule is associated to a specific browse tag category.
Assignment templates are applied to a transaction when one or more objects that have a template assigned are associated to the transaction. This association can be established in the following ways:
- By an account type or market configured in Admin Console Data Management or zone configured in IDI Desktop Client BackOffice Management > NPA NXX Management. Templates are applied to the transaction when the account is selected and the applicable account type, market, and/or zone has an assignment template assigned.
- By SKUs added to the transaction during the transaction’s assembly phase when the SKUs have an assignment template assigned. In this case, assignment templates govern item selection when you use the Add Items option for adding items to a transaction (folder with plus sign icon).
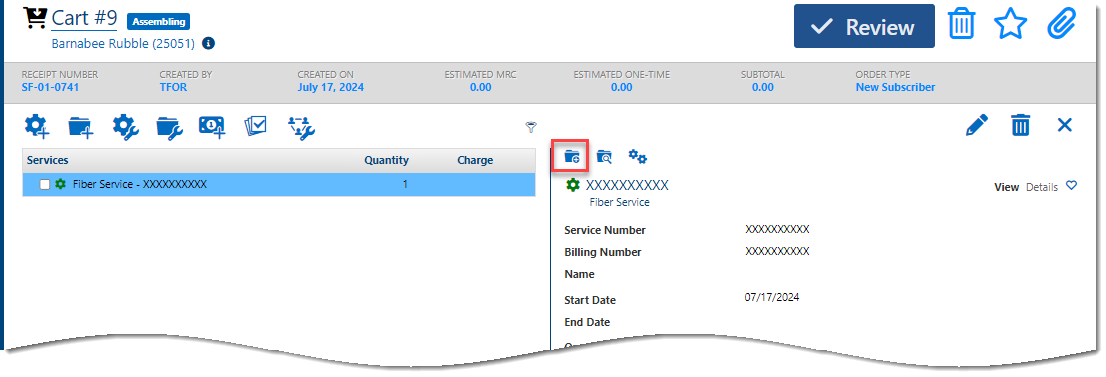
Clicking the Add Items icon displays the following view where each option presented follows rules set by the assignment template associated to the item (catalog item, account type, market, or zone). Below, Contract represents a browse tag category rule in the associated assignment template. Exactly 1 indicates you must select one and only one contract. The SKUs below Contract are the catalog items that fit the rule.

Selecting an item in each of the categories listed may drive subsequent options as you proceed with the transaction.
Browse tags, browse tag categories, and assignment templates are managed in IDI Desktop Client Product Management. For complete details on setting up browse tags, browse tag categories, and assignment templates, refer to the respective articles:
- Configuring Browse Tags
- Configuring Assignment Templates and Browse Tag Categories
Configuring Browse Tags
This article describes how to set up browse tags in IDI Desktop Client Product Management. Browse tags facilitate selecting SKUs when you assemble a web transaction. They populate the filters and available items lists in the Orders web module when you use the Browse option to select catalog items. You associate one or more SKUs (billable and retail products, packages, pricing plans, discounts, services, contracts, and AdvancePay products) to a browse tag. Applicable SKUs can have zero to many browse tags. For example, a retail product may have these browse tags:
- Handset to indicate it is a Handset opposed to an accessory.
- iPhone to indicate the model.
- Warranty to indicate the item has an available warranty.
Associating multiple browse tags to a catalog item makes it easier to find specifically what you’re looking for as you browse. The system provides several system-defined browse tags (seed data). Others can be set up as needed.
How browse tags work in web transactions (the result of this setup) is covered in the Getting Started article.
Setup
This involves adding browse tags and assigning them to SKUs. Note: The ability to create browse tags in Product Management is only available to users with the Browse Tags permission enabled in their permission profile. In the Admin Console Security node > Permission Profiles, navigate to Applications > CostGuard Client > Product Management > Browse Tags. This permission is disabled by default.
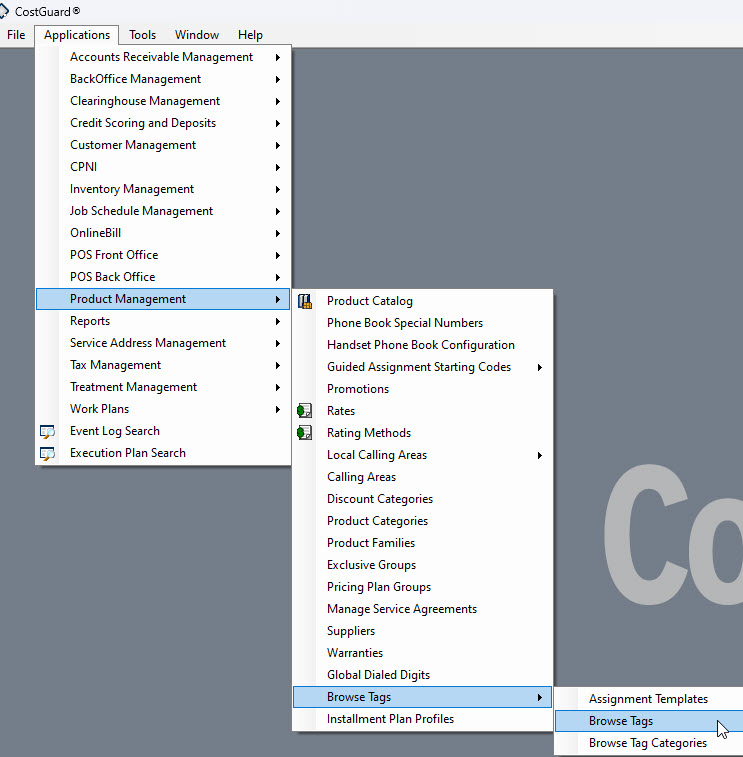
To get started with setup, choose Applications > Product Management > Browse Tags > Browse Tags. (This menu option is restricted by the above permission.)
This displays the Browse Tags grid. The initial view shows the system-defined browse tags. Your custom browse tags will also be listed as you add them. Note: The system-defined tags have an ID less than 10,000. Your custom browse tags will be assigned an ID greater than 10,000.
The context (right-click) menu has options for adding, editing, deleting, filtering, and duplicating browse tags. Note: Duplicating simply creates a copy of the selected tag and adds it to the bottom of the list. From there you can rename and edit the tag as needed.

System-defined Browse Tags
Most of the system-defined browse tags listed below align with catalog item types. Auto-Assign and Account-Level Feature have specific applications as described below. Note: System-defined tags cannot be removed.
- Plan
- Handset
- Feature
- Accessory
- Contract
- Auto-Assign lets you ensure designated catalog items are automatically and transparently added without having to present them in the transaction as a selectable item. For example, your business rules may require that all new services include a service activation fee. This application requires assignment templates and is covered in a dedicated example in the Assignment Templates article.
- Service
- Account-Level Feature lets you impose control over which items may or must be added at the account level. Note: The GUI-based Add/Browse Account Level options presented on the respective views during transaction assembly do not restrict which items can be added at the account level. This application requires assignment templates and is covered in a dedicated example in the Assignment Templates article.
- Discount
- Retail Product
- Pricing Plan
Adding a New Browse Tag
To do this:
- Right-click in the Browse Tags grid and choose New.
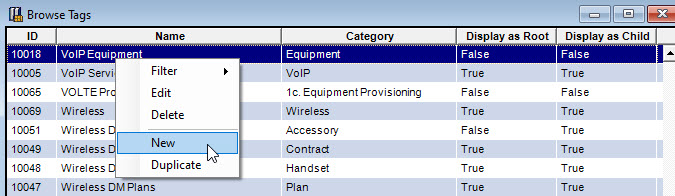
This displays the Add Browse Tag dialog.

- Configure these four properties that govern how the tag should be displayed and used during transaction assembly:
-
- Name is the label by which the browse tag is identified in the Filter list. This value does not have to be unique; however, it is suggested to use unique labels to avoid confusion.
- Category is optional. It may be used to logically organize browse tags in the grid and make them easier to find. Also, it has a specific application when setting up an assignment template for account-level items. This is covered in the Assignment Templates article.
- Display as Root marks the tag as a top-level filter (the first set of tags presented when you start to browse). This is checked on all system-defined tags by default. Unchecking this box prevents the tag from appearing as a selectable feature. For example, you may want to hide tags that are not relevant to your business.
- Display as Child marks the tag as a lower-level filter to display after you select a root tag. This let users further refine their search by drilling down from root to child tags. The parent-child relationship is established when the respective tags are assigned to the same SKU. For example, a handset may be assigned the Handset tag as a root-level tag, and iPhone as a child.
From here you can continue by associating SKUs to the tag using this form, or Save the information entered above and dismiss this form and associate SKUs to the browse tag later. If you defer associating SKUs, you can edit the browse tag via the Browse Tags grid, or make an association to a specific SKU via the SKU’s Product Catalog Add/Edit form. Both options are covered below.
Associating SKUs to the Browse Tag
Using the Add/Edit Browse Tags Form
To do this while you’re adding (or editing) the browse tag:
- Right click in the Associated Products grid and select New.

This displays the Add Linked Product form.
- Use the SKU and/or Description fields to search and display a list of SKUs from which to choose. Then select one or more SKUs as needed by checking their check boxes.
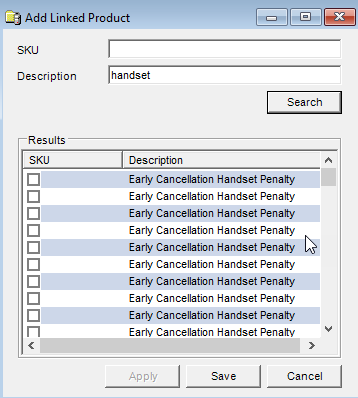
- Click Save on this form AND the Add/Edit Browse Tag form to save the SKU associations.
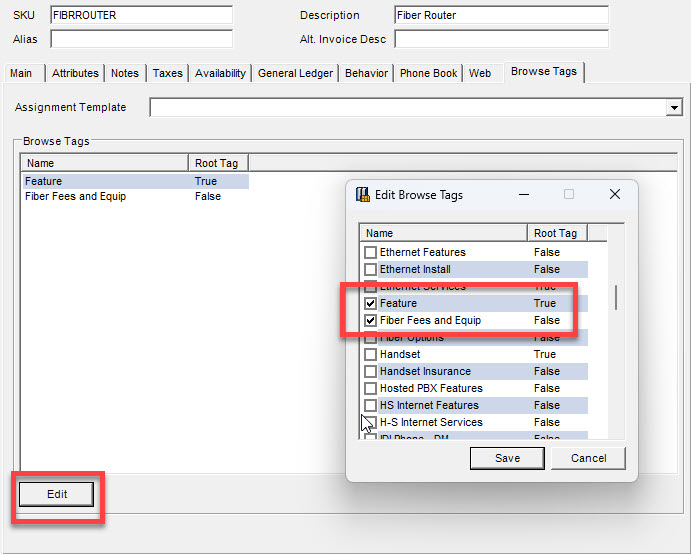
Viewing/Editing Browse Tags on a SKU
Note: Managing browse tags directly on a SKU does not require Browse Tags permission. The Browse Tags tab lists browse tags where the SKU is already associated (if any). The Edit button lets you add/remove browse tag associations. Clicking Edit displays the Edit Browse Tags form. This form is similar to the Assign Linked Product form shown above, except that the currently associated browse tags are pre-selected.
Auto-generating Browse Tags
The Generate Browse Tags tool in the Product Catalog lets you automatically generate browse tags based on your folder structure, and associate browse tags to catalog items based on the type of item (e.g. associate the Plan tag to all packages). It creates a tag based on the folder name and then applies it to all items inside the folder. For example, if the catalog has a Master Services folder, you can automatically assign all items in that folder a tag called Master Services. If there are nested folders, it creates a tag for every folder in the hierarchy. For example, if a child folder called Activation Flow and another grandchild folder called Contracts are found in the Master Services folder, the item would be assigned three tags: Master Services, Activation Flow, and Contracts.
Note: This functionality should be used with caution as it may result in creating unneeded or duplicate tags.
One practical application may be to facilitate implementing the same guided experience in the web as you may have already created for guided flows in IDI Desktop Client. Note: This requires careful consideration and planning. You are recommended to contact your account manager to engage IDI professional services to assist you with this.
In the Product Catalog, right-click on root (Product Catalog) folder and choose Generate Browse Tags.
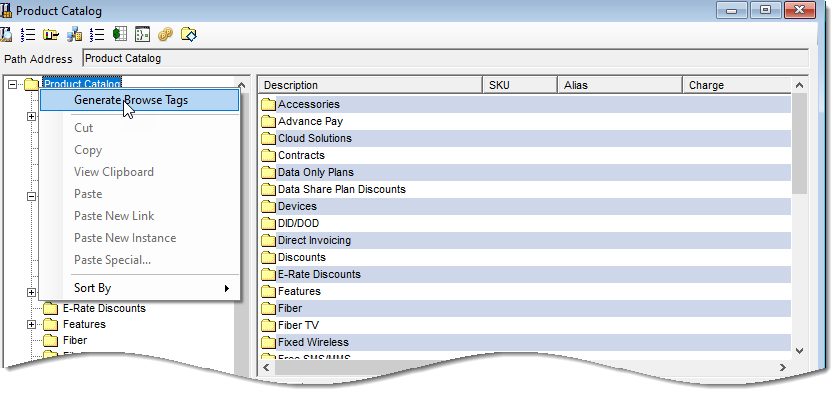
This displays the Generate Browse Tags form.

| Action/Option | Description |
| Generate missing browse tags | When using Generate Browse Tags to associate browse tags to catalog items based on the type of item, this option auto-generates tags when a similar tag does not already exist. For example, when you create a new catalog item, the Browse Tags tab is empty. This option directs the system to add system-defined tags to their respective items based on the catalog item type rather than manually associate the tags one by one (i.e. add the Service browse tag to all services, Contract tag to all contracts, and so on). This option covers all system-defined tags, whereas the Assign options below let you do this on an individual catalog item type basis. |
| Remove all auto-generated browse tags | Removes ALL auto generated tags across all folders and item types. |
| Generate and link browse tags for folders | Directs the system to create tags to match the existing Product Catalog folder structure. It facilitates implementing the same guided experience in the web as you may have already created for guided flows in IDI Desktop Client. |
| Assign Contract browse tags to contracts | These options assign the named system-defined browse tag to all catalog items of that type. |
| Assign Discount browse tags to discounts | |
| Assign Feature browse tags to products and packages | |
| Assign Handset browse tags to handsets | |
| Assign Pricing Plan browse tags to pricing plans | |
| Assign Retail Product browse tags to retail products | |
| Assign Service browse tags to services |
Paste New Instance Option for Browse Tags/Assignment Templates
The Paste New Instance Options form in the Product Catalog lets you bring forward browse tag and assignment template associations when copying/pasting a new instance of an item.
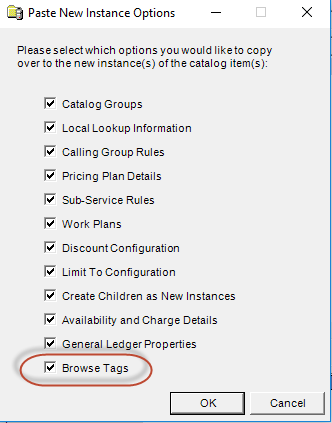
Product Types that support this are:
- Contract
- Discount
- Dynamic Charge
- Product
- Retail Product
- Package
- Pricing Plan
- Service
Continuing with Assignment Templates
If you need to use assignment template in combination with browse tags, refer to the Assignment Templates article.
Configuring Assignment Templates
This article describes how to set up assignment templates and browse tag categories in IDI Desktop Client Product Catalog. Assignment templates establish rules that guide transaction assembly in a structured fashion per your business rules. They can be set up to determine when specific SKUs are required and how many may or must be added (minimum/maximum), whether to auto-assign a SKU, or whether to prevent a SKU from being selected. Each rule is associated to a specific browse tag category.
Assignment templates are applied to a transaction when one or more objects that have a template assigned are associated to the transaction. This association can be established in the following ways:
- By an account type or market configured in Admin Console Data Management or a zone configured in IDI Desktop Client BackOffice Management > NPA NXX Management. Templates are applied to the transaction when the account is selected and the applicable account type, market and/or zone has an assignment template assigned.
- By SKUs added to the transaction during the transaction’s assembly phase, and the SKUs have an assignment template assigned. In this case, assignment templates govern item selection when you use the Add Items option for adding items to a transaction (as opposed to the Browse option).
How assignment templates work in web transactions is covered in the Getting Started article.
Setup
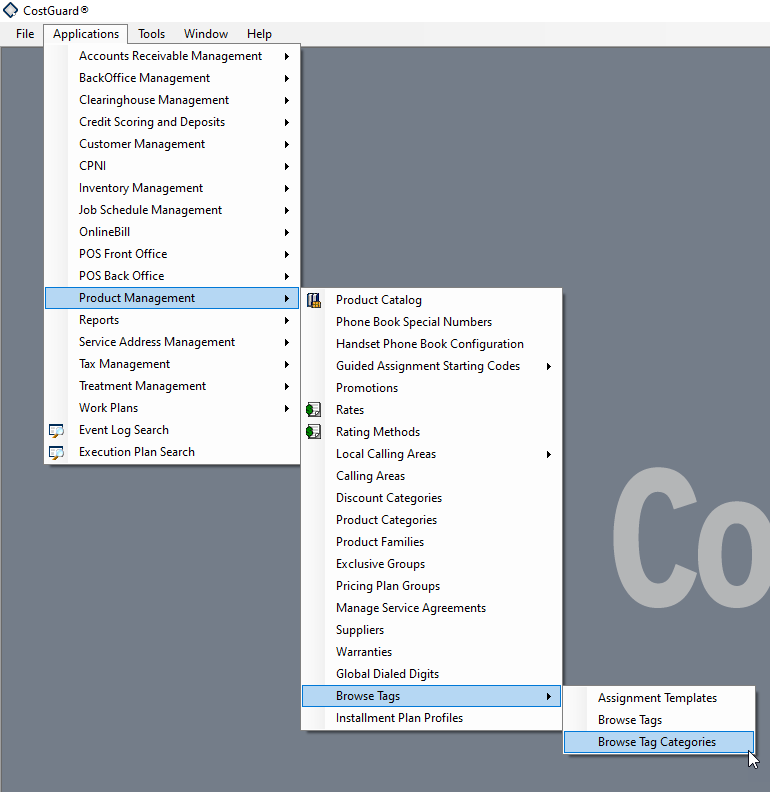
Browse tag categories and assignment templates are set up in IDI Desktop Client via Applications > Product Management > Browse Tags. Note: This requires the Browse Tags permission to be enabled in your permission profile. In the Admin Console Security node > Permission Profiles, navigate to Applications > CostGuard Client > Product Management > Browse Tags. The permission is disabled by default.
Browse Tag Categories
Browse tag categories are required when adding a new rule to an assignment template. The Orders web module lists available items under the respective categories when you use the Add Items option during transaction assembly. The system provides several system-defined browse tag categories (seed data). Others can be set up as needed.
Choosing Product Management > Browse Tags > Browse Tag Categories displays a grid listing all available categories. The initial view shows the system-defined browse tag categories. Your custom browse tag categories will also be listed as you add them. Note: The system-defined categories have an ID less than 10,000. Your custom categories will be assigned an ID greater than 10,000.
The context (right-click) menu has options for adding, editing, deleting, and filtering browse tag categories.

System-defined Browse Tag Categories
Most of the system-defined browse tag categories listed below align with catalog item types. Auto-Assign has a specific application as described below. Note: System-defined categories cannot be removed.
- Plan
- Handset
- Feature
- Accessory
- Contract
- Service
- Retail Product
- Auto-Assign – lets you ensure designated catalog items are automatically and transparently added without having to present them in the transaction as a selectable item. For example, your business rules may require that all new services include an activation fee. This application is covered in a dedicated example later in this article.
Adding a New Browse Tag Category
Right-click in the Browse Tag Categories grid and choose New. Browse tag categories have two properties.
- Name serves as the label by which the category is presented wherever a browse tag category can be selected. While this value does not have to be unique it is suggested to keep these unique to avoid confusion.
- Account Level – Use this check box to specify the category only be available when browsing at the account level, and not at the service level. This application is covered in a dedicated example later in this article.

Assignment Templates
Choosing Product Management > Browse Tags > Assignment Tags displays the Assignment Templates grid with a list of existing templates. The initial view shows one system-defined assignment template called SalesCentral Contract Filter. Caution: This template has no practical application; however, it is required for browse tags to work. Do not remove or rename it. You should simply ignore (not touch) it.
The context (right-click) menu has options for adding, editing, deleting, duplicating, and filtering templates. Note: Duplicating simply creates a copy of the selected template and adds it to the bottom of the list. From there you can rename and edit the template as needed.

Adding an Assignment Template
Right-click in the Assignment Templates grid and choose New to display the Add Assignment Template form. Enter a Name. This is the label by which the template is presented when you assign the template to catalog items in the Product Catalog, account types or markets in Data Management, or zones in IDI Desktop Client BackOffice Management > NPA NXX Management. It is recommended to keep names unique to avoid confusion.
Then add one or more rules. To do this, right-click in the Add Assignment Template form Rules grid and choose New from the context menu. This displays the Add Assignment Template Rule form.

For each rule, specify the following:
- Category – These are browse tag categories. The category you specify here will serve as the label for the rule when it’s presented in the transaction. Applicable products you associate to the rule via the rule’s Required Tags list will be listed below each Category label in the transaction. Notes:
- The drop-down menu lets you select an existing browse tag category, or you can use the New Category option to create a new one on-the-fly.
- It is recommended to avoid scenarios that apply multiple assignment templates on a transaction, where two or more have rules with matching categories. This may create conflicts or unexpected results. Having multiple templates applied to a transaction is common practice; however, you should avoid the matching categories scenario. See the section on troubleshooting at the end of this article for more on this.
- Minimum Required and Maximum Required – These specify the lower and upper limits for selecting items in this category. Note: When two assignment templates are merged, the greater of the two minimum values and lesser of the two maximum values is used. The following table indicates how these parameters work in combination.
| To do this: | Set values as follows: |
| Make a selection optional | Minimum = 0
Maximum = 1 or more |
| No maximum limit | Leave Maximum undefined (null) |
| Limiting selection to only one item | Set both values to 1 |
| Do not allow any items from this category | Set both values to 0 |
- Required Tags – Select one or more browse tags to include in the rule. These browse tags will find their associated products and list them below each Category label in the transaction. If two assignment templates are merged, this list is merged together to form a single list of required browse tags.
Associating Assignment Templates to Catalog Items, Account Types, Markets, and Zones
When and where assignment templates should apply is demonstrated in examples later in this article. The areas (objects) where you can put an assignment template are as follows:
- In the IDI Desktop Client Product Catalog, on a catalog item, use the Assignment Template selector on the Browse Tags tab. Note: You can only assign one template to a SKU.

- In IDI Desktop Client > BackOffice Management > NPA NXX Management > Zone Tables:

- In Admin Console Data Management, in the Account Types or Markets tables:

Examples – Applying Assignment Templates
These examples use the following elements:
| SKUs | Assigned to Browse Tags |
| Feature Phone 1000 | Handset |
| Smart Phone | Handset, Smart Phone |
| Talk Plan | Plan, No Data Plan |
| Talk Text Plan | Plan, No Data Plan |
| Talk Text Web Plan | Plan, Web Plan |
| 2G Web Data | Feature, AddOn |
| 5G Web Data | Feature, AddOn, Upgrade AddOn |
| Unlimited Data | Feature, AddOn, Upgrade AddOn |
| Lanyard (and other account-level features) | Account-Level Feature |
| Activation Fee | Auto-Assign, Activation |
| Browse Tag Categories |
| Plan |
| Phone |
| Smart Phone |
| Feature |
| Auto-Assign |
| Data |
| Account-Level |
Example – Restricting data plans to be sold with a phone
Feature Phone 1000 does not support web capabilities; therefore, the Talk Text Web Plan and the data features should not be sold when Feature Phone 1000 exists on the transaction or account. To do this:
- Create a Feature Phone assignment template and configure it to restrict the types of plans to ones that do not have web capabilities, and block all data products as well:
- Add a rule for the Plan category and add Plan and No Data Plan as required browse tags. By adding these tags, only the Talk Plan and Talk Text Plan SKUs are available for the transaction because these are the only plan SKUs in both browse tags. The Talk Text Web Plan is not available since it is not in the No Data Plan browse tag.
- To force the transaction to allow one and only one plan, set both Minimum Required and Maximum Required to 1.
- To prevent all data features from being added to the phone, add a rule for the Data category, add Feature as a required browse tag, and set both Minimum and Maximum Required to 0.
- In Product Catalog, on the Feature Phone 1000 catalog item Browse Tags tab, select the Feature Phone assignment template. This directs the system to follow the restrictions specified on the template when Feature Phone 1000 is present on the transaction or already existing on the account.

Example – Permit Data Add-ons
There are two plans that do not contain data capabilities by default; however, users should be able to add data features if they wish. To do this:
- Create a No Data Plan assignment template and configure it to allow data features:
- Add a rule for the Data category, then add Feature and AddOn as required tags. By adding these tags, the 2G Web Data, 5G Web Data, and Unlimited Web Data features will be available for the transaction, since all three features are in both the Feature and AddOn browse tags.
- To make data feature selection optional and allow only one selection, set Minimum Required to 0 and Maximum Required to 1.
- In the Product Catalog, on the Talk Plan and Talk Text Plan catalog items, select the No Data Plan assignment template.
Note: The following illustrates a scenario where a potential conflict may exist by using multiple assignment templates on a transaction, and both templates have rules with matching categories. If both Feature Phone 1000 and Talk Plan or Talk Text Plan are included in the transaction, Data options will not be available. The Feature Phone and No Data Plan assignment templates both have a Data rule and so the templates are merged. The combined template will enforce the Data rule on the Feature Phone assignment template where both Minimum and Maximum are set to 0. Remember the lesser Maximum Required value takes precedence when templates are merged.
Example – Restricting Some Add-ons and Allowing Others
Talk Text Web Plan contains the 2G Web Data feature by default, so users should not be allowed to add this feature as an add-on; however, users should be allowed to upgrade their data to either 5G Web Data or Unlimited Web Data. To do this:
- Create a Data Plan assignment template and configure it to not allow adding the 2G Web Data feature while allowing 5G Web Data and Unlimited Web Data. To do this:
- Add a Data category and add Feature and Upgrade AddOn as required browse tags. This ensures only 5G Web Data and Unlimited Web Data will be available since only those two features are in both the Feature and Upgrade AddOn browse tags.
- To make data feature selection optional, and allow only one selection, set Minimum Required to 0 and the Maximum Required to 1.
- In the Product Catalog, on the Talk Text Web Plan catalog item, select to the Data Plan assignment template.
Note: If both the Feature Phone 1000 and Talk Text Web Plan are included on the transaction, Data options will not be available due to using multiple assignment templates on a transaction, and both templates have rules with matching categories (described in the previous example note).
Example – Account-level Features
The GUI-based Add/Browse Account Level options presented on the respective views during transaction assembly do not restrict which items can be added at the account level. You can impose greater control over which items may or must be added at the account level using a combination of:
- System-defined Account-Level Feature browse tag assigned to designated account-level features in the Product Catalog.
- Custom browse tag category with Account Level check box checked.
- Assignment template with a rule row combining the above Account Level browse tag category with the system-defined Account-Level Feature browse tag.
To do this:
- Create a new browse tag category and configure it as Account Level.
- Edit the system-defined Account-Level Feature browse tag to set Browse Tag Category = the above custom browse tag category, then assign the tag to applicable account-level features in the Product Catalog.
- Create an assignment template with a rule row where Category is set to the new browse tag category and the system-defined Account-Level Feature tag is a Required Tag (along with any other tags as may be needed). Then assign the template to an Account Type, Market in Admin Console Data Management, or Zone in the IDI Desktop Client.
With this configuration, upon launching a new web order, the master template is layered with the above assignment template which drives the account level feature options per the template’s Account-Level Category rule.
Example Using Auto-Assign
This lets you automatically and transparently assign certain items to a transaction without having to present them as selectable options during the flow. For example, your business rules dictate all new service activations have a special Service Activation Fee that charges a one-time fee to the customer. To do this:
- Create an Activation assignment template and configure it to auto-assign the service activation fee when a new service is included in the transaction. To do this:
- Add a rule for the Activation category and add Auto-Assign (system-defined) and Activation as required browse tags. This will automatically add just the Service Activation Fee to the transaction, since this is the only feature that has both the Auto-Assign and Activation browse tags.
- Set Minimum Required and Maximum Required to 1 to ensure one and only one activation fee is applied.
- Add the new assignment template to all services that require an activation fee.
Other auto-assign examples:
- If insurance MUST accompany every handset sold over $1000, tag the insurance SKU with the Auto-Assign tag, then place the tag into a template rule and assign the template to all handsets over $1000.
- If all customers in a specific zone must be charged an additional installation charge because certain rural geographic zones require additional work, tag the installation charge SKU with the Auto-Assign tag, and then place the tag into a template rule and assign the template to the zone, so that only customers in that zone have that charge.
Troubleshooting
If you encounter the Due to assignment restrictions no items can be added error on attempting to add services or features in a web transaction, these are potential causes/solutions:
Example 1:
Cause: Configuration issues such as the following scenario:
-
- Creating a browse tag category with the Is Account Level check box checked.
- Including that category in an assignment template rule row.
- Applying that template to a product catalog item instead of a Market, Account Type or Zone, as intended.
Solution: Uncheck Is Account Level on the category or move the template off the catalog item and onto a Market, Account Type or Zone.
Example 2:
Cause: Assignment template conflicts where multiple templates have rules that use the same browse tag category (e.g. Feature) but different required browse tags. For example: a Feature rule in Template 1 requires tags A, B and C, while a Feature rule in Template 2 requires tags D, E and F. In this case, as the system layers the templates 1 and 2 together into a master template on a transaction, the system is unable to match any items that have all 6 tags (A thru F).
Solution: Change the browse tag categories in the rules and/or ensure that catalog items include all tags, so they are always found no matter the required tag combination.