About Direct Invoicing
Direct Invoicing is for service providers who need to immediately bill an account for a purchase or charge when the business prefers to not wait for invoicing as dictated by the bill cycle. The solution was originally developed under IDI platform version 19.7 (FR 2990). Enhancements have been added in version 20.1 (FR 3056), version 22.4 (Web Sales FR 3411), version 22.7 (AR 9055) and version 22.12 (AR 9106).
- Version 20.1 provides the ability to:
- Configure direct invoicing settings (including invoice configuration) in the Orders web module
- Set up retail products to allow direct invoicing in the IDI Desktop Client Product Catalog
- During order assembly:
- add direct invoice products on the order or cart/sale
- apply discounts to direct invoice
- specify a contact or address (other than the default) to use for taxing direct invoice products
- Bill to Account and subsequently send an invoice for the direct invoice products independent of the normal bill cycle
- Version 22.4 aligns direct invoicing with web sales and starting blocks (introduced with version 22.1). This version 22.4 and later, you’ll use starting blocks to begin direct invoice transactions tailored with labeling on pages, icons, and buttons to reflect the direct invoice user experience. This release provides an out-of-the-box Direct Invoice Experience starting block defined to begin a direct invoice transaction. Authorized users can modify the default configuration of this starting block and/or create additional starting blocks for direct invoicing as needed.
Additionally, the Orders and Customer Care web modules have new views for searching and managing direct invoice transactions.
To facilitate moving from an earlier version of direct invoicing, on taking version 22.4 or later, existing direct invoice order and sale transactions will be converted to direct invoice transactions with the new searching/tracking capabilities in Orders and Customer Care.
- Version 22.7 provides the ability to add/edit notes on direct invoice items. The Notes field lets you enter supplemental data regarding the order and invoice line item. This can help reduce questions regarding the charges by providing additional details on the invoice. You can choose to display notes on the direct invoice or be for internal purposes only. Notes are optional. Also, new options in Order Field Configuration let you default or restrict the Notes and Display on invoice fields.
- Version 22.12 enhances starting block configuration for direct invoicing. The configurable parameters on New/Edit starting block form are now presented on two tabs for clarity – Main and Policy. The Policy tab has a new area for Invoice Configuration when Start As on the Main tab is set to Direct Invoice. You can use this area to:
- Select a template for invoice presentation. The drop down menu is populated with templates as configured in the IDI Desktop Client.
- Choose to include all order items on the invoice or only direct invoice items.
- Specify text for the terms and conditions.
- Select a logo image to appear on the invoice.
Note: These instructions cover direct invoicing through version 22.12. If you’re on an earlier version pay close attention to notes indicating when certain functionality does or does not apply. In particular:
- In setup – Prior to version 22.4 you would begin direct invoice transactions as either an order or cart/sale where the transaction would subsequently be converted to a direct invoicing experience by adding an allow direct invoicing item. With starting blocks, this conversion is no longer performed. Direct invoice transactions will be driven by selecting a starting block set up specifically to initiate a direct invoice transaction. You may use the out-of-the box Direct Invoicing Experience starting block as is, or modify it, or create one or more completely new direct invoice starting blocks to meet your requirements.
Also with version 22.4, direct invoicing requires that starting block functionality be enabled. If you’re not currently set up for direct invoicing and you enable it, starting block functionality is enabled as well (if not already enabled). If your system is already set up for direct invoicing, starting block functionality will automatically be enabled when you take 22.4 or a later release.
- Submitting a direct invoicing transaction – The process for assembling and submitting a direct invoice transaction is similar in earlier and later versions; however there are some significant differences, Therefore, this article provides two separate procedures to follow.
- Starting block configuration enhancements available with version 22.12.
Setup
Configuration Prerequisites
Permissions
Prior to version 22.4 and the introduction of the Direct Invoicing starting block, order/sale transactions supported a direct invoice experience by adding a direct invoice item on the order. The Allow Direct Invoice permission regulated a user’s ability to search, find, and add a direct invoice item to a transaction to prevent accidentally invoking the direct invoice experience. With 22.4 and later, the only way to initiate a direct invoicing transaction is by selecting a starting block set up for direct invoicing. This supersedes having to observe the Allow Direct Invoice permission, and so it was deprecated.
IDI Desktop Client Setup
Prior to using direct invoicing, you must do the following:
- Enable the POS License
- Assign all applicable IDI Desktop Client permissions for access to Product Management and POS Back Office
- Configure Adjustment Types (in Admin Console -> Data Management) for the Bill-to-Account (BTA) credits and debits
- Configure Product Suppliers (in IDI Desktop Client -> Applications -> Product Management -> Suppliers); specifically, Distributors and Manufacturers to be assigned to the Direct Invoice Items in the Product Catalog
- Configure Retail Discount Reasons (in IDI Desktop Client-> Applications -> POS Back Office -> Set Up)
- Configure Retail Promotions (in IDI Desktop Client -> Applications -> Product Management -> Retail Promotions); if needed
Workflow Module
Direct invoicing requires a Workflow. Any applicable workflows must be correctly configured and assigned to specific Order Types, as required. In order to Process a BTA Adjustment, a Workflow must have tasks to perform the Billing System Update and Complete Order actions.
Setting Up Direct Invoice Products in the Product Catalog
Note: Even though with version 22.4 and later the system no longer uses a product configured to allow Direct Invoicing to convert an order or cart/sale to a Direct Invoice Order, any product you intend to invoice directly must be set up to allow direct invoicing.
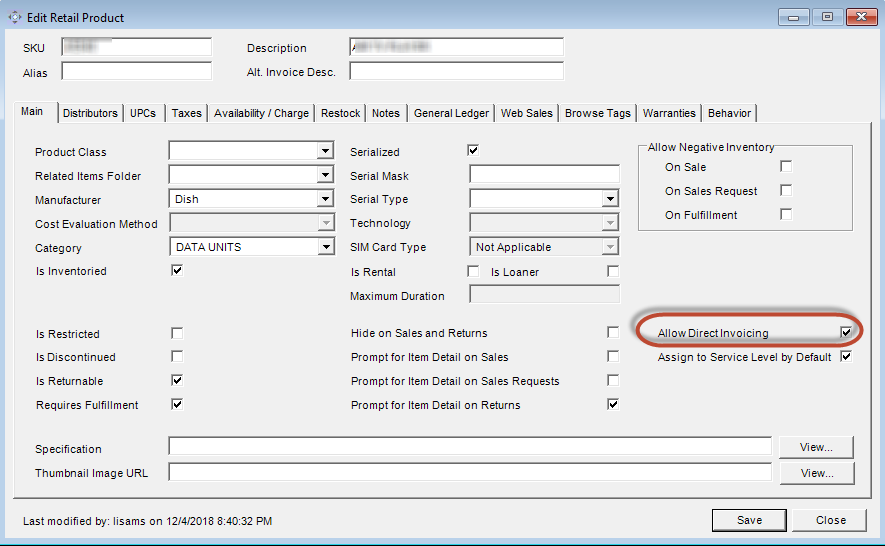
Any retail items that you intend to invoice directly must be configured to allow direct invoicing in the Client Product Catalog. Add these items as Retail products and check the Allow Direct Invoicing checkbox. This makes the product available for selection during order assembly if Direct Invoicing is enabled in your system as described below.
Note: It is recommended to use a SKU that facilitates searching on SKU when adding items during order assembly.
Enabling and Setting Up Direct Invoicing in Orders
The Direct Invoicing settings in Orders let you enable and configure Direct Invoicing functionality.
Notes:
- This requires the Allow Direct Invoicing permission.
- Do not enable direct invoicing unless you intend to use this functionality.
To enable direct invoicing in Orders:
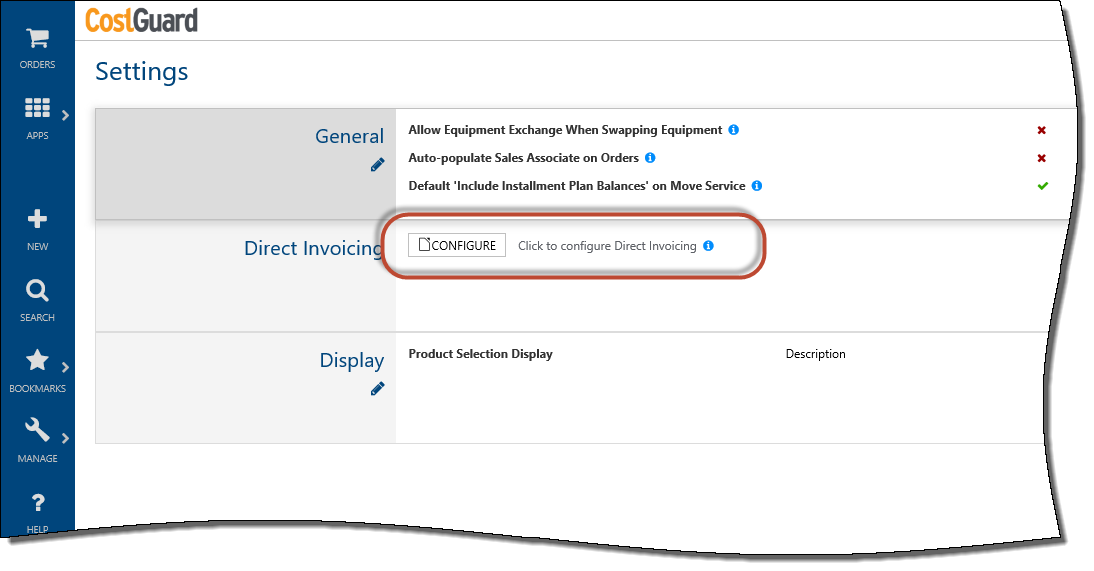
- Select MANAGE > Settings

- In the Direct Invoicing section, click CONFIGURE.
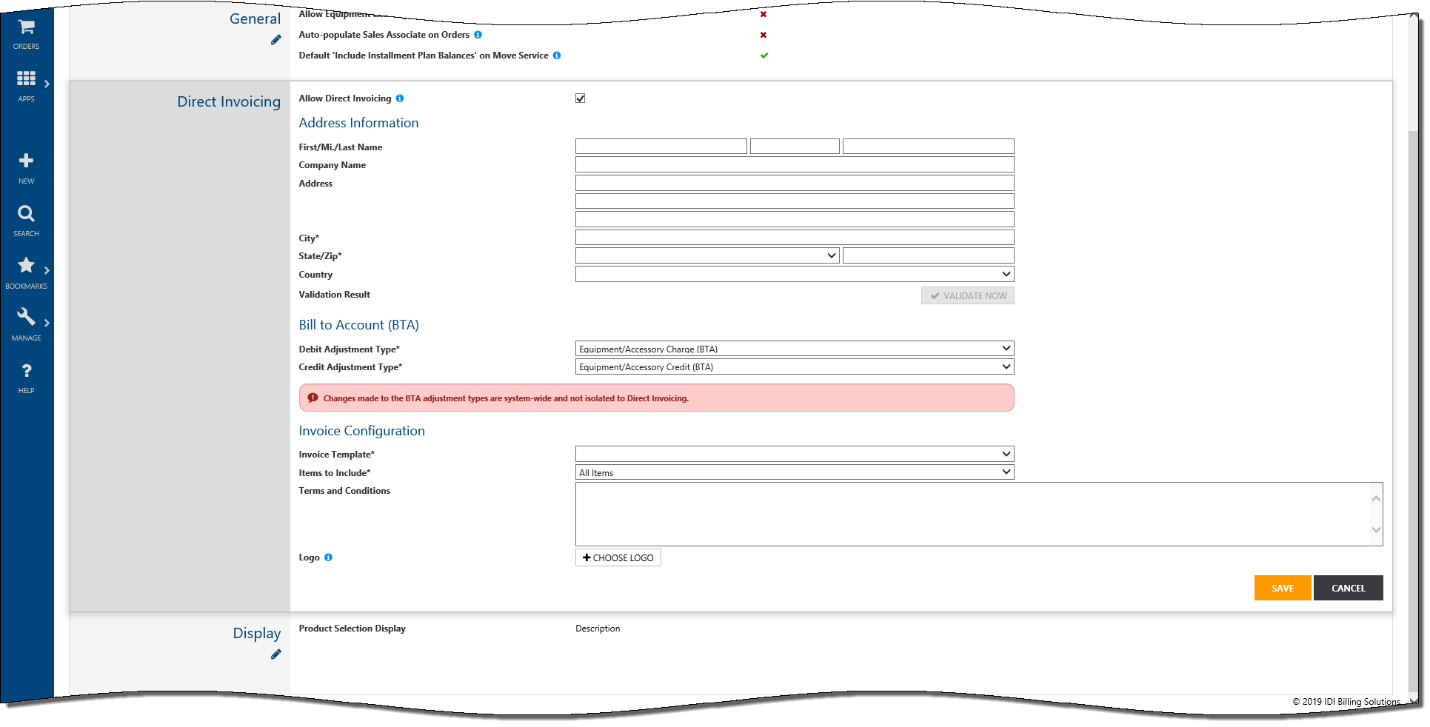
This displays the Direct Invoicing settings for:
- Allowing Direct Invoicing
- Address Information to set up a default tax jurisdiction
- Bill to Account (BTA) Debit and Credit Types
- Invoice Configuration
Allow Direct Invoicing
The Allow Direct Invoicing checkbox is selected (checked) by default.

This indicates direct invoicing is available for use (pending completion of the remaining setup steps). Note: Leave this setting checked unless you need to disable the functionality.
Address Information and Tax Jurisdiction
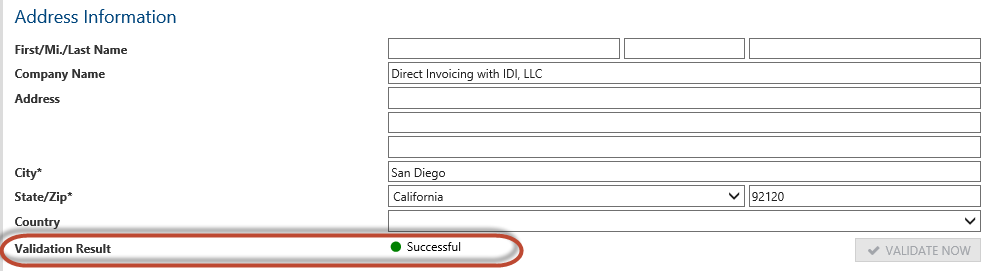
This establishes a default tax jurisdiction for direct invoicing. Upon entering the address, the Validate Now button is enabled. Click this button to validate the address information and establish the default tax jurisdiction for direct invoice orders.
Note: You’ll have an opportunity to change the tax jurisdiction (and apply discounts) for a specific direct invoice item when you assemble the order.
Bill to Account
Bill to Account (BTA) lets you apply a debit or credit on the customer’s account balance independent of the normal bill cycle. Select the desired adjustment types for the BTA from the respective drop-down menus.

Note: Adjustment Types for BTA, a core Tender Type, are system-wide and not isolated to direct invoicing. If BTA is already in use for Point-of-Sale purposes, the menu choices will default to the already established values.
Invoice Configuration
These settings let you configure a printable version of the invoice generated for direct invoice orders.

- Invoice Template – Select a template from the drop-down menu. The following IDI default templates are available:
- Default Direct Invoice
- Default Network Receipt
Note: A separate Change Request is required to develop and support any additional-custom invoice templates.
- Items To Include – This indicates which items are shown on the invoice:
- All Items (includes both direct invoice and billing Items)
- Direct Invoice Items Only – When selected,the system will also not display line items related to non-direct invoice items (e.g. price adjustments, installment plans, etc.) but any taxes from the hidden items will be included in the Tax Totals.
- Terms and Conditions – Enter text, as needed.
- Logo – The selected logo must meet the specifications of the configured invoice template. When using the Default Direct Invoice template, the logo specifications are width = 200 pixels by height = 60 pixels.
Click the Choose Logo button to search for a logo file.
Once a logo has been selected, a Remove Logo button is displayed. You can click this button to remove the previously chosen logo if needed.

Saving the Configured Settings
On saving your settings, the Settings page will display the configuration details.
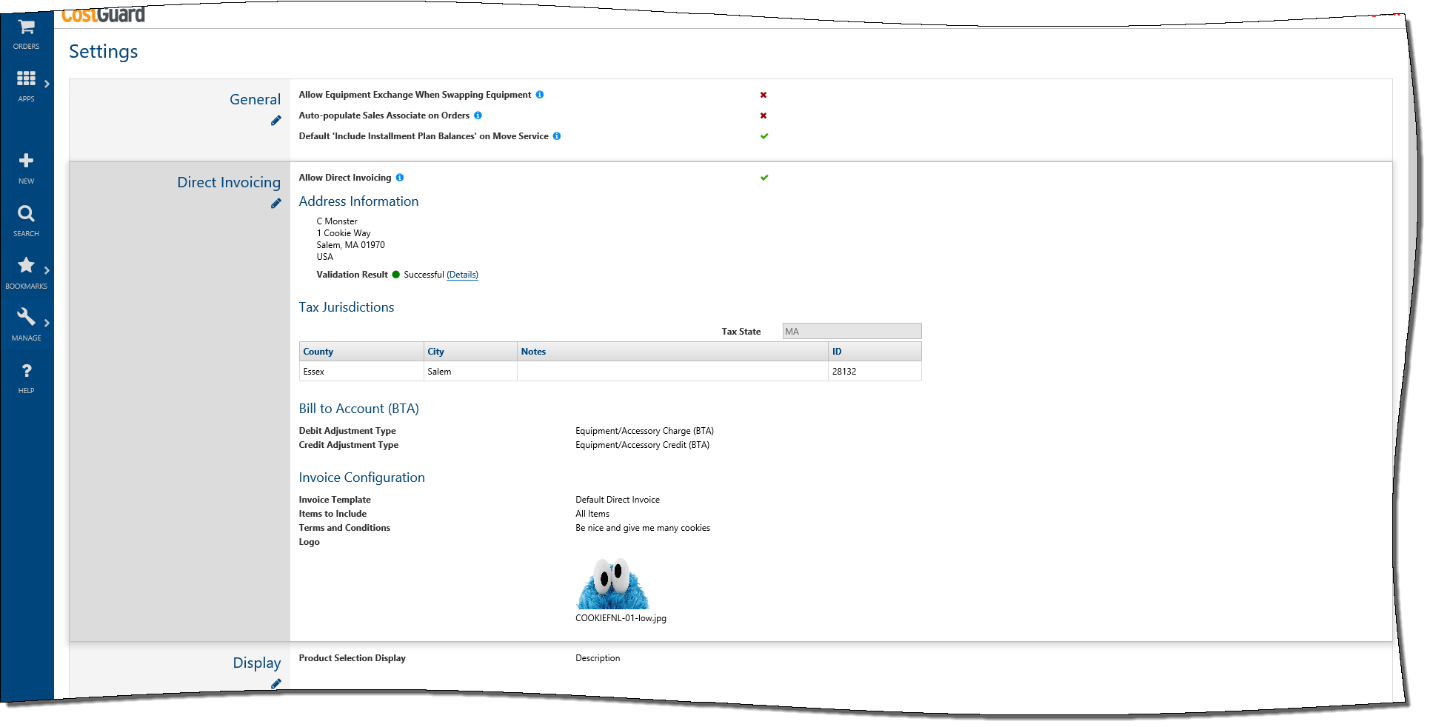
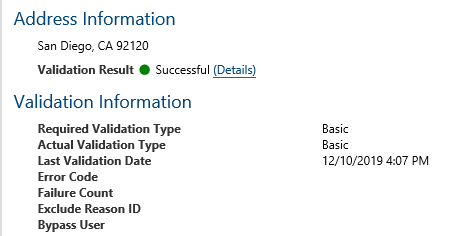
Validation details are available via the Details link after saving the Direct Invoicing settings.
If you need to change any configuration settings, click the Pencil icon 
Distribution Channel Auto-Setup in POS BackOffice
On successfully saving the settings, the solution will create a new channel of distribution in Location Management (POS BackOffice -> Locations) to support direct invoice transactions. This channel includes the following elements that can be viewed and edited in IDI Desktop Client:
- New Region
- Name = Direct Invoicing Region
- Abbreviation = DIRINVR
- Is Active
- All options (tabs) are set to Inherit from the Global Location
- New Store (within the new region)
- Name = Direct Invoicing Store
- Abbreviation = DIRINVS
- Is Active
- Store Type = Store[1]
- General Options are set to Override (not Inherit) from the Direct Invoicing Region
- All other options (tabs) are set to inherit from the Direct Invoicing Region
- Contact Info will be populated with the address information entered above.
- The Store will be configured with a Direct Invoice-specific Register Policy that is defined with the following:
- Set as an Override and not inherit from the Direct Invoicing Region
- Auto Reconcile = Yes
- Bill-to-Account (BTA) is configured as an accepted Tender Type
- The Store will be configured with a Direct Invoicing-specific Printing options that are defined with the following:
- Set as an Override and not inherit from the Direct Invoicing Region
- Network Printer Template is set to the Invoice Template selected (as described later)
- Footer is populated with the Terms and Conditions entered above
- New Register (within the new Store)
Configuring Starting Blocks for Direct Invoicing
Note: This only applies for version 22.4 and later.
Starting blocks are configured in the Product Catalog web module. II platform version 22.4 and later provides a Direct Invoice Experience starting block as shown below. This configuration is ready to use out-of-the-box and does not require further setup unless you need to make certain adjustments to meet your specific requirements. In that case you can either modify this configuration or create one or more new direct invoice starting blocks from scratch.
Version 22.12 or later – two tab presentation:


Versions 22.4 through 22.11:
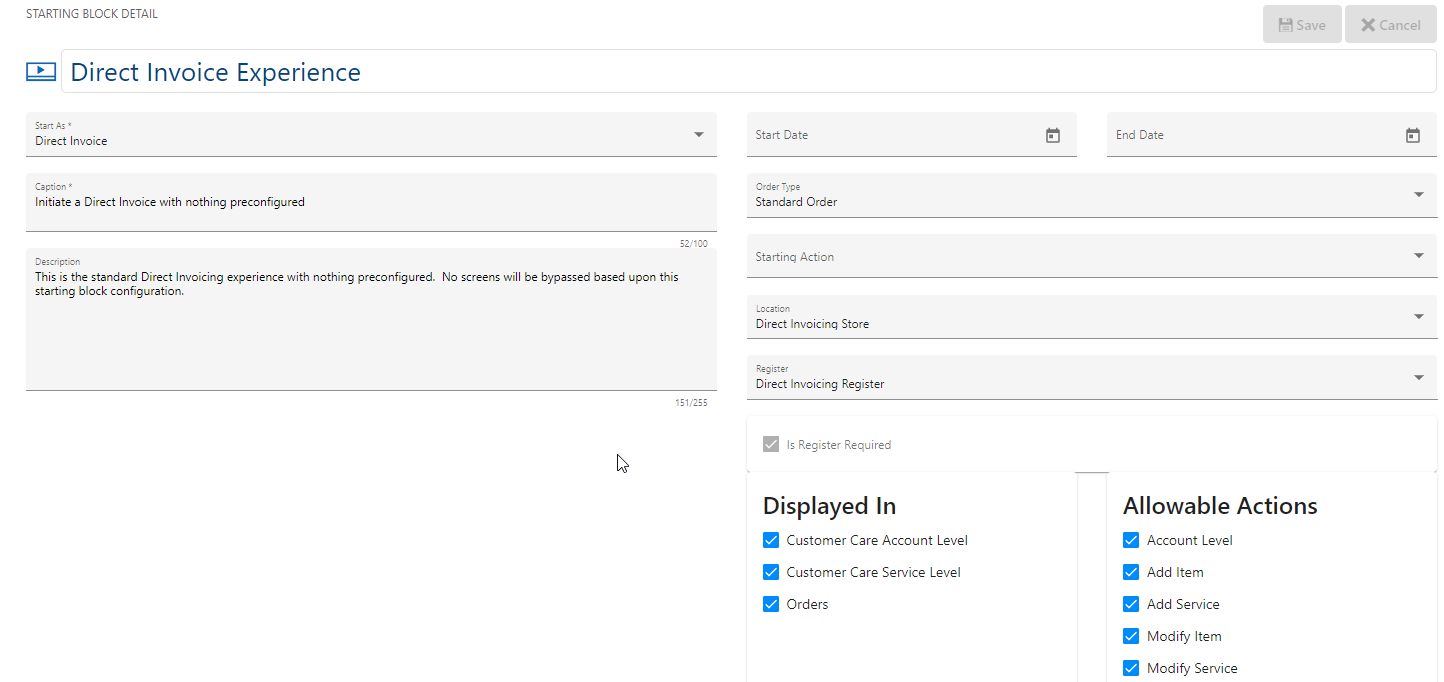
The Start As drop-down menu is pre-set to the Direct Invoice transaction type. DO NOT change this value if you intend to use the starting block to start a direct invoice transaction. When Start As is set to Direct Invoice, the Is Register Required check box is selected and cannot be unselected. Also, the Location and Register drop-down menus are pre-set to Direct invoicing Store and Direct Invoicing Register respectively. This matches the current setup for systems that use direct invoicing. For this release, it is recommended to NOT change Location and Register settings.
Note: The Is Register Required check box and the Location and Register drop-down menus are hidden when Start As is set to anything other than Direct Invoice.
With version 22.12 or later you can use the Invoice Configuration section to:
- Invoice Template – Select a template for invoice presentation. The drop down menu is populated with templates as configured in CostGuard Client.
- Items to Include – Choose to include all order items on the invoice or only direct invoice items.
- Terms and Conditions – Specify text for the terms and conditions.
- Logo – Opens window to find and select a logo image to appear on the invoice.
All other settings can be modified as needed; for example, to use a starting action or modify the Displayed In and/or Allowable Actions settings. Each of the settings are described in greater detail in the Web Sales article in the IDI Knowledge Center.
Defaults & Restrictions for Add/View Notes on a Direct Invoice Item
Order Field Configuration in the Orders web module lets you:
- Restrict the ability to enter notes and toggle the Display on Direct Invoice check box.
- Change the default for Display on Direct Invoice to selected (checked).
In Orders:
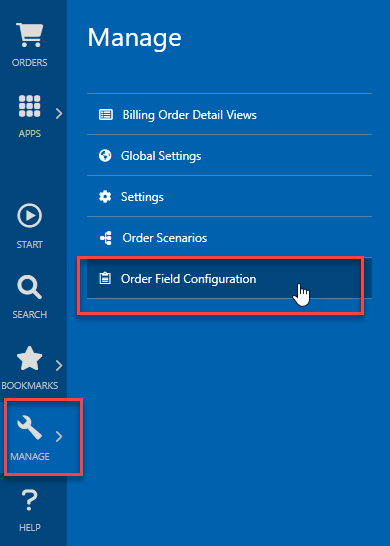
- Select MANAGE > Order Field Configuration.
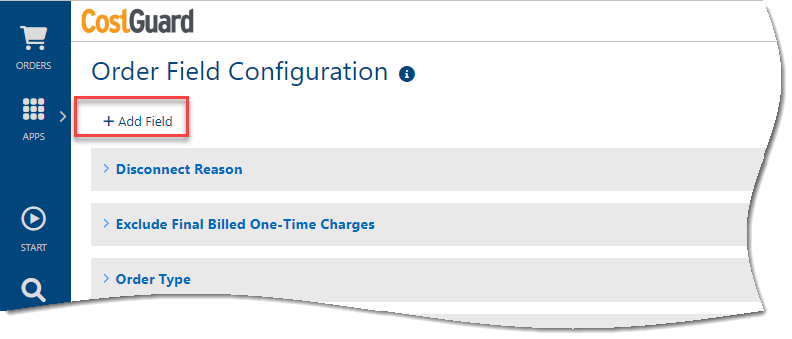
- Click +Add Field.
- In the Add Field Configuration drop-down menu you’ll see options for Display Notes on Direct Invoice and Item Notes

- Item Notes – You can restrict user acess for adding notes to a direct invoice item based on Starting Action and/or User Group(s).
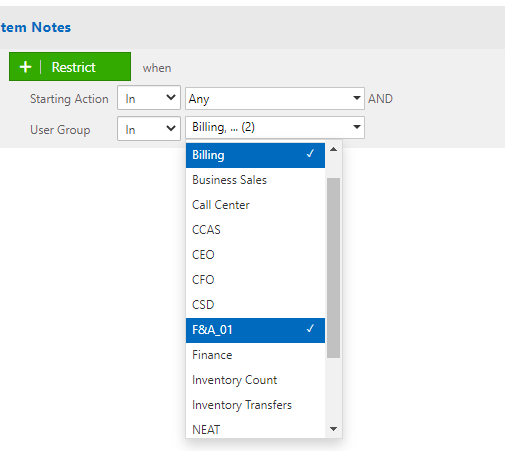
- Display Notes on Direct Invoice – You can:
- Specify the check box default to checked based on Starting Action.
- Restrict user access to the check box based on Starting Action and/or User Group(s).

Direct Invoice Entry
The overall process is like any other transaction, except that you will need to perform some additional steps when assembling, reviewing, modifying and/or completing a direct invoicing transaction. Note: Orange color scheme for banners, buttons, etc… transitions to blue with version 22.12 and later.
Start
Use a properly configured starting block (Start As = Direct Invoice) to begin a direct invoice transaction. When starting block functionality is enabled the NEW button in Orders is re-labeled START.

Clicking START displays the dialog for selecting the starting block. It lists any starting blocks that you’ve configured in the Product Catalog web module that fall within the start/end dates set on each block. You can browse through the list using the forward (>) and backward (<) buttons or enter a string to search on (for example direct).

Selecting a direct invoice starting block displays the Basic Information page similar to initiating an order or cart transaction, except that the page is labeled to indicate that you’re starting a New Direct Invoice transaction.

As with other transaction types, you need to specify the Customer. Order Type may or may not be auto-populated based on the starting block configuration.
Saving the basic information displays the Details page for assembling the transaction. The page is appropriately labeled to indicate you’re working with a direct invoice transaction.

Assembly
This is where you select one or more direct invoice items for the transaction (items configured to allow direct invoicing). You can also do the following on an optional basis as needed:
- Apply discounts
- Change the tax jurisdiction for an item
- View, Edit or Delete an item that’s been added to the transaction
- Add notes to an item
Adding Direct Invoice Items
On the Details page, click the Add Item button.

Choose to add account- and/or service-level items. Then search for direct invoice Items using the description: Note that direct invoice items can be serialized or non-serialized. Note that retail items can be serialized or non-serialized. You’ll need to enter serial numbers for serialized items before adding them to the transaction. Note: All labeling is consistent with a direct invoicing user experience.

If you’re on version 22.7 or later, the item details view will have additional fields for adding notes to the item.
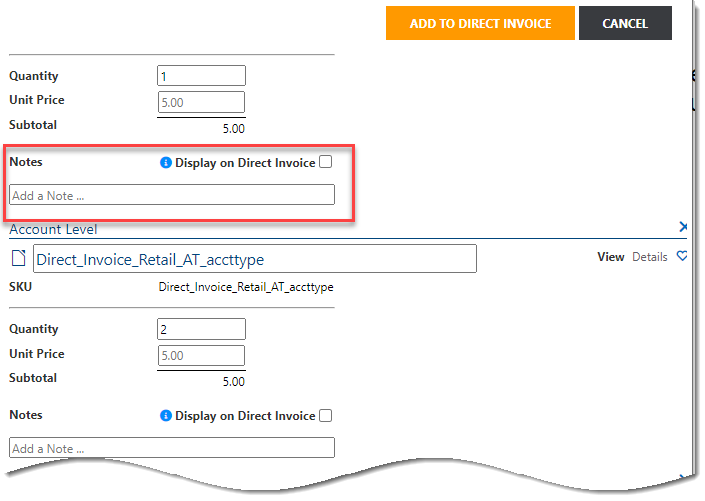
Clicking in the field expands it to let you enter up to 4000 characters. Note: Although the Notes field can handle 4000 characters, be cautious of how much room the notes will take up on the direct invoice.

Checking the Display on Direct Invoice check box displays the notes on the direct invoice on its own line under the item’s Description. Clicking the information icon (!) displays text to let you know the entire note will display on the invoice if checked and caution you to be aware of space limitations.

- When unchecked, the note is for internal viewing only. It will remain on the direct invoice item and will be displayed whenever the order is being viewed, up to and after completion of the order. Once the order is completed, the notes are read-only and cannot be edited.
- When checked, the notes will be displayed on the invoice. Note: No further setup is required if you have the Default Direct Invoice template selected in your Direct Invoice settings in Orders. If you want to use a different template, you’ll need to contact IDI for assistance.
When you’re finished with the item(s), click ADD TO DIRECT INVOICE. Or if you need to apply discounts or change tax jurisdiction, select the applicable option from the View drop-down menu.

Applying a Discount on a Direct Invoice Item
The Discount view lets you apply one or more discounts on-the-fly.
To do this:
- Click the + icon. This displays fields for entering the discount details.
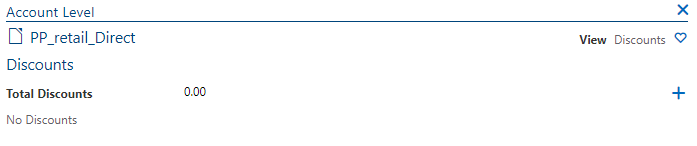
- Enter a Description
- Select a Reason.
- Select either Amount or Percentage as the Type
- Enter the Amount
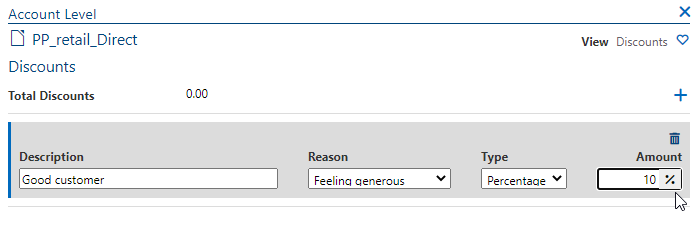
- Click the + icon to add another Discount. To remove an added Discount, click the
 icon.
icon. - Click ADD TO DIRECT INVOICE to apply the discount or change the View to continue configuring this item.
Note: If a Retail Promotion has been configured for the direct invoice item and the eligibility conditions are met, the system will automatically apply the Retail Promotion-driven discount.
Changing Tax Jurisdiction on a Direct Invoice Item
If you need to establish a tax jurisdiction other than the configured default for a specific direct invoice item, use the Tax Information view. You can select from any of the following options:
- Default Taxing Method – Uses the Tax Jurisdiction for the configured default address (MANAGE -> Settings). This is the default selection when you open this view.
- Primary Customer Contact – Uses the Tax Jurisdiction from the account’s Primary Customer Contact. Selecting this option displays this contact’s address information (as shown below).
- Service Address – Uses the Tax jurisdiction from the selected Service Address. Selecting this option displays a drop-down menu for choosing an existing Service Address on the account
- Service Contact– Uses the Tax jurisdiction from the selected Service Contact. Selecting this option displays a drop-down menu for choosing an existing Service Contact on the account. Or you can click the + icon to add another Service Contact (using Customer Care)

Click ADD TO DIRECT INVOICE to apply the tax information or change the view to continue configuring this direct invoice item.
Review and Bill to Account
When you’re ready to move from Assembling to the Review phase, click Review Direct Invoice.
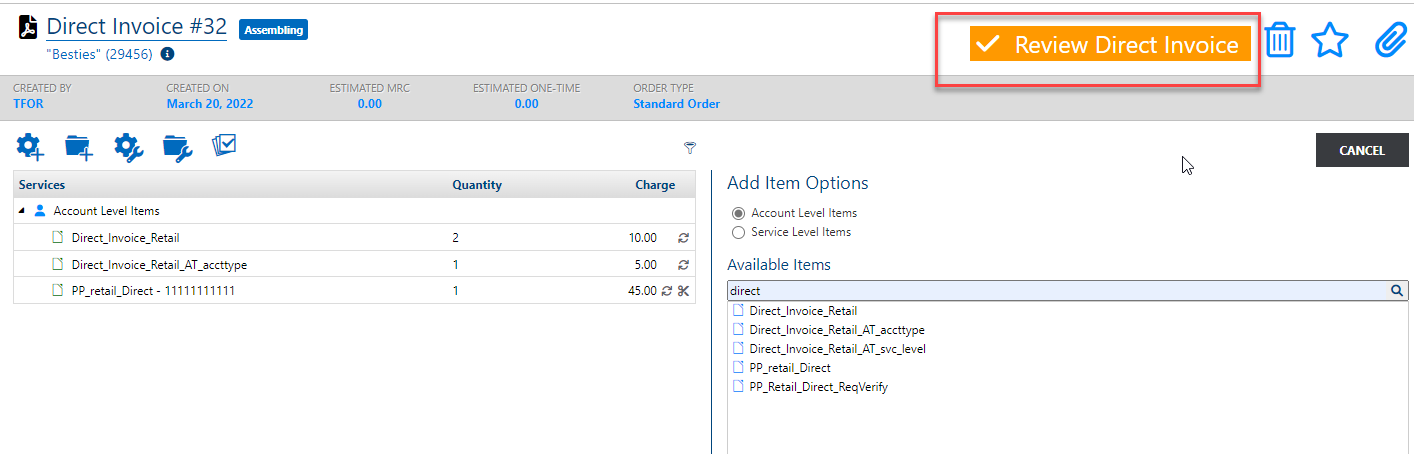
This displays the Summary view.
Note: If you leave the Detail page in assembly phase without clicking Review Direct Invoice, and then return to the transaction via the Direct Invoice OmniSearch, the Summary view will not be as described below. It will not show the TAX & TOTALS tab and will have a COMPLETE DIRECT INVOICE button (rather than SUBMIT DIRECT INVOICE). In this case, you must click the COMPLETE button to proceed to the Summary with TAX & TOTALS.
If you proceed to the summary directly from the Details view by clicking Review Direct Invoice, the Summary page will have a TAX & TOTALS tab that shows a subtotal, tax, and total amounts stemming from all charges related to the direct invoicing items on the transaction.

This tab lets you view the generated direct invoice and/or add a line for the amount to be Billed to Account (BTA).
- To view the invoice, click the View Invoice icon. Note: This icon is only available on the TAX & TOTALS tab.

This displays the invoice (per the configured invoice template). If done prior to adding BTA (see next steps), the invoice will indicate a total is due.

If you’ve added notes and selected to display them on the invoice, you can see the notes in the Description column under the SKU/Description.

- To add a BTA line, click the +NEW button on the TAX & TOTALS tab.
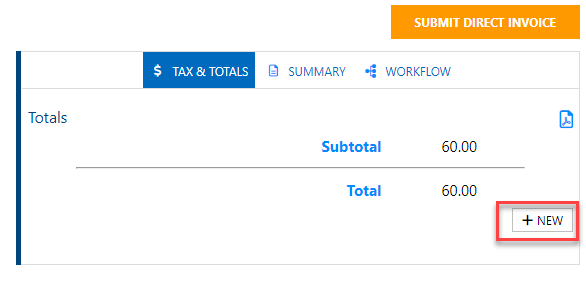
This displays the Type and Amount fields.
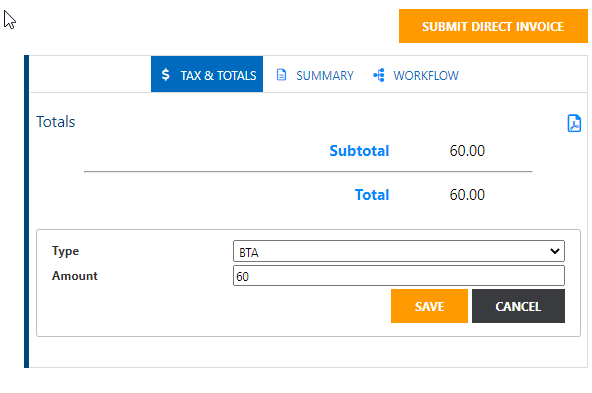
- Type defaults to the BTA (Bill-to-Account) tender. Only tenders configured with a base tender type of BTA are supported.
- Amount defaults to the total amount due for all direct invoice (retail) items for this transaction.
Note: The system will not let you submit the direct invoice unless the Amount is equal to the total amount due for the direct invoice items. Attempting to submit prematurely will display an error message to alert you of this condition.
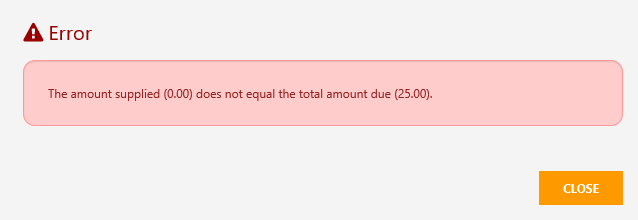
If you edit this amount (for an amount less than the total due), the system will prompt for another Type and Amount entry.
- Click SAVE. This adds a line (or lines) for the Type (BTA) and Amount under the Total.

- Now, if you display the invoice, you’ll see the BTA information.

At this point you can either return to the Details view to add more items or submit the Direct Invoice.
Submit
When you’re ready, click SUBMIT DIRECT INVOICE. This results in the following:
- The indicated amount tendered to BTA will be immediately billed to the account and be an unposted adjustment on the customer’s account balance.
- An invoice (that overwrites any existing invoice) is stored in Document Storage. This is only done for direct invoice transactions. No invoice is generated for non-direct Invoice transactions.
- Any workflow(s) associated with the Order Type are started. If the workflow includes steps that allow for you to pause the direct invoice order, you can add more or edit Items on the transaction for any unlocked services.
Creating the Bill-To-Account Adjustment at Submit
Creating the BTA Adjustment uses the Workflow Action – Process BTA Adjustments.
Note: This action is available to be used when configuring a Workflow Trigger.
On submitting, the Process BTA Adjustments Action does the following:
- Finds all open or authorized tender information items in the transaction with a BASE tender type = BTA
- Creates an adjustment for each BTA-based tender on the transaction. Note: It uses Customer web service CreateAdustment operation to create the adjustment
- The Adjustment can be blocked or not (based on Workflow configuration, if applicable)
- Adjustment Type is based upon the Debit (positive) or Credit (negative) Adjustment Type configured on the specific BTA-based Tender Type
The description of the created BTA Adjustment on the Account Balance is <Adjustment Type Description> [BTA for Transaction <.Receipt Number>].
If/when the Billing System Update runs after this action is completed, the system will recognize the already-created adjustment and will not create a duplicate. Note: You cannot edit any BTA tenders that have already been captured or completed.
Managing Direct Invoice Transactions
Orders – Direct Invoice Search
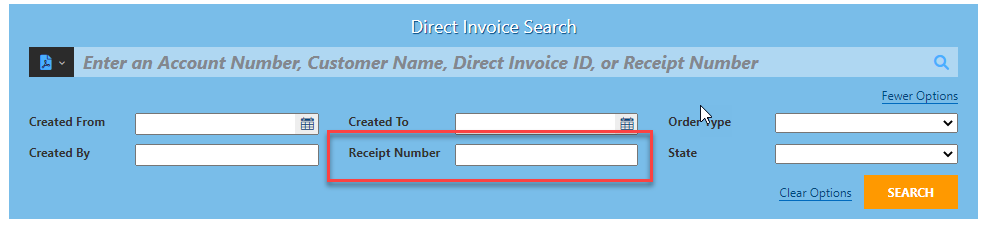
When direct invoicing is enabled, the OmniSearch page in Orders provides an option for searching on Direct Invoicing transactions.

Under More Options, the Direct Invoice search lets you search by receipt number.
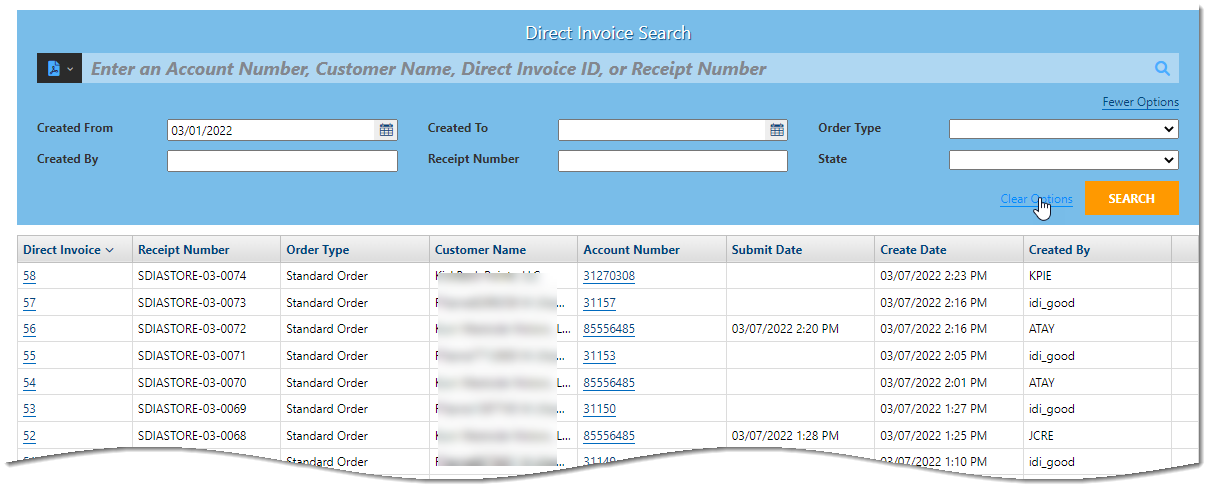
Example Search Result:
Customer Care – Direct Invoice History
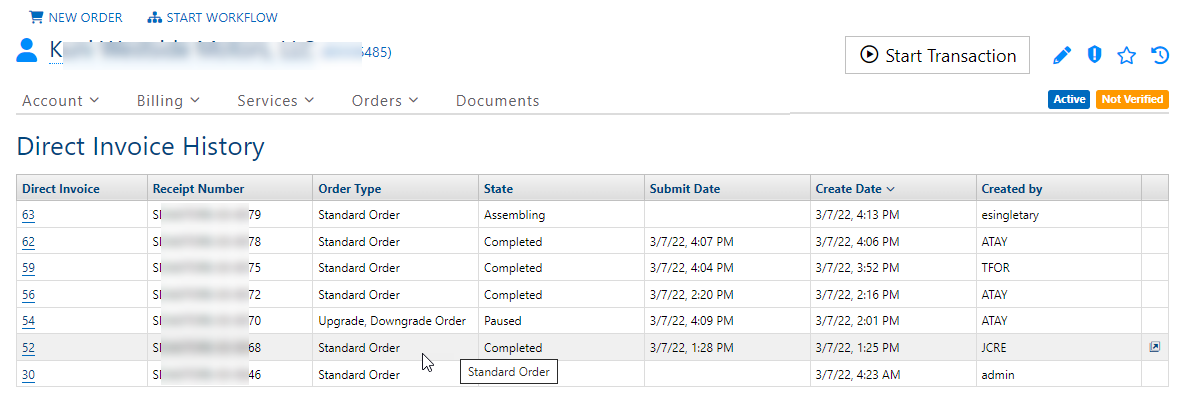
Also, when direct invoicing is enabled in systems at version 22.4 or later, in Customer Care, the Orders menu provides a new option for viewing Direct Invoice History.
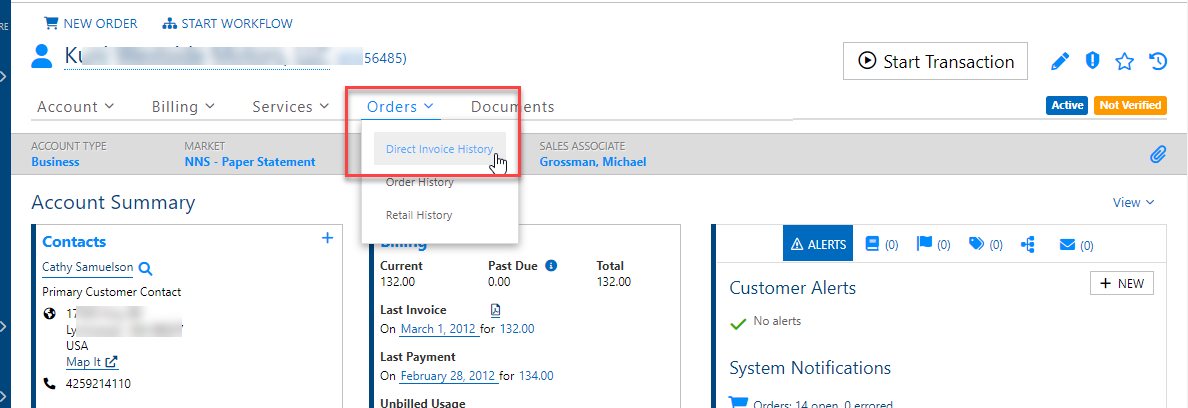
The functionality on this page is similar to the Order History page in Customer Care. Clicking a Direct Invoice link (far left column) takes you to the transaction in the Orders web module.
- Store was added as a new core POS Store Type (ID = 3) POS Back Office -> Setup -> Store Types ↑