About Web Sales
Web Sales is an ongoing development effort to provide a complete web-based solution for initiating the full scope of front office transactions including billing orders, tendered retail sales and direct invoice transactions. This supports convergent selling of wireless and wireline services and products on the same transaction. The start/assembly/finalize phases are basically the same regardless to the type of transaction with some unique steps as needed to complete the respective transaction types.
Leveraging this functionality, you can use a transaction in the Orders web module to either sell, order, or direct invoice any post-paid billing and/or retail catalog item for any service or account. If the starting block and/or direct invoicing solutions are not currently enabled in your system, functionality described in this article will not be visible in your system.
If you need to use retail functionality in Web Sales:
The full range of web sales functionality that supports selling billing and retail products in the same transaction, and other POS location/register applications is covered in a comprehensive web sales knowledge article. This includes:
- Direct invoicing.
- Tendering retail transactions via the Paymentus payment vendor.
- Returns and voids.
- Support for service and installment agreements.
If you want to benefit from advantages Web Sales provides for billing (non-retail) orders:
Continue in this article. It covers how to use starting blocks for billing only orders. This includes making use of IDI-provided starting blocks that you can use as is or modify for a wide range of transactions including disconnects/reconnects, suspend/restore, new service/feature and more.
This article lets you start simple, and learn the basics. If you’re interested in learning about the broader range of functions and benefits that web sales offers, you can consult the comprehensive article referenced above, or consult more targeted articles for:
Release History
Functional milestones will be deployed over a series of IDI solution software releases where each subsequent release builds on the prior one. For details regarding the overall goal, objectives, and planned future deliverables for this project, refer to the IDI Knowledge Center > IDI solution Updates > Upcoming Features page.
Below is a list of deployments that concern providers that don’t require retail functionality:
Version 24.7
This release provides an enhanced user experience for performing credit checks on web transactions. Also, not strictly related to web sales, this deliverable provides:
- The ability to manually add deposits to a transaction.
- the ability to navigate directly to Customer Care from the Orders Enhanced Customer Search to create a new customer and then return to the order seamlessly.
Version 23.10
This release provides the following enhancements:
- Behavior options to order pages when not applicable for the current transaction (for instance, a disconnect customer or hotline service). You can choose to skip one or both of the following pages when the starting block’s and/or Order Field configuration provide the required information:
- Skip New Transaction (Basic Information) page and begin on the Details (Assembly) page.
- Skip New Transaction and the Details pages and begin on the summary (either the Review Cart or the Summary page).
- Display New Transaction page and then skip Details page. After saving the basic information, the transaction resumes at either the Review Cart or Summary page.
- Additional starting block options for certain starting actions – Additional options are presented for starting block configuration when applicable for the selected starting action. This lets you prepopulate the required information on the order to streamline the process and potentially avoid errors. The options depend on the selected starting action.
Version 22.12
This release provides an enhanced web transaction experience and new starting block functionality. You can initiate an order, sale, or direct invoice transaction that requires a retail location and register. You can do this by either:
- Configuring the specific register and location on the starting block. In this case, the selected starting block sets the register and location for the transaction without any user involvement.
- Applying the location and register from the user’s specified My Location as set via the Orders web module application tray.
Applying a register and its location to a transaction lets you:
- Have a receipt or direct invoice generated for the transaction.
- Email the generated receipt or direct invoice to the customer as a message or notification using IDI’s Communication web module.
Version 22.4
This release provides an enhanced direct invoicing solution aligned with Web Sales and starting block functionality. With this release, you’ll use a starting block to begin the direct invoice transaction that is tailored for that user experience by page labeling, icon, and button names. Prior direct invoice functionality required you to begin a direct invoice transaction as either an order or cart/sale where it would be converted to a direct invoicing experience by adding a direct invoicing item. With this release, direct invoice transactions are initiated via a direct invoice starting block, so this conversion is no longer needed. The following enhancements are also provided with IDI solution version 22.4:
- The Orders and Customer Care web modules facilitate searching, tracking and managing direct invoice transactions.
- Existing direct invoicing orders or sales are converted to direct invoice transactions such that you can use the new search/history functionality in Orders and Customer Care to manage them.
First Deliverable – Version 22.1
This release introduces configurable Starting Blocks. Starting block configuration and maintenance is done in the Product Catalog web module. Leveraging starting block configuration, you can initiate either a front office sale transaction (remote customer presence) or back office order transaction (no customer presence) in the Customer Care and/or Orders web modules. The type of transaction you initiate drives order or sale-oriented functionality from assembly to completion.
When you configure a starting block, you can also define parameters to streamline transaction assembly by setting default values and/or limiting options. For sale transactions, you can assemble, review, and finalize a remote sale containing billing items that can be assigned to either an account or to any type of service.
In addition, this milestone enhances Orders web pages to support desktop- and mobile-friendly presentation/usability.
Terminology
| Order | Typically, providers that don’t require retail functionality will use starting blocks set up to start order transactions. Orders follow the assembly and billing order phases of the traditional (pre-web sale) orders. |
| Cart/Sale | A cart is the assembly phase when you select a starting block configured as a sale transaction. This is a transient phase where items are selected for eventual checkout (purchase). Carts also provide a review cart page where you can review the result (change in customer’s invoice) based on the cart content. Carts do not persist after being finalized. At this point the cart transitions to a sale. A sale is the result of a finalized cart.
The cart/sale scenario may be of interest to providers that handle over-the-phone orders and want to take advantage of the opportunity this flow provides to review the transaction with the customer prior to submitting. |
| Transaction | This term is used in this article as a generic reference to carts, sales, and orders. |
Setup
Setup involves:
- enabling starting block functionality in your system (disabled by default) and configuring starting blocks in the Product Catalog web module.
- setup for credit checking (if you need to use that functionality).
Security – Permissions
Permissions are required for skipping required credit checks, and manually adding deposits to a transaction. These permissions are included in the following roles:
- Orders Admin
- Orders Manager
- Orders User
These permissions are listed under Orders for the selected user and environment in the Security web application.
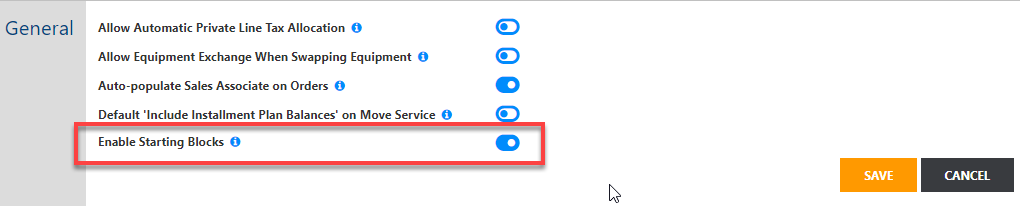
Enabling/Disabling Starting Block Functionality
There are two settings for enabling this functionality – one in Orders and one in Customer Care. You must enable the Orders setting to use this functionality. The setting in Customer Care is also required if you want to use this functionality in Customer Care.
- Enabling Starting Blocks in Orders
- When disabled (default), there is no change to the current user experience in Orders and Customer Care. Also, starting blocks cannot be configured in Product Catalog web module.
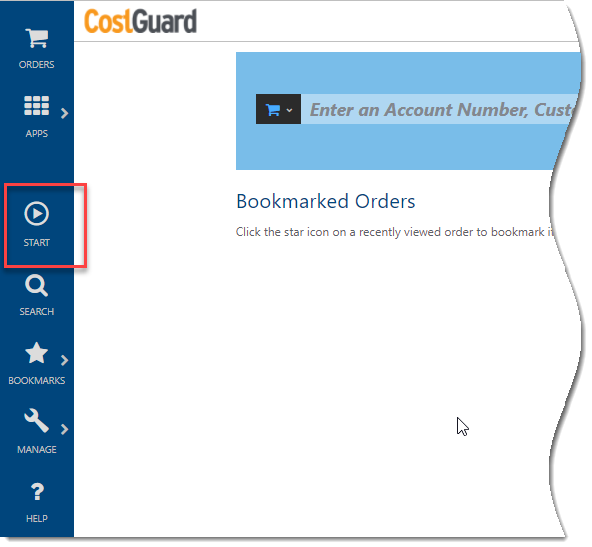
- When enabled, the Product Catalog web module supports starting block configuration. Also, the NEW (+) button in Orders is relabeled as START > and clicking it displays a dialog for selecting a starting block as a means to start a sale/order. Also, starting block functionality is supported in Customer Care if the corresponding setting is enabled there as well.
- Enabling Starting Blocks in Customer Care
- When disabled (default), starting block functionality and sale transactions are not supported in Customer Care. In this case you can enable the functionality in Product Catalog web module and Orders using the Orders setting and leave it disabled in Customer Care.
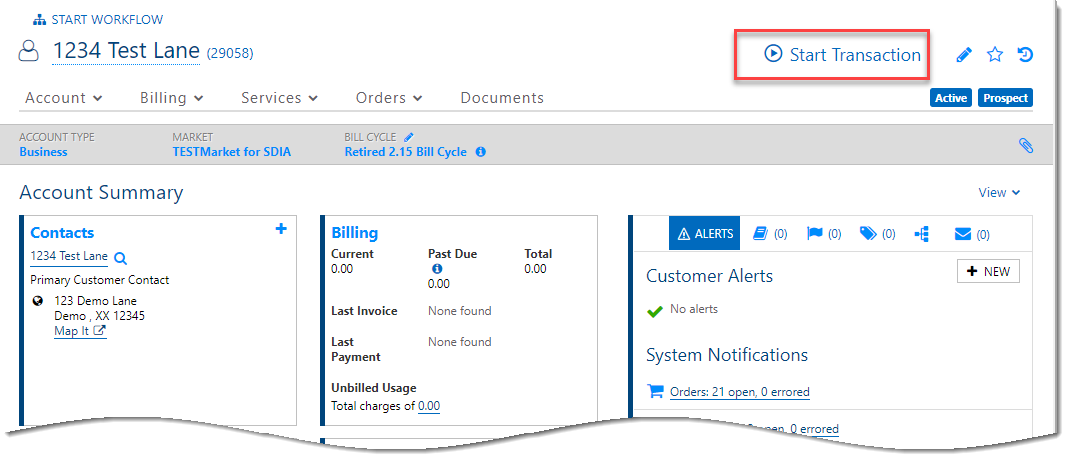
- When enabled a Start Transaction button is provided on the Account Summary page (all views) to initiate account-level transactions. A button is also provided on Services and Features page when a service is selected to support service-level transactions. In both cases, clicking Start Transaction displays the dialog for selecting a starting block.
Prerequisites for Credit Checking
This article provides a quick overview. Complete setup details are provided in the Setup for Credit Scoring and Deposits article in the IDI Knowledge Center.
Getting Started/Prerequisites
Establish a relationship with TransUnion and work with them to set up an account for your company. Contact your IDI Project Manager for advice on how to do this. Then submit a work order to have IDI set up credit scoring logic as described above. Include your specific requirements for an IDI specialist to assess.
Credit Scoring
- Assign permissions in Admin Console Security and Web SaaS Security.
- Configure credit scoring settings in IDI Desktop Client.
- Configure credit classes in Admin Console > Data Management.
- Configure one or more starting blocks in the Product Catalog web module.
Setting Up Starting Blocks in the Product Catalog Web Module
Authorized users can create and maintain starting blocks in the Product Catalog. The following starting blocks are provided out-of-the-box when the Orders setting is enabled:
- New (Basic) Order
- New (Basic) Sale
- Disconnect Customer
- Disconnect Service*
- Hotline Service*
- New Feature*
- New Service
- Reconnect Service*
- Redirect Service*
- Restore Service*
- Suspend Service*
- Swap Equipment*
In addition, for systems on IDI solution version 22.4 or later, the Direct Invoice Experience starting block is provided when direct invoicing is enabled.
Notes:
- Starting blocks marked with an asterisk (*) replace the equivalent options available in the Actions drop-down menu (available when starting blocks are disabled).
- The out-of-the-box starting blocks listed above can be used as is or be modified as needed. You can also create custom starting blocks as needed.
To create/edit a starting block, in the Product Catalog web module choose MANAGE > Starting Blocks.

This displays the Starting Blocks page listing existing starting blocks. The Name link for each block lets you open the block to view and edit its current configuration. You can also use this form to create custom starting blocks to meet your specific requirements.
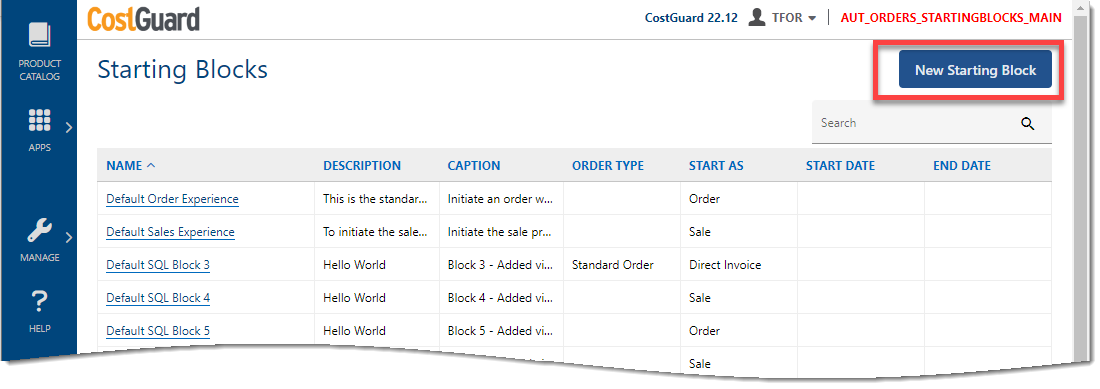
To create a new starting block, click New Starting Block in the upper right corner. Then use the New Starting Block dialog to configure the block’s behavior.
Note: In IDI solution 22.12 and later, the New/Edit Starting Block form presents configuration options on two tabs – Main and Policy. In earlier releases, all fields are presented on one comprehensive form, and some fields are not available at all.
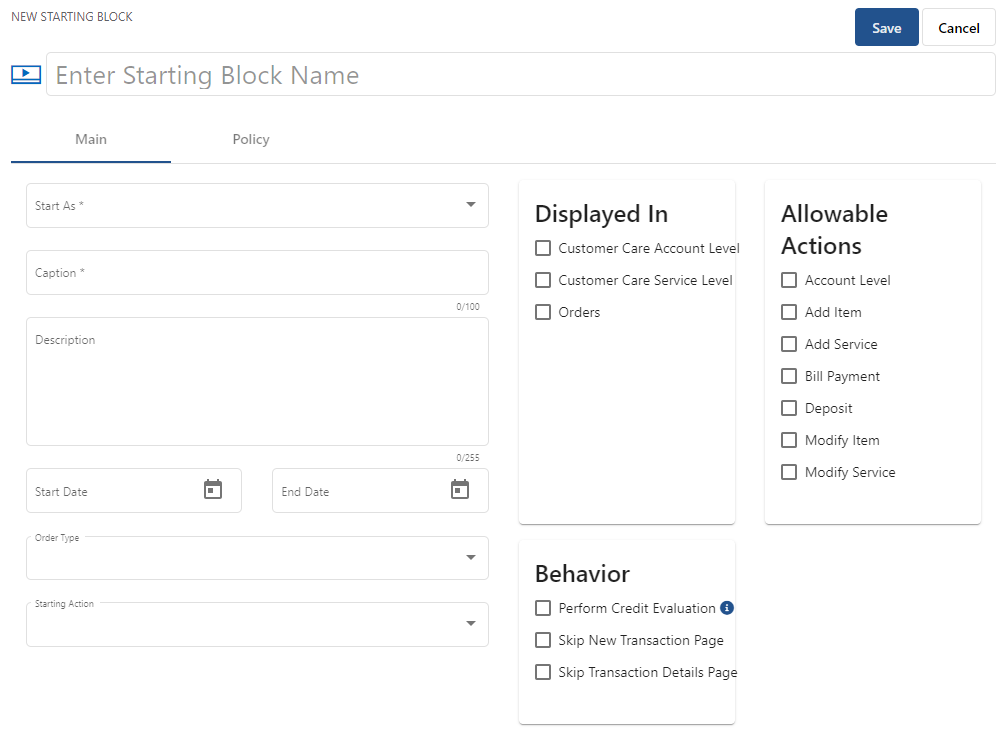
- The fields presented on the Main tab (shown above) are described below.

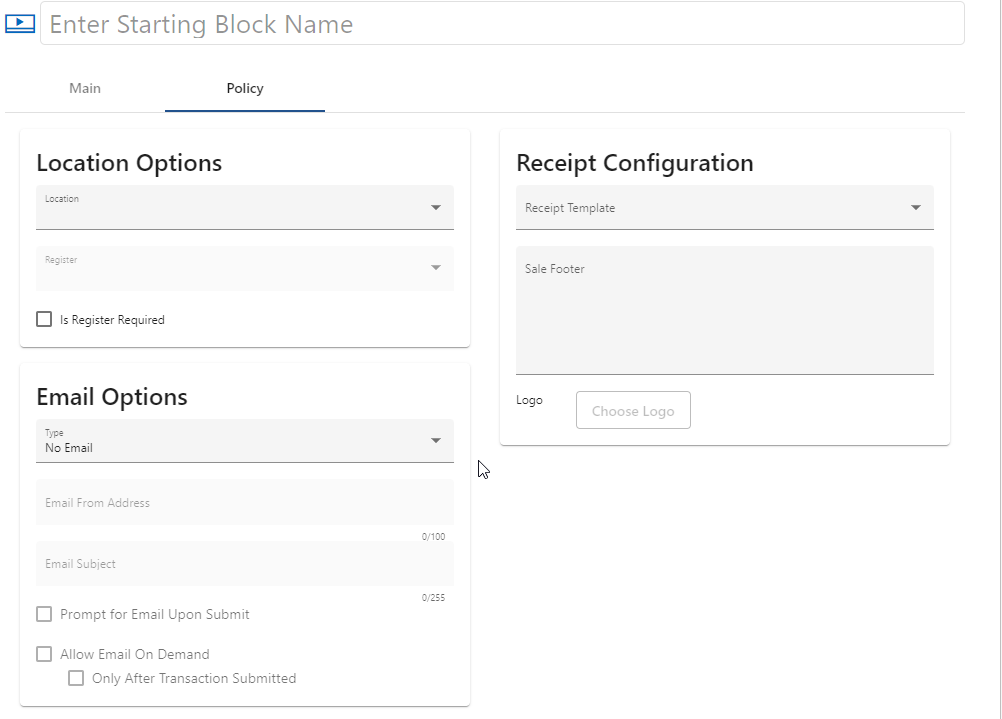
- The fields on the Policy tab are not applicable unless you need to use registers in support of retail-related functionality.
Considerations for Credit Checking and Manual Deposits
This functionality requires you to select the Perform Credit Evaluation Behavior and Deposit Allowable Action. This action toggles the ability to manually add a deposit to the transaction, independent of the credit scoring logic. This setting does not impact automatically adding deposits to a transaction as dictated by your credit scoring logic. Note: With proper setup, manual deposits can also be supported without starting blocks.
Web Sales Look and Feel
This section covers:
- starting a web sales transaction from the Orders web module or Customer Care. This includes starting:
- an Order transaction
- a Cart/Sale transaction – typically not applicable for wireline
- a Direct Invoicing transaction
Starting a Transaction from the Orders Web Module
From the Orders APPS tray click START >.
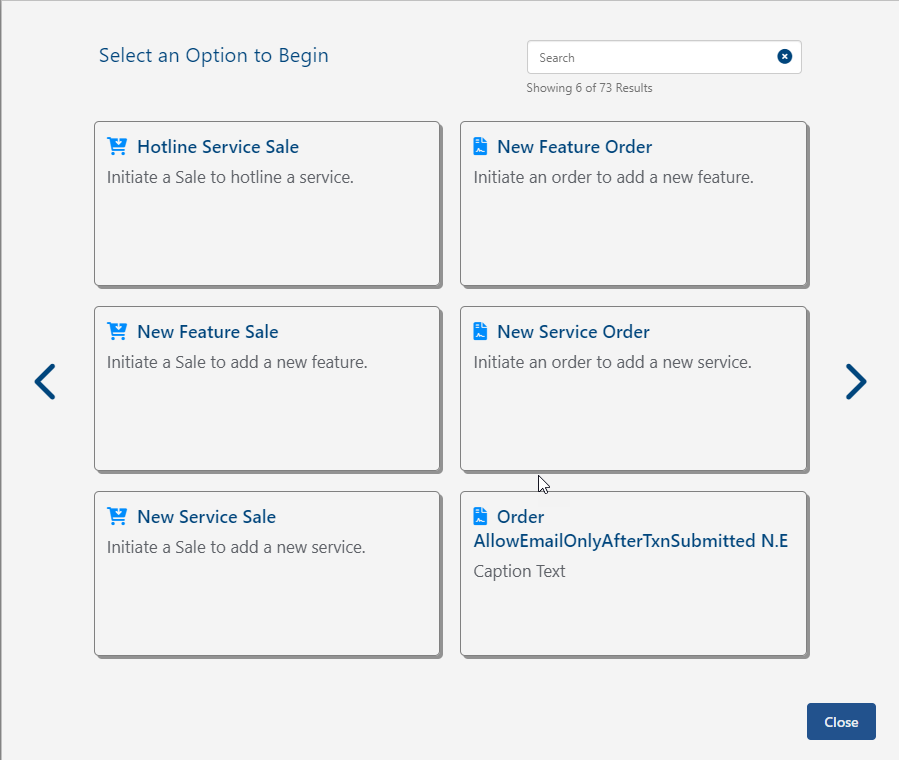
This displays the dialog for selecting a starting block. It lists existing starting blocks configured for availability by location (Orders, Customer Care account-level and Customer Care service-level) and date range. You can browse through the list using the forward (>) and backward (<) buttons or enter a text string to search (for example new order).
The following sections briefly describe the look and feel of the order and cart/sale transaction types.
Order Transaction
Selecting a block configured as an order transaction displays the familiar New Order Basic Information page. Note: If the block is configured with a specific Order Type, that Order Type will supersede any existing Order Field Configuration (OFC) and will be automatically selected. If no Order Type is configured on the selected block, the solution observes the Order Field Configuration, if set. If neither the block nor the OFC have been set to select a specific Order Type, the Order Type must be selected, as currently supported.

On specifying the customer and saving the basic information, the familiar order assembly page is displayed. From here the order proceeds as any other order transaction in the Orders web module.

Cart/Sale Transaction
Selecting a block configured as a sale transaction displays the same basic information page, except that the icon in the upper left corner indicates you’re starting a New Cart. Note: As with Order flows described above, if the block is configured with a specific Order Type, that Order Type will supersede any existing Order Field Configuration (OFC) and will be automatically selected.

On specifying the customer and saving the basic information, the order assembly page is displayed. With this release, the basic flow is similar to a billing order except that certain elements have different labels consistent with a cart/sale transaction as opposed to a billing order. Also, the presentation of certain screen elements has been improved, and the assembly phase for cart/sales provides an additional page for reviewing the sale with the customer prior to finalizing the sale.

Clicking Review displays the Summary page. This page is unique to Sale transactions. It provides sales representatives an opportunity to review the transaction with their customer to ensure it meets the customer’s expectations prior to finalizing.

The Billing Summary section provides the following information:
- A simple order summary statement – in the above example, Adding one service and two features.
- Separate sums for billing recurring and one-time (non-recurring) charges.
- A simple summary of the total (sum of recurring and one-time charges) and the resulting Increase/Decrease on the next invoice; for example: The next invoice will include an estimated amount of 15.00
The Retal Summary section provides totals for the following:
- Item (count) Subtotal – The sum of the extended price from all retail product line items. The label contains a count of the unique items (SKUs) involved.
- Retail Discounts – The sum of the retail discounts applied.
- Taxes – The sum of the calculated sales taxes to be paid.
- Total Amount Due – This is the net of the above listed sums.
Note: For IDI solution version 22.1, the Retail Summary only supports direct invoice items.
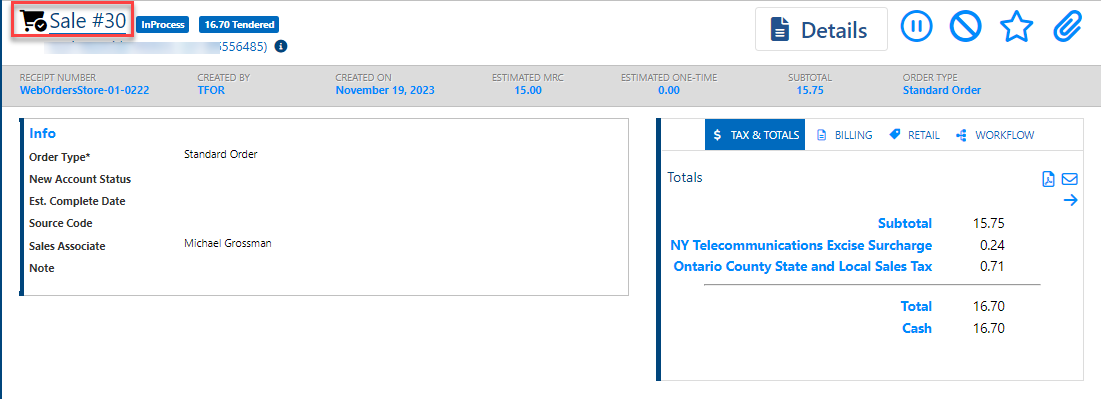
Clicking Proceed to Checkout displays the page for tendering (if applicable) and finalizing the transaction. The left panel provides miscellaneous transaction information and the right panel has four tabs:
- TAX & TOTALS shows a breakdown of the retail charges to be tendered, icons for viewing and emailing the receipt, and a +NEW button for adding tender types/amounts.

Note: Tendering options are based on Register Policy setup in the IDI Desktop Client (see Setup). If your system is integrated with the Paymentus payment vendor, you’ll have an option for Paymentus tender type. Using Paymentus is demonstrated the section on Tendering a Retail Transaction with Paymentus.
From this page, clicking Finalize Sale submits the cart and converts it to a sale.
Starting a Transaction from Customer Care
In Customer Care a Start Transaction button is provided on the Account page (all views) in the upper right next to the icon bar. This button is intended to display starting blocks configured to be available for account-level transactions in Customer Care.
A Start Transaction button is also displayed on the Services and Features page in the right-hand Service Views panel when you select a service in the left-hand panel. This button is intended to display starting blocks configured to be available for service-level transactions in Customer Care. Note: The account-level Start Transaction button next to the icon bar is still available.
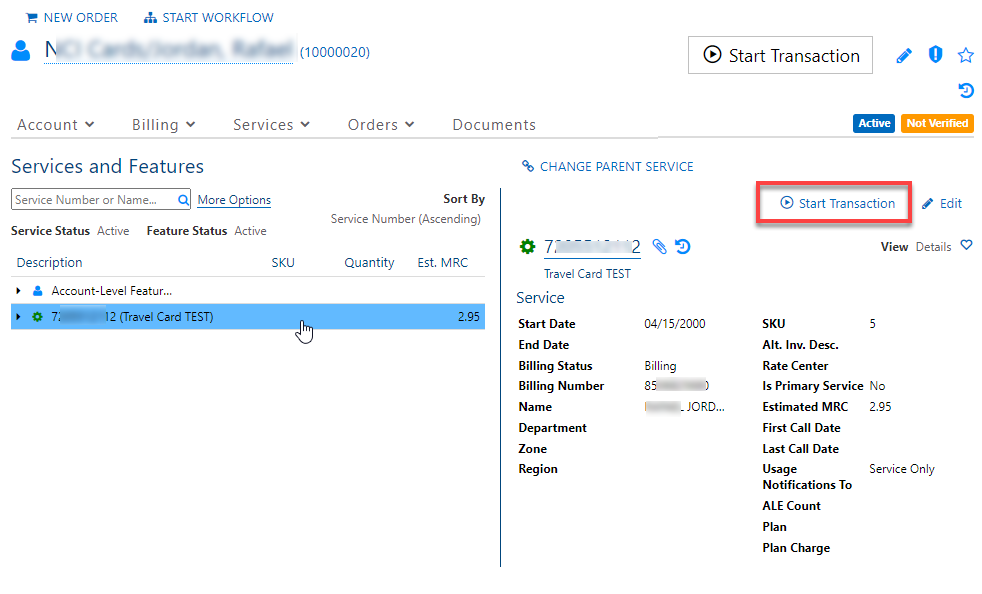
In either case, clicking this button displays the form for selecting a starting block. Once you select a starting block, the Orders web module opens in a new tab and the transaction proceeds based on the selected block (same as when you start via the Orders web module).
Transaction Search
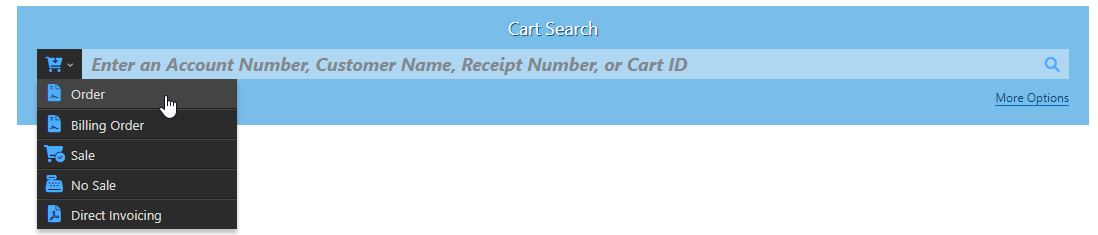
The OmniSearch in the Orders web module lets you choose whether to search for billing orders, orders (assembly phase), carts, sales and no sale transactions. Orders is the default search.
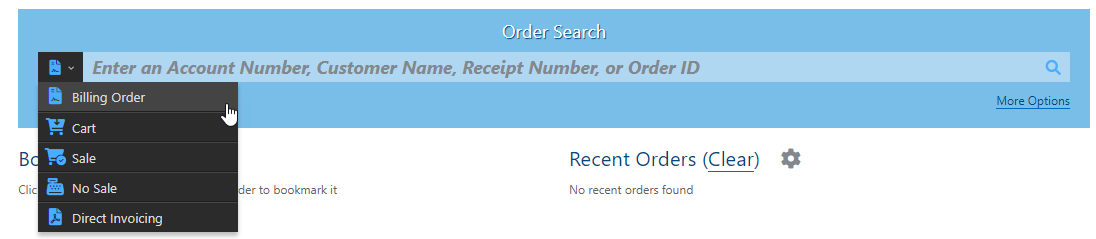
Selecting any other search option will add Order back to the list.
Order Search
When Order Search is selected the main search field lets you search by Account Number, Customer Name or Order ID. More Options provides the following additional criteria.

Credit Checking
This is supported for transactions initiated by a starting block set up to perform credit evaluations. Also, manually adding deposits is supported when the starting block is set up for this. For details on credit checking and manual deposits, refer to the Credit Evaluations article in the IDI Knowledge Center.