About Discounts
This article provides a quick overview of discount functionality in the IDI solution. It’s one in a series of articles that provide complete instructions for creating and managing discounts. You’ll find links to the other articles in Where to Go From Here at the end of this overview.
Discounts are added and configured as catalog items in the IDI Desktop Client Product Catalog, and then applied to customer accounts or services via any of the following applications:
- Orders and Customer Care web modules
- Client-based Customer Management and POS Front Office
Discount activity on a customer’s account can be monitored via the various usage views in Customer Care or Client Customer Management.
The IDI solution system supports two basic discount types:
- A Grant discount grants customers an award, for example free minutes, usually as part of a calling plan or promotion. Grant discounts are calculated when usage is rated.
- A Volume discount must be earned through a specified purchase. For example, a 10% discount may be applied to the bill after the customer uses 100 minutes of long distance service. Volume discounts are calculated at billing.
Both volume and grant discounts may be applied associatively where discounts apply within a specific calling network (for example, within a geographic region, area code or specific group such as family and friends).
Volume discounts can be set up as these specific types:
- Loyalty discounts reward subscribers based on how long ago the account was established or how long ago the discount was assigned. The option to configure a loyalty discount is available in the volume discount wizard.
- Reward points discounts let subscribers accumulate points based on loyalty or purchasing certain products. Rather than giving customers a credit, customers can use accumulated reward points toward the purchase of an item or to pay a bill. The option to configure a reward points discount is available in the volume discount wizard.
- Tiered group discounts apply across grouped accounts. The group is defined by assigning the discount to a specific group of accounts or services. This may be used to give discounts to individual subscribers who are part of a common entity, such as a business or association. The discount is calculated using the number of active services within that group and the discount tier that corresponds to the number of services. The Add/Edit Volume Discount form has a setting to make a volume discount a tiered group discount. Tiers are set up in the volume discount wizard. Tiered group and loyalty discounts are mutually exclusive so when Tiered Group is selected, the volume discount wizard will not let you choose the Loyalty discount option.
The IDI platform also supports Refillable discounts that offer your customers a way to avoid high overage charges. When a customer’s Base product has been depleted, the Refill product is automatically added to cover a new increment of usage (voice, data, text, or currency). You can also create Refillable products for different types of usage, such as one amount for domestic airtime and a different one for international airtime. Most setup for refillable packages is done outside the Product Catalog; however, a separate grant discount catalog item is required for each refillable discount offering, and there are parameters in the grant discount wizard related to refillable discounts.
These items that support discount configuration and operation are also configured in the IDI Desktop Client Product Catalog:
- Discount Categories help you monitor usage across the various discounts you offer. For example, if a monthly plan grants set amounts of voice, data and texting, each of those would be tied to a different grant discount, and each grant discount would be tied to a different discount category. When viewing usage and free units on a customer account, you can see the amount used in each bucket based on their respective discount categories.
Although not strictly required, it is good practice to assign all discounts to a discount category. Discount categories are created and assigned to discounts AFTER all discounts have been built, and your discount strategy is fully formulated. You can make discount category assignments directly via the Edit Discount form, or via the Discount Categories form via the Client Applications menu > Product Management > Discount Categories. The Discount Categories form facilitates setting discount categories across all discounts.
- Processing Order lets you establish the order in which a discount is processed in relation to other discounts. The system processes the discount with the highest processing order first (1 = highest), recalculates the balance and then processes the next discount in the sequence against the new balance.
Usually, larger (more impactful) discounts should be processed later so they take the biggest percentage off the smallest version of the amount, after all other discounts of a higher order (i.e. 1 or 2) have already reduced the total. Processing order can be set via the Add/Edit Discount form, or via the Processing Order form which is available by clicking the applicable icon in the Product Catalog window icon tray.
- Discount Sorting Rule is required for grant discounts. This rule considers factors in addition to processing order to determine the order in which grant discounts are processed. The rule must include Discount Processing Order; however, the actual order is set on an individual discount basis. The other factors serve as tie breakers and may be included or excluded as needed. One rule applies to all grant discounts. The Discount Sorting Rule form is available by clicking the applicable icon in the Product Catalog window icon tray.
- Global Dialed Digit Numbers is an associative option for grant discounts that establishes a list of service numbers that subscribers can call without a charge. You can manage these numbers via the Global Dialed Digit Numbers form available by clicking the applicable icon in the Product Catalog window icon tray.
- Reward Points Conversion Factor specifies how many points equal $0.01 in redeemed value for all reward points discounts. This rate is set up once and should not be modified once reward points are issued. The Conversion Factor form is available by clicking the applicable icon in the Product Catalog window icon tray.
Adding a New Discount – Overview
Implementing discounts is an iterative process that involves adding discounts to the Product Catalog, running them through the discount configuration wizard and then completing the ancillary steps needed to finish discount configuration.
- Start by adding new discount catalog items in the Product Catalog. This process is similar to adding other catalog items.

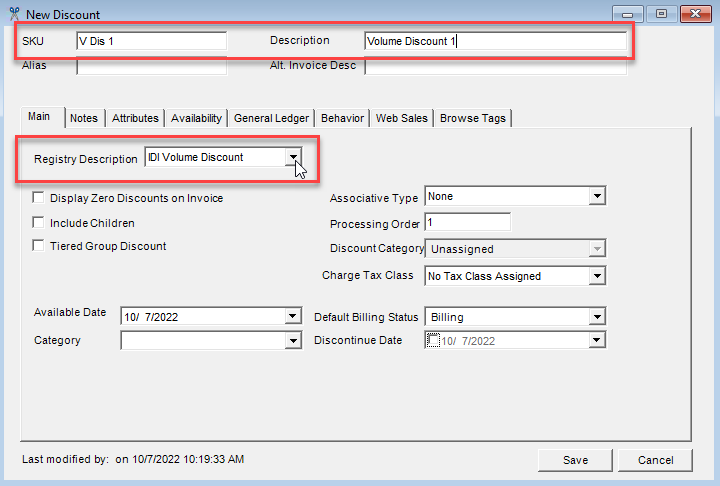
When you create a new discount, there are aspects specific to the various kinds of discounts as described later. The New Discount form has several tabs similar to other catalog items. Only the Main tab is specific to discounts. The other tabs let you configure parameters common to any catalog item.
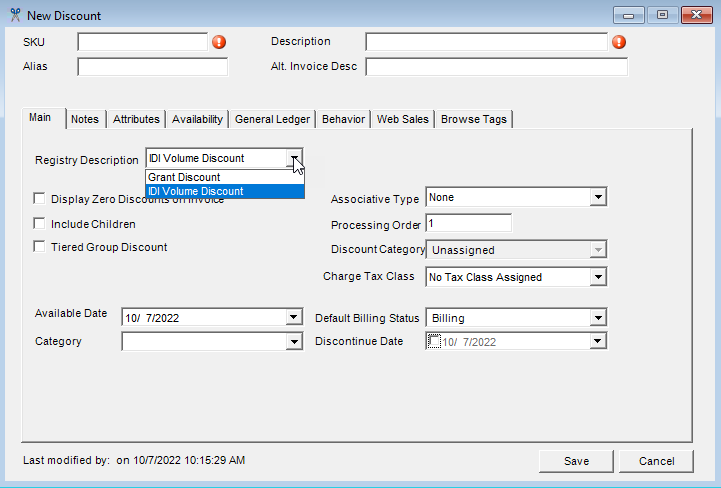
At this point you typically don’t have all the information you need to complete the catalog item configuration so you’ll add the discounts as shells. Shells are partial discount definitions. The Discount Category field (which defaults to Unassigned) cannot be edited until the discount is saved and run through the configuration wizard. Also, you may not be ready to set other parameters, especially the Processing Order, until all discounts have been created. When you create these shells, at a minimum you must set the required SKU and Description parameters, and you should also set the Registry Description to establish whether this will be a Grant or Volume discount.
- Then run each shell through the discount configuration wizard by right-clicking on the catalog item and choosing Configure. Note: The Configure menu option changes to Edit Configuration after the discount has been assigned to one or more accounts. In this case, certain discount wizard options can be changed and will apply to all assigned instances of the discount on saving the changes.

The wizard presents different options for grant and volume discounts. Wizard options are also driven by the choices you make along the way (for example, whether or not a volume discount is based on Loyalty).
- After all discounts are configured:
- Create discount categories and assign discounts to them (Applications > Product Management > Discount Categories).
- Set discount processing order. You can do this via the Discount Processing Order form available via the icon tray in the Product Catalog window. This form lists all existing discounts. It lets you select each discount to set the processing order.
- Set up the discount sorting rule. This rule applies to grant discounts. It works in conjunction with processing order to specify the order in which grant discounts are processed. The Discount Sorting Rule form is available via the icon tray in the Product Catalog window.
- Set up other supporting items (global dialed digit numbers and reward points conversion factor) as needed. These are also available via the icon tray in the Product Catalog window.

- Finish configuring the discount shells:
- Assign a discount category if not already done via the Discount Category form.
- Set discount processing order if not already done via the Discount Processing Order form.
- Determine general ledger accounts via the Edit Discount form and tweak other discount parameters as needed.
- Assign discounts and test via billing.
General Considerations
The following are general guidelines to consider when creating and configuring discounts:
- Discounts can be assigned at the service or customer level.
- After adding discounts to the Product Catalog, their setup must be completed through the configuration wizard BEFORE they can be assigned to an account or service.
- Once a discount has been assigned to a customer, many wizard options can be edited on the account. Some can only be changed by submitting a service request. This is covered in the Grant and Volume Discount articles.
- Discounts that have Include Children selected may only be assigned to Corporate Accounts.
- A new discount must be saved and configured before you can assign it to a Discount Category.
Where to Go From Here
To learn more about setting up and managing discounts, refer to these articles:
- For basic setup these articles take you through the steps for adding a new discount in the Product Catalog and running the discount through the applicable discount configuration wizard:
- Grant Discounts
- Volume Discounts. For volume discounts, quick guidelines are also provided for:
- Reward Points Based on Loyalty
- Reward Points Based on Products
- Tiered Group Discounts
- Finishing Discount Configuration – This covers these post configuration wizard steps:
- Creating and assigning Discount Categories
- Setting Processing Order
- Setting up a Discount Sorting Rule (applies only to grant discounts)
- Setting up Global Dialed Digit Numbers
- Managing Assigned Discounts – This describes how to:
- monitor consumed and available units remaining for on an account by discount category.
- change certain discount wizard options by editing the discount configuration in the Product Catalog.
- monitor and manage reward points when applicable.
For complete instructions on Refillable Packages, refer to the article on Setting Up Refillable Discount Usage Functionality.
Grant Discounts
A Grant discount grants the customer an award, for example free minutes, usually as part of a calling plan or promotion. Grant discounts are calculated when usage is rated. Note: If you’re adding a grant discount to support a refillable package, that option is available on the Units page of the grant discount configuration wizard.
Adding a Grant Discount
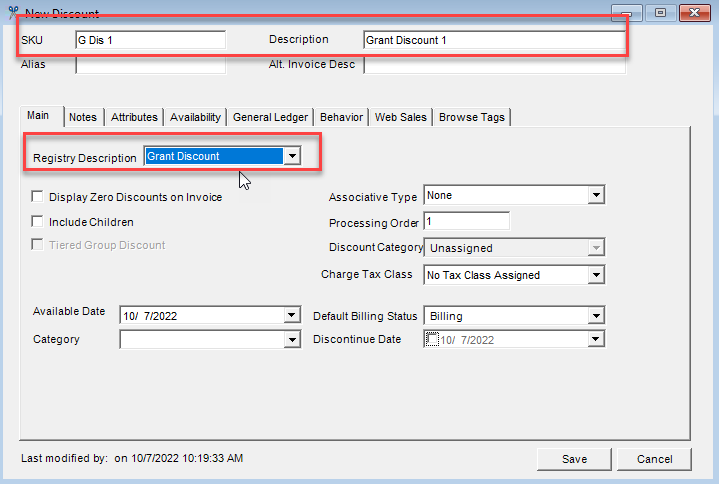
Start by adding a new item as a Discount in the Product Catalog. In the New Discount form specify the required SKU and Description fields and select Grant Discount in the Registry Description drop-down menu. You cannot edit the Discount Category at this time. This is deferred until after the discount has been saved and run through the discount wizard. It is also recommended to defer setting the Processing Order. Notes:
- Tiered Group Discount is not available as an option for grant discounts.
- Associative Type options are based on Registry Description as described below.
- Other fields are described in Add/Edit Discount Form – Main Tab.
Associative Type
This drop-down menu lets you specify the calling network where the discount applies. The following options are available for grant discounts:
- None (Default) – The discount applies to all numbers (no specific network).
- Favorite Exact Dialed Digits – This is a specific list of service numbers that contribute to the discount, but they do not have to be subscribers. This list is maintained on the customer account on an individual service basis (in Customer Care or CostGuard Client Customer Management). Note: These numbers cannot be on the same account, be toll-free or international.
- Global Exact Dialed Digits – This is a specific list of service numbers that subscribers can call without a charge. This list is maintained in the Product Management Global Dialed Digits Numbers table (see Global Dialed Digits Numbers in the article on Finishing Discount Configuration). Note: Calls made to global dialed digit numbers are applied to the appropriate Global Dialed Digits discount when the calls meet these conditions:
- The dialed number is included in the Global Dialed Digits Numbers table.
- The date of the call falls within the effective and expiration dates for the dialed number as set up in the Global Dialed Digits Numbers table.
- The service number’s total amount for calls to Global Dialed Digits does not exceed the number of units entered on the Units page of the Shared (Grant) Discount wizard.
If the call does not meet all these conditions, it is deducted from the next appropriate grant discount, such as Anytime, Night/Weekend discounts.
- Intra Account Calling – The discount is added to one service number on an account which can be considered the parent service number. That service number and all child service numbers on that account receive the discount.
Grant Discount (Shared Units) Configuration Wizard
The grant discount configuration wizard (labeled Shared Units Wizard) requires you to specify how the discount will (or will not) be shared across services on the account, and then takes you through a series of pages to specify other criteria. To configure a grant discount right-click on the Discount catalog item in the Product Catalog and select Configure to open the Shared Units wizard. On the welcome page, click Next to proceed and define the following options.
Shared Across Service Numbers
Specify how the discount will be shared across services on the account. Note: If you need to change this setup after the discount has been assigned to one or more accounts, you’ll need to submit a service request. If shared across all services on sibling accounts is selected, sharing will be allowed across services with the same corporate parent account. It will only share services on the accounts at the same level in the corporate account tree.

- Not Shared – If selected and the discount is assigned to a service, only that service receives the discount. If selected and the discount is assigned at the customer level, it behaves the same as Shared across all services on account. Note:
- This option should be selected for AdvancePay discounts.
- This option is not available for the Intra Account Calling associative type.
- Shared across all services on account – All lines on the account share the discount.
- Caution: Do not use this option for refillable discounts.
- Example: If the discount grants 100 free minutes to the service where it is assigned, and the account has five services, all five services will share 100 minutes.
- Shared across all services that have this discount – All lines on the account assigned this discount share the totals of this discount.
- Example, If an account has five services and three of those services have the same discount for 100 free minutes, those three services will share 300 minutes.
- Shared across selected services (no max) – If selected, an unlimited number of lines from the same account can be added to share the discount. Caution: Do not use this option with the Intra Account Calling Associative Type.
- Sharing Example: If the discount provides 100 free minutes to the service where it is assigned, and the account has five services, but only three services share the discount (service where the discount is assigned plus two other selected services on the account), then only those three services will share 100 minutes.
- Configuring the selected services list – The list of selected services for the account where the discount will apply must be configured. When a shared selected services discount is sold, a dialog for selecting the services is displayed at the time of sale unless you suppress this dialog by checking the Suppress Shared Grant Discount Dialog setting in POS Backoffice > Locations > General Options tab. If the location for the sale is set up to suppress the dialog or the dialog is dismissed without selecting the services, a follow-up is generated as a reminder to populate the shared numbers list. In that case, the list must be configured on the service via the context menu for the discount (right click and choose Properties > Shared Services). This applies to both the no max and max lines options. This process is described in greater detail in the article on Managing Assigned Discounts.
- Shared across selected services (max lines) – If selected, a limit is set on the number of lines that can share the discount. You must enter the maximum number of services per account that can share the discount. Again, if you need to configure the list after the discount is assigned, see Managing Assigned Discounts. The Sharing exmple for the no max option applies here as well.
- Shared across services with selected SKU(s) – If this option is selected, the system automatically checks all services on the account for their assigned products/packages. The associated SKUs are configured on the Associated SKUs wizard page.
This option works very much like the shared across selected services option. The difference is that you are not required to manually select the services to share the discount. When a service number is assigned the discount, the system checks all other services on the account for their assigned SKUs. If a service has at least one of the associated products (SKUs), that service shares in the grant discount’s minutes or occurrences.
For example, the grant discount Family Share includes the following SKUs:
| SKU | Description |
| ExtendNW | Extended Nights & Weekends |
| 100Text | Basic Text Message |
| 500Text | Text Message Plus |
- Family Share is assigned to service number 315-555-1212, Account 1234.
- 100Text SKU is assigned to 315-555-1313, Account 1234.
- 500Text SKU is assigned to 315-555-1414, Account 1234.
- 250Text SKU is assigned to 315-555-1515, Account 1234.
All service numbers receive the benefits of the Family Share discount, except 315-555-1515. The 250Text SKU was not included in the discount’s Associated SKUs list.
- Shared across all services on sibling accounts – If selected, sharing will be allowed across services with the same corporate parent account. It will only share services on the accounts at the same level in the corporate account tree.
Units
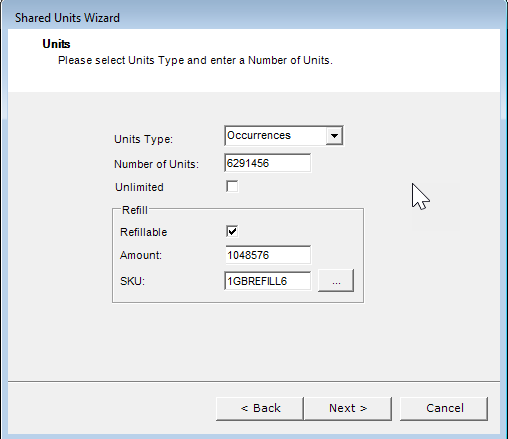
The Units page specifies the kind and amount of units granted by the discount. Note: There are considerations when you’re configuring the grant discount to support a refillable package.

Select a Units Type from the drop-down list:
- Minutes (used with voice-based calling)
- Occurrences (such as number of calls or texts, or amount of data)
- Currency (money)
Then enter the Number of Units for the discount as an integer value (no text). Notes:
- 0 = no units. If the intention is for the discount to offer unlimited units, leave Number of Units blank and check the Unlimited box as described below.
- If Unit Type = Currency, enter the value as dollars up to two decimal places. Do not enter a dollar sign or other special characters.
- If Unit Type = Minutes enter the value as minutes; however, the value will be stored in seconds in the database.
- If Unit Type = Occurences, and you are entering a value for data, the Number of Units is binary measured in kilobytes. Remember to enter the binary value in kilobytes with no units suffix (KB, GB, etc). For example:
- For values in kilobytes, like 100 KB, simply enter the integer 100.
- For values in gigabytes, terabytes or anything larger, calculate number of units (GB, TB, etc.) based on the 1024 multiplier to get the actual number of kilobytes (1 GB = 1,048,576 KB, 2 GB = 2,097,152 KB, 10 GB = 10,485,760 KB ).
Note: The CostGuard system will accept non-binary numbers. So, an entry like 6,000,000 will be accepted; however, it may NOT be accurate. Rather, you must calculate the exact number of KBs for the specified amount using the 1024 multiplier. So for example, for 6GB enter 6,291,456 (6 x 1024 = 6,144 bytes x 1024 = 6,291,456 KB). See the example below.

- If you’re creating a refillable discount, the Number of Units value is the base amount.
- If the discount is used by an AdvancePay product, leave the Number of Units field blank. The AdvancePay product’s price points overwrite the discount’s Number of Units when applied in POS or Customer Management.
- Authorized users (through permission profile) can modify the Number of Units field for an assigned/billed grant discount directly on a customer’s account. This lets you analyze actual usage on accounts and then adjust the discount to better fit your needs. See the article on Managing Assigned Discounts.
Check Unlimited if the discount is for unlimited units. Caution: If unlimited, DO NOT enter a value in the Number of Units field, as it may produce unexpected results when rating/billing occurs.
Note: If you need to change this setup after the discount has been assigned to one or more accounts, you’ll need to submit a service request. If shared across all services on sibling accounts is selected, sharing will be allowed across services with the same corporate parent account. It will only share services on the accounts at the same level in the corporate account tree.
This completes unit configuration unless you’re configuring the discount to support a refillable package.
Refillable Grant Discount Considerations
A unique grant discount is required for each refillable discount offering. Note: The refill product must be set up before any discounts can be built. This is because the SKU/ID associated to this product will be used to associate the product to the discount when the discount is configured.
If you’re creating a refillable grant discount, select the Refillable check box.
Caution:
- You cannot have an Unlimited Units type with a refillable discount.
- Also the sharing option – Shared across all services on account – is not compatible with refillable discounts and will cause issues with rating/billing. If you’re configuring this discount for a refillable application, be sure Shared across all services on account is not selected.
Selecting Refillable enables the Amount and SKU fields. These fields are required for refillable grant discounts. For refillable discounts the Number of Units value is the base amount, and the Amount value is the number of units for refills.
- For refillable discounts the Amount value is the refill amount. This field has the same validation as Number of Units (which is the base amount for refillable discounts). This field only allows a limited number of digits depending on the Units Type selected. Guidelines for Occurrence amount (for data, based on KBs and the 1024 multiplier) applies here as well and is shown below.
- The SKU field can be entered manually, or a value can be selected from the Discount Factors window, which is available by clicking the ellipses button next to the SKU field. This field is validated to make sure the value entered is a valid Product (ProductCatalog.ProductType = 1). Note: If the SKU is not found in the list, an error is displayed when you try to continue. Products cannot be shared and can only be applied to a single discount. This validation is done on the final wizard page when the data is committed. An error message is displayed if this validation fails.
Recurrence Type
The Recurrence Type page specifies whether the discount is applied only once or every bill period.

- One-Time – If checked, the customer receives only one grant or block of units (pools of minutes). If you are creating a discount to be used with an AdvancePay Product, select One-Time. When customers select an AdvancePay plan, they are purchasing one block of units at a time.
- Recurring – If checked, the customer receives new grants or blocks of units (pools of minutes) every bill period.
Notes:
- For refillable discounts, Recurrence Type applies to the base discount, which is recurring in most cases. Refills are applied as needed (could be just one in a bill period); however, the base discount is granted again in full during the next bill period.
- If you need to change this setup after the discount has been assigned to one or more accounts, you’ll need to submit a service request. If shared across all services on sibling accounts is selected, sharing will be allowed across services with the same corporate parent account. It will only share services on the accounts at the same level in the corporate account tree.
Grant Expiration
The Grant Expiration page specifies when the discount ends.

If you check Can be overridden, a sales or customer service representative can override the Expires on Disconnect option of the discount assigned to the service or customer.
Note: Can be overridden can be checked regardless of the expiration method chosen. It can also be used in conjunction with Expire Units on Disconnect.
- Expires at the end of billing period
- Never Expires
- Expires after certain number of days – Enter the number of days as a whole number.
- Expire Units on Disconnect – This can be selected in conjunction with any of the above options.
- If you check Expire Units on Disconnect, the remaining unused minutes expire on the discount disconnect date, even if the discount expiration date is in the future.
- On the customer record, the unit balance’s expiration date remains the same, but the units get an expiration ledger row with a post date equal to the disconnect date of the discount. Leaving the expiration date as originally calculated allows for any POS return logic to correctly determine the amount of money to refund the customer.
- Whether you check Expire Units on Disconnect or not, the minutes may still be prorated based on the configuration of the discount which may cause changes to the Unit Balance.
- If the discount is disconnected before the expiration date has occurred, Expire Unit on Disconnect overrides the amount of end grace added.
- If you do not check Expire Units on Disconnect, the units are still valid until their expiration date is reached.
- Can be Overridden – If checked a sales or customer service representative can override the Expires on Disconnect option of the discount assigned to the service or customer.
Notes:
- If the discount is used by an AdvancePay product, that product’s price points overwrite the expiration days/dates when applied in POS or Customer Management.
- For refillable discounts, this Grant Expiration applies to the base discount. The refill expires automatically at the end of the bill period and is not rolled over. The granted base amount behaves according to this setting.
- If you need to change this setup after the discount has been assigned to one or more accounts, you’ll need to submit a service request.If shared across all services on sibling accounts is selected, sharing will be allowed across services with the same corporate parent account. It will only share services on the accounts at the same level in the corporate account tree.
Proportional Allocation
This page is only displayed if Number of Units on the Units page is not left blank.

Check the Proportional Allocation of Units check box to use proportional allocation when connecting or disconnecting the discount. This tells the system to calculate a portion of whatever is being granted (minutes, occurrences, currency) relative to the time between when the feature is assigned and when it is FIRST billed, and then only allocate that amount. This only applies to the amount granted during that interim period up to the first invoice.
- Unchecked – The customer receives the whole granted amount (say 100 minutes), regardless of when the item is assigned relative to when their first bill period occurs. For example, the discount is assigned on 1/15, and billed on 2/1. Despite having the discount for just half the bill period, the customer gets the full granted amount = 100 min.
- Checked – The system calculates the number of days that exist between the date when the item is assigned relative to the first bill period. For the above example, the customer gets half the granted amount = 50 min.
Note: Proportional Allocation can be edited on the discount in the Product Catalog after it has been assigned to a customer account. See Editing Discount Wizard Options in the article for Managing Assigned Discounts.
Favorite Numbers
This page is only displayed when Associative Type = Favorite Exact Dialed Digits. The Favorite Numbers page specifies the quantity of favorite numbers allowed on the service and whether they can be managed by OnlineBill subscribers. The Favorite Exact Dialed Digits list is set up and maintained after the discount is assigned to the account. This is done on an individual service basis (in Customer Care or CostGuard Client Customer Management). Note: These numbers cannot be on the same account or be toll-free or international.
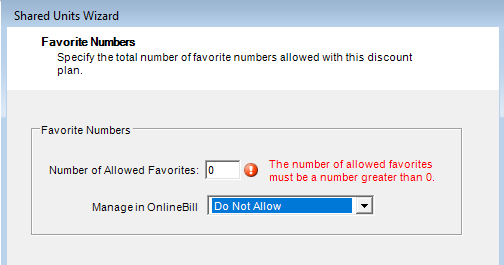
Number of Allowed Favorites specifies how many active favorite numbers services using this discount can have at any one time. The service’s list of Favorite Numbers can be greater, but no more than this number can be active at the same time.
If OnlineBill is applicable, specify the level of access subscribers will have for managing favorite numbers in OnlineBill:
- Do Not Allow forces subscribers to contact your company to manage their favorite numbers.
- Read Only lets the subscriber see their list of favorite numbers in OnlineBill, but they cannot change them.
- Allow lets the subscriber make changes to their Favorite Numbers list when they are logged into OnlineBill.
Note: A stand-alone (not shared) favorite numbers discount cannot be changed to a shared discount if it has been assigned to a service. To determine whether the favorite number discount has been assigned, right-click the discount and select View Assigned Instances in the Product Catalog.
Selected Usage Types
Select usage types to contribute to the discount. For example, if you add only the Domestic 1+ usage type, only domestic toll calls will be totaled and discounted. Note: Usage types are configured in Admin Console Data Management.

You can choose to include All usage types or specific usage types on an Inclusive or Exclusive basis. Selecting Inclusive or Exclusive enables the New button and associated ID (smaller) and Name (larger) fields. In this case you can:
- Click New to display the Discount Factors form. On this form:
- Double-click to select an individual usage type.
- To select a contiguous list select the first item, press shift and select the last item.
- To select a non-contiguous list, press ctrl while making your selections.
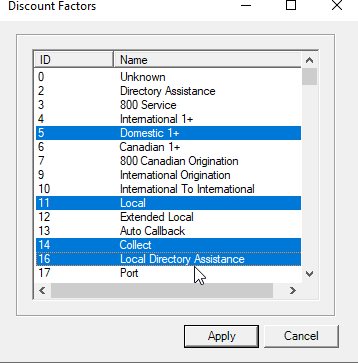
- Or you can manually enter usage type IDs or Names. The ID field accepts a comma-delimited list and requires exact matches. The Name field only permits one name at a time and permits wildcards (*). In either case, click New to add the specified usage types. When using wildcards, if one match is found it’s added to the list on clicking New. If more than one match is found, all matches are listed in the Discount Factors form to let you choose one or more using the methods described above.
Minutes-based discounts do not include any occurrence-based usage types. Occurrence-based calls are ignored even if All is selected.
Occurrence-based discounts can include minutes-based usage types. Minutes-based calls are counted as one occurrence per call.
Note: Selected Usage Types can be edited on the discount in the Product Catalog after it has been assigned to a customer account. See Editing Discount Wizard Options in the article for Managing Assigned Discounts.
Selected Service Types
The Selected Service Types page specifies which kinds of services are eligible to receive the discount. This form works the same as the Selected Usage Types form.
Service types are defined in the Product Catalog. It is expected that when one or more service types are added here, they are used in combination with the Discount Factors specified on the other pages in the wizard. For example, if Usage Types = Domestic 1+ and Service Type = POTS, only Domestic 1+ usage against a POTS service would be discounted; Domestic 1+ against a Conference service or Toll free service would not be considered by the rater/biller.
Note: Selected Service Types can be edited on the discount in the Product catalog after it has been assigned to a customer account. See Editing Discount Wizard Options in the article for Managing Assigned Discounts.
Selected Distance Types
The Selected Distance Types page specifies which kinds of distances are used to determine the discount. For example, if you add only the International distance type, only international calls will be totaled and discounted. This form works the same as the Selected Usage Types form.
Distance Types are added to the CostGuard system as seed values using the Distance Type table in Admin Console > Data Management.
Note: Selected Distance Types can be edited on the discount in the Product Catalog after it has been assigned to a customer account. See Editing Discount Wizard Options in the article for Managing Assigned Discounts.
Selected Wireless Call Indicators
The Selected Wireless Call Indicators page specifies which wireless call indicators are included in the discounts. This form works the same as the Selected Usage Types form. Notes:
- This is only used for wireless voice calling.
- Selected Wireless Call Indicators can be edited on the discount in the Product Catalog after it has been assigned to a customer account. See Editing Discount Wizard Options in the article for Managing Assigned Discounts.
Selected Originating Locations
The Selected Originating Locations page specifies call originating locations that contribute to the discount.
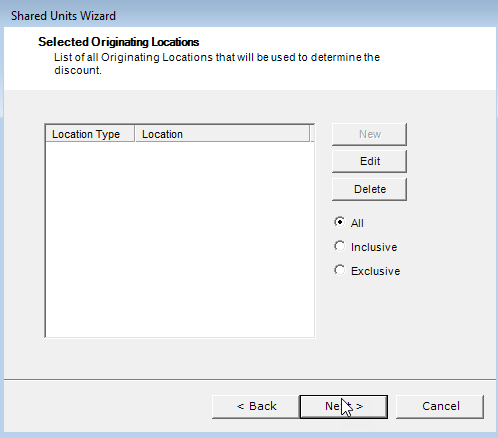
You can choose to specify All locations or specific locations on an Inclusive or Exclusive basis. Selecting one of these options enables the New button. Clicking New displays the Location form. Select the Location Type from the drop-down menu, then enter one or more locations as a comma-delimited list. Each location type requires specific information as follows:
- LATA.OCN: LATA (Local Access Transport Area) and OCN (Operating Company Number) separated by a period. You can look up LATAs in IDI Desktop Client Applications > BackOffice Management > NPA NXX Management > LATA Table. OCNs are listed in the Admin Console Data Management > OCN table.
- NPA: NPA number as set up in the NPAs table (IDI Desktop Client Applications BackOffice Management > NPA NXX Management > NPA Table).
- State: State abbreviation as set up in the State table (IDI Desktop Client Applications BackOffice Management > NPA NXX Management > State Table).
- Country.Region: Country code and Region code, separated by a period. For example, entering 33.9,39.2 adds Monaco, France and Milan, Italy to the list. The country codes and region codes must exist in the Countries and Regions table in Admin Console > Data Management.
- Dialed Digits are configured in IDI Desktop Client Product Management as part of rate plan setup. They are strings of digits that would be dialed. For example, 5859244110 to designate a specific phone number in the U.S., or 4822 to designate calls to Warsaw, Poland. The system matches the most specific first. For example, if the location of one rate detail in the rate plan is 585 and a later one is 5859244110, the system tries to match the more specific one (5859244110) before trying to match the less specific (585). As records are processed the [Orig. Number] value of each record is looked up to see if the Dialed Digits begins with the same value to apply rating.
- SIDs (system IDs) for CDMA/TDMA technology roaming partners are listed in CostGuard Client Applications BackOffice Management > Roaming > SID Maintenance.
- Serving PMNs (IDs) for GSN technology roaming partners are listed CostGuard Client Applications BackOffice Management > PMN Management > PMN.

Note: Selected Originating Locations can be edited on the discount in the Product Catalog after it has been assigned to a customer account. See Editing Discount Wizard Options in the article for Managing Assigned Discounts.
Selected Terminating Locations
The Selected Terminating Locations page specifies call terminating locations that contribute to the discount. This form works the same as the Selected Originating Locations form.
Note: Selected Terminating Locations can be edited on the discount in the Product Catalog after it has been assigned to a customer account. See Editing Discount Wizard Options in the article for Managing Assigned Discounts.
Selected Serving Locations
The Selected Serving Locations page specifies the SID, PMN or State of the serving location to be included in the discount. This form works the same as the Selected Originating Locations form. Note: This factor does not apply to wireline.
- State: State abbreviation as set up in the State table (IDI Desktop Client Applications BackOffice Management > NPA NXX Management > State Table).
- SID is the system ID associated to CDMA/TDMA technology roaming partners (IDI Desktop Client Applications BackOffice Management > Roaming SID Maintenance)
- Serving PMN is the ID associated to GSM technology roaming partners (IDI Desktop Client Applications BackOffice Management > PMN Management > PMN)
Note: Selected Serving Locations can be edited on the discount in the Product Catalog after it has been assigned to a customer account. See Editing Discount Wizard Options in the article for Managing Assigned Discounts.
Time of Day
The Time of Day page lets you apply a discount to a particular time of day. The choices in the list are maintained the Rate Periods table in Data Management.

- Time of Day defaults to All. Click Inclusive or Exclusive to include or exclude times of day selectively. Clicking either of these options displays the specific times in the left panel with individual check boxes. This also enables the Select All and Deselect All buttons.
Note: Time of Day can be edited on the Discount in the Product Catalog after it has been assigned to a customer account. See Editing Discount Wizard Options in the article for Managing Assigned Discounts.
Finishing the Wizard
On the Completing the Shared Units Discount Configuration Wizard page you can use the Back button to return to any wizard page to make changes or Finish to close the wizard and save the changes.
Note: As indicated above, some discount wizard options can be edited after the discount has been assigned while some changes require a service request. See Editing Discount Wizard Options in the article for Managing Assigned Discounts.
Finishing Grant Discount Setup
After all grant discounts have been added and run through the configuration wizard, do the following to complete the grant discount setup:
- Assign discount categories.
- Set the processing order.
- Set up the discount processing rule (applies only to grant discounts).
- Set up general ledger rules.
- Tweak other parameters if needed.
These steps are covered in the article on Finishing Discount Configuration.
Volume Discounts
A Volume discount must be earned through a specified purchase. For example, a 10% discount may be applied to the bill after the customer uses 100 minutes of long-distance service. A volume discount can also be set up to reward customer loyalty. Volume discounts are calculated at billing.
Adding a New Volume Discount
Start by adding a new item as a Discount in the Product Catalog. In the New Discount form specify the required SKU and Description fields and select Volume Discount in the Registry Description drop-down menu. You cannot edit the Discount Category at this time. This is deferred until after the discount has been saved and run through the discount wizard. It is also recommended to defer setting the Processing Order.
Notes:
- The Associative Type options are based on Registry Description as described below.
- There are also considerations for Tiered Group Discount as described below.
- Other fields are described in Add/Edit Discount Form – Main Tab.
Associative Type
This lets you specify the calling network/products where the discount applies. The following Associative Type options are available for volume discounts:
- None (Default) – The discount applies to all numbers (no specific network).
- All – All service numbers (subscribers) that are actively billing in your system contribute to the discount.
- Product – A discount is given on calls from any line with the discount to any other line that has one of the associated products assigned and are active customers. The discount must apply to a service number since calls are made to service numbers and not customer accounts.
- Selective – This is a specific list of subscriber service numbers that contribute to the discount. This list is maintained on the customer account on an individual service basis (in Customer Care or IDI Desktop Client Customer Management).
- Favorite Exact Dialed Digits – This is a specific list of service numbers (not necessarily subscribers) that contribute to the discount. This list is maintained on the customer account on an individual service basis (in Customer Care or IDI Desktop Client Customer Management). Note: These numbers cannot be on the same account, nor be toll-free or international.
- Favorite Start Dialed Digits – This is similar to Favorite Exact Dialed Digits; however, each terminating service number on the list must include an exact match of the number assigned to the discount. This also lets you limit the start dialed digits to country codes, area codes, NPANXX values, or any such combination. For example, using the country code of 49 as starting dialed digits would discount international calls to Germany as well as domestic calls to any numbers where 49 are the first two numbers of the area code (if such an area code exists)
Notes:
- When entering a name for a Favorite Discount type, it is recommended that you enter a name that is specific to the type of Favorite Discount (Exact Dialed Digits or Start Dialed Digits). This way, when adding a new discount to a customer or assigning a discount to a billing group, the type of Favorite Discount is easily identifiable.
- For Selective or Favorite associative types, the associated service numbers are assigned to the discount after the discount is assigned to a subscriber’s account or a specific service number in Customer Care or IDI Desktop Client Customer Management.
Tiered Group Discount
The Tiered Group Discount option is selectable when Registry Description = Volume Discount.
A Tiered Group Discount is applied across grouped accounts. The group is defined by assigning the discount to a specific group of accounts or services. The discount is calculated using the number of active services within that group and the tier that corresponds to that quantity.
This type of discount is often used to give discounts to individual subscribers who are part of a common entity, such as a business or association.
For example, your company has agreed to give a discount (Acme Discount) to all of Acme Limited’s employees who sign up for services with your company. The discount amount is based on the number of active services associated with Acme Limited. The Acme Discount is configured so that if up to five services are associated with the Acme Discount, a 5% discount is given to all eligible items in the configuration. If there are more than five services, the discount is 10%.
Notes:
- A Tiered Group discount must be a volume discount.
- Tiered group discounts and loyalty discounts are mutually exclusive.
- Tiered group discounts and Include Children are mutually exclusive.
- Only Flat or Single tier types can be used, the Rolling tier type cannot be used. Tier type is specified when you run the discount configuration wizard.
- An account could receive multiple discounts if the tiered group discount is assigned at both the account level and again at the service level. To avoid this, create a product catalog folder for all tiered group discounts and use the limit-to function to limit the discounts so they can only be assigned at the account level.
- To help with assigning the correct discount to the account, enter a description that uniquely identifies the group, such as Acme Manufacturing Employees Discount or State University Alumni Discount.
- The tiered group discount always uses Active Services as the Tier Unit, therefore, other contributing factors are not configured. All active services are counted when determining the discount amount.
- The tiered group discount is applied to all eligible factors set up during discount configuration.
- The types of services selected in Eligible Services receive the discount, but do not affect the discount amount. All active services are counted when determining the discount amount.
Volume Discount Wizard
The wizard lets you select a discount type (Credit, Bonus, or Reward Points), specify whether this is a loyalty discount (not applicable for tiered group discounts), and then displays a series of pages for specifying contributing and eligible factors – usage types, service types, distance types, products, locations, time of day, and other factors.
To configure a volume discount:
- Right-click on the Discount catalog item in the Product Catalog and select Configure. This displays the discount configuration wizard.
- On the welcome page click Next to proceed and define the following options.
Discount Type
This page gives you three Discount Type options: Credit, Bonus, or Reward Points.

- Credit – Gives customers a certain amount of money back. When this option is selected, the next wizard page lets you choose whether to apply the discount when the account has a past due balance.
- Bonus – Gives customers a certain amount of the specified units. Select a Bonus Type from the list. Notes:
- The content of this drop-down menu is set up in Admin Console Data Management. The menu will be empty until Bonus Types are set up.
- Bonus discounts are managed manually outside of the CostGuard system. A report can be run to retrieve the appropriate information from the CostGuard system.
- Reward Points – Gives customers points which can be accumulated and redeemed for POS purchases or for tendering a bill payment. There are specific requirements for setting up a reward points discount. See Reward Points Discount Examples at the end of this article for details.
Note: If you need to change this setup after the discount has been assigned to one or more accounts, you’ll need to submit a service request.
Past Due Balance Options
Note: This page is only displayed when Discount Type is set to Credit. The Do Not Apply with Past Due Balance checkbox defaults to unchecked (apply regardless of past due balance).
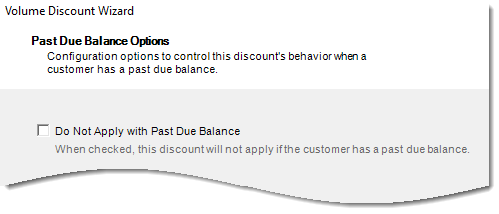
When checked the discount is not applied when there is an outstanding balance for the account. Note: An account is considered as having a past due balance if there is an unpaid amount on an invoice that is past due. Good payment standing status (if implemented) is NOT considered when determining whether an account is past due.
Choosing Whether to Configure a Loyalty Discount
Volume discounts can be based on loyalty, for example how long ago the account was established or how long ago the discount was assigned.
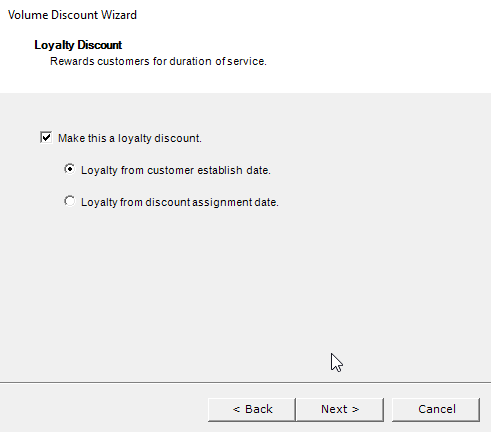
To configure a loyalty discount:
- Check the Make this a loyalty discount check box. (leave unchecked if you’re not configuring a loyalty discount.)
- Select the appropriate option:
- Loyalty from customer establish date or
- Loyalty from discount assignment date
Notes:
- If you are configuring a tiered group discount (as specified on the Add/Edit Discount form), the Loyalty Discount wizard page is not displayed.
- If you choose to configure a loyalty discount, wizard pages for contributing factors are skipped as loyalty is the only contributing factor. The wizard will present options for eligibility factors.
- This option cannot be edited after the discount has been assigned.
Contributing and Eligible Factors
From this point, the wizard takes you through a series of pages for specifying contributing and eligible and factors.
- Contributing refers to all factors that contribute to the discount, or must be present for the discount to apply. These are the requirements that must be satisfied in order to earn the discount.
- Eligible refers to what is eligible to be discounted (i.e. usage types, service types, products, etc.)
Notes:
- For loyalty discounts, loyalty is the only contributing factor; therefore, the wizard skips contributing factors and only displays pages for eligibility factors. Also, the order in which wizard pages are presented differs from volume discounts that are not loyalty. Amount Type, Tier Units, and Ignore Calls with Zero Charges are displayed before Usage Types and other eligible factors.
- For tiered group discounts, the number of services is the only contributing factor; therefore, the wizard takes you through a series of windows for specifying eligible factors starting with eligible usage types.
- For any volume discount other than loyalty discount or tiered group, you’ll need to specify one or more contributing factors, and each contributing factor may or may not be eligible. The Contributing and Eligible Factors page lets you tell the wizard whether eligible factors need to be considered separate from the contributing factors or whether they are the same.

If they are the same, selecting Contributing and Eligible factors are the same will make the wizard display the windows just once (to specify contributing factors). The system will use this information to configure eligible factors as well.
If you need to configure contributing and eligible factors separately, selecting Contributing and Eligible factors are different will make the wizard run through the windows twice – once for contributing factors and once for eligible factors.
The contributing and eligibility pages are described just once below as they work the same whether you’re selecting contributing or eligibility factors.
Note: When configuring a discount based on usage, you must select factors on the Usage Types, Service Types, and Distance Types windows or the discount is considered improperly configured. These selections all work together. If selections are not made on all these wizard pages, the discount is considered invalid.
Contributing/Eligible Usage Types
This lists the available usage types to select as contributing and/or eligible factors. Note: You must select at least one usage type.

Click New All to include all usage types.
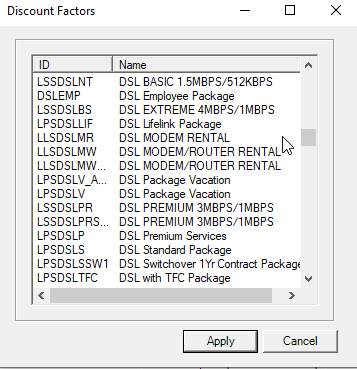
Click New to selectively include one or more usage types using the Discount Factors form. On this form:
- Double-click to select an individual usage type.
- To select a contiguous list select the first item, press shift and select the last item.
- To select a non-contiguous list, press ctrl while making your selections.

Or you can manually enter a usage type ID (smaller field) or Name (larger field) one-at-a-time. In either case, click New to add the specified usage type. The ID field requires an exact match. The Name field permits wildcards (*). When using wildcards, if one match is found it’s added to the list on clicking New. If more than one match is found, all matches are listed in the Discount Factors form to let you choose one or more using the methods described above.
Note: Contributing and eligible usage types can be edited after the discount has been assigned. See Editing Discount Wizard Options in the article for Managing Assigned Discounts.
Contributing/Eligible Service Types
This page lists the available service types to select as contributing and/or eligible factors. This form works the same as the Contributing/Eligible Usage Types form.
Service types are defined in the Product Catalog. It is expected that when one or more service types are added here, they are used in combination with the Discount Factors specified on the other pages in the wizard. For example, if Usage Types = Domestic 1+ and Service Type = POTS, only Domestic 1+ usage against a POTS service would be discounted; Domestic 1+ against a Conference service or Toll free service would not be considered by the rater/biller.
Note: Contributing and eligible service types can be edited after the discount has been assigned to a customer account. See Editing Discount Wizard Options in the article for Managing Assigned Discounts.
Contributing/Eligible Distance Types
This page lists the available Distance Types to select as contributing and/or eligible factors. This form works the same as the Contributing/Eligible Usage Types form.
Distance Types are added to the CostGuard system using the Distance Type table in Admin Console > Data Management.
Note: Contributing and eligible distance types can be edited after the discount has been assigned to a customer account. See Editing Discount Wizard Options in the article for Managing Assigned Discounts.
Contributing/Eligible Originating Locations
This page lists available originating call locations to select as contributing and/or eligible factors.

Clicking New displays the Location form. Select the Location Type from the drop-down menu, then enter one or more locations using the required syntax (comma-delimited list). Each location type requires specific information as follows:
- LATA.OCN: LATA (Local Access Transport Area) and OCN (Operating Company Number) separated by a period. You can look up LATAs in IDI Desktop Client Applications > BackOffice Management > NPA NXX Management > LATA Table. OCNs are listed in the Admin Console Data Management > OCN table.
- NPA: NPA number as set up in the NPAs table (IDI Desktop Client Applications BackOffice Management > NPA NXX Management > NPA Table).
- State: State abbreviation as set up in the State table (IDI Desktop Client Applications BackOffice Management > NPA NXX Management > State Table).
- Country.Region: Country code and Region code, separated by a period. For example, entering 33.9,39.2 adds Monaco, France and Milan, Italy to the list. The country codes and region codes must exist in the Countries and Regions table in Admin Console > Data Management.
- Dialed Digits are configured in IDI Desktop Client Product Management as part of rate plan setup. They are strings of digits that would be dialed. For example, 5859244110 to designate a specific phone number in the U.S., or 4822 to designate calls to Warsaw, Poland. The system matches the most specific first. For example, if the location of one rate detail in the rate plan is 585 and a later one is 5859244110, the system tries to match the more specific one (5859244110) before trying to match the less specific (585). As records are processed the [Orig. Number] value of each record is looked up to see if the Dialed Digits begins with the same value to apply rating.
- SIDs (system IDs) for CDMA/TDMA technology roaming partners are listed in IDI Desktop Client Applications BackOffice Management > Roaming > SID Maintenance.
- Serving PMNs (IDs) for GSN technology roaming partners are listed CostGuard Client Applications BackOffice Management > PMN Management > PMN.

Note: Contributing and eligible originating locations can be edited after the discount has been assigned to a customer account. See Editing Discount Wizard Options in the article for Managing Assigned Discounts.
Selected Terminating Locations
This page lists the available terminating locations to select as contributing and/or eligible factors. This form works the same as the Originating Locations form.
Note: Contributing and eligible terminating locations can be edited after the discount has been assigned to a customer account. See Editing Discount Wizard Options in the article for Managing Assigned Discounts.
Time of Day
The Time of Day page lets you apply a discount to a particular time of day. The choices in the list are maintained the Rate Periods table in Data Management.

- Time of Day defaults to none selected. To ensure you don’t complete the wizard without selecting a time of day, it is recommended that you click Select All, and then unselect individual options as needed.
Note: Time of Day can be edited after the discount has been assigned to a customer account. See Editing Discount Wizard Options in the article for Managing Assigned Discounts.
Ignore Calls with Zero Charges
The Ignore Calls with Zero Charges page lets you ignore calls with charges that are rated to zero and/or previously discounted to zero.
Note: This option can be edited after the discount has been assigned to a customer account. See Editing Discount Wizard Options in the article for Managing Assigned Discounts.

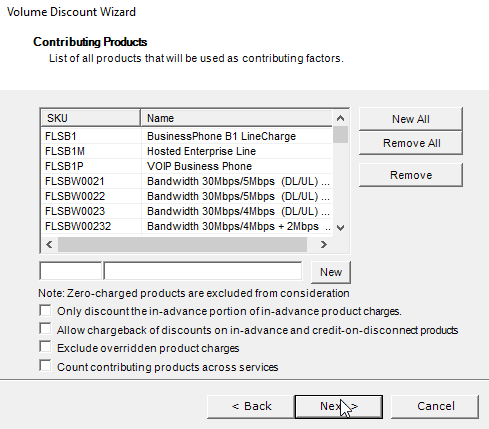
Contributing/Eligible Products
This lists the available products that can be used as contributing and/or eligible factors to set up your discount. Note: Contributing and eligible products setup can be edited after the discount has been assigned to a customer account. See Editing Discount Wizard Options in the article for Managing Assigned Discounts.
Click New All to include all products.
Click New to selectively include one or more products using the Discount Factors form. On this form:
- Double-click to select an individual product.
- To select a contiguous list select the first item, press shift and select the last item.
- To select a non-contiguous list, press ctrl while making your selections.
Or you can manually enter a product ID or Name one-at-a-time. In either case, click New to add the specified product. The ID field requires an exact match. The Name field permits wildcards (*). When using wildcards, if one match is found it’s added to the list on clicking New. If more than one match is found, all matches are listed in the Discount Factors form to let you choose one or more using the methods described above.
This page also provides the following product-related options:
- Select Only discount the in-advance portion of in-advance product charges to prevent a discount being applied on the catch-up portion of an in-advance product. This affects only the first bill of an in-advance product if the product was assigned mid-month. For example, when this option is selected, if a product with a monthly charge of $20 is added on 4/15, on the 5/1 bill the discount only applies to the in-advance portion ($20 for 5/1-5/31), and not to the $10 charge for the 4/15-4/30 portion.
- Check Allow Chargeback of discounts on in-advance and credit-on-disconnect products to calculate and bill chargebacks for in-advance products that have been discounted by the plan.
- This only discounts the in-advance portion of the in-advance product charge; i.e. the prorated portion when customers sign up midway in the month.
- This option is irrelevant if proration not set up on the product. Generally, customers only use one kind of proration for all products.
- This only affects the first bill.
- When checked, the discount only affects the full amount of the MRC, not the prorated portion or the total of the prorated portion plus the first advance month.
Example:

- Select Exclude overriden product charges to exclude overriden product charges from being calculated in the discount.
For example, during an order, or after an instance of a product is assigned to an account or service, an authorized user can manually override the price – such as when a sales agent has negotiated special pricing, or when there are other factors like longevity (not a loyalty discount) or this product is combined with a long-term contract.
Or this volume discount can apply to a billable product which is configured to Override Charge on Assignment. In that case, the charge is applied to the assigned instance based on the product configuration, but it is flagged in the database as an override so future changes to the product’s charge in the product catalog do not trickle down to this particular assigned instance.
- Select Count contributing products across services to have the discount count contributing products across all services on an account. Typically, a volume discount will only look at contributing products on the service that the discount is assigned to. This setting has no impact on the logic for contributing product activity (e.g., disconnected middle of bill period). This setting does not apply to usage-related tier units (minutes and number of units).
Tier Units
This sets the units on which the discount is based. Note: The drop-down menu label and content depends on whether the discount is set up for loyalty, tier groups or neither of these.
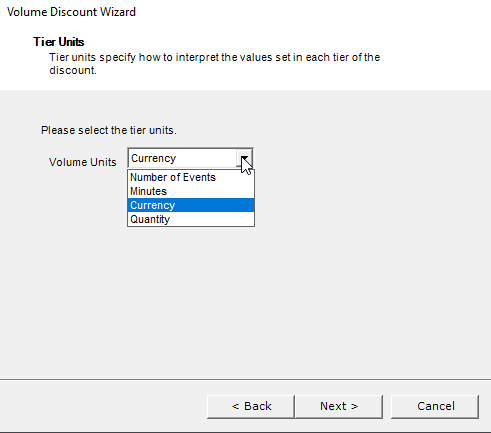
- The menu is labeled Volume Units if the discount is not a loyalty discount, and provides the following options (unless this is a tiered group discount):
- Number of Events (such as the number of DA calls or number of messages)
- Minutes (for voice-based usage)
- Currency (dollar amounts)
- Quantity – Note: This option is not relevant to volume discounts and can be ignored.
- If this is a tiered group discount, Volume Units is pre-populated with Active Services and cannot be changed.
- The menu is labeled Loyalty Units for loyalty discounts and provides following options:
- Days
- Weeks
- Months
- Years
Note: If you need to change this setup after the discount has been assigned to one or more accounts, you’ll need to submit a service request.
Amount Type
Amount Type lets you set your discount as a calculated percentage of the applicable charges or a fixed amount specified in the plan.

- Percentage – The discount amount is a percentage of the eligible charges.
- Constant Amount – The discount is a fixed amount. This is the only option available if Discount Type is Reward Points.
Selecting Constant Amount displays an additional option: Prorate Constant Amount. This setting only works with product charges and constant amounts. Note: Full month and partial month discount amounts will be rolled into a total amount that is displayed per service line on the invoice.
When multiple eligible products are being prorated, the system determines which one has the highest percentage and apply that amount across all prorated eligible products. This prevents those eligible products from accruing a higher discount amount than the full constant amount.
Note: If you need to change this setup after the discount is assigned to one or more accounts, you’ll need to submit a service request.
Tier Type
The level of discount to apply is determined by configuring tiers. Discount tier levels are used to set up the various percentages to create the discounts. There are three tier types to choose from: Flat, Single, and Rolling. The setup process (options available) depends on the selected type.
Notes:
- Eligible Factors do not apply to Rolling tiers.
- Products do not contribute to minutes-based discounts.
- Tiered group discounts cannot have a Tier Type of Rolling.
- Tier information is entered into the Discount Tier Levels table.
- Changing Tier Type after a discount is assigned can only be done by submitting a service request.

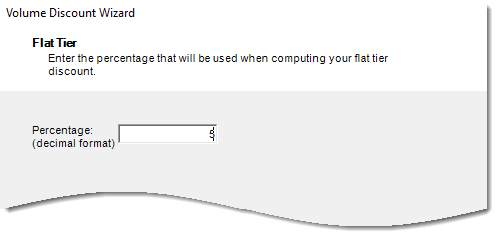
- A Flat Tier Type has only one level and is used to create a flat rate discount. This tier type determines how much of a discount (percentage or currency) to apply. You would use this type to create a flat discount of 5% for all the factors that you selected, such as those selected in Usage Types, Service Types, Distance Types, Products, and Locations. If you selected Constant Amount on the Amount Type window, enter a dollar amount. Otherwise, enter a percentage.
Note: The percentage value should be entered in decimal format.
- A Single Tier Type can have as many tier levels as you want to create (by clicking New). The discount is based on the total number of units and is determined by the tier level that corresponds to the number of units used.

For each tier level, define the End Range (the number of units at which that tier ends) and the Amount (Percent or Currency), depending upon the Amount Type.

Example: You set up Tier 1 as 1-10 minutes (End Range = 10) at 10% discount, Tier 2 as 10-15 minutes (End Range = 15) at 15% discount, and Tier 3 as 15-999999999 (infinite) minutes (End Range = 999999999) at 20% discount. The customer uses 12 minutes; therefore, the customer receives a 15% discount on all of the eligible minutes.
Discount tier levels are used to set up the various percentages to create the discounts.
| End Range | Enter the ending number of units (call, minute, or dollar amount).
Note: If this tier is not the first tier for this discount, you must enter a value that is greater than the value you specified in the End Range for the previous tier. |
| Amount | If you selected Percentage as an Amount Type, enter the decimal value of the discount.
If you selected Constant Amount as an Amount Type, enter that amount. If this is a Reward Points discount, enter the number of points given for this End Range. |
- A Rolling Tier Type can also have as many tier levels as you want to create. The discount is calculated using each tier level and adding the resulting discounts together.

For each tier level, you define the End Range (the number of units at which that tier ends) and the Amount (Percent) of the discount for that tier. The tiers begin and end ranges are based upon the tier units you selected – Currency or Minutes.
Notes:
- Eligible Factors do not apply to Rolling tiers.
- Tiered group discounts cannot have a Tier Type of Rolling.
- Example: You set up Tier 1 as 1-10 minutes (End Range = 10) at 10% discount, Tier 2 as 10-15 minutes (End Range = 15) at 15% discount, and Tier 3 as 15-999999999 (infinite) minutes (End Range = 999999999) at 20% discount. The customer uses $14 worth of usage; therefore, the customer receives a 10% discount on the first $10, PLUS a 15% discount on the next $4.
- The Volume Units you specified in the Tier Units window dictates which units to count toward the discount.
Reward Point Expiration
This page is only displayed for Reward Point discounts.

Select the unit (days, weeks, months, or years) and then specify the amount, or select Never Expire.
Note: This can be edited on the account after the discount is assigned. See Editing Discount Wizard Options in the article for Managing Assigned Discounts.
Finishing the Wizard
The Completing Volume Discount Configuration Wizard page lets you use the Back button to return to any wizard page to make changes or click Finish to close the wizard and save the changes.
Note: As indicated above, some discount wizard options can be edited on the account after the discount has been assigned, while other options can only be changed by submitting a service request. See Editing Discount Wizard Options in the article for Managing Assigned Discounts.
Finishing Volume Discount Setup
After all volume discounts have been added and run through the configuration wizard, do the following to complete the volume discount setup:
- Assign discount categories.
- Set the processing order.
- Set up general ledger rules.
- Tweak other parameters if needed.
These steps are covered in Finishing Discount Configuration.
Quick Guidelines – Specific Volume Discount Applications
This provides quick guidelines on how to set up these volume discount applications:
- Reward points based on loyalty
- Reward points based on products
- Tiered group discounts
Reward Points Based on Loyalty
A Loyalty Reward Points discount can be configured to reward customers based on length of time since the account was established or when the discount was assigned to the customer or service.
- First create a new volume discount in the Product Catalog. Note: Do not check the Tiered Group Discount option. Tiered group and loyalty discounts are mutually exclusive.
- Then configure the discount via the Volume Discount wizard as follows:
| Discount Wizard Page | Configuration |
| Discount Type | Reward Points |
| Loyalty Discount | Select Make this a loyalty discount and then select either option as needed. Note: Selecting Reward Points and Loyalty causes the wizard to skip Contributing and Eligible pages. |
| Amount Type | Constant Amount is the only valid option for reward points discounts. |
| Tier Units | Tier unit options are based on loyalty. Select Days, Weeks, Months, or Years. |
| Tier Type | Single Tier is the only valid option for a Loyalty discount. |
| Single Tier | You can set up as many tiers as needed; however, you must set up at least one tier. Enter a number for the end of each tier range and the number of points to be given for that range. |
| Reward Point Expiration | Specify the number of days, months, or years before the reward points will expire, or select Never Expire. |
Reward Points Based on Products
A reward points discount can be configured to reward customers for generating revenue through purchased products.
- First create a new volume discount in the Product Catalog. Note: Do not check the Tiered Group Discount option. Tiered group and loyalty discounts are mutually exclusive.
- Then configure the discount via the Volume Discount wizard as follows:
| Discount Wizard Page | Configuration |
| Discount Type | Reward Points |
| Contributing and Eligible Factors | The only valid option for reward points discounts based on products is Contributing and Eligible factors are the same.
Run through the Contributing pages and select the appropriate factors as required by your application. Note: On the Contributing Products page, reward points discounts exclude zero-charged products from consideration. |
| Tier Units | The only valid option for product-based reward points discounts is Currency. |
| Tier Type | Select the appropriate Tier Type.
For details on configuring tiers for each type, refer to Tier Types. |
| Reward Point Expiration | Specify the number of days, months, or years before the reward points will expire, or select Never Expire. |
Tiered Group Discounts
The Tiered Group Discount option is available for selection when Registry Description = Volume Discount.
A Tiered group discount is applied across grouped accounts. The group is defined by assigning the discount to a specific group of accounts or services. The discount is calculated using the number of active services within that group and the corresponding discount tier.
This type of discount is often used to give discounts to individual subscribers who are part of a common entity, such as a business or association.
For example, your company has agreed to give a discount (Acme Discount) to all of Acme Limited’s employees who sign up for services with your company. The discount amount is based on the number of active services associated with Acme Limited. The Acme Discount is configured so that if up to five services are associated with the Acme Discount, a 5% discount is given to all eligible items in the configuration. If there are more than five services, the discount is 10%.
Notes:
- A Tiered group discount must be a Volume discount.
- Tiered group discounts and loyalty discounts are mutually exclusive.
- Tiered group discounts and Include Children are mutually exclusive.
- Only Flat or Single Tier Types can be used, the Rolling Tier Type cannot be used. Tier Type is specified when you run the discount configuration wizard.
- An account could receive multiple discounts if the tiered group discount is assigned at both the account level and again at the service level. To avoid this, create a Product Catalog folder for all tiered group discounts and use the Limit-to function to limit the discounts so they can only be assigned at the account level.
- To help with assigning the correct discount to the account, enter a description that uniquely identifies the group, such as Acme Manufacturing Employees Discount or State University Alumni Discount.
- The Tiered group discount always uses Active Services as the Tier Unit, therefore, other contributing factors are not configured. All active services are counted when determining the discount.
- The Tiered group discount is applied to all eligible factors set up during discount configuration.
- The types of services selected in Eligible Services receive the discount, but do not affect the discount amount. All active services are counted when determining the discount amount.
| Discount Wizard Page | Configuration |
| Discount Type | Select Credit or Bonus. |
| Eligible Usage Types | Select the appropriate usage types. |
| Eligible Service Types | Select the appropriate service types. |
| Eligible Distance Types | Select the appropriate distance types. |
| Eligible Originating Locations | Select the appropriate originating locations. |
| Eligible Terminating Locations | Select the appropriate terminating locations. |
| Eligible Time of Day | Select the appropriate time of day options. |
| Ignore calls with zero charges – Contributing | Select or clear the check box as appropriate. |
| Eligible Products | Add the products that contribute to the reward.
Note: Reward points discounts exclude zero-charged products from consideration. |
| Tier Units | Active Services is the only valid options for Tiered Group discounts. |
| Tier Type | Flat or Single are the only valid option for a Loyalty discount. Rolled Tier is disabled.
For details on configuring tiers for each type, refer to Tier Types. |
Finishing Discount Configuration
These final setup steps are required after all discounts have been added and run through the configuration wizard:
- Create discount categories and assign discounts to them.
- Set the processing order.
- Set up the discount sorting rule (applies only to grant discounts). This serves as a tie breaker for grant discounts with the same processing order.
- Set up general ledger rules.
- Tweak other parameters if needed.
Discount Categories
Discount Categories are used to group discounts to facilitate tracking a customer’s consumed and remaining usage against the discounts. Create discount categories to group similar discounts, for example, Anytime Airtime Minutes or Incoming Airtime. Discount categories are present on Unit Balance views on the customer account. Discount categories are also used for Usage Notifications and Usage Notification reports.
Notes:
- If you offer AdvancePay service, you’ll want to separate those discounts from post-paid discount categories.
- Give discount categories names that customers would typically use when asking for their unit balances.
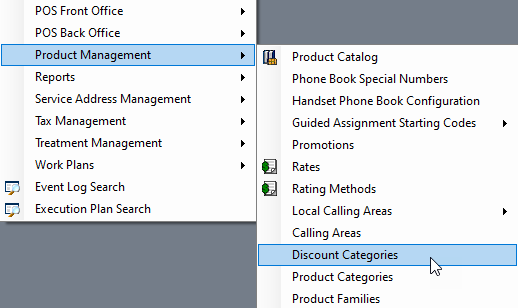
You manage discount categories via the Discount Categories form. This form lets you add, edit, and delete discount categories, and then assign discounts to their respective categories. The Discount Categories form is available via the CostGuard Client Applications menu > Product Management > Discount Categories.
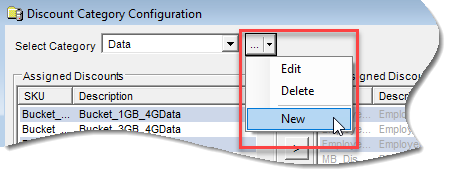
The Discount Categories form lets you see all the discounts you’ve created. Note: The discounts presented in the Assigned Discounts panel on the left and Unassigned panel on the right are based on the category selected in the drop-down menu. Selecting a different category changes the content of these lists accordingly.

Adding, Editing and Deleting Discount Categories
These functions are available via the unlabeled drop-down menu next to the Select Category drop-down menu.
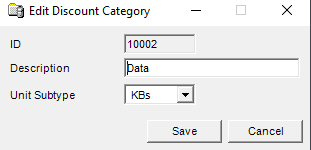
When you add or edit a discount category you give it a meaningful Description and specify the Units Subtype. Subtype refers to the units being tracked under this category. The ID is assigned by the system. Select the Units Subtype according to the usage being discounted:
- KBs are used for data.
- Clicks are used for occurrence-based discounts.
- Seconds are used for voice-based discounts.
Assigning Discounts to Categories
Select a category from the drop-down menu and then use the left/right arrow buttons to assign/unassign one or more discounts to the category as needed.

Note: You can also assign a discount to a discount category by opening and editing individual discount catalog items.
Setting Processing Order
When an account or service has multiple discounts, you should establish the processing order to establish when a discount is processed in relation to all other discounts. The system processes the discount with the highest processing order first (1 = highest), recalculates the balance and then processes the next discount in the sequence against the new balance. Usually, larger (more impactful) discounts should be processed later so they take the biggest percentage off the smallest version of the amount, after all other discounts of a higher order (i.e., 1 or 2) have already reduced the total.
Processing order may be set initially via the New Discount form when you add the discount. The Discount Processing Order form lets you set the processing order across all discounts, rather than having to open and edit each discount. The Discount Processing Order form is available via the Product Catalog window icon tray.
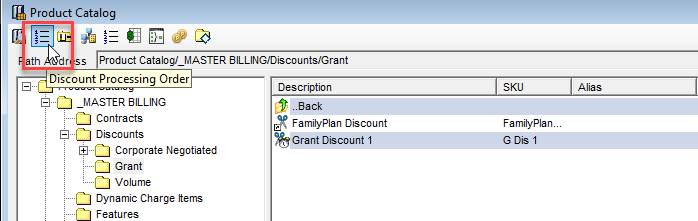
Clicking this icon displays the Discount Processing Order form listing all existing discounts. From here you can right-click a row and select Edit, then enter the processing order number.
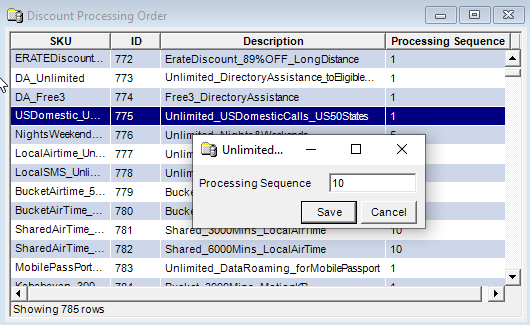
Processing Order – Volume Discount Example
- Discount #1 takes 10% off balance
- Discount #2 takes 20% off balance
When both discounts have the same processing order, the discounts are applied to the full charges and then added together:
- Charges = $200
- Discount #1 takes 10% off $200 (= $20)
- Discount #2 takes 20% off $200 (= $40)
- Total off = $60 = $140 new balance
When processing orders are different, the system recalculates a new balance after each discount is applied:
- Charges = $200
- Discount #1 (sequence 10) takes 10% ($20) off the initial charges = $180 new balance
- Discount #2 (sequence 20) takes 20% ($36) off the $180 balance
- Total off = $56 = $144 new balance
Processing Order – Grant Discount Example
There are two discounts:
- Unlimited Nights and Weekends (UNLNW)
- 700 Anytime Minutes (700ATMIN)
Note: For grant discounts you must also set up the Discount Sorting Rule, and the rule must include Processing Order. See Setting Up Discount Sorting Rule.
- Make sure Discount Processing Order is included in the Discount Sorting Rules.
- If both grants are set to the same Processing Order sequence, the system evaluates them based on their names, and would process the 700 Anytime discount first (numbers before letters), which could apply to nights and weekends minutes and could use up the bucket; then, when the 700ATMIN grant is exhausted, the rest of the nights and weekends calls would be free under the UNLNW discount, but there could still be overage charges for anytime calls that exceed 700 minutes.
- If you set the order on the UNLNW discount to a lower value (e.g. 1) so it is processed first, the system will discount all nights and weekend calls down to zero, then whatever is left will process against the 700 bucket (e.g. processing order = 5).
- Typically, you would want all Unlimited plans to have lower processing orders than any limited (specific number of units) plans to ensure usage goes against the unlimited plans before minutes buckets.
Setting Up Discount Sorting Rule (Grant Discounts Only)
For Grant discounts, processing order is determined by processing order setup in combination with a sorting rule as defined via the Discount Sorting Rule Icon on the Product Catalog window icon tray.

The Discount Sorting Rule lets you sort discounts by Expiration Date, Filter (usage type, distance type and time-of-day), Units Remaining, One-Time or Recurring, and Discount Plan. The rule must include Discount Processing Order; however, the actual order is set on an individual discount basis as described above. The Units Remaining, One Time/Recurring and Expiration Date rules serve as tiebreakers when Discount Processing Order is the same on all the discounts being evaluated. These factors may be included or excluded as needed.
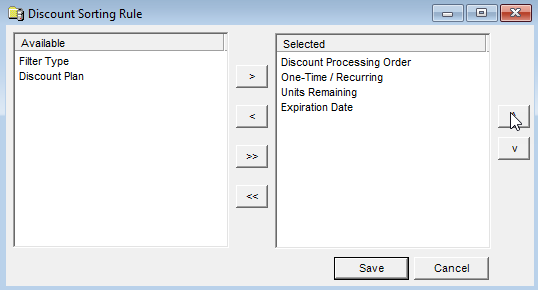
- To sort an item, move it from the Available box to the Selected box. Click the >> or << arrow to move all sorting rules from one side to the other. Click the > or < arrow to move one sorting rule at a time.
- To change the order of the sorting rules displayed in the Selected box, select a sorting rule and click the ^ arrow to move the item up in the list or click the v arrow to move the item down in the list.
- Once an item has been moved to the Selected column, double-click or right-click and select Edit to configure the item. Each rule has a different edit dialog. Note: The only criterion that cannot be edited or removed is Discount Processing Order. This is set via the Add/Edit discount form, or via the Discount Processing Order form.
Editing the Filter Type Rule
This lets you specify Usage Types, Distance Types and Time of Day as sorting criteria.

This dialog has three separate tabs. You may choose to sort by any combination of these criteria. They all operate in the same manner.
- First choose to sort by All or selectively include or exclude specific items.
- Choosing Inclusive or Exclusive enables the Add button and the associated fields.
- If you know the IDs of the items you want to add, enter them directly in a comma-delimited list. Or you can click Add to display a list of available items. As an example the Usage Type list is shown below.

- You can double-click to select an indivilual item, use the shift key to select a contiguous list, or ctrl to select a non-contiguous list.
- Once you’ve established your list of items to sort by, use the drop-down menu to specify that discount plans matching the specified criteria be processed First or Last.
Editing the Expiration Date and Units Remaining Rules
For expiration date and units remaining you can choose the sort direction:
- Ascending – Use the oldest minutes first.
- Descending – Use the newest minutes first.
- Ascending Current Period First – Use the minutes in the current period first, then use the oldest minutes next, and then work forward.
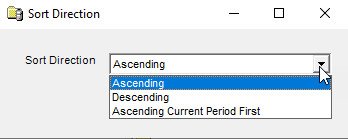
Editing the Discount Plan Rule
This option lets you select one discount plan to process First or Last.

Editing the One-time/Recurring Rule
This lets you choose whether to process one-time discounts or recurring discounts first.

Global Dialed Digits Numbers
The Global Dialed Digits Numbers table lists all phone numbers associated with the grant discount associative type = Global Exact Dialed Digits. This means when subscribers call one of the listed numbers, that call is free. The table is managed via the CostGuard Client Applications menu: Product Management > Global Dialed Digits.

The context menu for this table lets you add, edit, or delete entries in this table. The dialog for adding a number is shown below.
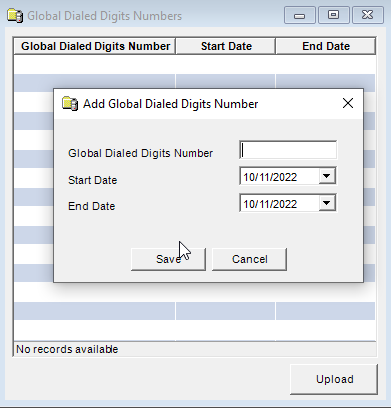
For each entry, the following information must be specified:
- Global Dialed Digits Number – Exact phone number that can be called without a charge. It must be a 10-digit number within the NANP.
- Start Date – First date the number can be called without a charge.
- End Date – Date the number can no longer be called without a charge.This lets you choose whether to process one-time discounts or recurring discounts first:
- From the Selected box, either right-click on the One-time/Recurring sorting rule or double-click on it.
- Select One-time or Recurring from the drop-down list.
- Click Save.
Other Adjustments
Set up general ledger and tweak other parameters via the Edit Discount form as needed.
Managing Assigned Discounts
In Customer Care and IDI Desktop Client you can monitor and manage assigned discounts. You can:
- monitor units consumed and available units remaining for discounts on an account via any view that shows usage balance.
- edit certain discount wizard options by editing the discount configuration in the Product Catalog.
- edit Number of Units directly on a customer’s account.
- monitor and manage reward points when applicable.
- specify the services to share in a Grant discount.
Monitoring Discount Activity
Discount consumption is broken out by discount category. Usage is only available for viewing AFTER usage has been processed. For example, if a user goes into Product Management, creates new discount categories and applies discounts to those, they won’t see the effect until usage is processed.
Note: This applies for both discounts assigned at the customer account level AND the service level.
Below is an account’s Usage Balance view in Customer Care.

In IDI Desktop Client there are three ways to access this information:
- Account Summary Last Invoice Information section Usage/Free Units link.

- From an open invoice
- From the Customer window, Services tab by right-clicking on a service and choosing Properties > Unit Balance.
Editing Discount Wizard Options on an Account
The Configure menu option on a discount in the Product Catalog changes to Edit Configuration after the discount has been assigned to one or more accounts. In this case, certain discount wizard options can be changed and will apply to all assigned instances of the discount on saving the changes.
To edit the configuration for an assigned discount:
- Find the discount in the Product Catalog.
- Right-click on the item and choose Edit Configuration. Note: This option is only available for discounts that have been assigned to one or more accounts.

The options that can be edited depend on the type of discount.
Grant Discounts
- Can be edited:
- Number of Units – This is done directly on the accounts as described in Editing Number of Units After Discount is Assigned/Billed.
- Proportional Allocation
- Selected Usage Type
- Selected Distance Type
- Selected Wireless Indicators
- Selected Originating Locations
- Selected Terminating Locations
- Selected Serving Locations
- Time of Day
- Cannot be edited:
- Sharing options
- Units options (with the exception of Number of Units)
- Recurrence Type
- Grant Expiration
Volume Discounts
- Can be edited:
- Contributing/eligible usage types
- Contributing/eligible service types
- Contributing/eligible distance types
- Contributing/eligible originating locations
- Contributing/eligible terminating locations
- Time of Day
- Ignore calls with zero charges
- Contributing/eligible products
- Reward point expiration
- Cannot be edited
- Discount Type
- Loyalty
- Tier Units
- Amount Type
Editing Number of Units after Discount is Assigned/Billed
Authorized users (through permission profile) can modify the Number of Units field for an assigned/billed grant discount directly on a customer’s account. This lets you analyze actual usage on accounts and then adjust the discount to better fit your needs. The path to the permission in Admin Console Permission Profiles is: Application > CostGuard Client > Product Management > Discount Configuration > Number of Units > Edit. To edit Number of Units, drill down to the discount on the Services tab in the Customer window, then right-click and choose Edit.

Reward Points
In IDI Desktop Client Customer Management you can monitor and manage Reward Points via the Customer window > Balances tab> Reward Points view. You can tender purchases for a customer when they have points available by selecting the Reward Cash tender type (available via the Other tab on the tendering form.
Viewing and Managing Reward Points Balance
Whenever points are added to or subtracted from an account, the account posting process updates the balance by settling debit points (points that have expired) against credit points (points added by the billing operation).
Basic Business Rules:
- Debit points settle against the points that are closest to expiration first, then against the points next closest to expiration, and so on.
- Unposted reward points are not available for use by the tendering operation.
- All transactions (manual adjustments, tendering debits, expiration debits) immediately post to the account EXCEPT reward points that are added by the billing operation. Reward points created by the monthly bill operation do not post until the bill period has been approved. This lets you review the invoices and their associated reward points, make changes if necessary, and then rebill, without being concerned that the reward points may have already been used by a customer between the initial bill and a rebill.
The Reward Points view, selectable via the left drop-down menu on the Balances tab, displays a list of reward point transactions. The upper pane lists posted transactions. The lower pane lists unposted transactions.

Note: You can also view Reward Point balances in Customer Care via the Balances page on a customer account; however, currently Customer Care does not support tendering as described below.
Managing Reward Points
With the appropriate permissions, you can make adjustments (debit or credit) to the existing Reward Points balance via the Actions drop-down menu.
Tendering Reward Points
Your subscribers can use reward points as tender for a POS purchase or to tender a bill payment at a POS location. To use reward points as tender, a Reward Cash tender type must be one of the store’s accepted Tender Types set up in Register Policies.
When tendering a POS transaction, select the Reward Cash tender type. This opens the Reward Cash Details form displaying the available Reward Points and the converted value based on the Conversion Factor set up in the Product Catalog.
Configuring Shared Services for Grant Discounts
On Grant discounts, when the Shared Across Services option is set to Shared across selected services (max lines or no max) the Shared Services list must be configured on an account basis. When a shared selected services discount is sold, a dialog for selecting the services is displayed at the time of sale unless you suppress this dialog by checking the Suppress Shared Grant Discount Dialog setting in POS Backoffice > Locations > General Options tab.

The default is to display (not suppress) the dialog. In this case, at the end of the retail sales transaction in POS after you tender the sale and confirm the receipt information, you’ll get a prompt to enter the shared services.

Clicking Yes displays the following dialog for entering the list of shared services. Note: The dialog will show all discounts on the sale. Select the applicable discount to see the list of services eligible for sharing the discount.
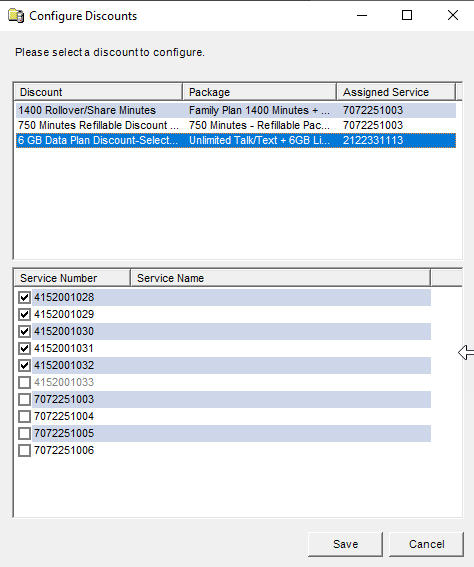
If the location for the sale is set up to suppress the dialog or the dialog is dismissed without selecting the services, a follow-up message is generated as a reminder to populate the shared numbers list. In that case, the list is configured on the service via the discount context menu (right click and choose Properties > Shared Services).
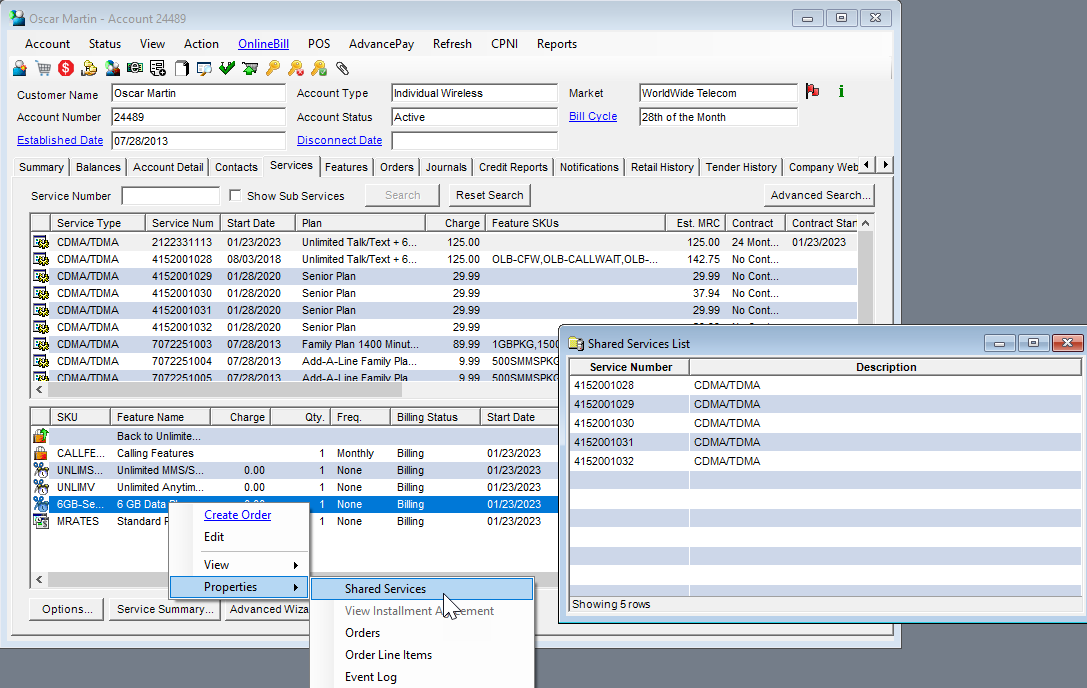
Add/Edit Discount Form – Main Tab
| SKU (required) |
Unique identifier used to define the product.
Maximum characters = 20. |
| Description (required) |
The name of the discount as it is displayed in the system. This also appears on your customers’ invoices unless Alt. Invoice Desc. is populated. |
| Alias | Used to link this discount to the discounts of another system.
Maximum characters = 50. |
| Alt Invoice Desc | Description of the discount entered here appears on the customers’ invoices if populated; if left blank, the Description appears on the invoices.
Note: If including this field on the customers’ invoices, you must work with your print vendor to include it. Maximum characters = 50. |
| View Configuration | Click to view the discount configuration. Note: This button is only displayed on the Edit Discount window (not available until the discount has been saved).
You can also right-click on a discount and select View Configuration. |
| Registry Description | Select Volume Discount or Grant Discount. Select Grant Discount for use with an AdvancePay product (wireless only).
The configuration wizard pages vary, depending upon this selection. |
| Display Zero Discounts on Invoice |
|
| Include Children | If checked, corporate discounting is applied. Corporate children, invoice responsible or not, are included in the calculation of discounts on an invoice responsible corporate parent.
Note: This option is not available if Tiered Group Discount is selected. |
| Tiered Group Discount | If selected, this discount is applied across accounts in a group. The group is defined by the accounts (or services) that this discount is assigned to. The discount is calculated using the number of active services within that group and the discount tier corresponding to the number of services.
Note: This option is not available if Include Children is selected or if Registry Description is set to Grant Discount. |
| Associative Type | This lets you define a network of service numbers where the discount may be applied. Available associative types vary for volume and grant discounts (registry selection). This field defaults to None for both volume and grant discounts. The other options are described in detail in the Volume and Grant Discount articles respectively. |
| Processing Order | Specify when the discount should be processed, in relation to all other discounts.
Discounts with the highest rank (with 1 being the highest) are processed before discounts with lower ranks. For Grant discounts, other criteria for determining processing order may also be considered. Note: This can be edited via the Discount Processing Order form as described in Finishing Discount Configuration. |
| Discount Category | This groups discounts to be used in calculating minutes used against a discount and the remaining free minutes.
It defaults to Unassigned. It can only be specified after the discount shell has been saved and run through the discount wizard. Once this is done you can edit Discount Category directly on the discount (Edit Discount form) or use the Discount Category form as described in Finishing Discount Configuration. |
| Charge Tax Class | This is common to most billable products; however, it is not applicable for discounts. |
| Available Date | Date the discount becomes available for assignment to a customer or service.
Valid date format: MM/DD/YYYY. Default: Current date |
| Category | Product Category used to group similar items, such as accessories or handsets, for accounting purposes. |
| Default Billing Status | Select the default Billing Status of the discount when it is assigned to an account or service: Billing or Not Billing. |
| Discontinue Date | Date the discount is no longer available for assignment.
Valid date format: MM/DD/YYYY. Note: The discount cannot be assigned to a customer or service after the date entered in this field; however, existing assignments remain active. |