Release Summary
Change Orders/Enhancements
The following change orders and other enhancements are included in this release.
AR/FR | Description | |
|---|---|---|
Orders | FR 3786 | Enhancements for Starting Block configuration The Starting Block Configuration page in the web Product Catalog has been redesigned for greater ease of use and flexibility. This includes new configurable conditions for when Starting Blocks display, as well as the ability to associate an Assignment Template to a Starting Block. |
Orders | FR 3788 | Improved display of Browse Tag Categories in web transactions New Browse Tag Category configuration options give you more control over how applicable categories are organized and listed in web transactions. These include Rank, Display Name, and Service-Level Actions, which are now observed in the Orders web app, when applicable. |
Orders | FR 3789 | Enhanced equipment sale and swap Selling and swapping equipment on an existing service can now be done in a single web transaction and with fewer clicks. |
Provisioning – Calix SMx | FR 3772 | Capture and store auto-generated ONT ID as a POD Property This adds a new parameter to the existing Create-Update ONT (Optical Network Terminal) action in the Calix SMx provisioning specification to capture and store an auto-generated ONT ID as a POD Property. Providers can then use the ONT ID in future actions to update or disconnect the ONT. See the Calix SMx provisioning specification for details. |
Equipment Inventory | FR 3773 | Equipment inventory enhancements You can now configure manufacturers and models in the Inventory web module and assign a model to equipment when creating or editing a record. Models can also be marked as available or unavailable, so retired models can be excluded from equipment assignment without losing their history. The Equipment Inventory Bulk Data Import has also been updated accordingly. |
Paymentus | FR 3775 | Reversing payments When Paymentus sends IDI a notification that involves crediting the account, IDI can now determine whether to create a Payment Reversal or an Adjustment. |
Paymentus – Customer Care | FR 3776 | Indication of scheduled vs. one-time payments Paymentus payment details In Customer Care, now clearly indicate whether a payment is recurring (scheduled) or a one-time payment. |
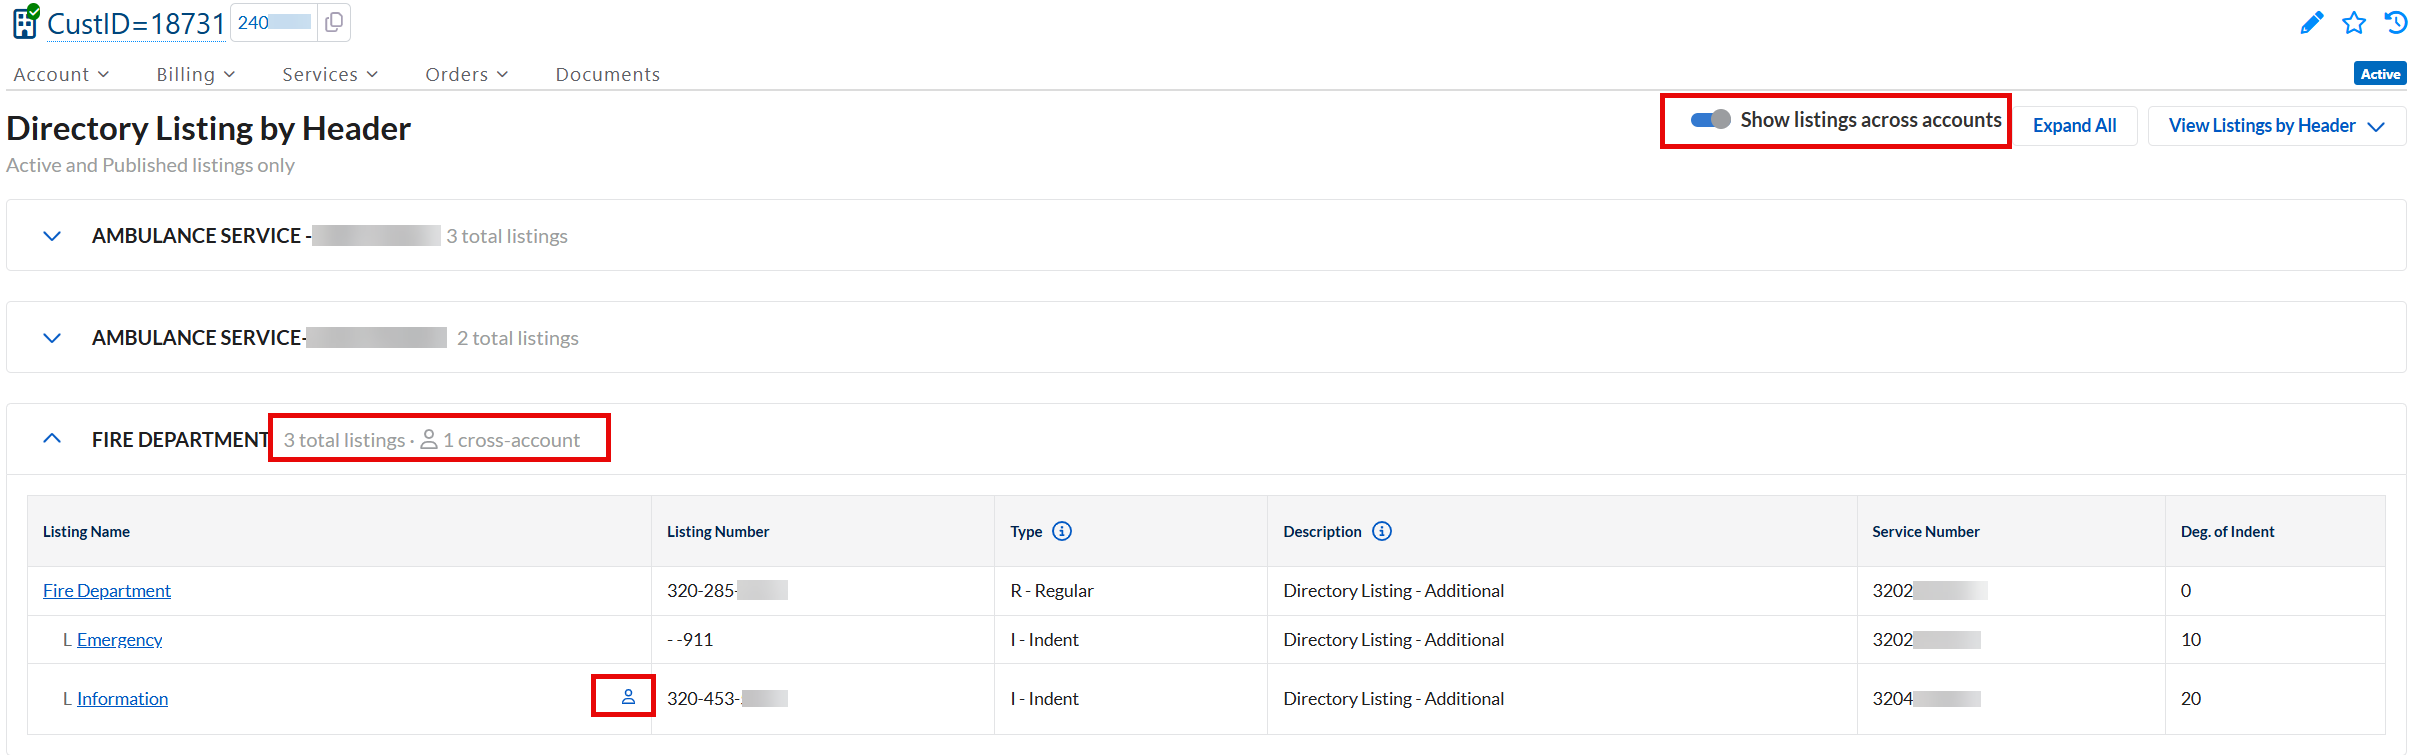
Customer Care | FR 3762 | Additional Directory Listings view A new view has been added to the Account > Directory listings page that displays listings grouped by header telephone number. |
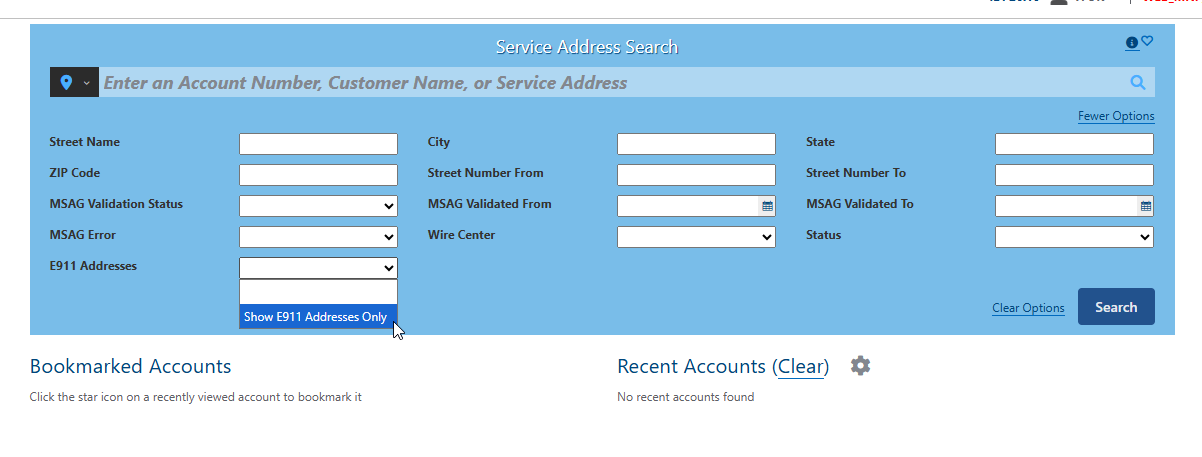
Customer Care | FR 3791 | Service Address search filter for for E911 addresses There is a new filter on the Service Address search to return only E911 addresses.
|
Web APIs | FR 3765 | TM Forum Compliance TM Forum compliant APIs have been published for TMF 629 Customer Management, TMF 667 Document Management and TMF 678 Customer Bill Management. More information is available in the Developer Resources article |
Resolved Known Issues
The following known issues have been resolved in this release.
PR | Description | |
|---|---|---|
Payment Processing | 85196 | Improved Recurring E-Pay Performance Performance improvements in recurring E-Pay transactions help reduce timeouts. Also, error handling for these timeouts will facilitate troubleshooting if they occur in the future. |
Payment Processing | 85198 | Recurring Credit Card not charged Recurring transactions are now created as expected for customers who changed their billing cycle. |
Customer Care | 85199 | Unable to add email to E-Pay contact card Updating the email address on an E-Pay Contact Card now works as expected. |
Platform Application Target Deployment Dates
Module | Target Deployment Date |
Provisioning - Calix SMx | 10/05/2026 |
Enhancements for Starting Block Configuration
The Starting Block Configuration page in the web Product Catalog has been redesigned for greater ease of use and flexibility. The configuration options are now organized under four tabs instead of two. This improves the presentation on smaller screens (e.g. Tablets). In addition, there are new options, and the presentation of some existing options are rearranged for clarity.
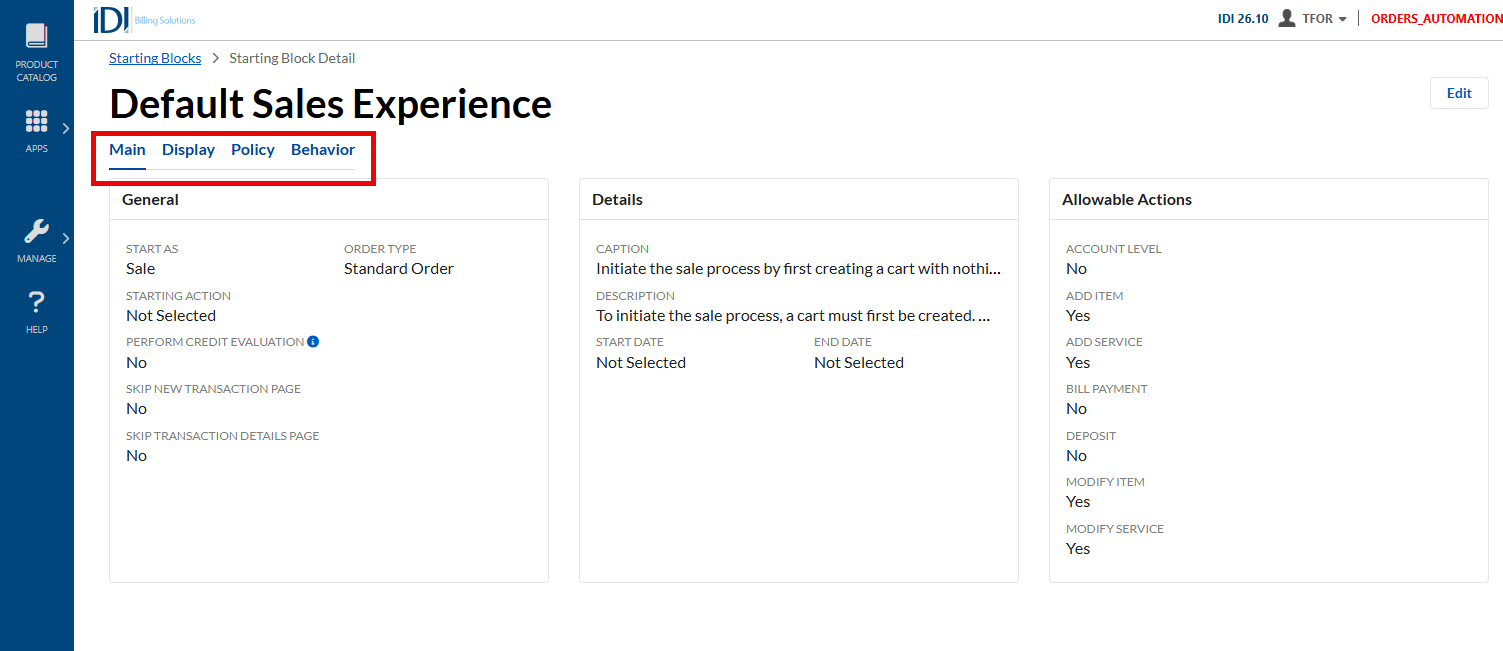
Main Tab
These options have been reorganized under three headings – General, Details (formerly found under Behavior), and Allowable Actions. The Displayed In options have been moved to the new Display Tab.
Display Tab
The Displayed In options are now shown here. Each Display at this level category has a color-coded badge to clearly indicate whether the option is enabled:
Green – Always displayed in the area.
Blue – Displayed in the area when the criteria are met.
Grey – Not Displayed in the area.
The Only display under certain conditions checkboxes under each Display at this level category let you specify additional conditions to satisfy specific use cases. For example, the User Group selectors under each category let you restrict Starting Block availability to a certain class of user (e.g. administrators).
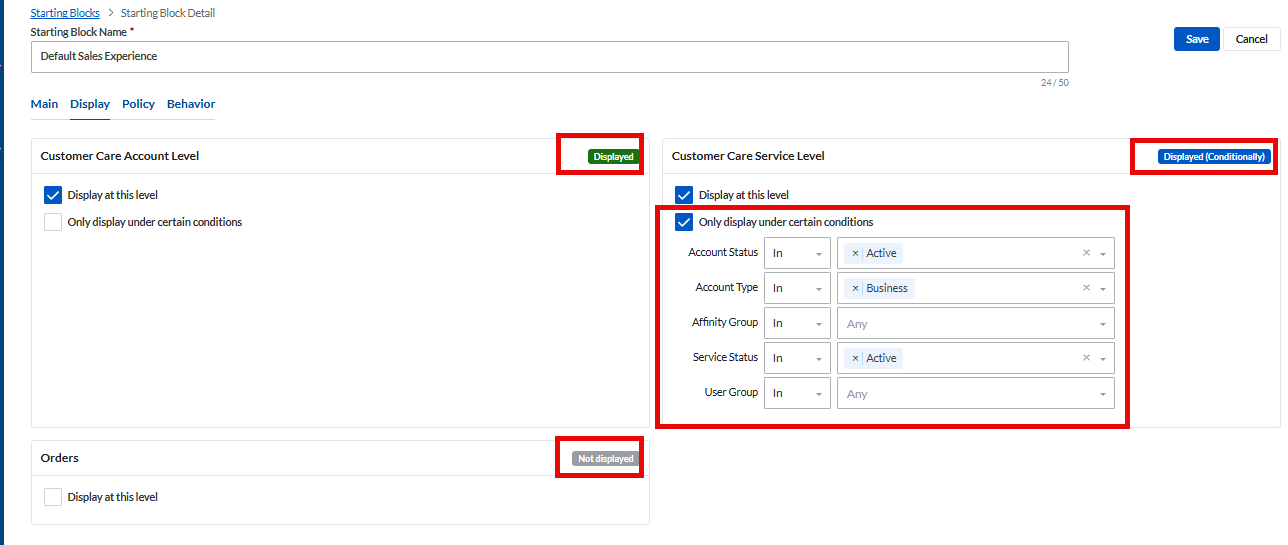
Each area’s configurable conditions are unique:
Customer Care (Account Level):
Account Status
Account Type
Affinity Group
User Group
Customer Care (Service Level):
Account Status
Account Type
Affinity Group
Service Status
User Group
Orders:
Location - The location of the assigned user.
User Group
Policy Tab
The Policy tab has not changed.
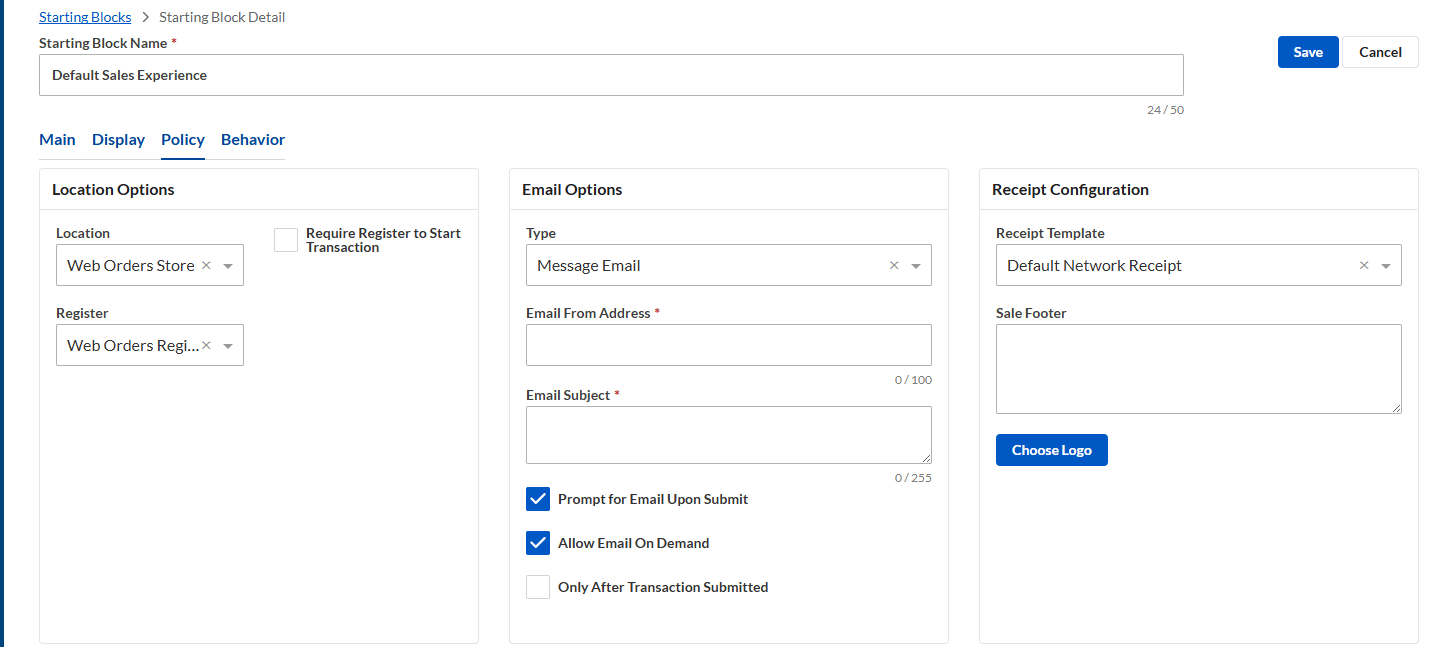
Behavior Tab
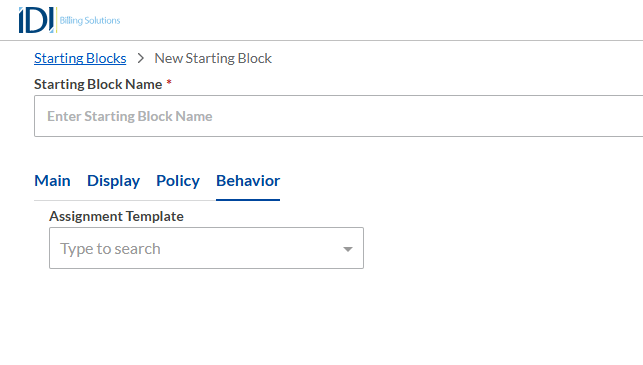
As indicated in the Main Tab description above, the options that were previously listed under Behavior are now listed under Details on the Main tab. The new Behavior tab provides a new Assignment Template selector to drive what items are available for selection when this Starting Block is used.
Enhancements for Browse Tag Category Configuration
Browse Tag Category configuration provides several new options that let you display the applicable categories in web transactions in a clear, organized way.
When adding a new Browse Tag Category or editing a new one you can now specify a display name, display order, and limit availability to specific service-level actions.
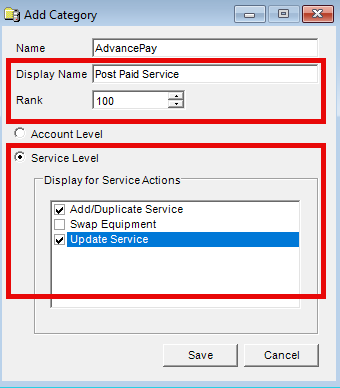
Display Name specifies the text shown in Orders when the corresponding Browse Tag Category is displayed, if you want what’s shown to be different than the Name. This field is a optional. If left blank, the Name will be displayed.
Rank is a value between 1 and 1000 (inclusive) that sets the order in which Browse Tag Categories are displayed. Prior to this, results were shown in alphabetical order. Now they’ll be sequenced from lowest rank to highest (i.e. in ascending order of rank). If two or more categories with the same rank are returned, alphabetical order will be used for the relative categories.
Service Level – Account Level and Service Level radio buttons replace the Account Level checkbox. Selecting Account Level specifies the category will only be available at that level. Selecting Service Level presents a list of Display for Service Actions options. By selecting one or more of these options, the category will only be available for those actions.
Enhanced Equipment Sale and Swap
Selling and swapping equipment on an existing service can now be done in a single web transaction and with fewer clicks.
Automatic Selection of a Handset and other New Equipment Information when a Handset ID is Entered
When you perform a Swap Equipment transaction for a service in the Orders web module, the Technology Type on the Equipment Information tab defaults to the service's Technology Type. Now, when you enter a Handset ID (i.e. equipment ID (EID) or serial number), Orders searches for a matching Handset in Device Management and in specific prior IDI transactions as noted below.
If a match is found, the Technology Type and Handset selectors fill in automatically and are locked. The EID is also applied, if applicable. This speeds up data entry and reduces the chance of errors.
If no match is found, a message lets you know. The Technology Type and Handset selectors stay available so you can select them manually.
If you clear the Handset ID field after a match was found, the filled-in details stay locked. To change them, enter a different Handset ID or refresh the page.
Note: The lookup only finds handsets that exist in Device Management or were previously sold through an IDI solution’s transaction. It does not search retail inventory transaction history.
.

Ability to Swap Equipment on an Existing Service
This eliminates the need to sell out equipment in one transaction, then swap in a separate transaction. When selling a retail product to a service with a Product Class of Handset or SIM Card, a checkbox is provided to make the action a Swap Equipment transaction. In addition, a Swap Reason will be required.
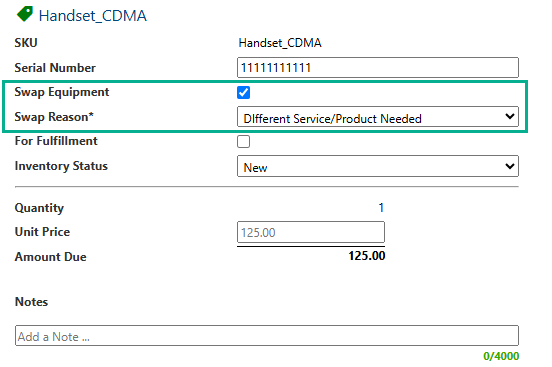
Note: This functionality only applies when the Action = Update. It does not apply for Add, Duplicate, or Reconnect actions.
Equipment Inventory Enhancements
You can now configure Manufacturers and Models in the Inventory module and assign a Model to equipment when creating or editing a record. Models can also be marked as available or unavailable, so retired Models can be excluded from equipment assignment without losing their history.
The Inventory slide-out menu has a new MANAGE option for Equipment Configuration.
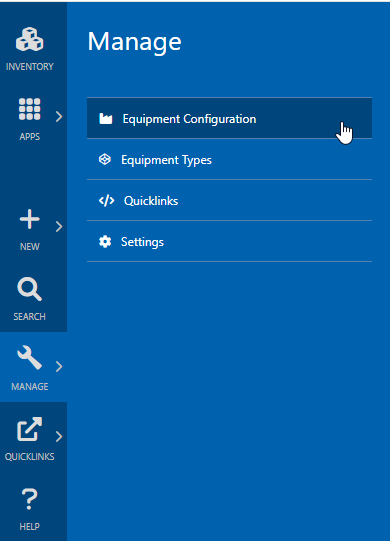
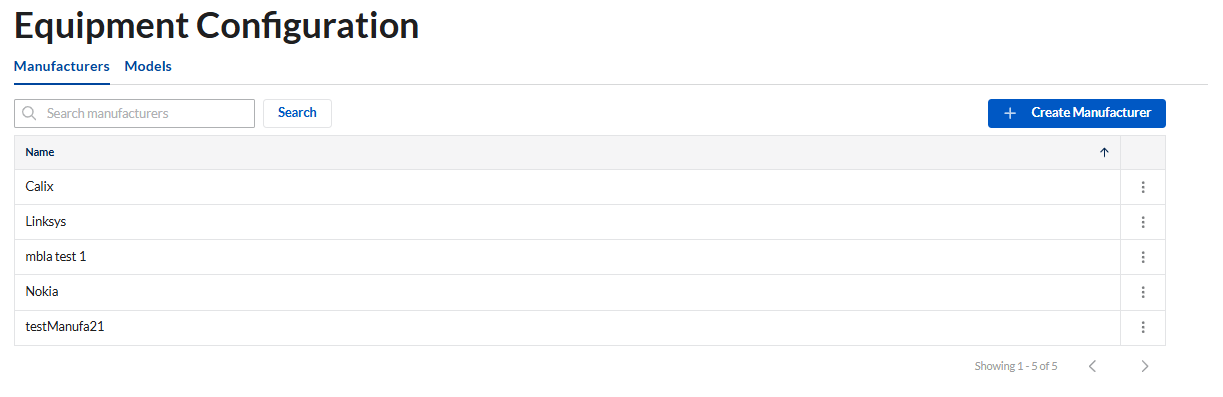
The Equipment Configuration page provides two tabs for viewing and managing Manufacturers and Models. It defaults to the Manufacturers tab. From here you can view and manage (edit/remove) existing Manufacturers and add new ones.
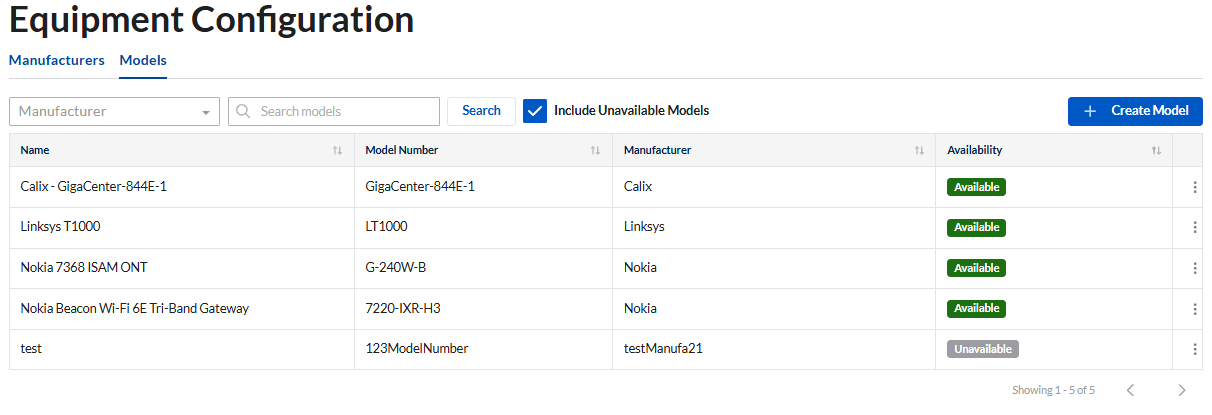
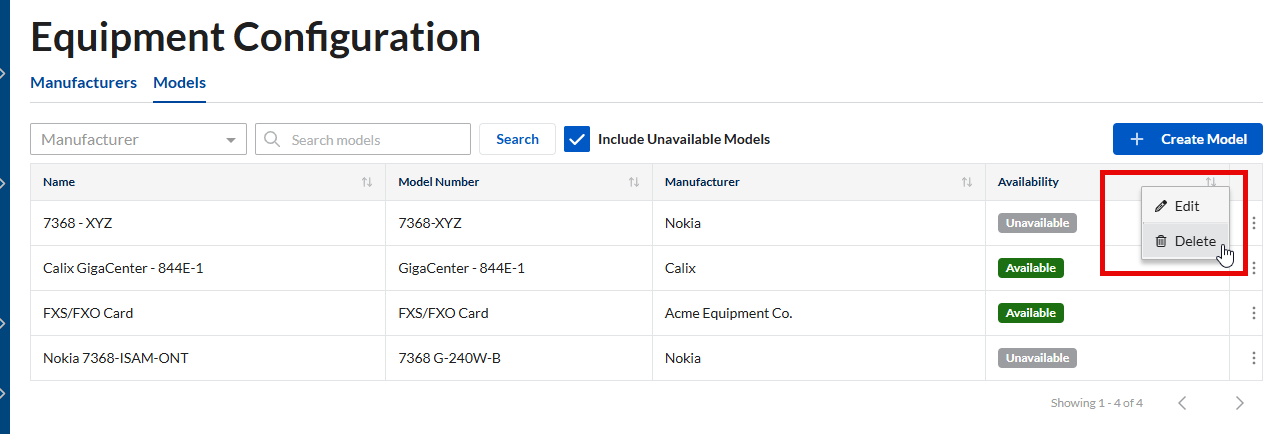
The Models tab is similar. It has an additional control for choosing to display or hide unavailable Models. Available Models are marked with a green badge. Unavailable Models are marked with a grey badge.
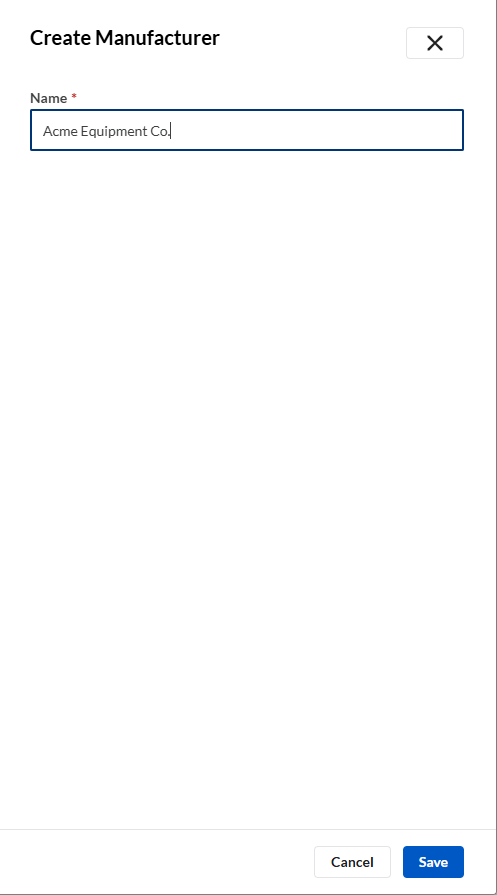
Adding a Manufacturer
On the Manufacturers tab, click Create Manufacturer. Then enter a Name and click Save.
Adding a Model
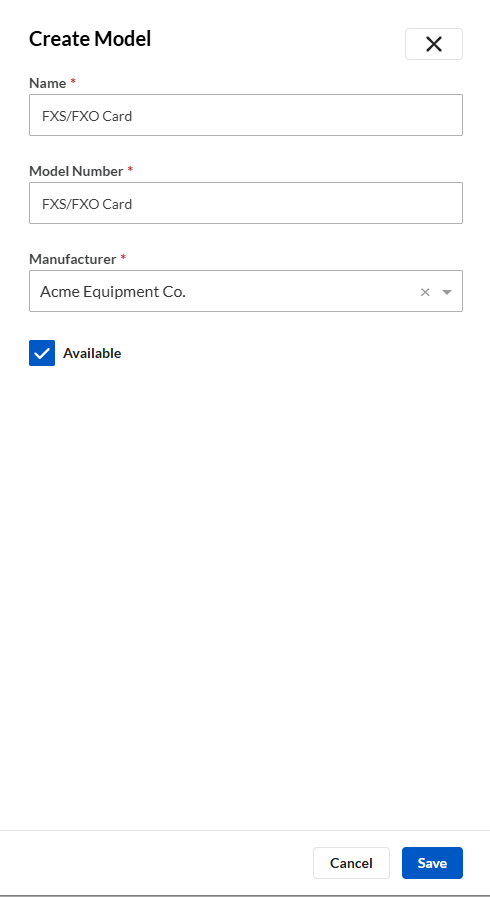
On the Models tab, click Create Model. Then enter a Name, Model Number, and Manufacturer. You can also choose to make the Model Available. Click Save when you’re done.
Editing/Deleting an Item
Select the item. You can click on it directly in the list or use the Search tool if you have a large number of Manufacturers and Models. Then click the kebob button in the far right column and choose Edit or Delete.
Manufacturer and Model Searches
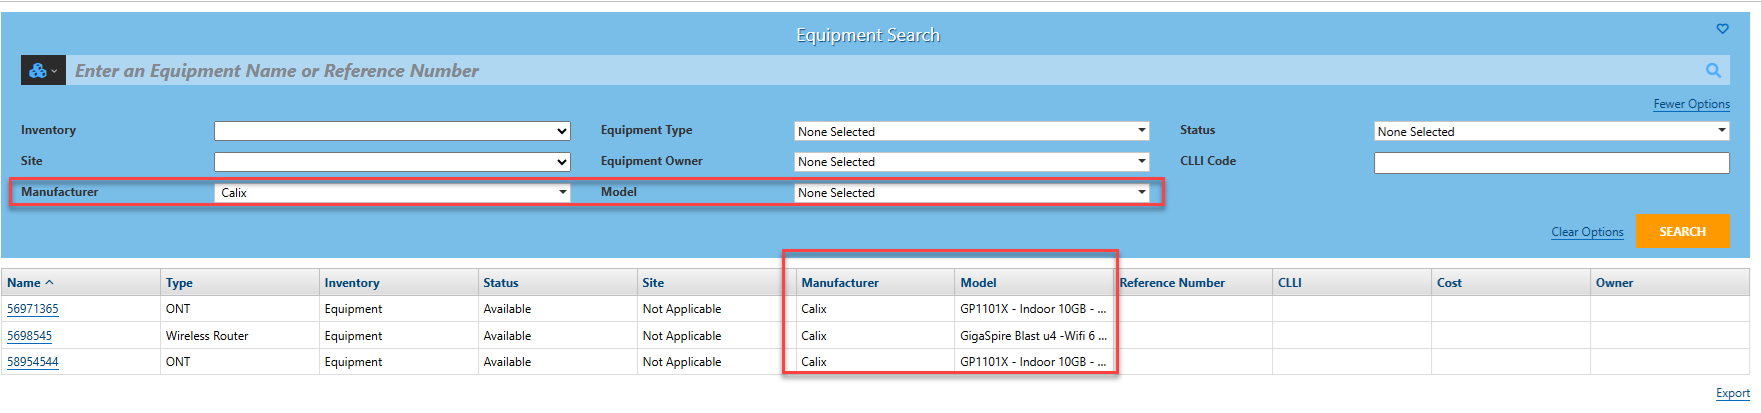
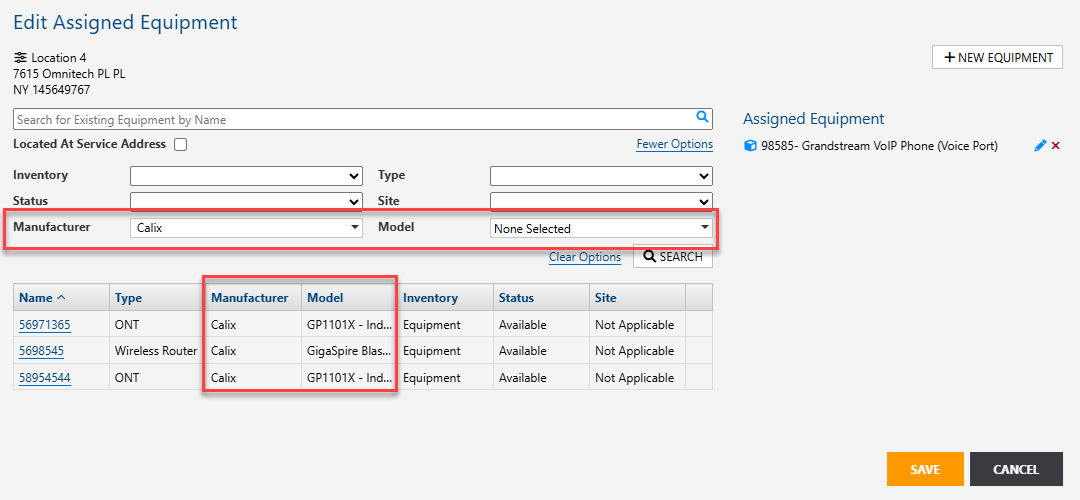
The Equipment Search and Equipment Assignment pages provide two additional filters for Manufacturer and Model.
Equipment Search with Search Results
Manufacturer and Model Filters When Assigning Equipment to a Service
Manufacturer and Model Fields on Adding/Viewing Equipment
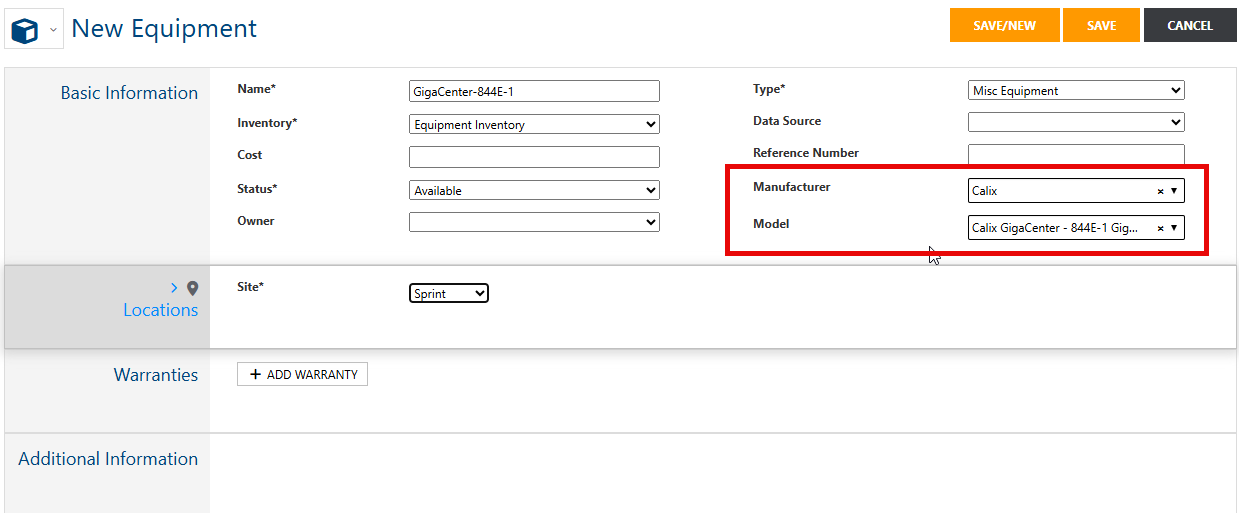
When adding equipment, there are two new fields for selecting the Manufacturer and Model.
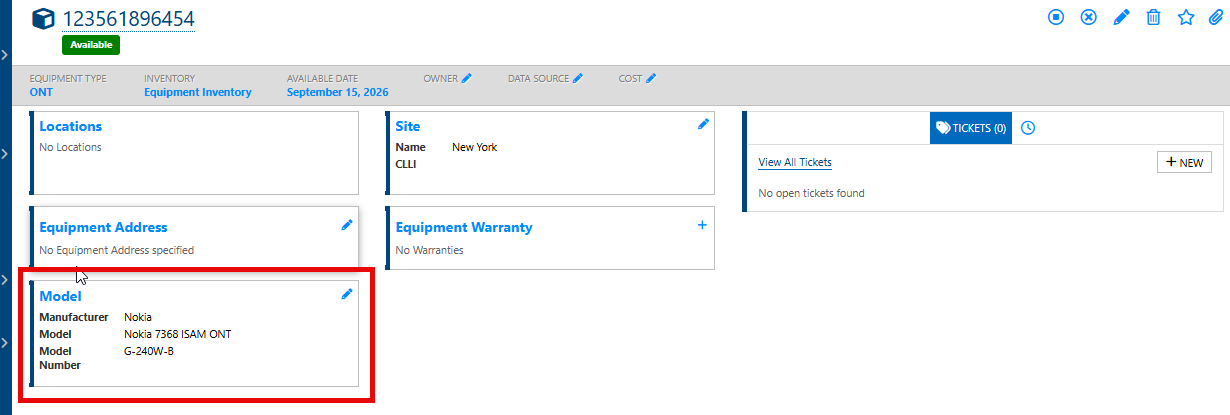
The Manufacturer/Model information is shown on the Equipment page accordingly.
Clearer Identification of Scheduled vs. One-time Payments
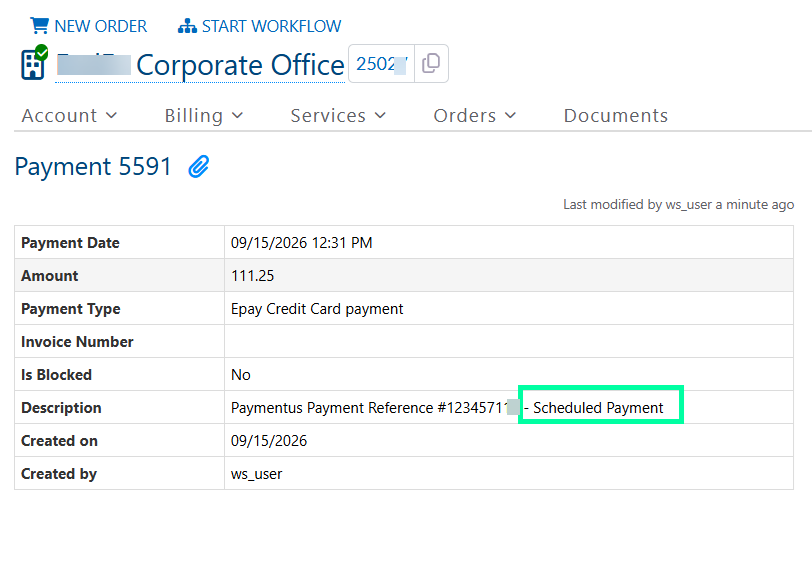
The Paymentus payment details In Customer Care now clearly indicate whether a payment is recurring (Scheduled per Paymentus ) or a one-time payment. To see this, navigate to the Billing > Balances page and then select a payment.
Recurring payments are marked as Scheduled in the Description.
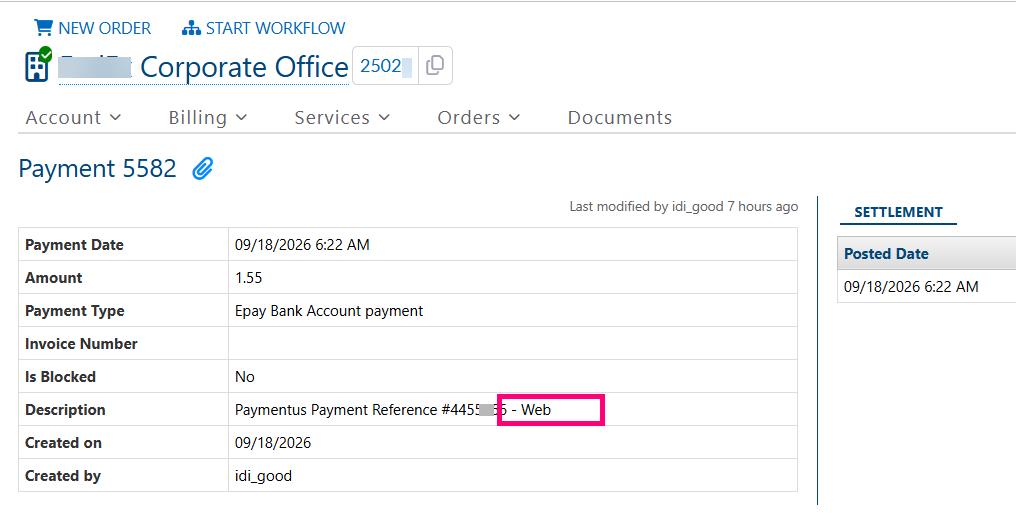
One-time payments are marked with the application used to make the one-time payment (Web, Customer Portal, or Agent Dashboard). Below shows a one-time payment via the web.
Directory Enhancements in Customer Care
Enhancements in this release make the Directory Listings functionality easier to use and more meaningful.
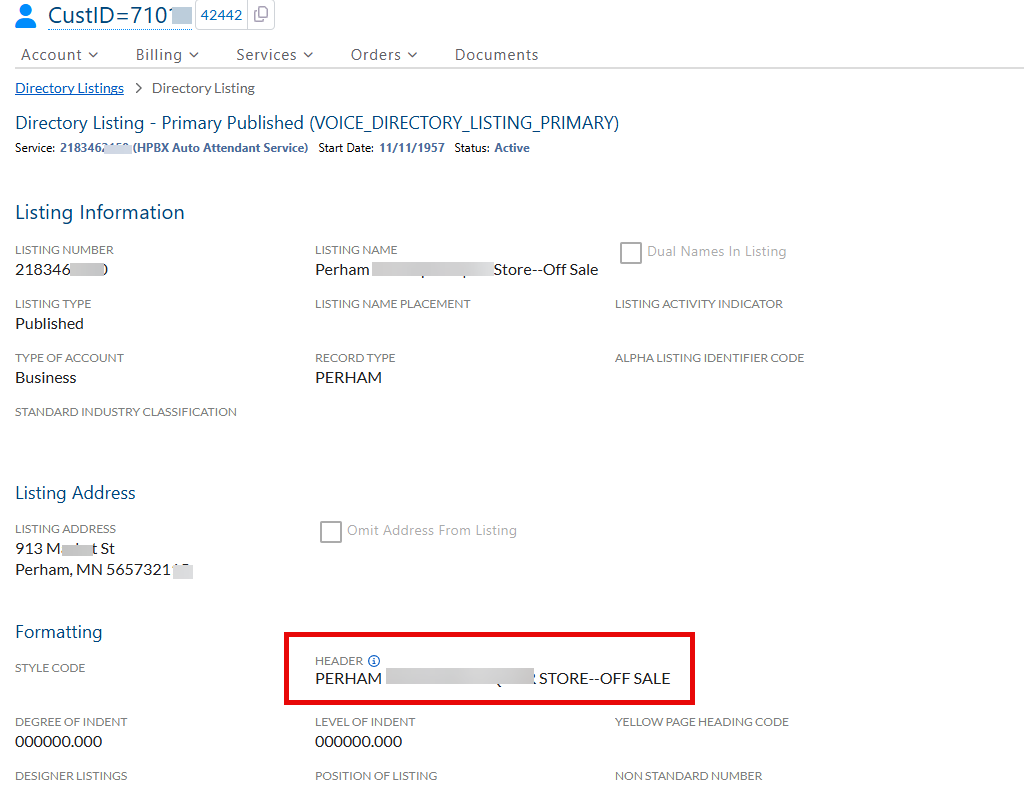
Header Telephone Number Label Shortened to Header
The Header Telephone Number field label on the Directory Listing Details page has been renamed Header. The field supports alpha-numeric information and can be used for any parent/child grouping of listings. The information icon informs users familiar with the original field label.
New Option to View Listings By Header
A new View selector on an account's Directory Listings page lets you toggle between the default view and a new one that shows active, published directory listings grouped by Header and sorted by Degree of Indent (if applicable).

View Listings By Header is shown below. Note: Only active and published listings are shown in this view.
Listings are ordered by degree of indent as set on the Directory Listing Details page when applicable. Indented and unindented listings are shown in separate sections. An L icon in the left column indicates the listing is indented and the degree is indicated at the far right.
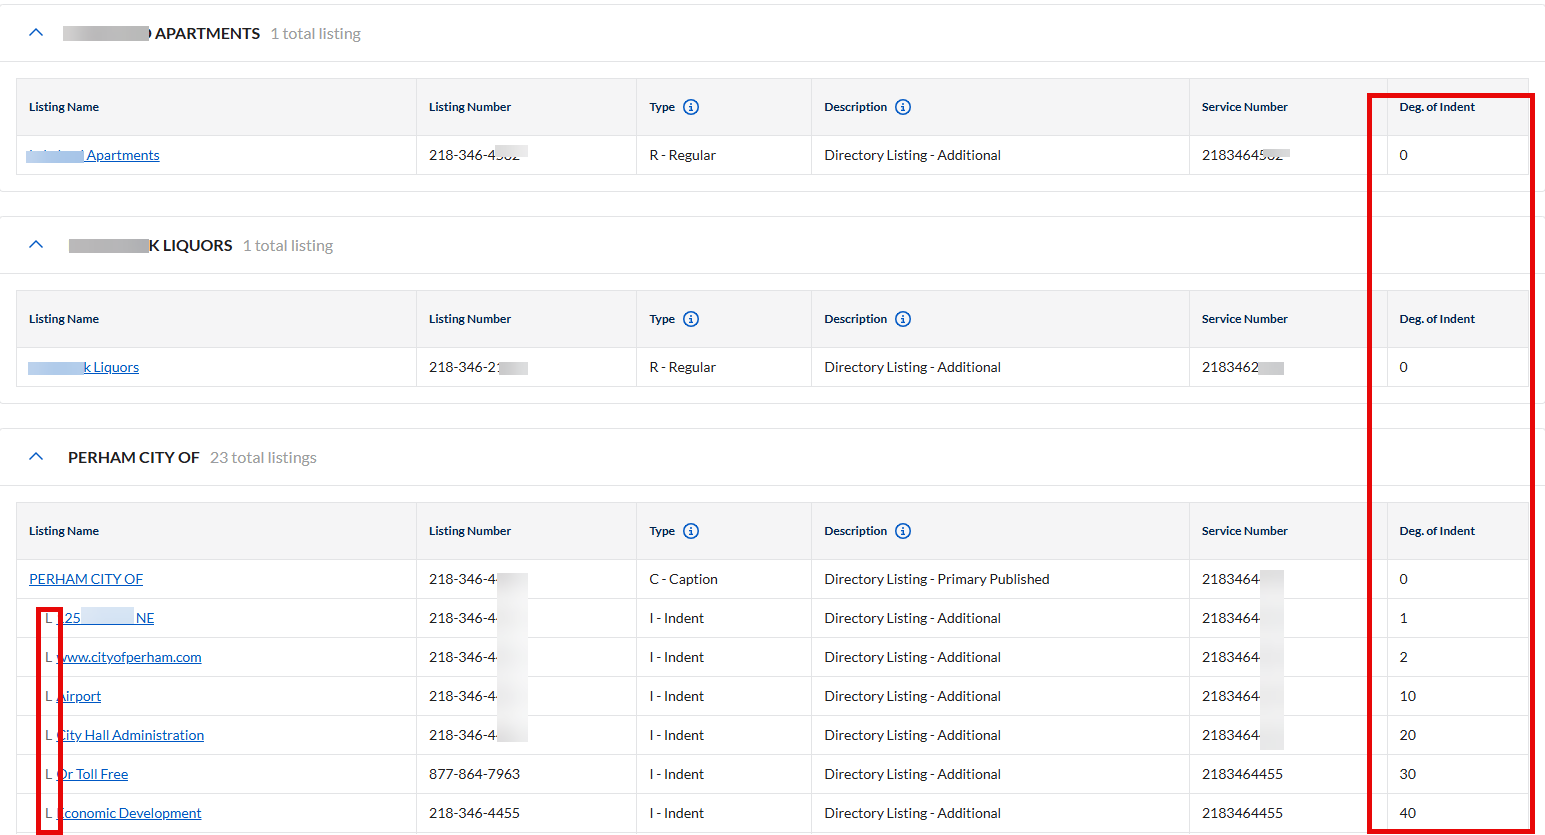
If the account has multiple Header telephone numbers, each will have active/published listings shown in separate grids.
Clicking on a Listing Name in this view displays the Listing Details page.
You can Collapse/Expand the listing by toggling the Collapse All/Expand All button.
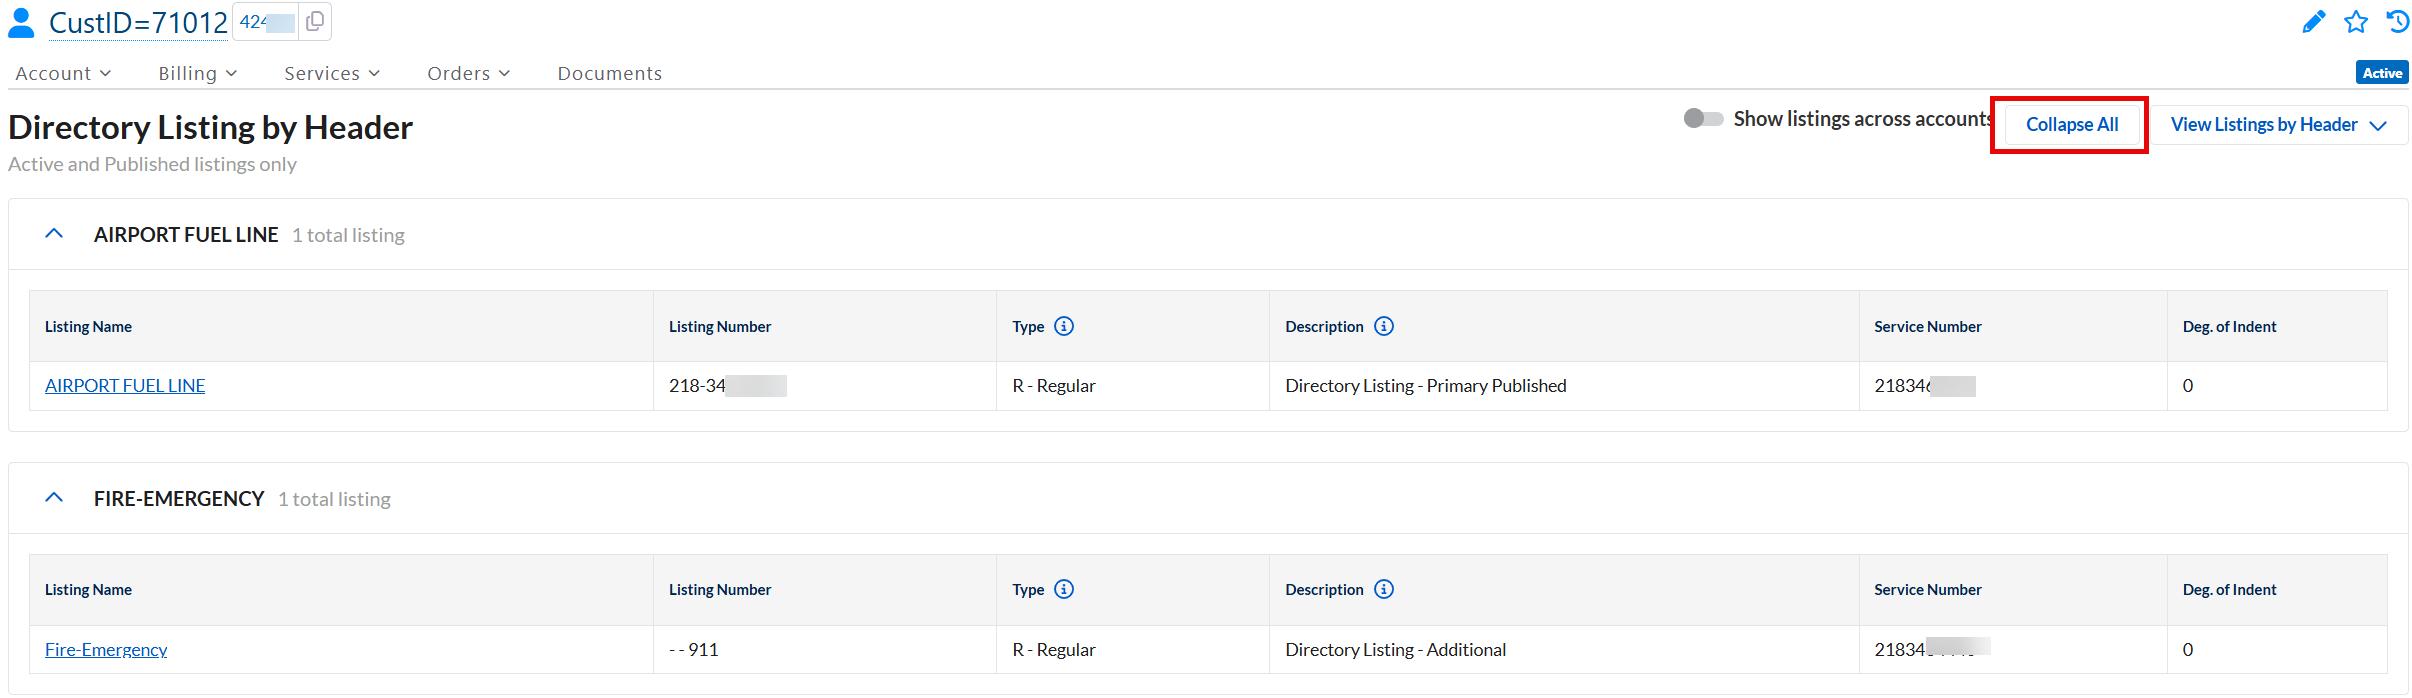

Showing Listings for a Header Across Accounts
If a Header telephone number is used across different accounts you can click Show listings across accounts to show the listings by their respective Headers .