Configurable starting blocks facilitate order entry by defining certain defaults and limitations that streamline the order entry process. Starting blocks:
specify the transaction type.
Order transaction - back office billing orders where the order occurs without the presence of a customer as currently occurs in the Orders web module.
Sale transaction - front office sale transaction with a remote customer presence. Sale transactions let you assemble, review and finalize a remote sale containing billing items that can be assigned to the account or to any type of service.
Direct Invoice – start a direct invoice transaction.
establish certain parameters such as:
where the starting block is available for selection and the resulting order can be run. This can be one or any combination of the Orders web module, Customer Care account-level, Customer Care service-level.
what actions can occur within the order. This can be one or any combination of the following: add service, add items, modify service or items. This streamlines the sales process by setting defaults and limiting options for service representatives.
Once configured starting blocks can be used to initiate orders in both the Orders and Customer Care web modules.
Notes:
Starting Block functionality, including the ability to configure them in the Product Catalog, must be enabled via the in the Orders web module.
Enable Starting Blocks setting
There are two new settings for enabling this functionality – one in Orders and one in Customer Care. The setting in Orders is required to enable this functionality. The setting in Customer Care is only needed if you want to use this functionality in Customer Care.
Enabling Starting Blocks in Orders
Show Picture
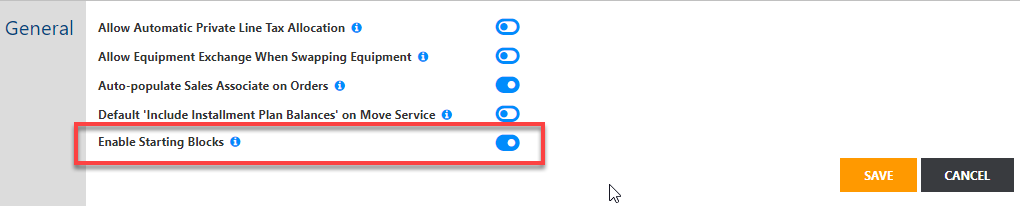
When disabled (default), there is no change to the current user experience in Orders and Customer Care. Also starting blocks cannot be configured in Product Catalog.
When enabled, the Product Catalog supports starting block configuration. Also the NEW (+) button in Orders is relabeled as START > and clicking it displays a dialog for selecting a starting block as a means to start a sale/order. Also, starting block functionality is supported in Customer Care if the corresponding setting is enabled there as well.
Enabling Starting Blocks in Customer Care
Show Picture
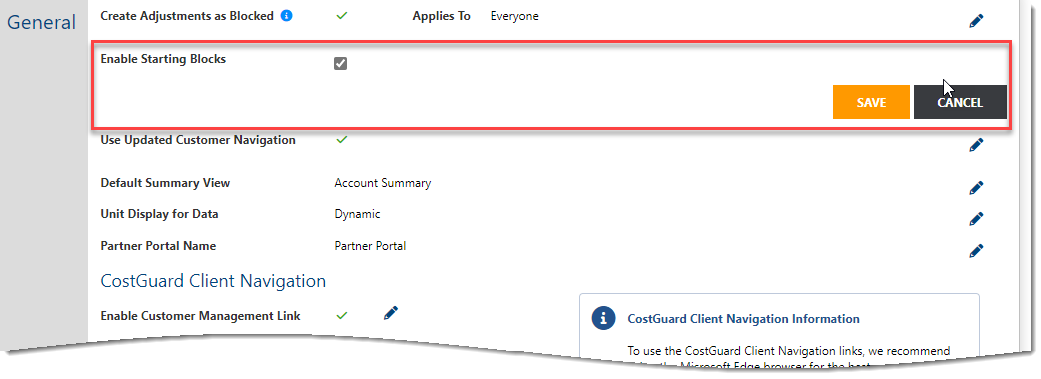
When disabled (default), starting block functionality and sale transactions are not supported in Customer Care. In this case you can enable the functionality in Product Catalog and Orders using the Orders setting and leave it disabled in Customer Care.
When enabled a Start Transaction button is provided on the Account Summary page (all views) to initiate account-level transactions. A button is also provided on Services and Features page when a service is selected to support service-level transactions. In both cases, clicking Start Transactions displays the dialog for selecting a starting block.
The ability to add, edit, or delete protection plan profiles is governed by the Manage Protection Plan Profiles permission (Product Catalog Admin role in Security). See Permissions.


System-provided (Out-of-the-box) Starting Blocks
Authorized users can create and maintain starting blocks in the Product Catalog. The following starting blocks are provided out-of-the-box when the Orders setting is enabled:
New (Basic) Order
New (Basic) Sale
Disconnect Customer
Disconnect Service*
Hotline Service*
New Feature*
New Service
Reconnect Service*
Redirect Service*
Refresh Service*
Restore Service*
Suspend Service*
Swap Equipment*
Direct Invoice Experience
Bill Payment
Return Item
Void Transaction
Note
Starting blocks marked with an asterisk (*) replace the equivalent options available in the Actions drop-down menu (available on the Services and Features page in Customer Care when starting blocks are disabled).
These starting blocks can be used as is or be modified as needed, and you can create custom starting blocks as needed.
Steps to Create and Configure Starting Blocks
In the Product Catalog choose MANAGE > Starting Blocks.
Show Picture

This displays the Starting Blocks page listing existing starting blocks (default blocks listed above as well as any custom blocks that you've added). The Name link for each existing block lets you open the block to view and edit its current configuration. This page also lets you create new starting blocks.
Show Picture

To create a new starting block, click New Starting Block in the upper right corner. Then use the New Starting Block form to configure the block’s behavior.
The New/Edit Starting Block form presents configuration options on two tabs – Main and Policy.
Show Picture
Main Tab:
Policy Tab for Sale/Order Transactions: Policy Tab for Direct Invoice Transactions:
Click here for details regarding configuring Starting Block Parameters.(including special considerations for Bill Payment, Returns & Voids)
Starting Block Parameters
Main Tab:
Name, Caption | These fields are required. The text you enter here is displayed on the Select Starting Block form. The Caption should briefly describe the block’s purpose. |
Description | This field is optional. You can use it to provide additional notes.
|
Start As | This field is required. Use the drop-down menu to select the type of transaction to be initiated when you select this block. Select the type that supports the desired user experience:
|
Start Date, End Date | These date selectors are optional. You can use one or both to establish a date range when the starting block will be available on the Select Starting Block form. It will not be available before the start date, nor after the end date. Not entering a start date makes the block immediately available, and not entering an end date makes it available in perpetuity. |
Order Type | This field is optional. You can use it to set a default order type. The type can be modified on the Basic Information page when you start a new transaction. |
Starting Action | This field is optional. You can use it to set a default action for the transaction. The action can be modified on the Basic Information page when you start a new transaction.
|
Displayed In | Use these check boxes to select where the starting block will be available for selection. This can be one or any combination of the:
|
Allowable Actions | Use these check boxes to select which actions can occur within the transaction during assembly. This can be one or any combination of the listed actions. |
Behavior | This provides options to: Perform Credit Evaluations. This directs the transaction to invoke your custom Credit Checking logic configured by IDI per your requirements.
Skip one or both of the following pages when the starting block’s and/or Order Field configuration provide the required information:
|

Policy Tab
Location Options | Location options can apply for any transaction type. Using a location and register supports assigning a unique receipt or direct Invoice number to the transaction. Specifying the location and register can be handled in two ways:
|
Email Options | These options support emailing a receipt (or direct invoice) for the transaction. The drop-down menu defaults to No Email. In this case, all related fields are disabled and there will be no options to email a receipt on completing the transaction. If you want to email a receipt, select one of these options:
|
Receipt/Invoice Configuration | This area is labeled Receipt Configuration when Start As on the Main tab = Sale or Order. In this case you can use this area to:
|
Considerations for Credit Checking and Manual Deposits
This functionality requires you to select the Perform Credit Evaluation Behavior and Deposit Allowable Action. This action toggles the ability to manually add a deposit to the transaction, independent of the credit scoring logic. This setting does not impact automatically adding deposits to a transaction as dictated by your credit scoring logic.
Note
With proper setup, manual deposits can also be supported without starting blocks.
Considerations for Tender Bill Payment Starting Blocks
The default Bill Payment starting block is predefined with the following parameters on the Main tab:
Start As = Sale
Starting Action = Tender Bill Payment
Displayed in is set to Customer Care Account Level and Orders
Allowable Actions Account level and Bill Payment are enabled (checked)
Behavior = Skip Transaction Details Page
The Policy tab setup has not changed, except that Require Register to Start Transaction is preselected and cannot be disabled.
Considerations for Return Item Starting Blocks
The default Return Item starting block is predefined with the following parameters on the Main tab:
Start As = Sale
Starting Action = Return Item – This provides two additional drop-down menus:
Return Reason
Inventory Status
Displayed in is set to Customer Care Account Level and Orders
Allowable Actions all are enabled (checked)
No Behavior to skip pages are predefined
The Policy tab setup has not changed.
Note
As rules that govern returns are set on a register policy basis, the Location options can be used to set up additional starting blocks to enforce different return rules for different locations. Also, Require Register to Start Transaction is preselected and cannot be disabled.
Considerations for Void Transaction Starting Blocks
When Void Transaction is selected as the starting action:
The Start As drop-down menu is set to Order and cannot be changed. This ensures voids can only be performed on order transactions.
The Allowable Actions options are disabled and cannot be changed.
Displayed In defaults to Customer Care Account level and Orders; however, Customer Care Service level may be selected if you want.
On the Policy tab, Location, Email and Reciept configuration options are disabled and can not be changed.