About Paymentus Integration
Paymentus is a leading provider of cloud-based bill payment solutions for more than 1,700 billers and financial institutions across North America. Integrating Paymentus and its PCI 3.0 compliant solutions with the IDI platform enhances IDI’s full-web front office experience. Enhancements in the Customer Care and IDI’s self-service portal solution (Customer Portal) let you leverage a Paymentus-supported digital payment experience including:
- Processing transactions for Paypal, Venmo, Google Pay, and Apple Pay channels.
- Support for Processing/Convenience Fees that are automatically calculated and applied to a payment being made.
Notes:
- Customer Portal is an offering in both the IDI platform and Paymentus. Which portal is being referred to in these instructions should be clear by the context; otherwise, the specific portal will be named.
- For providers that replaced their OnlineBill offering with the Customer Portal, subscribers will automatically be directed to Customer Portal when entering their OnlineBill log-in credentials.
Paymentus will maintain payment accounts, tokens, and payment-related activity. This includes managing recurring payments (which will no longer be handled by the Create Recurring E-Pay Transactions scheduled job). Also, existing electronic payment touchpoints in Customer Care and IDI self-service portal will use a Single Sign-on (SSO) solution to seamlessly navigate you from these IDI applications to a corresponding Paymentus application:
- From an account in Customer Care, customer service representatives can navigate to the Paymentus Agent Dashboard to do the following:
- Make a payment for the current account balance or another specified amount.
- Manage payment methods – digital wallets, credit cards, debit cards and e-check.
- Schedule and search recurring payments.
- View and manage a history of payment transactions.
- Refund an existing payment.
- From an account in the IDI self-service portal, subscribers can navigate to the Paymentus Customer Portal for functionality equivalent the Agent Dashboard.
Synchronizing payment-related information between the two systems is performed by:
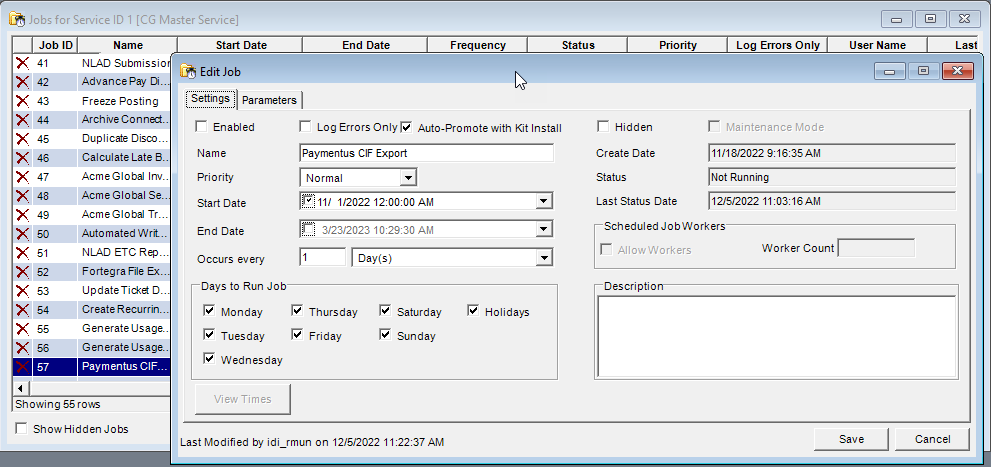
- The Paymentus CIF scheduled job. This job registers your subscriber accounts (created in the IDI platform) in Paymentus. It creates the Paymentus Customer Information File with account and billing details and exports the details from the IDI platform to Paymentus. This job is scheduled to run once daily.
- API integration. This updates account balances and receives payment notifications. The notifications include completed payments and updates to payment scheduling.
Enhancements for Paymentus integration have been deployed over a series of IDI platform software releases where each subsequent release builds on the prior one:
- Milestone 1 was originally provided with IDI platform version 22.12.
- Release 23.4 provides updates and enhancements to milestone 1.
- Release 23.6 provides support for payment surcharges with Paymentus integration.
- Release 23.8 facilitates managing surcharges through the Paymentus Configuration form in Customer Care.
- Release 23.9 provides support for IDI’s AdvancePay solution.
- Release 24.10 provides support for tendering retail payments in web orders.
For details regarding the overall objectives and planned future deliverables, refer to IDI Product Roadmap in the IDI Knowledge Center.
Notes:
- You’ll need to coordinate with IDI Support/Account Management and Paymentus to enable and fully integrate this functionality in your IDI platform.
- If you currently use another payment vendor and are changing over to Paymentus, you’ll need to work with IDI professional services if you intend to migrate payment account data from your incumbent payment vendor to Paymentus.
Setup
The following setup is required:
- Working with Paymentus to support integration with the IDI platform.
- Completing Paymentus configuration in Customer Care.
- Customer accounts must have a valid email address.
The following setup may also be needed depending on your business requirements:
- Surcharges
- Checking/ACH payments
- Tendering retail transactions in web orders
- Scheduling payments in OnlineBill
- AdvancePay
Working with Paymentus
Integrating Paymentus with Your IDI Platform Environment
This is done on an individual environment basis. A separate setup is required for each IDI platform environment where you’ll be using the Paymentus Agent Dashboard and Customer Portal applications.
Submit a service request to have IDI coordinate with Paymentus to arrange for this. Paymentus will provide IDI with the Subdomain, TLA, and encryption keys that you’ll need to configure Paymentus configuration in the IDI platform as described in Paymentus Configuration in Customer Care later in this article.
How SSO Navigation Works
Two user classes are created in Paymentus to support SSO navigation from Customer Care and IDI self-service portal to the Paymentus Agent Dashboard and Customer Portal respectively. These users exist in Paymentus and are transparent to IDI platform users.
Users
Users represent users who navigate to the Paymentus Agent Dashboard from Customer Care. The first time a user navigates to the Agent Dashboard that user is automatically created in Paymentus. SSO ensures the user is assigned to the User Group specified in the Paymentus configuration in Customer Care. As a result, the user has limited access to specific actions in the Paymentus Agent Dashboard.
If a user needs to do more in the Agent Dashboard than what is supported through the integration, that user will require a separate User ID that provides access to additional Agent Dashboard actions. These separate Paymentus User IDs can match the user’s assigned user names; however, the IDI platform will not support SSO integration for these separately created users because it only supports SSO navigation for users in the User Group specified in Paymentus configuration in Customer Care.
Customers
Customers represent your IDI self-service portal subscribers who consume services from you and Paymentus. The first time an IDI self-service portal subscriber navigates to the Paymentus Customer Portal that subscriber is automatically created as a customer in Paymentus.
Paymentus User Interface
Note: Paymentus functionality in the IDI platform is presented though I-frames. Paymentus controls content and functionality of these I-frames. You can work with Paymentus to tailor the function and presentation of these I-frames to meet your requirements. For this reason, I-frame depictions in this article may not reflect how the I-frames are implemented in your IDI platform. Your implementation may include OR omit some fields shown in this article.
Paymentus Configuration in Customer Care
This is required to establish Paymentus as the payment vendor in your IDI platform and enable SSO navigation. This setup also applies to IDI self-service portal if applicable. Customer Care and IDI self-service portal will observe these settings rather than payment gateway settings in the Admin Console > Enhanced PCI Configuration and POS Back Office Register Policy.
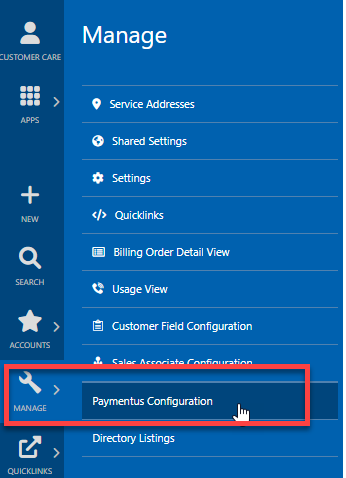
To begin, in the Customer Care Apps tray select MANAGE > Paymentus Configuration.
If Paymentus integration has not yet been established for the environment, clicking Paymentus Configuration displays the Integrate with Paymentus button.
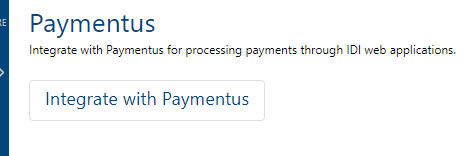
Clicking this button displays a form for configuring Paymentus integration for the environment.
Once the environment has been integrated with Paymentus, clicking this menu option takes you directly to the Paymentus Configuration form. The form has two tabs.
- The Configuration tab is for establishing users and SSO navigation.
- The Payment Type Groups tab lets you associate payment processing rules such as applying (or not applying) surcharges to specific customer groups. Note: This configuration is initially set up by IDI on your behalf. Admin-level users can modify this setup if needed; however, they should proceed with caution and fully understand the consequences of the changes they implement.

Note: You can turn off Paymentus integration in this environment if needed by clicking the Turn Off Paymentus link.
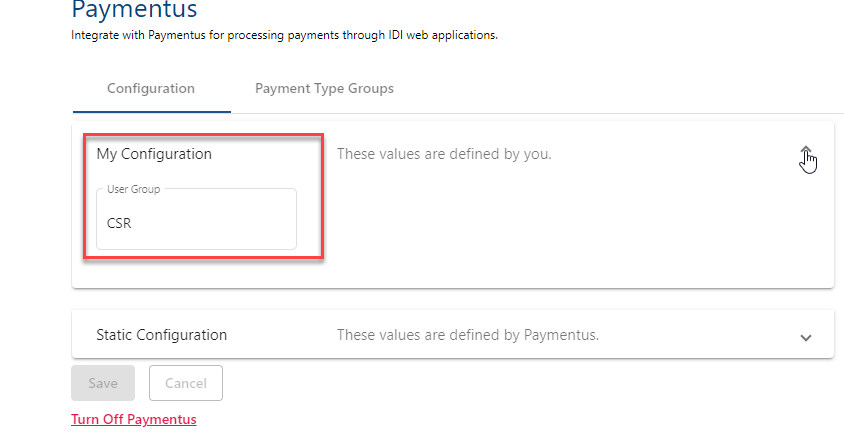
Configuration Tab
The Configuration tab has two drop-down menus as described below:
- My Configuration: In the User Group field enter the User Group provided by Paymentus to grant access to functionality applicable to Customer Care and IDI self-service portal users.
- Static Configuration:
- Paymentus Subdomain and TLA – These values are provided by Paymentus and map Paymentus to a single environment.
- SSO Encryption Secrets – The Paymentus Agent Dashboard (for Customer Care) and Customer Portal (for IDI self-service portal) each require a different SSO Secret. These secrets are unique per IDI environment and are provided by Paymentus.
- XOTP Key ID and Secret – These are unique per IDI environment and are provided by Paymentus.

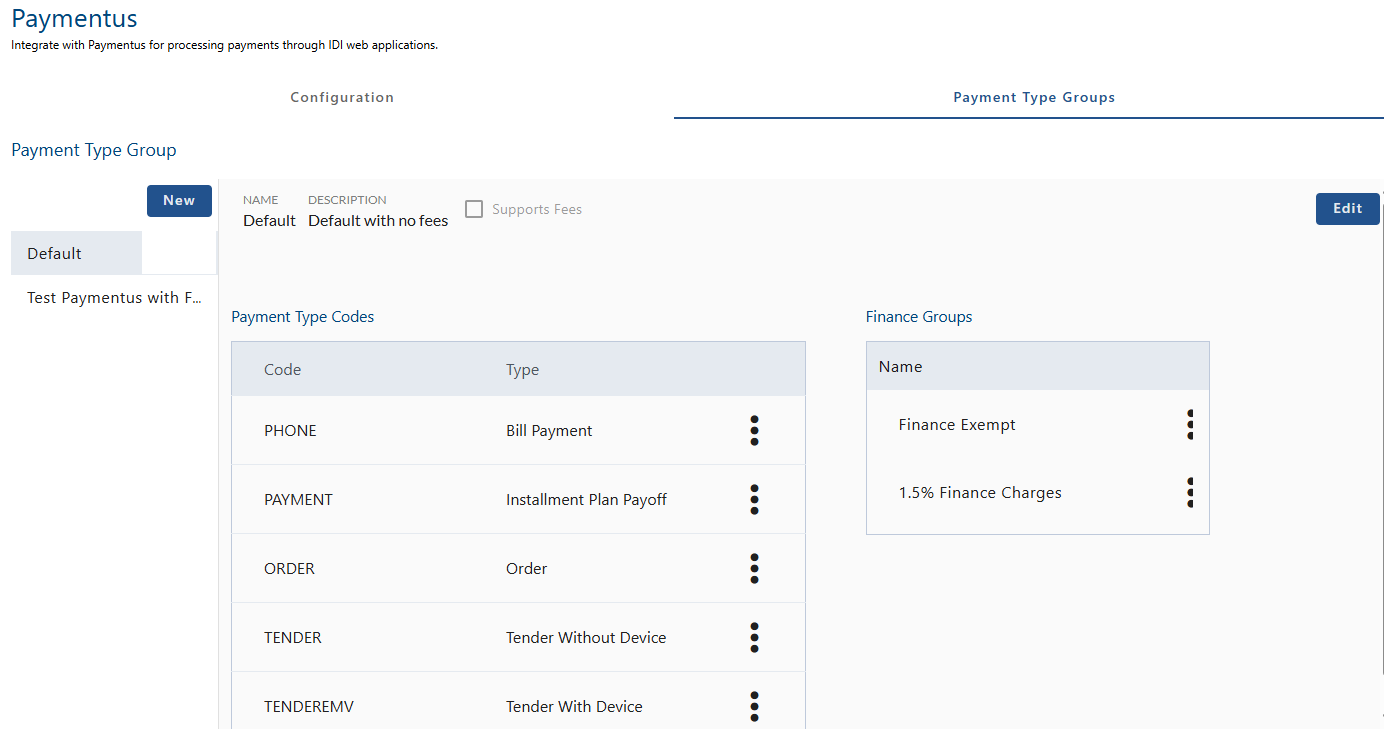
Payment Type Groups Tab
Payment Type Groups let you associate a set of payment processing rules to a specific customer group. For example, you can set up a payment type group to apply a fee when paying a bill and not apply a fee when paying off an installment plan.
Rules for processing payments are established by Payment Type Codes which consist of a Code paired with a corresponding Type. A payment type group comprises one or more payment type groups as needed to correctly process all payment types for the given customer group. The codes and types used to define payment type codes are provided by Paymentus.
A payment type group is associated to one or more specific customer groups by linking the payment type group to one or more finance groups. Finance groups are set up in Admin Console Data Management. This is the sole purpose for finance groups in this application. Any other settings on the finance groups (e.g. min/max amounts or rate) do not apply for Paymentus payment processing. However, finance groups can still be used elsewhere to assess late fees as before.
There are no payment type groups out-of-the box, so at least one is required. An example setup is shown below.
You can add as many payment type groups as needed for the different sets of accounts that require specific payment processing rules. To add a payment type group, add the group and then add payment type codes and link finance groups as described below. Additional guidelines for supporting fees are described in Adding Payment Type Groups for Surcharges.
Adding a Payment Type Group
Click New in the Payment Type Group section.
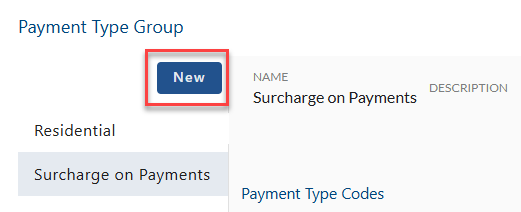
This displays fields for defining the new group. Name is required. The Description is optional. In addition, you can check Supports Fees as applicable to identify the group as having surcharges. This check box is for information only. For more on applying fees, see Payment Type Groups Setup for Surcharges.

Assigning Payment Type Codes
For a selected payment type group, assign the applicable payment type code(s). The codes and types needed to do this are provided by Paymentus.
Other codes and types may be provided by Paymentus. Work with Paymentus to ensure you’re using the correct payment type codes and types for your payment scenarios, and/or develop additional ones if needed.
To add a payment type code to a payment type group, select the group and then:
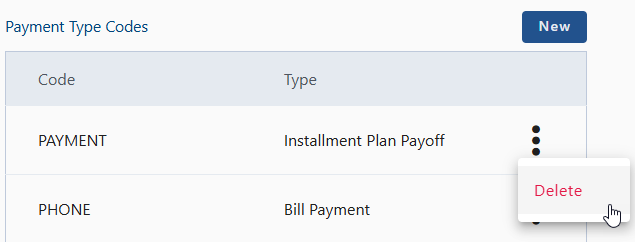
Click New in the Payment Type Codes section.

In the Create Payment Type Code form enter the Code name exactly as provided to you by Paymentus. Then select the appropriate Type from the drop-down menu.

If you need to delete a payment type code for a selected group, click the associated ellipsis button.
Linking Finance Groups
Link one or more finance groups to the payment type group. This establishes which accounts will use the rules assigned to this group. Select the payment type group and click Link in the Finance Groups section.

Note: You can link as many finance groups to a payment type group as required; however, once a finance group is linked to a payment type group, it cannot be linked to another group.
Payment Type Groups Setup for Surcharges
This lets you set up Paymentus integration to handle surcharges (fees) on bill and installment payments according to your specific requirements for different customer groups. Customer groups are established through finance group configuration in Admin Console > Data Management. Customers are assigned to a finance group on adding or editing a customer account. The following table illustrates how you might use this functionality.
| Finance Group | Surcharge Scenario |
| A | Apply surcharge for bill payments and installment payments |
| B | No surcharge for bill payments or installment payments |
| C | Apply surcharge for bill payments
No surcharge for installment payments |
| D | No surcharge for bill payments
Apply surcharge for installment payments |
Note: You may need to set up additional finance groups if your existing groups do not support all of your surcharge scenarios.
There are two payment type codes and types specifically for supporting surcharges as described in Assigning Payment Type Codes above. You’ll need to coordinate with Paymentus to establish additional payment type codes if needed. With these codes established, use the Payment Type Groups tab to:
- Add payment type groups as required to cover all of your surcharge scenarios.
- Assign payment type codes to those groups.
- Link the groups to their respective finance groups.
As noted earlier, Payment type group configuration is initially set up by IDI on your behalf. Admin-level users can modify this setup should the need arise; however, they should proceed with caution and fully understand the consequences of the changes they implement.
Once this setup is in place:
- Surcharges/fees are applied to payments by different finance groups per their Paymentus payment type codes.
- Pending surcharges/fees are indicated in the Paymentus Agent Dashboard or Customer Portal before the payment is confirmed. This provides an opportunity to cancel the payment if necessary.
Email Address
Customer accounts must have a valid email address set up under Account Details > Contact Information.
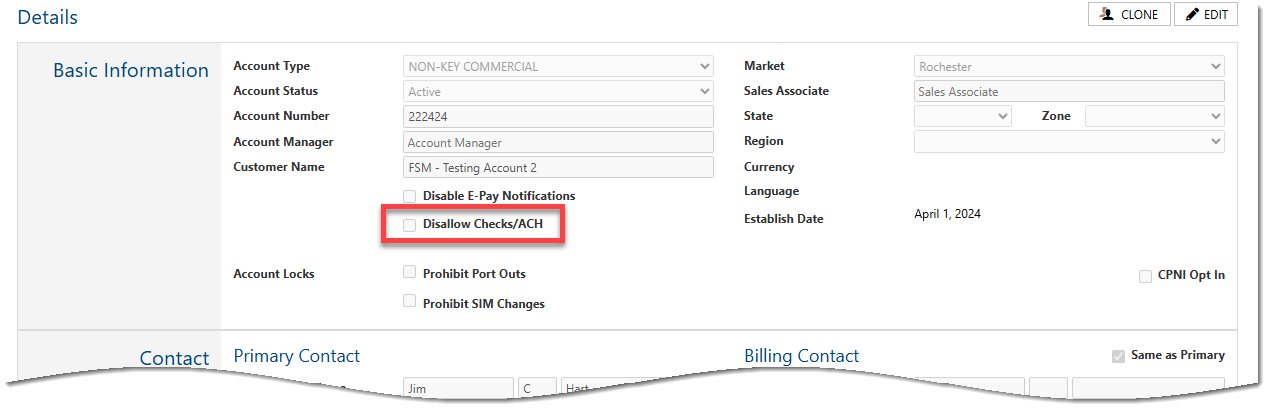
Setup for Check/ACH Payment Transactions
Customer Care provides an option to disallow check/ACH transactions on an account-basis on the Account Details page. If this setting is checked, payment methods for the account will be limited to non-check/ACH payments. When not checked, the subscriber will be permitted to select an existing ACH /(bank) payment method or create a new e-check payment method.
Setup for Tendering Retail Transactions in Web Orders
This functionality requires you to configure POS locations (stores) and registers via IDI Desktop Client POS Back Office. Register Policy setup has been enhanced to let you select Paymentus as a tender type and then configure the Paymentus Payment Gateway details. Also, store setup has been enhanced to specify a Paymentus ID to support payments through a Paymentus peripheral device. Note: You’ll need to perform this configuration on a store-by-store basis.
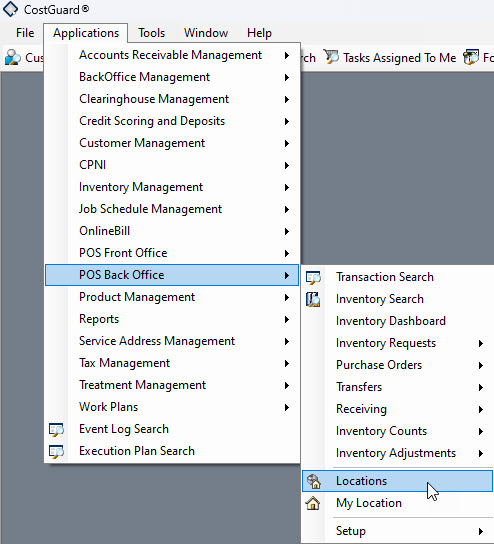
Access to this setup is via IDI Desktop Client Applications > POS Back Office > Locations.
Register Policy Setup
This is required if you intend to use a Paymentus payment method or peripheral device. Note: Equivalent setup is done in Customer Care > MANAGE > Paymentus Configuration. The Customer Care setup applies when tendering bill payments and E-Pay for a selected account in Care. The register policy setup in IDI Desktop Client applies when you select a specific register to tender a web sales transaction.
To set up a register policy:
- Right-click on a location and select Register Policy from the context menu.

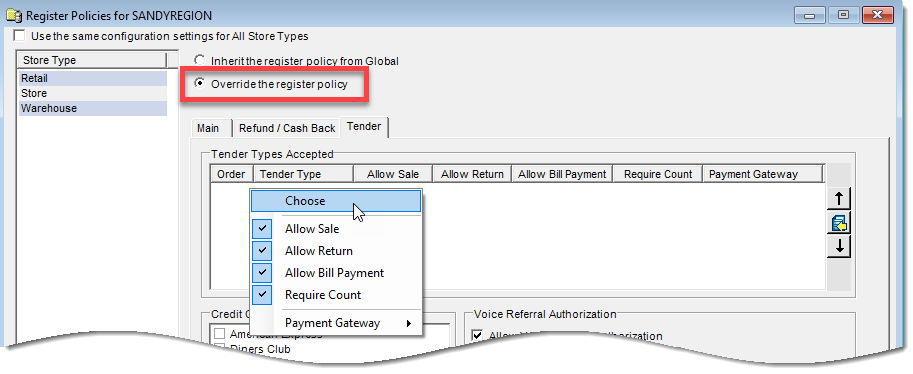
- On the Register Policies form choose to Override the global register policy if applicable, then on the Tender tab, right-click in the Tender Types Accepted area and select Choose.
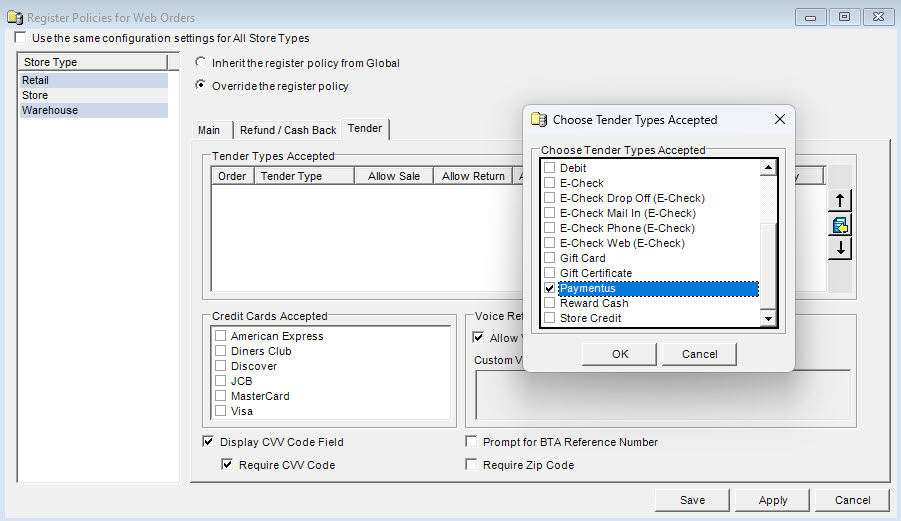
- Select the Paymentus tender type.
- After adding the Paymentus tender type, right-click on it and choose Payment Gateway > Configure from the context menu.
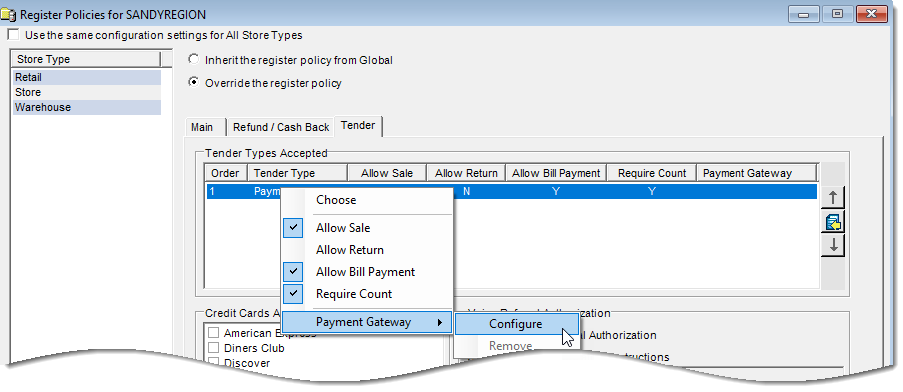
- Select Paymentus.
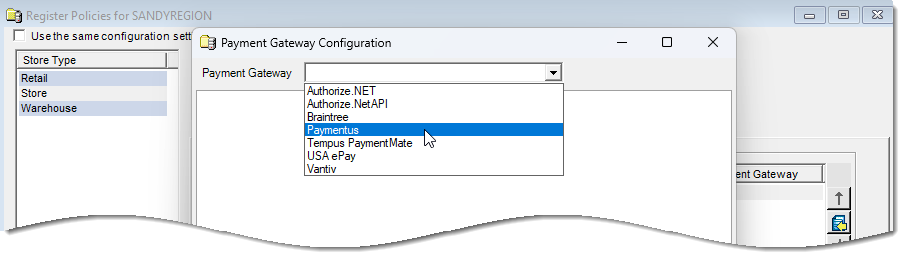
- Configure the Paymentus payment gateway details.

- User Group – Enter the User Group provided by Paymentus to grant access to functionality applicable to IDI Desktop Client and self-service portal users.
- Paymentus Subdomain and TLA – These values are provided by Paymentus and map Paymentus to a single IDI environment.
- Agent Secret – The Paymentus Agent Dashboard (for Customer Care) requires an SSO Secret. This secret is unique per IDI environment and provided by Paymentus.
- XOTP Key ID and Secret – These are unique per IDI environment and are provided by Paymentus.
- Callback URL – This is provided by IDI.
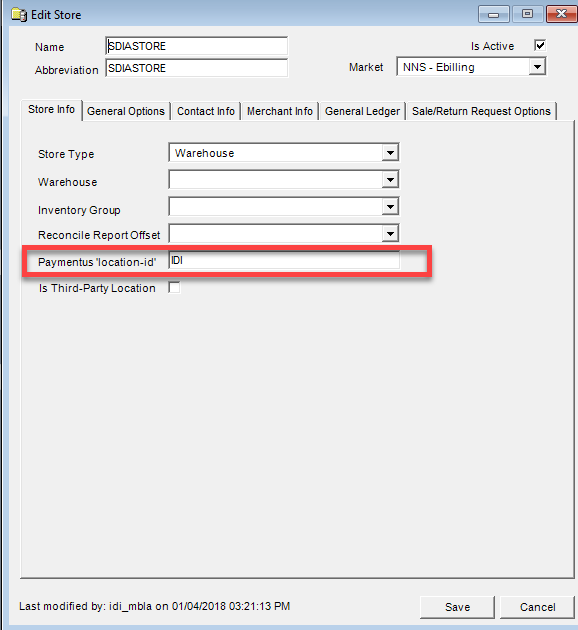
Setting Up Paymentus Location for a Store
This is required if you intend to tender transactions using a Paymentus peripheral device. The Location ID and device(s) that will be available for that location are determined though setup coordinated by your organization and Paymentus.
To specify the Paymentus Location-id on a store-by-store basis:
- Select the store in IDI Desktop Client via Applications > POS Back Office > Locations.
- On the Add/Edit Store form, Store Info tab, enter the Paymentus location-id provided by Paymentus.
Setup for Scheduling Payments in OnlineBill
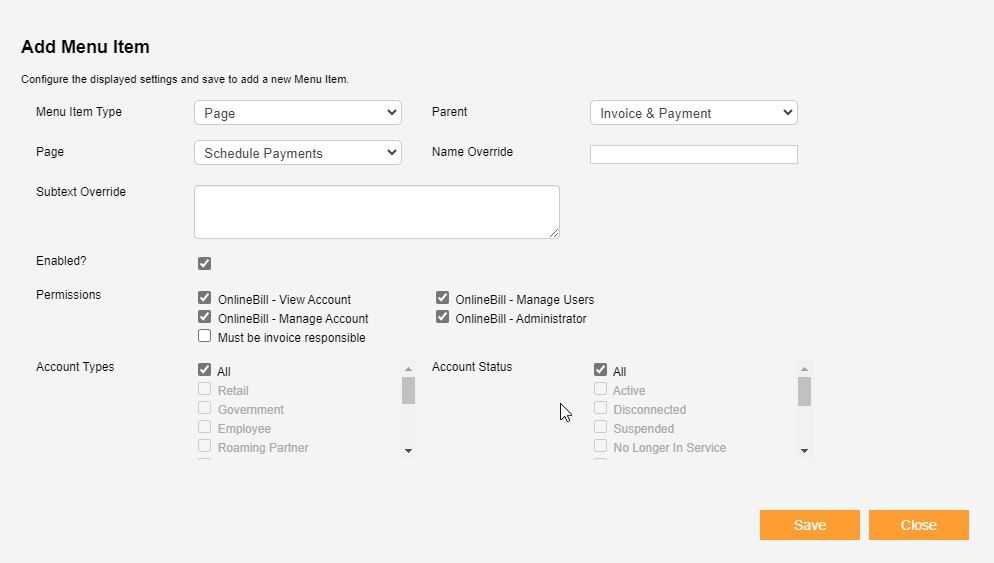
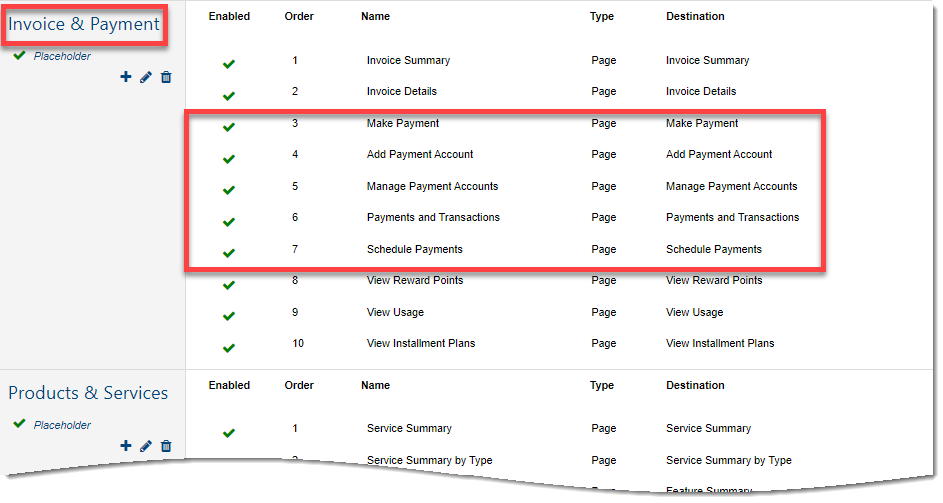
OnlineBill does not provide access to the Paymentus Schedule Payments page by default. To make this page available for OnlineBill users, a Schedule Payments option must be manually added to the Invoice & Payments menu via Menu Configuration. This requires admin-level access to OnlineBill. Note: This (equivalent) setup is not required if your subscribers use the IDI platform Customer Portal in place of OnlineBill.
- Log in as an Admin user and go to Menu Configuration.
- Scroll to the Invoice and Payments section and click + to add a new item.

- Add the new item as a page. Select Page from the Menu Item Type drop down menu and select Schedule Payments from the Page menu.
Setup for AdvancePay
The following is required to support AdvancePay through Paymentus integration:
- SaaS Configuration – In SaaS Config an authorized IDI associate must set: PURCHASEDFEATURES/ADVANCEPAY to True.
- AdvancePay Setup – If not already done, AdvancePay must be set up as described in IDI Desktop Client online help.
- Payment Type Code Setup for AdvancePay – There is a new Paymentus payment type code for AdvancePay called Orders. This payment code must be assigned to the appropriate Payment Type Group.
- Wallets – AdvancePay accounts must be set up with a Paymentus Wallet/Payment Account instead of the Credit Card E-Pay account (as currently supported).
Using Paymentus in Customer Care
In Customer Care, access to the Paymentus Agent Dashboard is via the Billing menu.

Choosing Billing > Paymentus displays a page with functional options on the left. Choosing an option displays the corresponding Paymentus I-frame on the right. The page defaults to the I-frame for Make Payment.
Note: Paymentus functionality in the IDI platform is presented though I-frames. Paymentus controls content and functionality of these I-frames. You can work with Paymentus to tailor the function and presentation of these I-frames to meet your requirements. For this reason, I-frame depictions in this article may not reflect how the I-frames are implemented in your IDI platform. Your implementation may include OR omit some fields shown in this article.

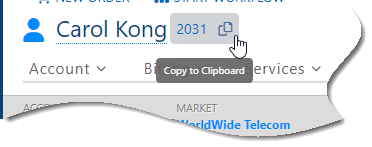
Note: Some Paymentus I-frames may not auto-populate account number based on the current account you have open. In such cases you can use the copy icon next to the account number at the top of the page to copy the account number to clipboard to use later as needed.

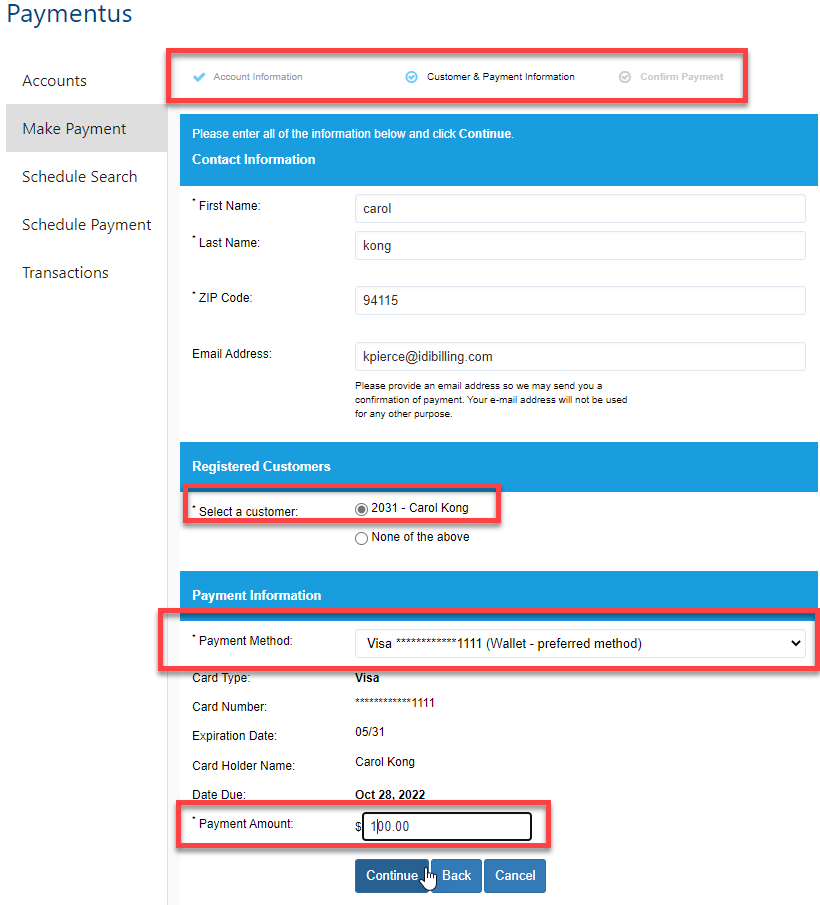
Make Payment
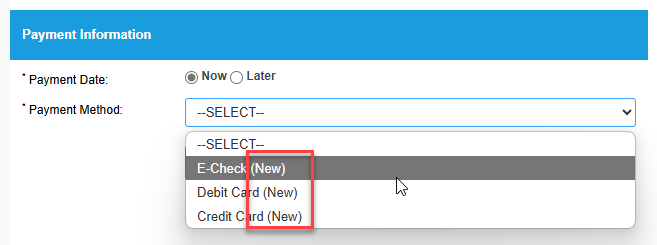
This option displays the Make Payment form. Note: Check/ACH payments may be allowed or disallowed for an account based on the corresponding setting in Customer Care.
- You can edit contact information as needed. Note: The email you enter here determines where the payment confirmation email will be sent.
- Select a customer from the Registered Customers list. This defaults to None of the above. You must select a customer account.
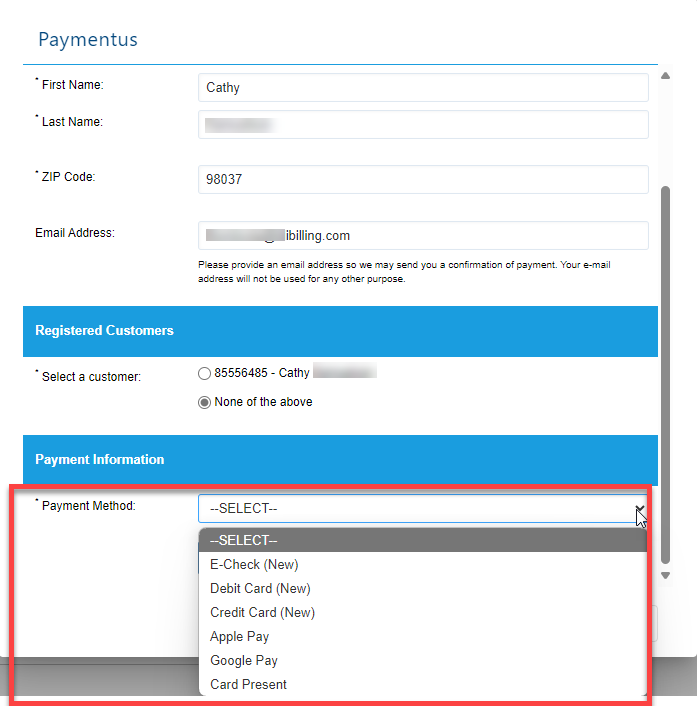
- Select a Payment Method from the drop-down menu. Note: (New) options for E-check (if allowed for the account), Debit and Credit payment methods let you add a new method on-the-fly.
- Payment Amount defaults to the current balance. You can enter a different amount if needed.
- The progress bar at the top indicates what is done and yet to be done in the Make Payment process.
When you click Continue the next page displays a summary where you can review and change payment details. Note: The progress bar is updated accordingly. If you need to edit any details here, click the applicable Change button. Then agree to the Paymentus terms and conditions by clicking the associated check box at the bottom of this page to proceed with the payment.

Click Make Payment when you’re ready. This displays a Payment in progress message.
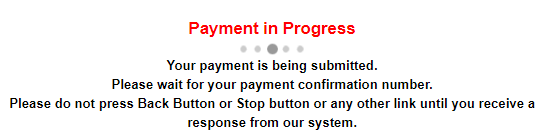
When this is done, you’ll see a page indicating the payment has been submitted. A link on the bottom of this page lets you print the page.

Paymentus Accounts
This option displays a form to search for customer accounts registered in Paymentus by the Paymentus CIF scheduled job. From the search results you can manage payment methods (credit cards, debit cards, e-check, google pay etc…) for a selected account.
Enter search criteria (for example, Account Number as shown below) then click Search.

Note: The copy icon next to the account number at the top lets you copy to clipboard the account number for the account that’s currently open and paste it in the Account Number field.
The search results will list all customer accounts that match the criteria.
Choose a customer from the list by clicking the associated radio button then click Continue.

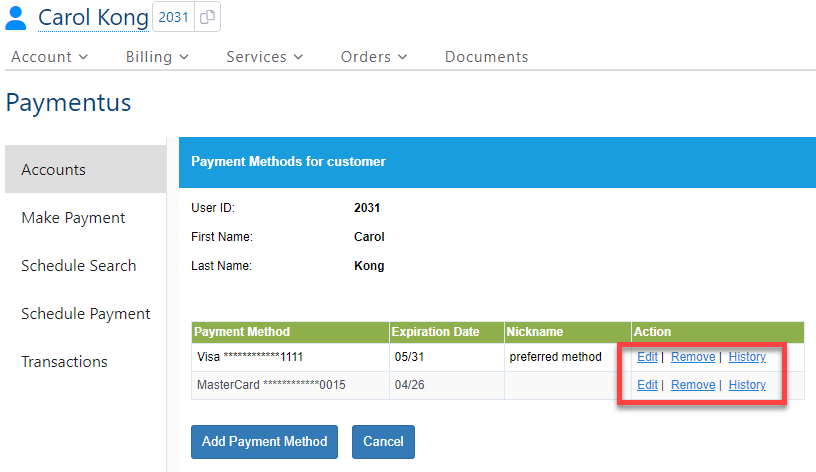
This displays a form for managing existing payment methods and adding new methods.
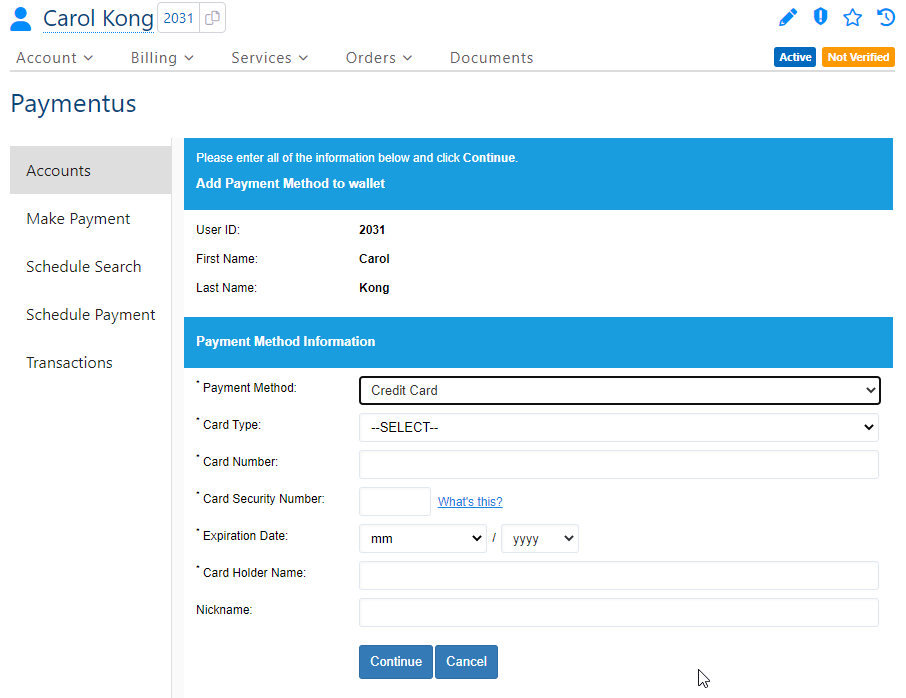
Add Payment Method
Clicking Add Payment Method displays the form for adding a new payment method. The fields vary depending on the type of payment method you select using the drop-down menu. Selecting a method displays the applicable fields (Credit Card shown below).
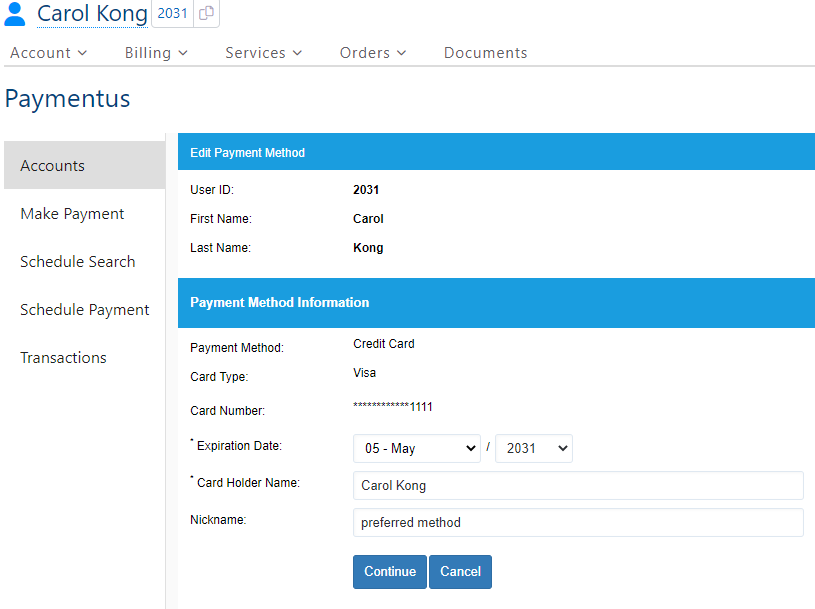
Managing an Existing Payment Method
Use the links in the Action column for an existing payment method to edit the details, remove the method or display a history of revisions that have been made to the method.
When you click Edit the available fields vary depending on the type of payment method. For example, for a credit card you can edit:
- Card holder’s name
- Nickname
- Expiration date
The History link displays a history of revisions for the payment method.

Clicking Remove displays a prompt that lets you confirm whether or not to remove the payment method.
Paymentus Schedule Payment
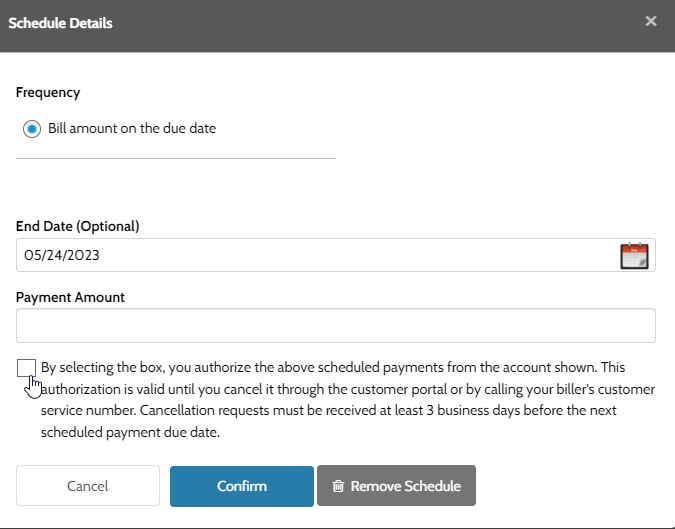
This option displays a form to create a new payment schedule.

Enter the schedule and payment information and click Continue. This displays a form to review the payment schedule and make changes if needed. Click Submit when you’re done.

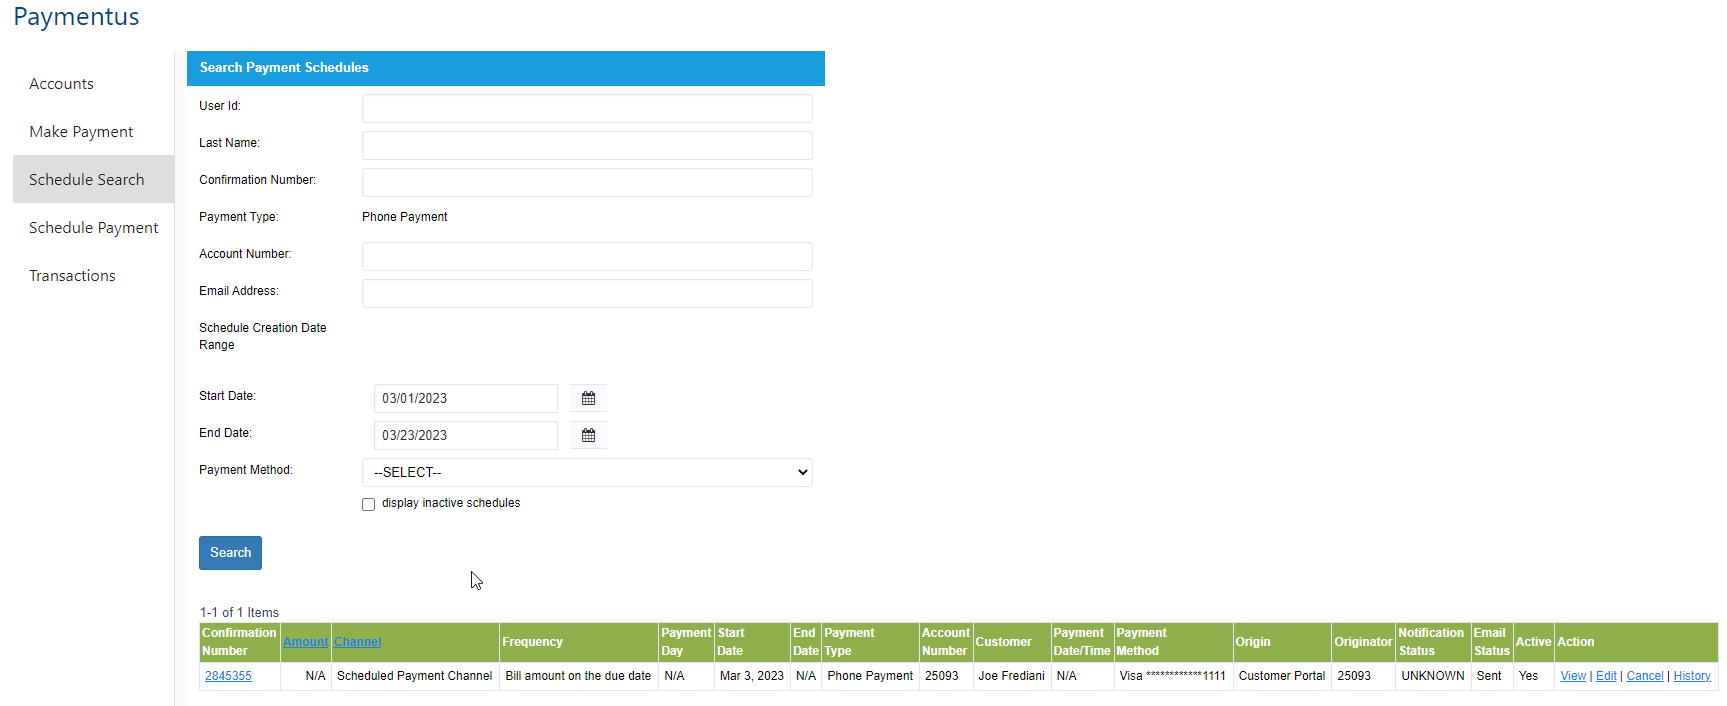
Paymentus Schedule Search
This option displays a form to search for scheduled payments systemwide. From the search results you can use the links in the Actions menu to view, edit or cancel the schedule or view a history of changes to the schedule.
Paymentus Transactions
This option displays a form to search for transactions systemwide.

Enter search criteria and click Search. This returns a list of transactions that match the criteria.
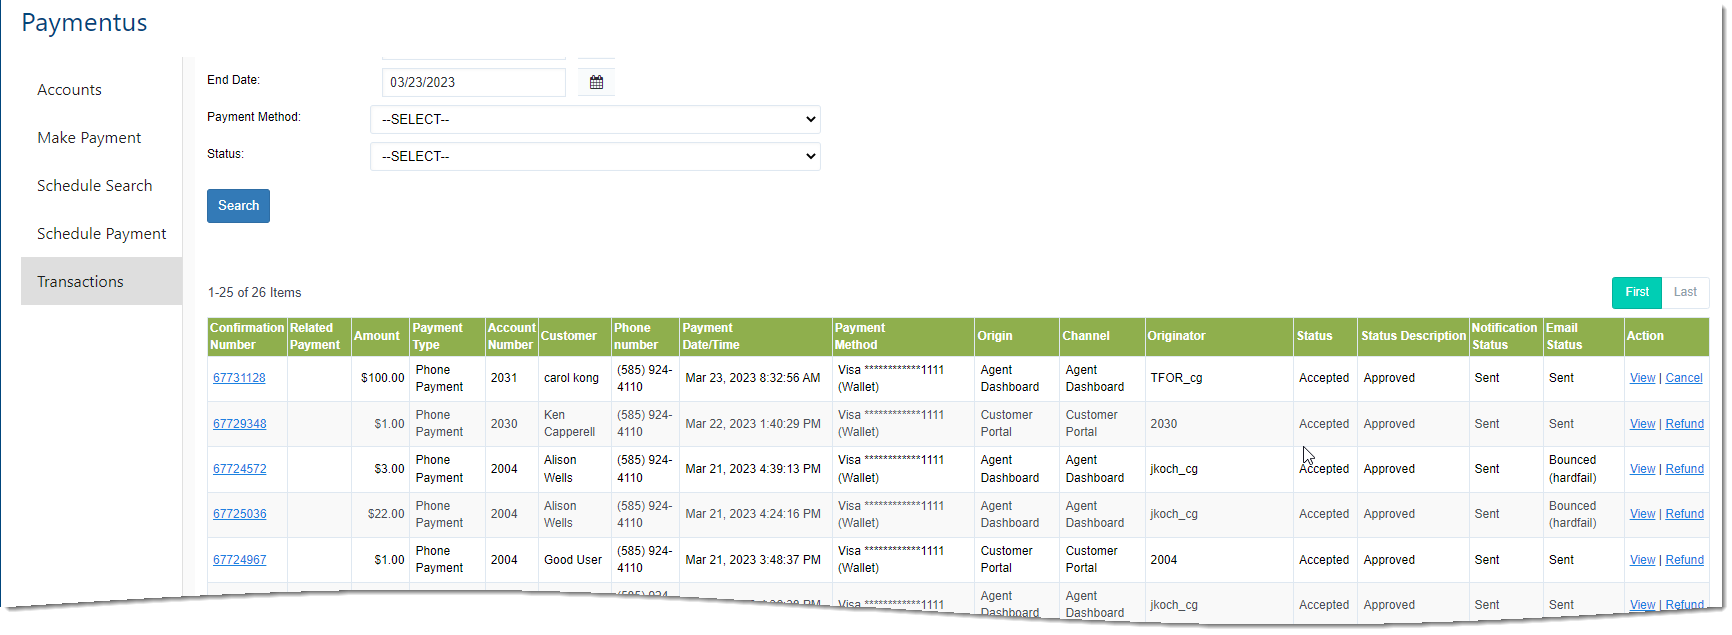
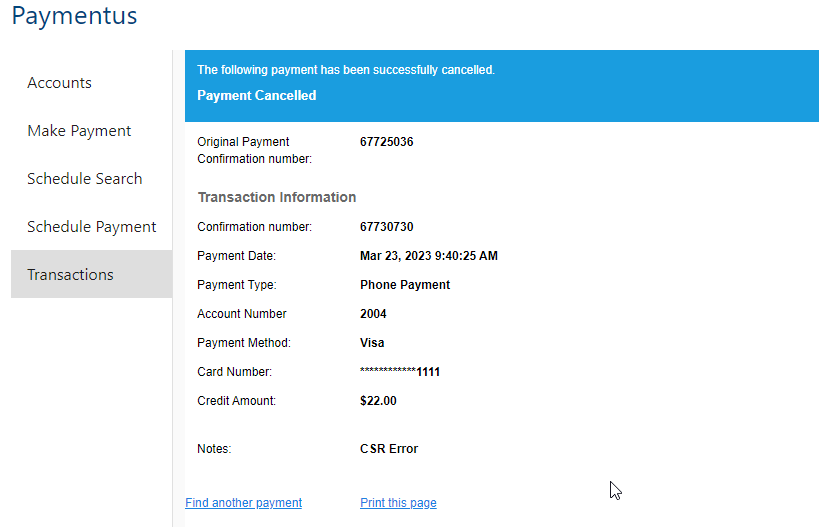
From here you can use the links in the Action column to view transaction details, cancel the transaction, or issue a refund. Available options depend on transaction status.
Viewing Transaction Details
The View link displays the transaction details and provides options to refund or cancel the transaction as applicable or resend the confirmation email.

Refunding a Payment
The Refund link displays a form with pertinent details and lets you enter a note for the refund.
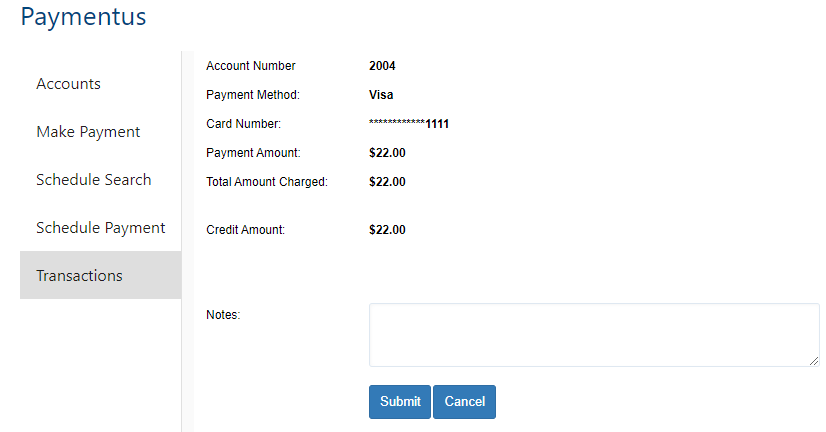
Clicking Submit displays a form that lets you review the refund details.
From here you can use the links at the bottom to print the page or find another transaction. The Find another payment option returns you to the transaction list where you can see the result of the refund. Note: The Related Payment column provides a link to the original (refunded) transaction and the Actions column provides just one option for viewing the refund transaction.
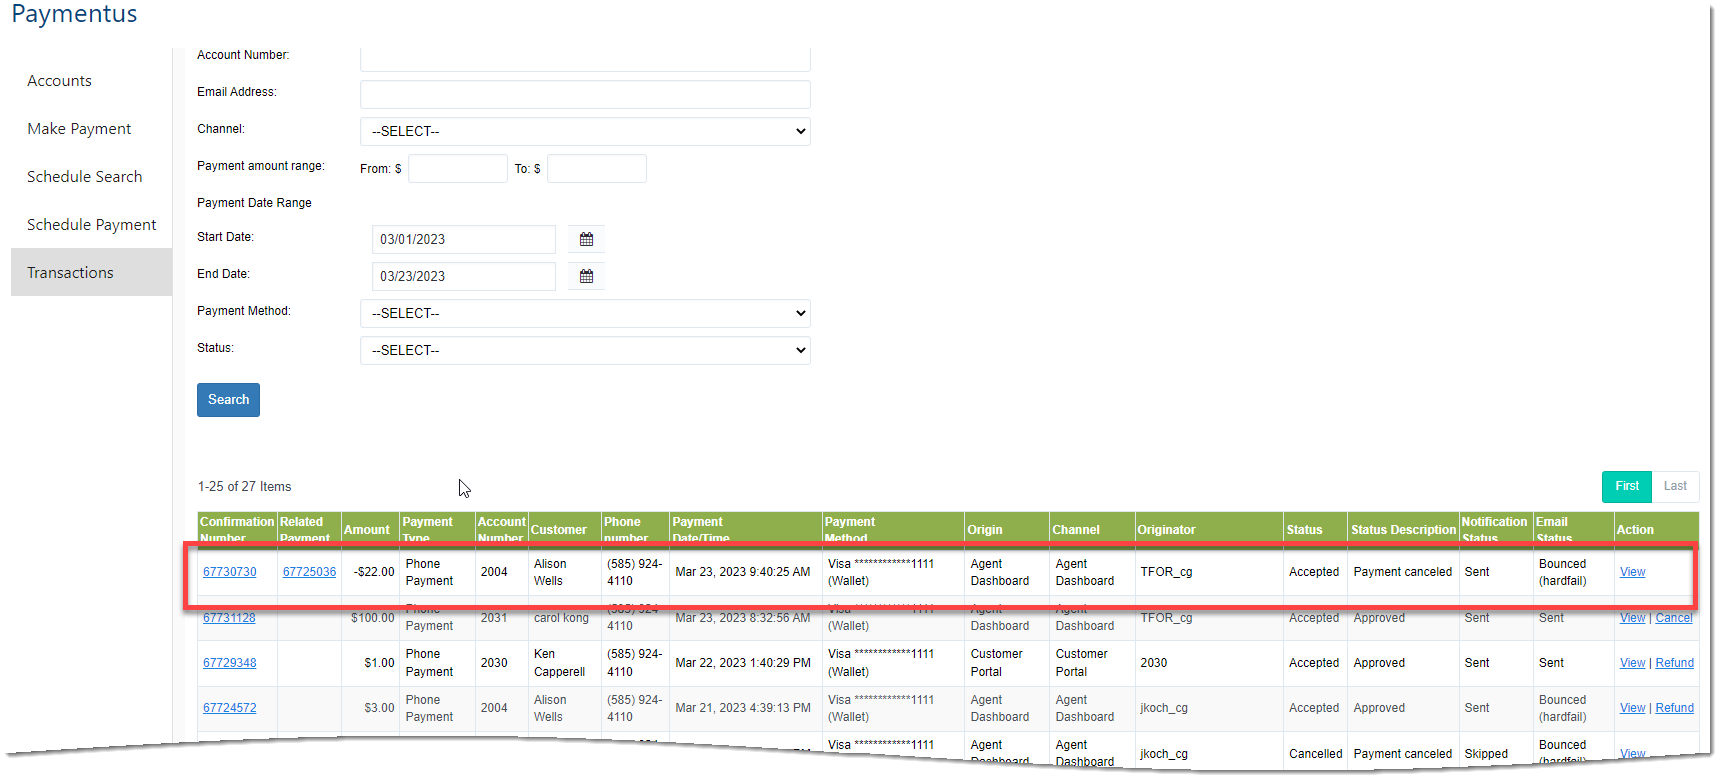
Note: Clicking a link in the Confirmation Number or Related Payment column takes you to the transaction details view.
Support for Advance Pay Auto Renewal
Paymentus integration supports:
- Using the Paymenus payment account as the tender for an AdvancePay automatic renewal purchase.
- Notifications from Paymentus to the IDI platform, including any details about the automatic renewal purchase and/or an applied surcharge/fee.
Automatic renewal purchase can be viewed in a Paymentus Transaction Search (using either the Customer Care via the Paymentus Agent Dashboard or IDI self-service portal via the Paymentus Customer Portal.
The Account menu has an AdvancePay Auto Renewal option.
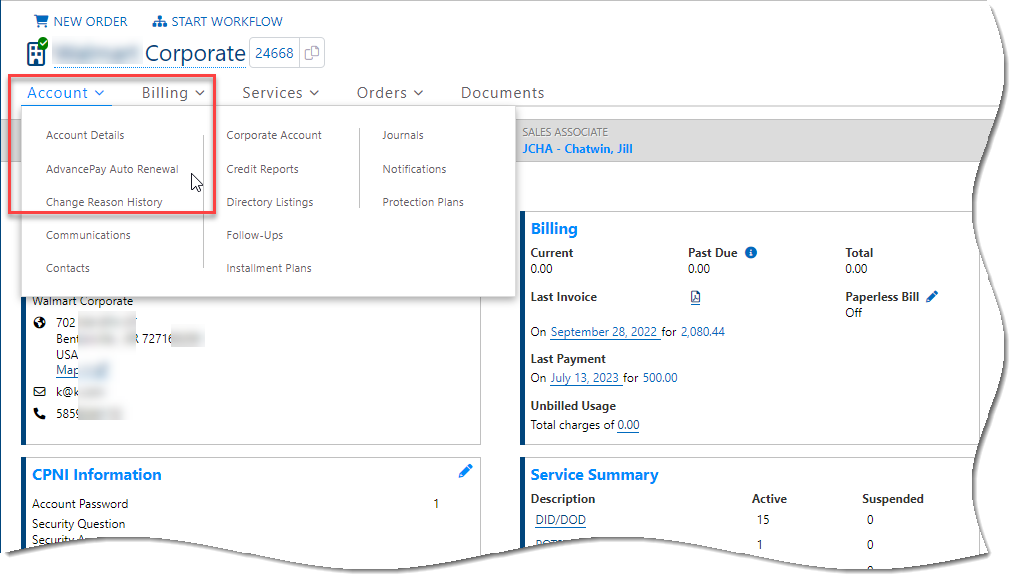
Selecting this option displays the AdvancePay Auto Renewal page. Use this page to manage (add/remove) auto renew services for a selected wallet.
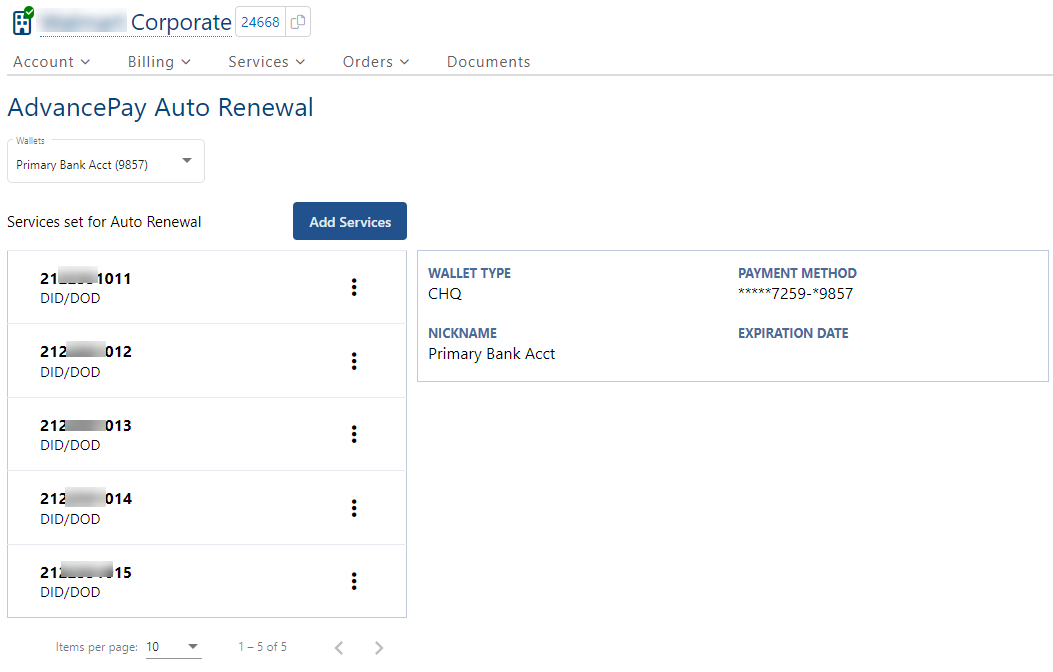
The Wallets drop-down menu on this page lists the wallets (payment methods) that have been set up for the account via the Paymentus I-frame. For a selected wallet, this page lists the current AdvancePay services associated to the wallet with plan, and pertinent information for the selected wallet. Note: If there are no wallets, a Paymentus I-frame will display and prompt you to create one.

Managing Auto Renewal Services for a Wallet
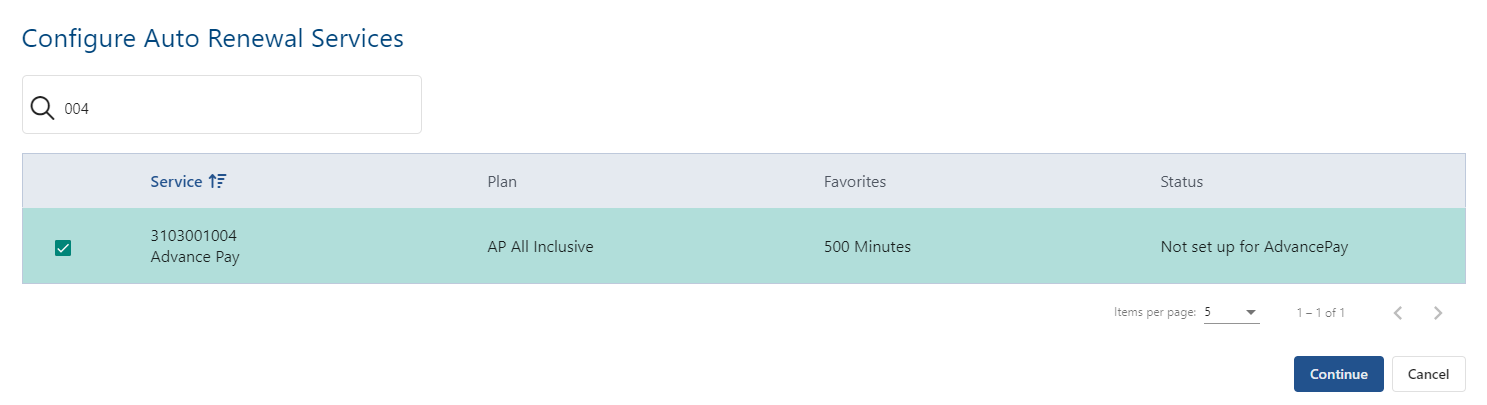
The Add Services button displays a dialog for managing (adding/removing) AdvancePay auto renewal services for the selected wallet. The Configure Auto Renewal Services dialog lists all AdvancePay services for the account, and favorite price point information for each service (if known). If the list is large, you can apply a filter to make the list manageable or limit the list to a specific range of services based on the entered text string. Services that have already been added are checked. You can select other services to add by checking their respective boxes and clicking Continue. Note: A service can only be associated to a single wallet.
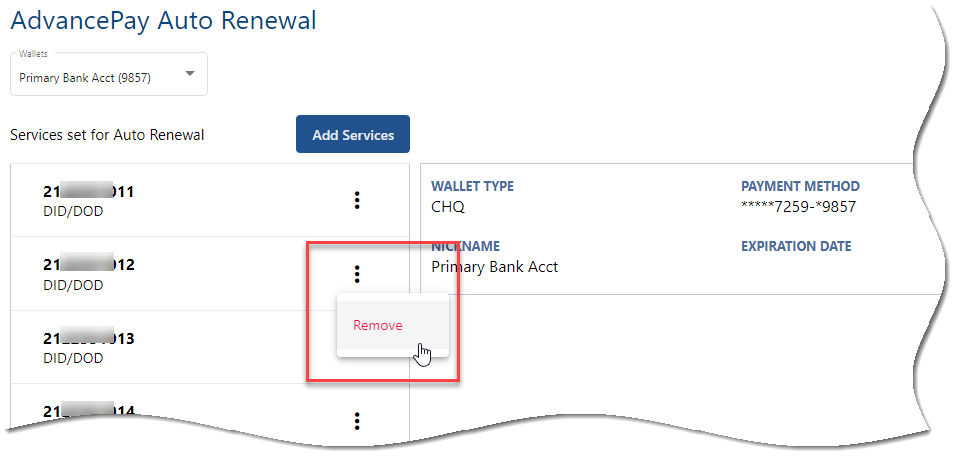
Removing Auto Renewal Services from a Wallet
You can also use the Configure Auto Renewal Services dialog to remove one or more previously added services by unchecking their check boxes and clicking Continue. Or you can use the ellipsis button for a service on the main page as shown below to remove the service. In either case, choosing to remove a service will display a confirmation dialog.
Auto Renewals Link in IDI Desktop Client
When the Paymentus Integration is enabled, the AdvancePay > Auto Renewals option in the IDI Desktop Client changes to a hyperlink that redirects you to the new auto-renewal page in Customer Care.

AdvancePay Scheduled Job Enhancements for Tendering an Automatic Renewal Purchase
When Paymentus integration is enabled, payments are processed through the Paymentus APIs instead of the PCI payment gateway. When the AdvancePay Automation Job processes an automatic renewal purchase, the solution tenders the calculated amount due to the customer’s specific Paymentus Payment Account. Doing so supports:
- Creating the ARP according to existing AdvancePay configuration and IDI platform rules.
- Tendering to/with Paymentus replaces tendering to an existing E-Pay Account.
- Creating the transaction, emails and notifications in Paymentus (as supported for Monthly Invoice Payments and Installment Plan Payoffs).
Tendering to Paymentus does not negatively impact existing AdvancePay reporting or financial-related processes.
Using Paymentus in the IDI Customer Portal
The IDI platform Customer Portal is designed to use the Paymentus payment vendor. Access for making payments and related functions is via the portal’s Payments menu.
Note: Paymentus functionality in the IDI platform is presented though I-frames. Paymentus controls content and functionality of these I-frames. You can work with Paymentus to tailor the function and presentation of these I-frames to meet your requirements. For this reason, I-frame depictions in this article may not reflect how the I-frames are implemented in your IDI platform. Your implementation may include OR omit some fields shown in this article.

OnlineBill users will enter the Paymentus Customer Portal via applicable options in the Invoice & Payment menu.
Notes:
- OnlineBill does not provide access to the Paymentus Schedule Payments page by default. To make this page available for OnlineBill users, a Schedule Payments option must be manually added to the Invoice & Payments menu via Menu Configuration. This requires admin-level access to OnlineBill.
- Admin OnlineBill users can also change the names of any Paymentus-related menu option using Menu Configuration, if needed to align with the Paymentus Customer Portal.
- For providers that replaced their OnlineBill offering with the Customer Portal, subscribers will automatically be directed to Customer Portal when entering their OnlineBill log-in credentials.

On accessing the Paymentus Customer Portal via the IDI Customer Portal or OnlineBill, the subscriber experience is basically the same.
Make Payment
Selecting Make Payment displays the form for starting the payment process. You can use the + Add New button to add a new payment account if needed. Note: Check/ACH payments may be allowed or disallowed for an account based on the corresponding setting in Customer Care.
To make a payment, check an option under Select Account(s) and click Continue to proceed to the next step.
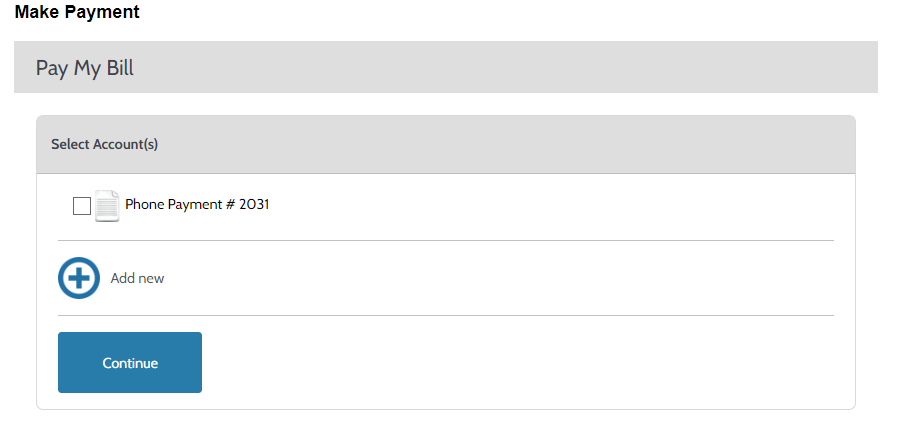
This displays the Pay My Bill form which lets you add one or more payments. Note: The + Add New button lets you add a new payment method. For details see Manage Payment Accounts.
To continue with Make Payment, specify the Payment Amount for each and select an option from My Wallet.
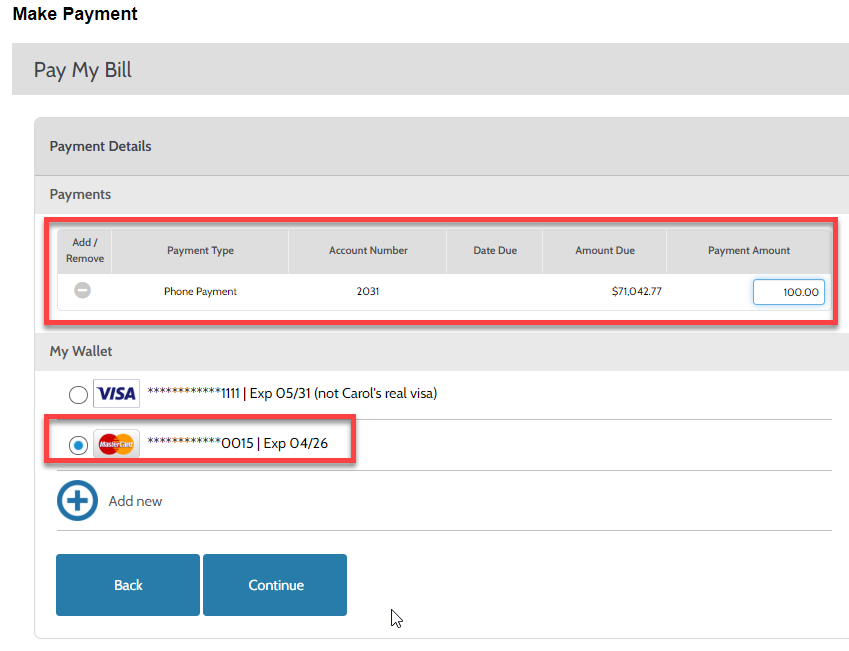
Click Continue to proceed to the next step. This displays a summary of the payment. From here you can proceed with the payment as is or go back to make changes.
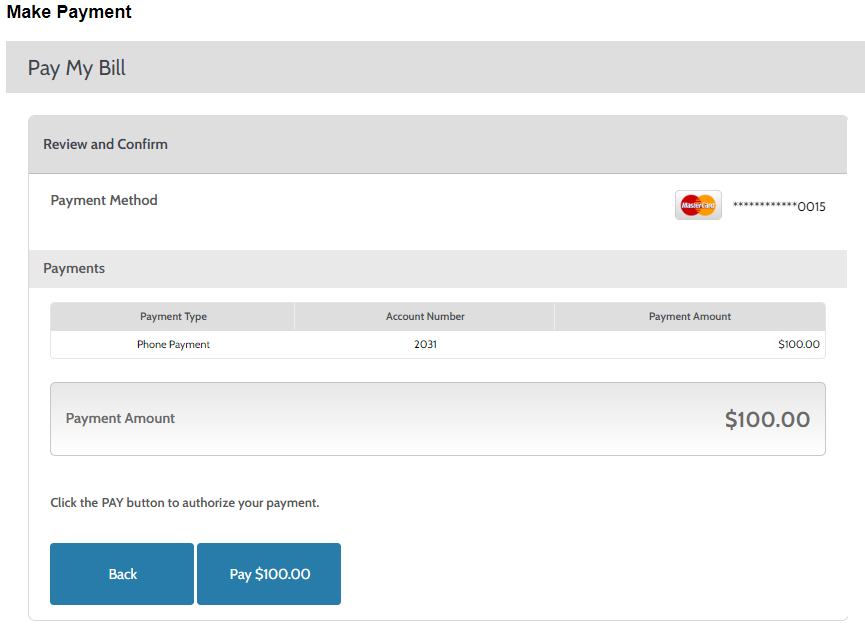
If you choose to pay by clicking the Pay amount button, a receipt will be displayed.

From here you can choose to make another payment or print the receipt.
Manage Payment Accounts
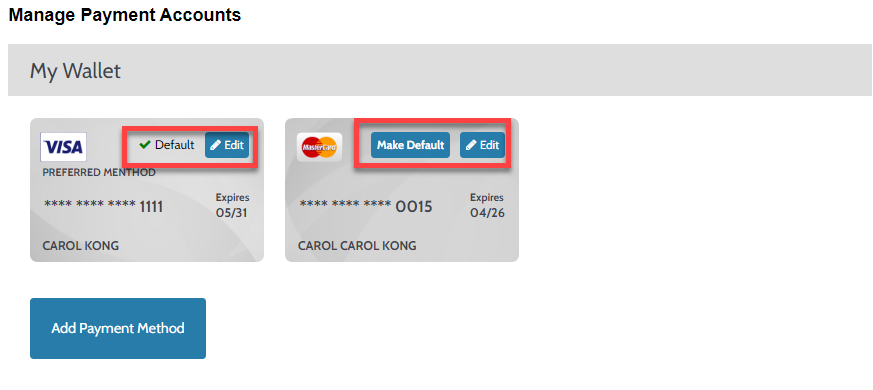
This option displays a form listing existing payment methods for the account. This form also lets you add a new payment method.
For existing payment methods, the image indicates whether the method is the default. For methods that are not the default, the image provides a Make Default button that lets you change the default with one click. Each image also provides an Edit button that lets you edit details for the payment.
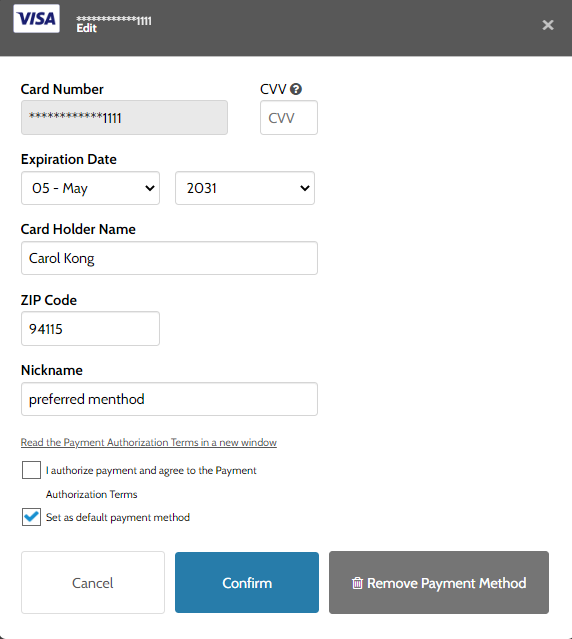
Clicking Edit displays the Edit Payment method form. The editable details depend on the type of payment method (E-Check, Debit, Credit or Digital Wallet). There is also an option to remove the payment method.
Clicking Add Payment Method displays the form for adding a new payment method. The required fields vary depending on the type of payment method you select using the upper tabs: E-Check, Debit, Credit or Digital Wallets (Credit shown below).

Payments and Transactions
This option displays a page with a payment and transaction history. For each transaction the left column indicates the status. Also shown for each transaction are the account number, amount, date, and payment method.
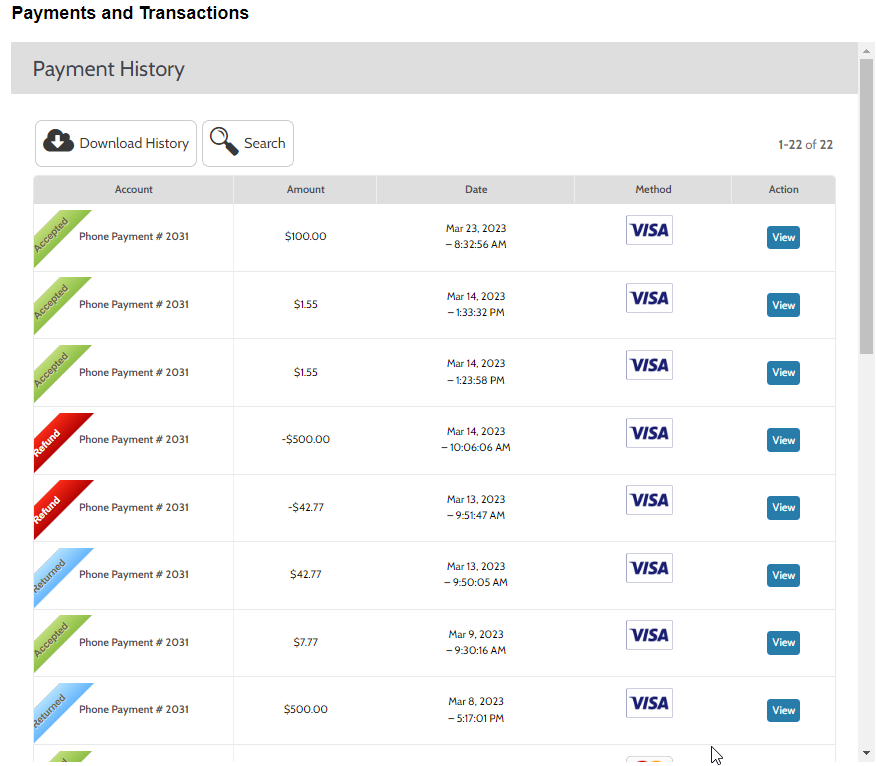
The View button in the right column lets you view the transaction details. From the detail view you can navigate back to the history via the breadcrumbs link at the top or the Back to Payment History button at the bottom.

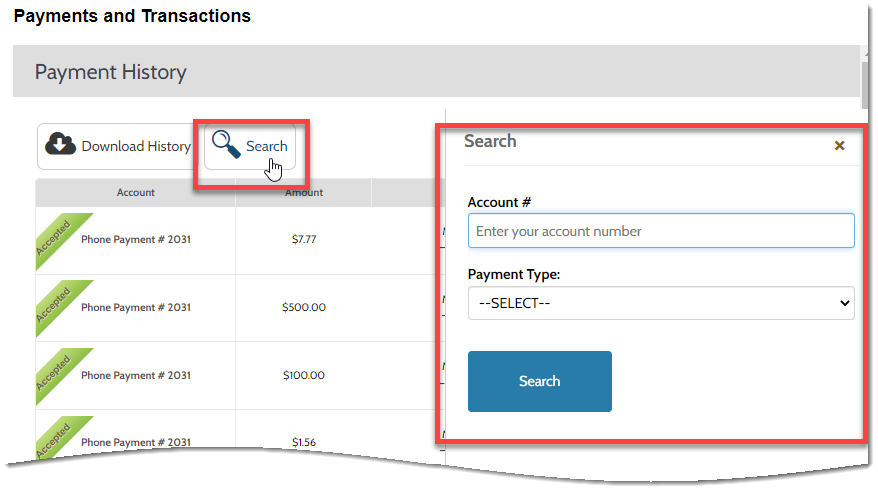
Also, from the transaction history page you can search for transactions by account and/or payment type.
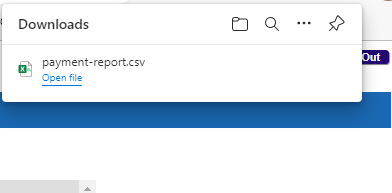
The Download History button downloads a csv file to your local downloads folder.

You’ll see a form in the upper right corner of your screen with a list of recent downloads. Clicking a link will open the corresponding file.
Schedule Payments
Note: OnlineBill does not provide access to the Paymentus Schedule Payments page by default. To make this page available for OnlineBill users, a Schedule Payments option must be manually added to the Invoice & Payments menu via Menu Configuration. This requires admin-level access to OnlineBill.
This option displays a form that lists existing payment schedules. For an existing schedule you can edit the schedule and/or payment details. Or you can add a new schedule.
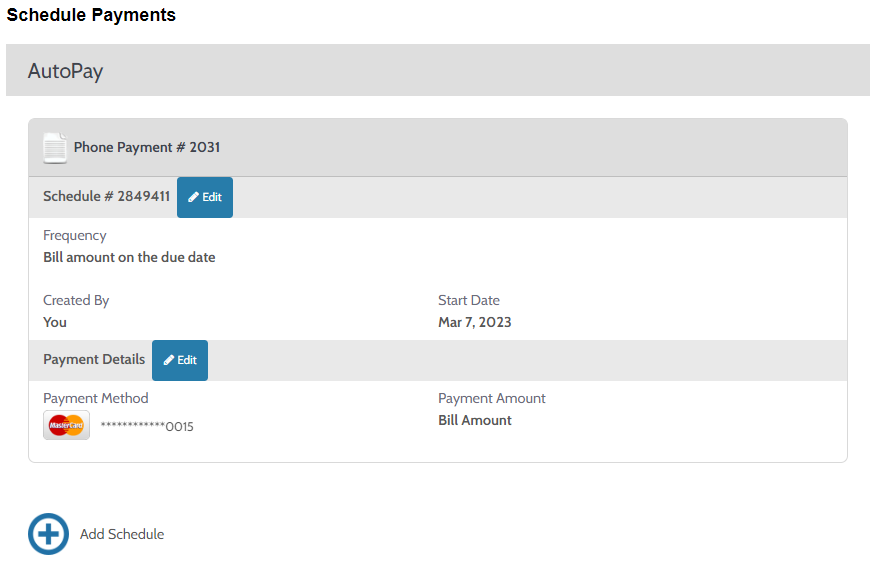
Editing schedule details
Editing Payment Method
This form lets you select a different payment method (if the account has more than one) or add a new method.

Changing Names for Paymentus Functions
Admin-level OnlineBill users can change menu option names in the Invoice & Payment menu as needed via Admin > Menu Configuration.
Using Paymentus to Tender Transactions
This covers:
- Tendering a transaction amount due:
- Using a Paymentus peripheral device for in-store transactions.
- Using a supported payment method for remote transactions.
- Tendering a return and issuing a refund for transactions tendered through Paymentus.
- Voiding a transaction completed through Paymentus.
This requires starting block functionality to be enabled in your system. Complete details for setting up and using starting blocks is covered in the Web Sales article in the IDI Knowledge Center.
Tendering Amount Due
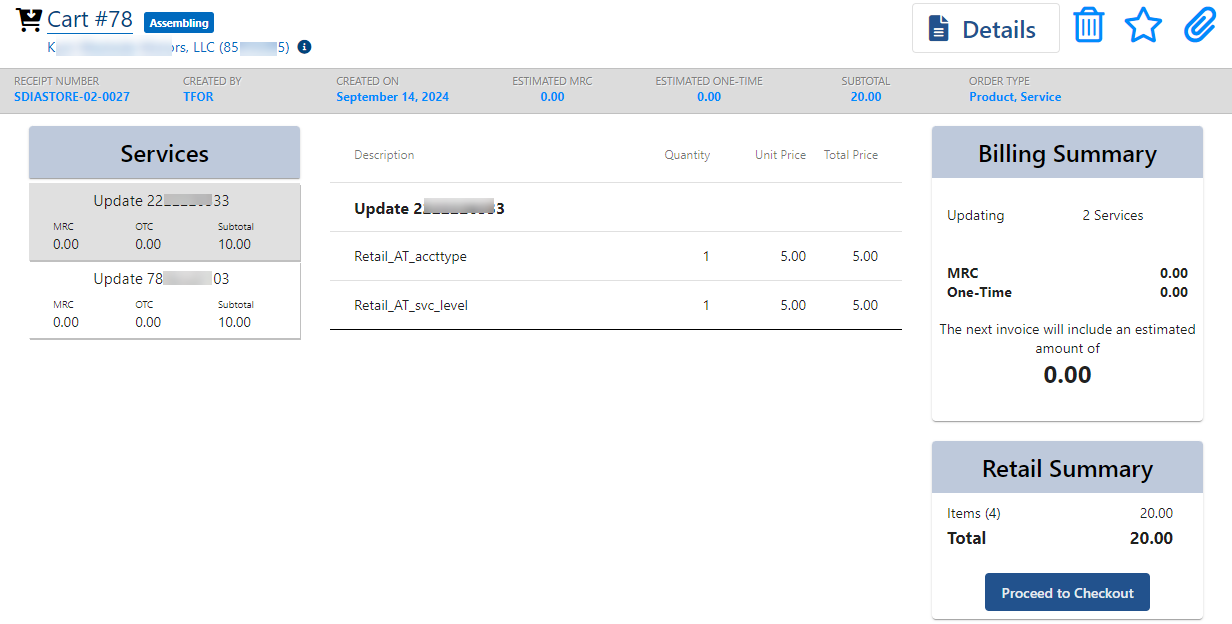
Initiate the transaction. Below shows initiating a sales transaction via a starting block. Then select the account and staging items as you would for any transaction and click Review to display the Billing/Retail Summary. Below, the summary shows updating two services, each with two retail products. Each product has a $5.00 charge ($10.00 total for each service and $20.00 total for the transaction).
When you click Proceed to Checkout, the tendering screen lets you add one or more tenders to cover the transaction charges. To tender through Paymentus, select the Paymentus tender type on the checkout TAX & TOTALS tab, then use the Method selector to choose whether to use a Paymentus device set up at the retail location (Use Paymentus Device) or use a Paymentus account set up on the customer’s account (Select Payment Method).

Note: You can use Paymentus tendering options in combination with other non-Paymentus tendering options. For example, you can tender part of the transaction with cash and then tender the rest through a Paymentus peripheral device.
Using a Paymentus Peripheral Device
This supports in-store tendering. To do this:
- Select the Paymentus Type, then select Use Paymentus Device and click Add. From here you can use the current device (if any) or choose to use a different device. The first time you do this, a current device will not be specified Current Device = None).

- In this case your only option is to click Choose. This displays a form listing all peripheral devices available at the Paymentus location. This form lets you scroll through muliple pages if there are more devices that can be displayed on the form at one time.
- Select a device and click Use Selected Device.

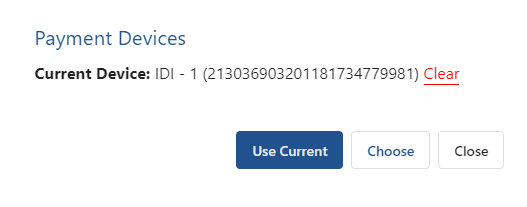
If the selected device is available, the tender will be added successfully; otherwise, you’ll need to select a different device. From that point, the device you select will become the current device until you choose to clear it. It will be indicated on the Payment Devices form and you can choose to use the current device (Use Current) or choose another (Choose). You also have the option to Clear the current device and choose a different one.
Using a Supported Paymentus Payment Method
This is primarily for remote (not in-store) transactions, or when a Paymentus device is not available.
To use a payment method, start by selecting Paymentus in the Type selector and Select Payment Method in the Method selector.
Note: You can combine multiple Paymentus payment methods (a combination of credit cards, or other methods such as ACH or PayPal). For example, the customer may wish to tender purchases for two separate services using different credit cards. The Amount field lets you adjust the amount to apply for each method. Below the amount is adjusted down to $10.00. If you add a tender for a partial amount, you’ll be required to add additional tenders to cover the full amount in order to finalize the transaction.
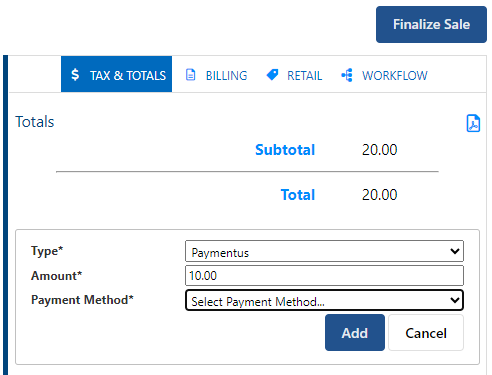
Clicking Add displays the Paymentus tendering form. This form lets you select a payment method that has been up for the account in Customer Care via Billing > Paymentus, or you can use a new payment method. The tendering form will give you the option to save it.
After adding the required tenders, the resulting view shows the amount tendered through Paymentus. Below shows the result of using two credit cards to tender the transaction.
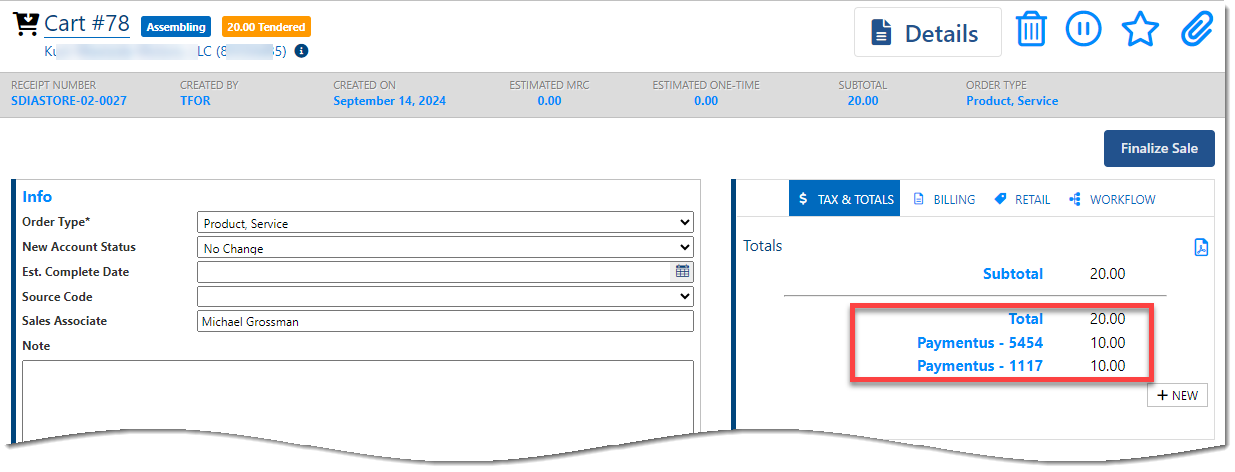
Clicking to finalize converts the transaction to a sale or order based on the starting block you used to process the transaction.

Issuing a Refund on a Return with Paymentus
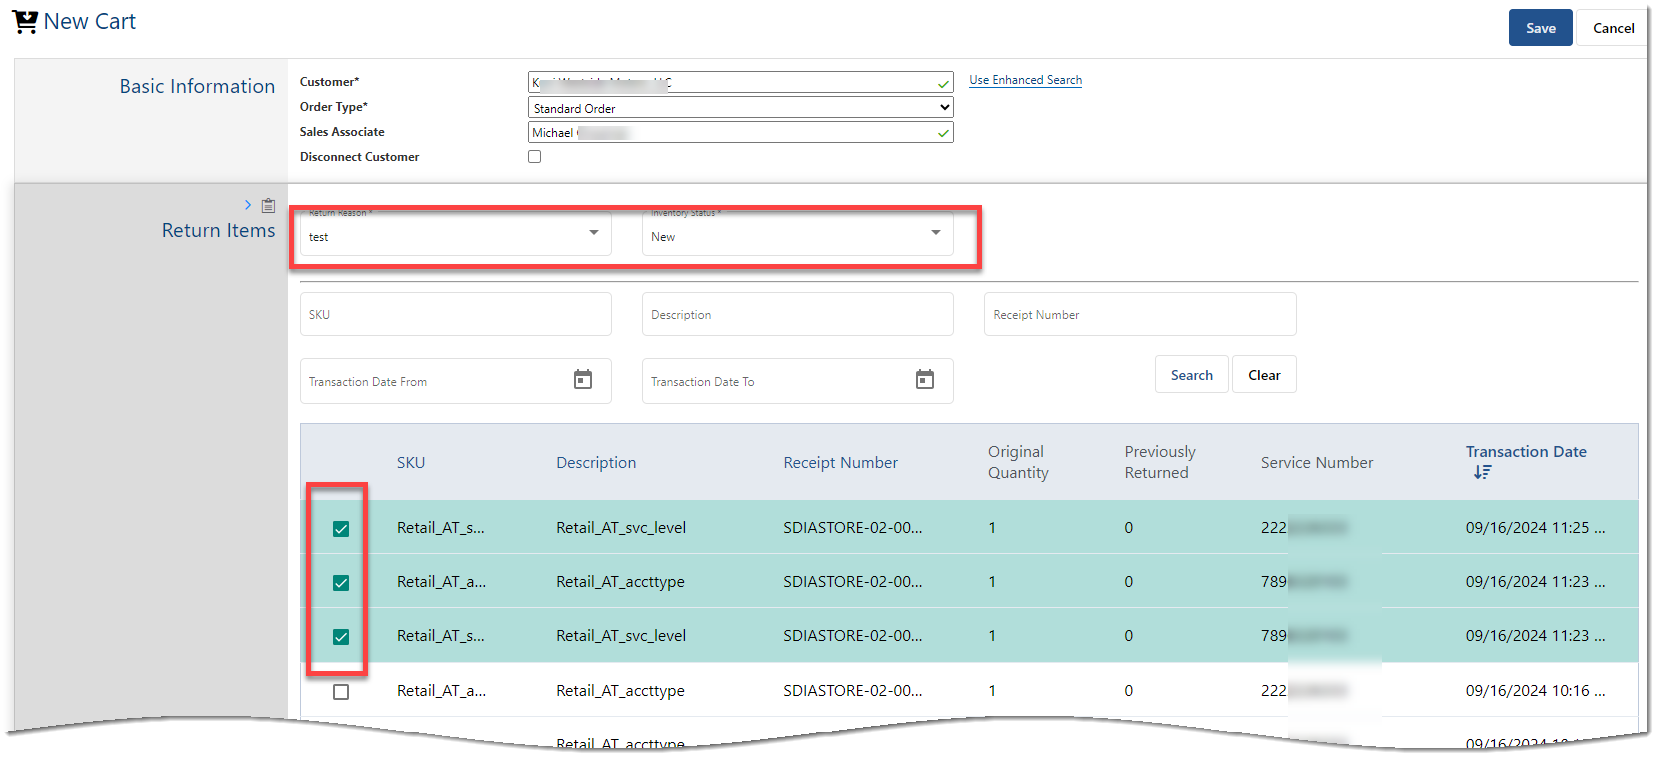
When you initiate a return, select the customer and items to return, and specify the reason and inventory status. These steps are common to any return (existing functionality). Below shows returning a total of three items tendered in two separate transactions; one tendered with cash and the other tendered through a Paymentus payment method.
Saving these selections displays the familiar view showing the quantity and total charge for each item to be refunded. Below shows three $5.00 items (total charges = $15.00). This is also existing functionality. You can make changes to the return transaction here by adding or deleting items.
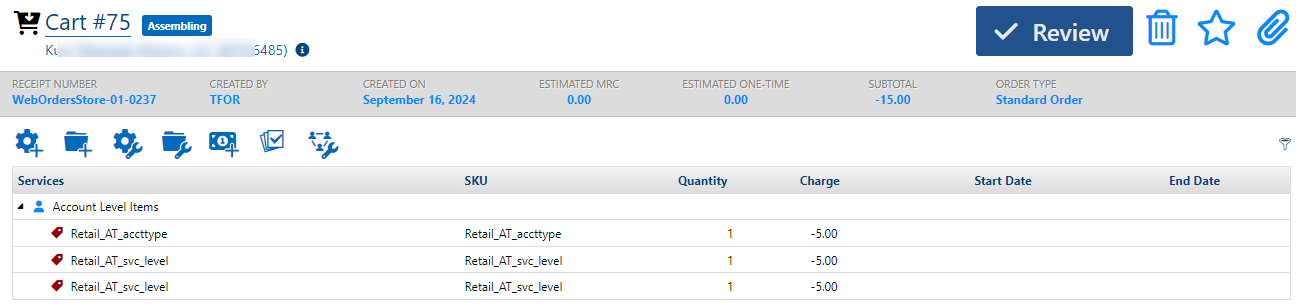
Clicking Review presents the billing and retail summary.

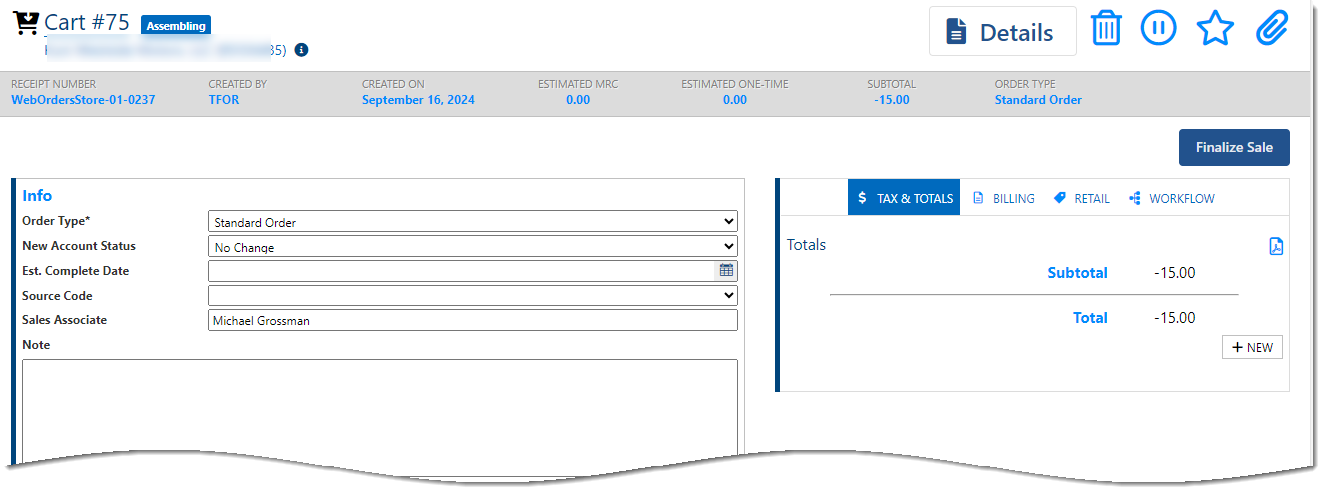
Clicking Proceed to Checkout displays the tendering page. From here you add tender types as needed to cover the full refund amount (in this case $15.00). For this return, you’ll need to add two return tenders – one to cover the transaction paid with cash, and one to cover the one tendered through Paymentus.
Click + New to add a tender. Below shows adding a Cash tender with the amount adjusted down to $5.00 to reflect the charge for the item that was paid for with cash. Click Add to add the Cash tender. This is existing functionality.

Then click +New again to add a Paymentus tender type for the refund due on other transaction. When you select the Paymentus tender type, the Payment Method selector provides just one option: Refund Tenders From a Previous Transaction. Note that the amount reflects the remaining amount to be refunded for this return ($10.00).

Clicking Add here displays a form listing the Paymentus tenders for the items you chose to return. You’ll see a row for each payment method and/or receipt. Each row shows the transaction’s receipt number, date, the Paymentus account (or device), and the total amount tendered for the payment method or receipt. This may differ from the amount being refunded, depending on the items you chose to return.

Note: If there are multiple rows listed (not the case above) you are only permitted to select one. Select the row and then click Refund. This displays a form indicating amount to be refunded for this tender. Note: The form also presents a warning indicating the refund will be final if you continue by clicking Submit. This is because the IDI platform is communicating with Paymentus in real time. This differs from non-Paymentus returns where the return is not finalized until you finalize the transaction.

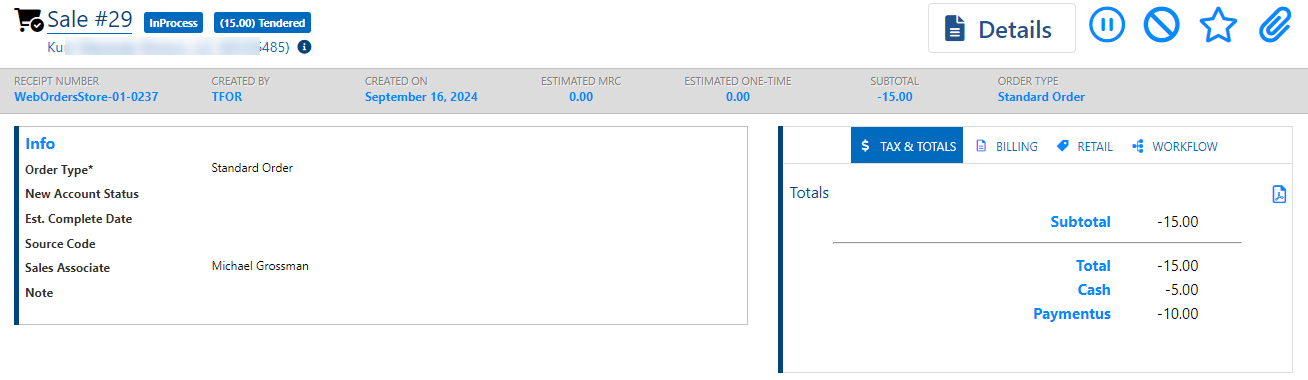
After clicking Submit, you’ll see both the cash and Paymentus tenders.

On finalizing you’ll see a summary of the return transaction.
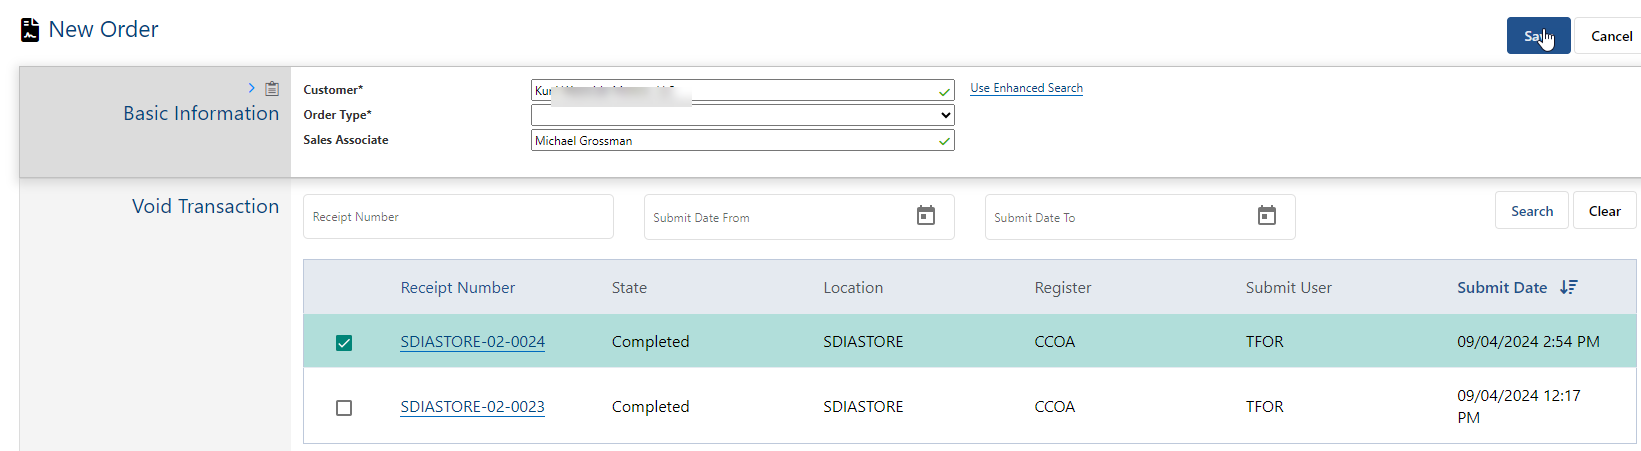
Voiding a Transaction Through Paymentus
You can void a transaction that was tendered using Paymentus.

Exporting Billing and Customer Information
Billing and account balance details are exported from the IDI platform to the Paymentus payment portal. These details are then available in the Paymentus Agent Dashboard and Customer Portal to facilitate any payment being made and to keep the solutions synchronized.
The Customer Information File (CIF) is generated by a new scheduled job that can be run at least once per day or as needed.