With this release (AR 7835), the IDI platform can be set up to send a notification when a customer enrolls their E-Pay account in recurring auto-pay. This allows for a notification to be sent regardless of what application updated the E-Pay account (Customer Care, IDI Desktop Client).
The solution leverages Workflow Trigger functionality with the existing Send Notification Workflow Action. Note: The Send Notification Action uses the IDI platform Notification engine. Notifications were chosen to support SMS (the IDI platform Communications platform does not yet support SMS).
Two New Workflow Triggers are available in the Workflow Trigger gallery:
- E-Pay Account Created
- E-Pay Account Modified
A configuration option in Customer Care lets you enable/disable notifications for E-Pay auto-pay enrollment. This option applies to the IDI Desktop Client, as well as Customer Care, so it must be configured even if you don’t use Customer Care. Enabling this option instantiates two Workflow Triggers in your system:
- Trigger = E-Pay Account Created with Action = Send Notification
- Trigger = E-Pay Account Modified with Action = Send Notification
Note: The E-Pay Account Created and E-Pay Account Modified triggers can also be used with other Workflow actions to support other business needs.
CostGuard Client changes have been made to support notifications for E-Pay accounts:
- New Data Source: E-Pay Account Notifications
- Template: Sample SMPP Notification template for E-Pay Account Notifications
Setup
Note: You should already be using customer notifications, and have the delivery method set up in Admin Console. If this is not already in place, additional setup will be needed.
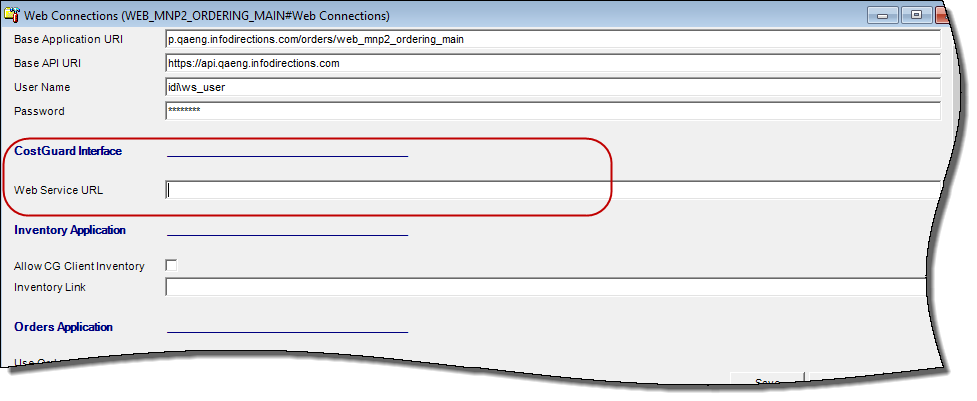
Web Service URL – Configuration Console
This setting is required for the Workflow Trigger functionality to work. It is only available to authorized IDI associates. Configure the Web Service URL via
Web Connections > CostGuard Interface
Set the value to: http://<application server>/CostGuardInterface/
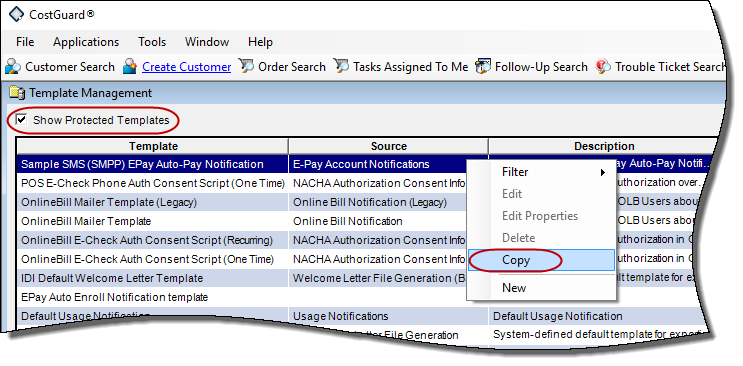
New Sample Template – IDI Desktop Client
A new sample template called Sample SMS (SMPP) EPay Auto-Pay Notification lets you specify custom text for the notifications. The template works with the SMPP delivery method. The path is: Backoffice Management > Customer Notifications > Manage Templates
The Show Protected Templates checkbox must be checked to see this sample template. Because the template is protected, you need to make a copy in order to make customizations.
Note: The template text is used in both the account created and account updated notification. If you need different text for each notification, you’ll need to create two separate templates. Some additional Trigger configuration will also be needed.
New E-Pay Account Notifications Data Source
This data source can be used in customer notification templates. It contains the following fields:
- EPayAccountID
- BankAccountType
- CustID
- CusomerAccountNumber
- CustomerName
- CustomerPrimaryContactPhone1
- CustomerPrimaryContactPhone1Type
- CustomerPrimaryContactPhone1TypeID
- CustomerPrimaryContactEmail1
- PrimaryServiceNumber
- EPayAccountDescription
- EPayAccountNumber
- EPayAccountExpirationDate
- EPayAccountRecurringEndDate
- EPayAccountRecurringStartDate
- EpayAccountRecurringStatus
Enable/Disable SETTINGS – Customer Care
Note: Auto Pay Notifications must be enabled in Customer Care. This setup is required whether or not you use Customer Care. If you don’t use Customer Care, the setup may be performed for you by an IDI associate. Enabling this setting creates two Workflow triggers with accompanying Send Notification actions that drive this functionality in all areas where it is supported (IDI Desktop Client and Customer Care).
The Auto Pay Notifications setting is disabled (unchecked) by default. The setting is located under Manage > Settings. Access to this setting requires the Manage Settings permission in Customer Care.

To enable,
- Check Auto Pay Notifications Enabled. This creates the Workflow Triggers and their accompanying Send Notification Actions. Once enabled, disabling this setting will delete the Triggers.
- Select the custom template you set up for this purpose.
Only templates associated with the E-Pay Account Notifications data source will be available for selection.
If you use two different templates for account created and account updated notifications, you can only select one here, and it will be used when creating both Workflow Triggers. A user with access to Workflow can then modify one of Triggers to use a different template.
- Select the Delivery Method. Options are SMS (SMPP), SMS (SMTP) or Email.
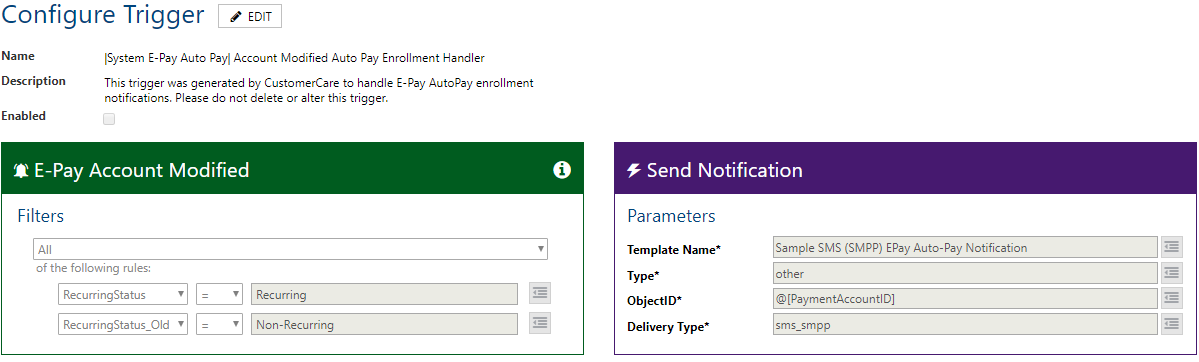
More on the Workflow Triggers (and Accompanying Actions)
The Triggers (left side) are populated exactly as shown below. The properties available to filter on include: BankAccountTypeID, ContactID, CreditCardTypeID, CustomerID, EndDate, IsDeleted, IsTerminated, LastModifiedDate, LastModifiedUser, PaymentAccountID, RecurringEndDate, RecurringStartDate, RecurringStatus, RemittanceTypeID, StartDate.
The associated Actions (right side) are populated based on the parameters entered when the E-Pay Accounts setting was saved.
The Triggers do not require any further configuration unless you’re using two different templates for account created and account updated notifications. In this case you’ll need to change the Template specification in the applicable Action.
- |System E-Pay Auto Pay| Account Created Auto Pay Enrollment Handler:

- |System E-Pay Auto Pay| Account Modified Auto Pay Enrollment Handler
Note for Testing
The Config Console provides a Test Mode setting for each delivery method in the Delivery Configuration dialog. The path is:
Local Service >Background Processes> Customer Notifications > Delivery Configuration
In a non-production environment, the Test Mode setting should be checked to prevent messages going out to customers. Unchecking the Test Mode setting in a non-production environment should be carefully coordinated.