IDI’s NetSuite journal entry integration automates the seamless transfer of general ledger data from IDI’s B/OSS platform into NetSuite as journal entries. By eliminating manual import processes, the SuiteApp accelerates month-end close, improves financial accuracy, and frees finance teams to focus on strategic tasks. Fully certified for the NetSuite environment, IDI’s SuiteApp extends NetSuite’s capabilities by integrating detailed telecom billing and accounts receivable data directly into enterprise financials — providing a complete, efficient, and error-free financial view.
Key Benefits
- Automates the creation of month-end journal entries in NetSuite.
- Eliminates manual processes to increase efficiency and enhance accuracy.
- Fully supported by NetSuite’s APIs.
- Offers flexibility to accommodate Service Providers’ custom NetSuite journal entries.
NetSuite Overview
NetSuite is an IDI partner and a cloud-based business management enterprise that offers a single, integrated suite for managing accounting, orders, inventory, projects, production, supply chain, and warehouse operations. NetSuite Enterprise Resource Planning (ERP) provides clear visibility into your data and tighter control over your business.
Note: You’ll need to coordinate with IDI Account Management and NetSuite to enable and fully integrate the ERP with your IDI BSS/OSS platform.
Setup
Reach out to your IDI account manager to establish a relationship with NetSuite and enable the functionality in your IDI platform. Both IDI and NetSuite professional service teams can assist with configuration and setup.
Enable NetSuite Integration in Your IDI Environment
Contact Support or your account manager to enable the NetSuite integration in your IDI environments.
Download and Install the IDI SuiteApp from the NetSuite App Store
The SuiteApp contains all the information required for IDI and NetSuite to integrate.
In NetSuite, navigate to the SuiteApps and search for IDI Billing, or follow the link below by adding your NetSuite account number to the URL.
https://[AccountNumber].app.netsuite.com/suiteapp/ui/marketplace.nl?sc=-180&whence=#/app?id=com.idibilling.gl

Once the IDI Billing app is installed, it will automatically create a NetSuite role called IDI Billing Suite App Connection and an integration called IDI Billing REST.
Confirm the IDI Billing Suite App Connection Role Exists
In NetSuite go to Setup > User/Roles > Manage Role and verify the IDI Billing Suite App Connection role exists.

Confirm the IDI Billing REST Integration Exists
In NetSuite, go to Setup > Integration > Manage Integrations and verify the IDI Billing REST integration exists.

Note: If either the role or integration is missing, try installing the IDI Billing SuiteApp again or contacting NetSuite support.
Assign IDI Billing SuiteApp Connection Role to NetSuite User
A NetSuite user needs to be assigned to the IDI Billing SuiteApp Connection role to create the access token needed for IDI to communicate with NetSuite.
In NetSuite, navigate to Setup > Users/Roles > Manage Users, and select the user who will generate the access token. Click the Access tab, choose edit and assign the IDI Billing SuiteApp Connection role.

Generate NetSuite Access Token
Once the role is assigned, an access token needs to be generated. Creating an access token will add two fields on the page: a Token ID and a Token Secret.
Important! – The Token ID and Token Secret values must be saved before leaving the page. Add them to the IDI Customer Care application (see below) and/or a password manager before leaving the page. The values cannot be retrieved from NetSuite after the page is closed. If the token information is lost, a new access token must be generated.
To generate the access token go to Setup > User/Roles > Access Tokens and select New Access Token.
- Application Name = IDI Billing REST
- User = User with IDI Billing SuiteApp Connection role
- Role = IDI Billing Suite App Connection

The Token ID and Token Secret will be created upon selecting save.
Configure NetSuite Settings in Customer Care
These settings are only available after NetSuite integration is enabled in your system. The Care configuration setting is toggled off (hidden) for customers who don’t use NetSuite.
In Customer Care go to MANAGE > Settings and scroll down to the NetSuite Configuration section. Enter the connection information to enable IDI to connect to the NetSuite APIs.
| Account ID | Unique identifier of an environment in NetSuite. The value is generally uppercase letters and numbers. Example: TD291491 |
| Token ID | Unique identifier of the user in NetSuite that uses the API. The token id generated in the step above. |
| Token Secret | Secret value that goes with the user and is used to authenticate the user in NetSuite. |
| API URL | Base URL of the NetSuite Rest API. Example: https://[AccountID].suitetalk.api.netsuite.com/services/rest/ |

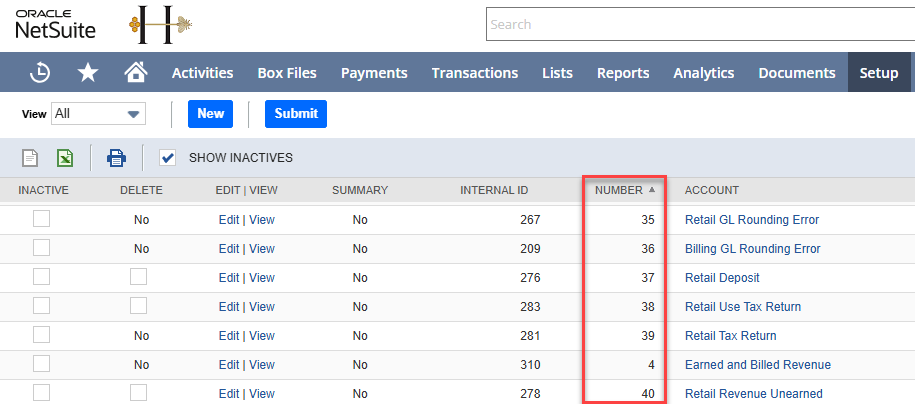
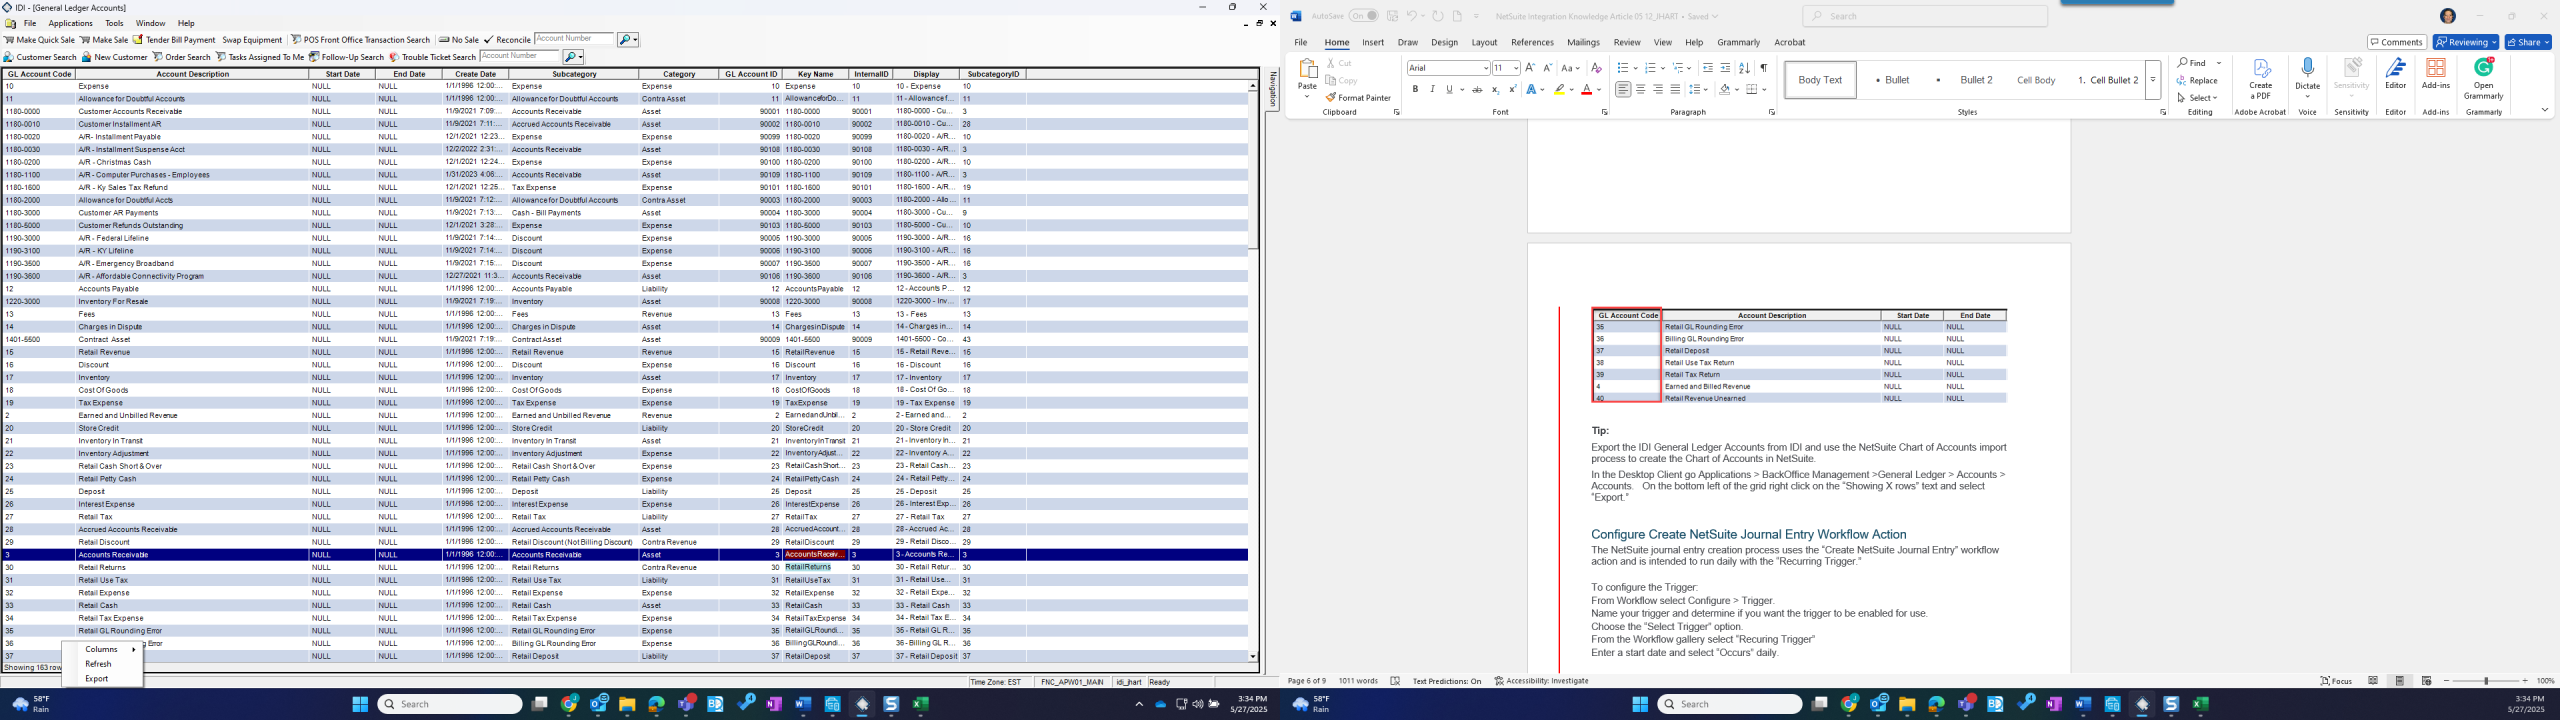
Ensure IDI General Ledger Accounts are in NetSuite
Ensure that all IDI General Ledger accounts are created in the NetSuite Chart of Accounts. Use the IDI GL Account Code to populate the NetSuite Number when creating the accounts in NetSuite. IDI will use the NetSuite Number to map to the IDI GL Account Code value when creating the journal entry in NetSuite.

Import IDI General Ledger Accounts into NetSuite.
Search the NetSuite help for Chart of Accounts Import and Importing CSV Files with the Import Assistant in NetSuite for current directions on how to perform this task.
Export the IDI General Ledger Accounts from IDI and use the NetSuite Chart of Accounts import process to create the Chart of Accounts in NetSuite.
In the IDI Desktop Client, go to Applications > BackOffice Management > General Ledger > Accounts > Accounts. On the bottom left of the grid right click on the Showing X rows text and select Export.
Map the IDI General Ledger Accounts to the NetSuite Accounts Import specification.

In NetSuite go to Setup > Import/Export > Import CSV records.
Choose:
- Import Type = Accounting
- Record Type = Chart of Accounts
Then, follow the NetSuite wizard and instructions.
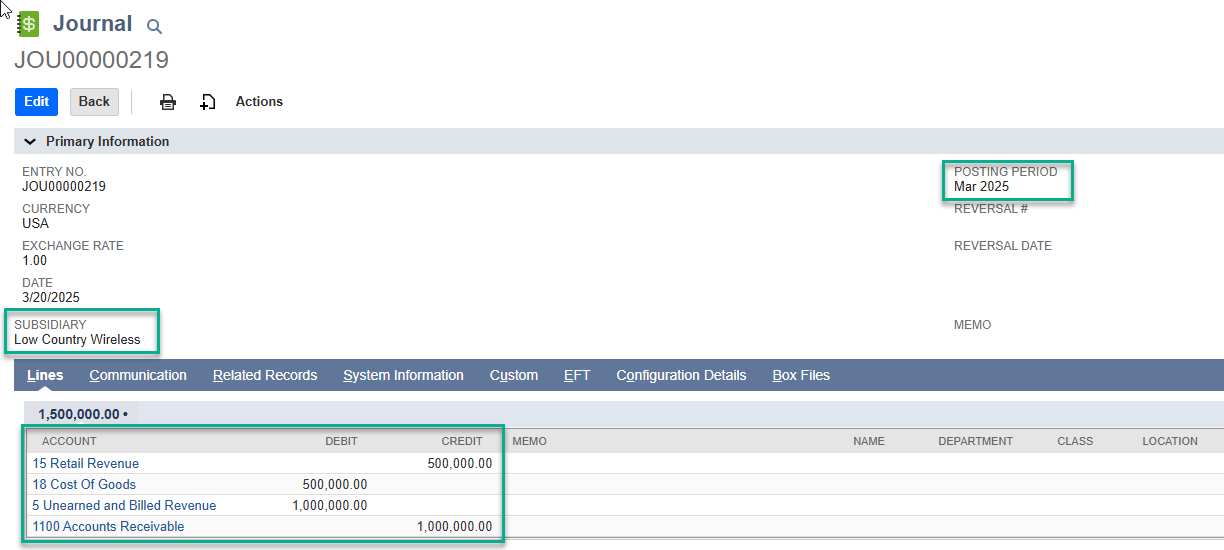
Review IDI Output Method
The Output method determines the values being updated when creating the NetSuite Journal Entry. Determine whether the IDI standard output method is suitable for your business. The Month End Journal Entries output method is IDI’s standard and default method. The output method creates a single journal entry and will update the following values when creating the Journal Entry.
- Posting Period: Month and year of the transaction data.
- Subsidiary: Unique subsidiary in NetSuite.
- Account: Unique ID of the General Ledger Account in NetSuite.
- Debit: The amount credited to the General Ledger Account for the transaction.
- Credit: The amount debited to the General Ledger Account for the transaction.
Below is an example of the finished Journal Entry in NetSuite.
Note: Both NetSuite and IDI are highly flexible and customizable applications. Reach out to Professional Services to create a customized output format that meets your company’s unique requirements.
Configure Create NetSuite Journal Entry Workflow Action
The NetSuite journal entry creation process uses the Create NetSuite Journal Entry workflow action and is intended to run daily with the Recurring Trigger. You can choose to execute the process at other intervals.
To configure the trigger in Workflow:
- Select CONFIGURE > Trigger.
- Name your trigger and determine if you want the trigger to be enabled for use.
- Click Select Trigger and select Recurring Trigger under the Workflow category.
- Enter a start date and choose Occurs > Daily.
- Click Select Action and select Create NetSuite Journal Entry under the NetSuite category.
- Specify the parameters:
| NetSuite Subsidiary | Enter the numerical value of the NetSuite Subsidiary for which you are creating the journal entry. |
| Output Method | Month End Journal Entries is the standard option and the default. |
| Run Date | This can be set to the current date and time. Select the Smart Data icon and choose System.CurrentDateTime. |
- Click Save.

How It Works
The Create NetSuite Journal Entry workflow action streamlines the month-end process by automatically creating journal entries in NetSuite. It is a single action but it performs the follow operations.
- Checks for new or updated month-end journal entry data in the IDI platform.
- Retrieves and summarizes the General Ledger data from the IDI platform.
- Retrieves the chart accounts from NetSuite and maps them to IDI’s chart of accounts.
- Performs validations to ensure accuracy.
- Automatically creates a new NetSuite journal entry.
- Logs the journal entry data.
Checks for New or Updated Month-End Journal Entry Data
The NetSuite Journal Entry process is designed to operate on a daily basis. The system examines the IDI log data to determine if a log entry exists for the current month. If no log entry is found, the system retrieves the IDI General Ledgers data from the previous month and starts the NetSuite journal entry creation process.
It will also verify whether the data has changed since the last log entry by comparing the total number of transactions, total debit amount, and total credit amount. If the values are the same, the process will complete, and nothing will be sent to NetSuite. If the values have changed, it will initiate the process for updating the NetSuite journal entry.
Retrieve and Summarize the General Ledger Data
Once the system determines that a NetSuite journal entry needs to be created, it retrieves the IDI General Ledger data and summarizes it based on the configured output method.
Retrieve and Map the NetSuite Chart of Accounts
The NetSuite Journal Entry API requires the internal ID of the general ledger account number to create the journal entry. The process retrieves the NetSuite chart of accounts via API to obtain the accounts’ internal ID.
Once received, the system will map the NetSuite Chart of Accounts to the IDI General Ledger accounts by aligning the NetSuite Number with the IDI GL Account Code.
The system will return an error if it is unable to map an IDI GL Account Code to the NetSuite Chart of Accounts.
Perform Validations
Before creating the NetSuite journal entry, the system will perform basic validations such as:
- The total number of records is less than 10,000 (NetSuite requirement)
- The total debits match the total credits.
- Totals for each general ledger account match the values in IDI.
If any of the validations fail, the process will terminate, and an error will be produced.
Automatically Create NetSuite Journal Entry
The system will automatically generate the NetSuite Journal Entry through the API. A single journal entry will be created with multiple general ledger accounts assigned to it.

Log the Journal Entry Data
Once the NetSuite journal entry is created, the system will retrieve the NetSuite journal entry ID. and log the successful transaction in the IDI log table.