Pre-Requisites
This guide assumes you have a working knowledge of Visual Studio and the C# language as well as a basic understand of web services. Before we begin you will need to make sure you have the following items available to you:
- Visual Studio (2019 or higher)
- IDI provided WSDL for the SOAP Web Services
- Web Service User Credentials (Provided by IDI)
- IDI Configured Environment for test and production
- IDI has configured their firewall to allow requests from your IP address.
Visual Studio
This guide assumes you are have installed Visual Studio 2015. You can use different versions but the names and locations of features can change from version to version.
Web Service Credentials
IDI will provide you with a login id and password for authenticating to IDI’s security server. These credentials should have been provided as part of your kick start package, if you did not receive them, you should contact your Account Manager.
Configured Environment
Before you can connect to IDI’s Web Services you must have an environment configured. Configuration includes setting up CostGuard Services, databases, and seed data. Once configured you will be provided an alpha numeric Customer ID usually consisting of 3 digits and 2 numbers (i.e.. IDI01). This ID is used as part of the destination URL for IDI Web Services.
Configuring Your IP Address to communicate with IDI
In order to connect to IDI’s Web Services farm you need to provide the IP Address (or range of IPs) that will connect to the Web Services. IDI will then add those addresses to their whitelist of allowed connections. Speak with your Account Manager for more information on how to request this service.
Preparing your Visual Studio project
The generally excepted way to consume IDIs Web Services from Visual Studio is to add a Service Reference to your project and let it boot strap the necessary objects for you.
Required Frameworks
IDI’s web services make use of the WCF Data Services so your project will need a reference to the namespace System.Data.Service.Client.
Adding the Service Reference
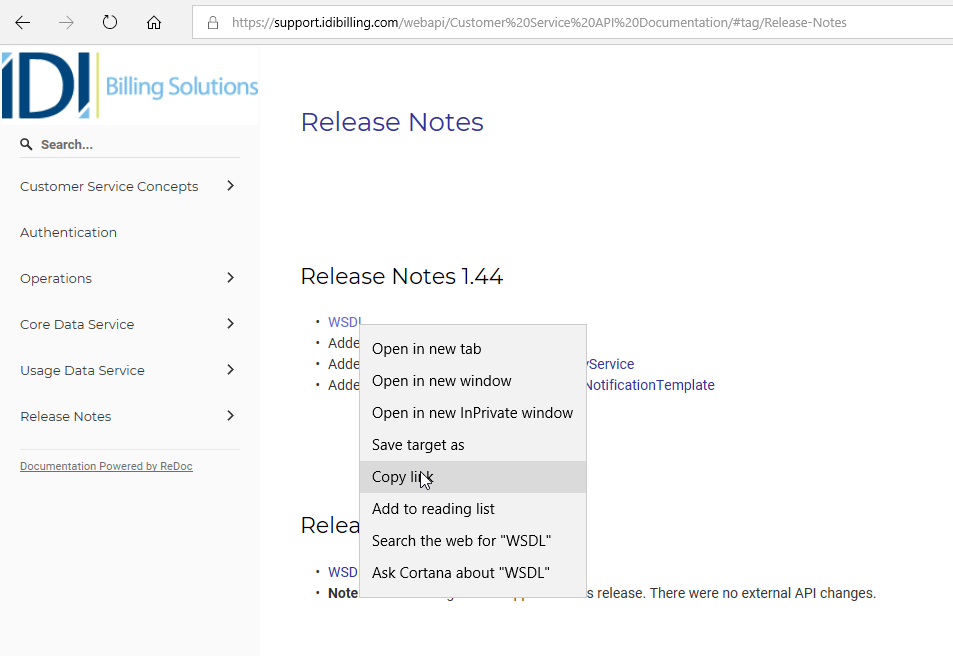
First you must find the URL to the web service WSDL. To do this, open the Web API Documentation and then select the web service(s) you wish to use in your project (in this case we’ll choose the Customer Service) and find the Release Notes section. In the window on the right you will see a link to the web service WSDL file. Right click that link and select copy link address.
Next open your Visual Studio project and find the Service References section in the Solution Explorer. Right click and select Add Service Reference.

When the dialog appears, paste in the link address to the WSDL in the Address box and select the Go button. Give the web service a name space (in our examples we will refer to it as CustomerServiceReference1).

Edit the App.Config
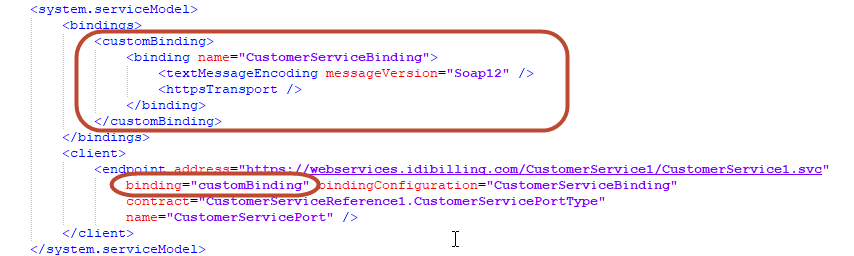
Open the App.Config (or Web.Config) and find the <customBinding> element created for the CustomerService and remove it.
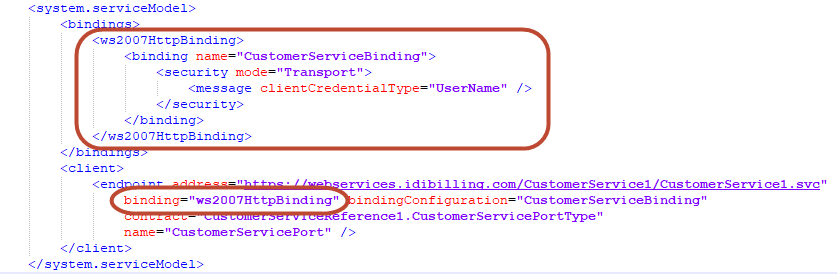
Insert the new binding below. Then find the <endpoint> entry for the new CustomerService under the <client> tag and update the binding type associated with the endpoint to “ws2007HttpBinding”.
Adding additional web service references
When adding additional services replace the customBinding entry and update the new <endpoint> entries with the proper binding type.
Connecting to the Customer Web Service
This section heavily references the sample project included in this article, it is recommended you open this project for reference as you read further.
Obtaining A Security Token
All web service requests require a Token from the security web service. This article does not cover obtaining a security token, but the sample project includes a SimpleWebTokenAccess.cs class with a function to obtain the token called CreateSWT();
Create A Channel Factory
The CustomerService.cs class uses the function GetCustomerServiceChannel(Context) to create a channel factory. This function will return a CustomerServicePortTypeChannel object that you can use to call the web service functions.
Making a Create Customer Request
DISCLAIMER: The following code is only meant to serve as pseudo code and is not intended to be compilable as is. For more specific code examples, please refer to the sample project.
The class CustomerService.cs includes an example of how to create a new Customer in the web service. Making this (and other requests to this service) requires a few steps:
-
- Obtain a Security Token.
Context context = await SimpleWebTokenAccess.CreateSWT();
- Create a Requestor Object. This object is used to pass global data when necessary.
Requestor requestor = new Requestor { AuthorizationToken = "Authorization" }; - Create a Channel using the appropriate endpoint address.
ChannelFactory factory = new ChannelFactory("CustomerServicePort", endpointAddress); CustomerServicePortTypeChannel channel = factory.CreateChannel(); - Create a CreateCustomerReq object. This object contains the details of your Create Customer call. Each operation in the web service has an associated Req object to specify the parameters of the request object (i.e. ModifyServiceReq, ModifyCustomerReq, etc.).
CreateCustomerReq req = new CreateCustomerReq
{
	AccountNumber = "ACME123456789",
	AccountTypeID = 1,
	CPNIInformation = new CPNIInformation
	{
		AccountPassword = "password",
		AuthorizedUserInformation = new AuthorizedUserInformation
		{
			new AuthorizedUserInformationItem { FirstName = "Elmer", LastName = "Fudd" }
		},
		SecurityQuestionID = "15",      //This must be a valid ID in your Core DB
		SecurityQuestionAnswer = "SQA 1"
	},
	CustomerName = "Bugs Bunny",
	PrimaryCustomerContact = new ContactInformationItem
	{
		FirstName = "Bugs",
		LastName = "Bunny",
		Street1 = "1 Main Street",
		City = "Victor",
		State = "NY",
		ZipCode = "14564",
		Country = "USA"
	},
	PrimaryCustomerContactSameAsBillingContact = true,
	CustomerType = CustomerType.Billable,
	AccountStatusID = 1,                //This must be a valid ID in your Core DB
	MarketID = 2,                       //This must be a valid ID in your Core DB
	BillCycleID = 1,                    //This must be a valid ID in your Core DB
	BalanceAgingGroupID = 10001,        //This must be a valid ID in your Core DB
	FinanceGroupID = 10001,             //This must be a valid ID in your Core DB
	AccountReceivableGroupID = 10001,   //This must be a valid ID in your Core DB
	ReportGroupID = 10002               //This must be a valid ID in your Core DB
};
Please note that some values are specific to your environment and should be filled in based on data in your CoreDB.
- Create a CreateCustomerRequest object using the Requestor and Req objects from steps 1 & 4 . This object acts as an envelope for the entire request. Each operation in the Customer web service will have an associated request object (i.e. ModifyServiceRequest, ModifyCustomerRequest, etc.)
CreateCustomerRequest request = new CreateCustomerRequest(requestor, req);
- Use the channel created in step 3 to add the AuthorizationHeader and to make the Create Customer Request with the CreateCustomerRequest object.
using (OperationContextScope scope = new OperationContextScope(channel)) { string accessToken = "$WRAP access_token={context.swt}"; var httpRequestProperty = new HttpRequestMessageProperty(); httpRequestProperty.Headers[HttpRequestHeader.Authorization] = accessToken ; OperationContext.Current.OutgoingMessageProperties[HttpRequestMessageProperty.Name] = httpRequestProperty; // submit the request CreateCustomerResponse response = channel.CreateCustomer(request); return response; } - This request will return a CreateCustomerResponse object with the results of the request. If any errors or issues occurred with the request the Messages property of the response will contain any error information. Below is a basic example of error handling from the call.
//Parse any error messages
if (response.Messages != null)
{
	Console.WriteLine("The following errors have occurred:");
	foreach (var msg in response.Messages)
	{
		Console.WriteLine(msg.MessageMember);
	}
}
else
{
	Console.WriteLine("No errors occurred.");
}
Querying a Customer OData
DISCLAIMER: The following code is only meant to serve as pseudo code and is not intended to be compilable as is. For more specific code examples, please refer to the sample project.
- Obtain a Security Token.
- Tabular data queries are made using OData standard calls to the respective web services. Our example uses Microsoft’s System.Data.Services.Client to connect to the OData end point. You will need to add this reference to your own project.
- Create a URI with the URI to the OData end point you wish to query. OData endpoint URIs use the same base URI as the web service, but have /CoreDataService appended to the path.
//Configure end point URI for data request Uri ODataURI = new Uri("https://api.qaeng.infodirections.com/customer/1Xa/OLB_WIRELESS_AUTOMATION/CoreDataService"); DataServiceContext context = new DataServiceContext(ODataURI); - IDI ODatas require a special Authorization header that includes a Simple Web Token (SWT) for Authentication. Data Services supports adding this during the SendingRequest event.
//Add a pre-send event to insert the Authentication Header
context.SendingRequest += new EventHandler(OnSendingRequest);
This event obtains a SWT and inserts it into the Authorization header of the request.
private static void OnSendingRequest(object sender, SendingRequestEventArgs e)
{
    Context context = await SimpleWebTokenAccess.CreateSWT();

    // Add an Authorization header that contains an WRAP access token to the request.
    string AuthHeader = string.Format("WRAP access_token={0}", context.swt);
    e.RequestHeaders.Add("Authorization", AuthHeader);
}
Creation of the SWT is beyond the scope of this example, but the sample code includes a SimpleWebTokenAccess Class for the purpose of this example.
- Use a DataServiceQuery object to build a query request from the DataService Contact object. Use the name of the OData endpoint as the parameter for this call.
You will also need to construct a local object for Data Services to deserialize the response to. This object should match the properties outlined in the CoreData documentation. An example of GetAccountBalance is included in the sample project.//This is the CustId in the Core database for the account you wish to query it's contacts string customerID = "36532"; //Create a query request and add a filter for CustomerID DataServiceQuery<BalanceSummaryResponse> dsq = context.CreateQuery<BalanceSummaryResponse>("BalanceSummary") .AddQueryOption("$filter", $"CustomerID eq {customerID}");Additional guidance on constructing local objects can be found in the metadata provided by the OData service by pasting
https://api.idibilling.com/customer/1Xa/{YOUR_ENVIRONMENT}/CoreDataService/$metadata into your browser.
Filtering is accomplished with the .AddQueryOption method. This method uses OData syntax to apply filters to your request. These methods can be strung together for multiple filters. - Execution of the request requires a call to the .Execute() method on the DataServiceQuery object and the results should be cast to a QueryOperationResponse object. The object contains a list of result items that should be cast to the local object you created for deserialization.
//Execute the request
QueryOperationResponse queryOperationResponse = dsq.Execute() as QueryOperationResponse;

//Enumerate the response
List<BalanceSummaryResponse> results = new List<BalanceSummaryResponse>();
foreach (BalanceSummaryResponse balanceSummary in queryOperationResponse)
{
	results.Add(balanceSummary);
	Console.WriteLine($"Balance of Customer ({balanceSummary.CustomerID}): ${balanceSummary.CurrentBalance}");
}
Using The Sample Application
When loading the IDIBilling.Samples.GettingStarted application for the first time you will need to configure it for your environment. Properties specific to your web services environment are located within the application config file. For instance:
<appSettings>
  <add key="BaseAddress" value="api.idibilling.com" />
  <add key="Environment" value="" />
  <add key="Domain" value="" />
  <add key="WebServiceUserName" value="" />
  <add key="WebServicePassword" value="" />
  <add key="ClientSettingsProvider.ServiceUri" value="" />
</appSettings>
In addition, please refer to the README.md file included with the sample application.
Code Sample Project
The sample project can be downloaded from the link below:
Getting Started with IDI Web Services Sample Project - Create a URI with the URI to the OData end point you wish to query. OData endpoint URIs use the same base URI as the web service, but have /CoreDataService appended to the path.