About Customer Portal
IDI’s Customer Portal is an intuitive digital platform that lets your subscribers be more self-sufficient in managing their bills and helps you significantly reduce support costs and call volumes. Subscribers can quickly and easily register for a customer portal account and then have access to the following self-service functions:
- View summary account information and manage passwords.
- View service and product details for an account.
- View current and historical usage data.
- View bills and download PDFs.
- Manage information related to contacts, notifications, and their user profile.
- Make one-time payments and set up auto-pay accounts.
- Manage paperless billing options.
The portal is designed for optimal display on desktop, tablet, and mobile screen sizes. It supports all browsers; however, Edge, Chrome or Safari is recommended for best results. Any device with a web browser is supported. Specific interface experiences are provided for handheld, tablet, and desktop form factors.
Flexible configuration options let you control branding and subscriber capabilities on a market basis. An open framework and APIs support integration to your existing systems and third-party applications.
All portal configuration and user administration is done in Customer Care. This means your customer service representatives are no longer required to have special permissions in the Security module to manage customer accounts.
To facilitate transitioning from OnlineBill to Customer Portal, your subscribers will not have to re-register their OnlineBill accounts or reset their passwords. OnlineBill accounts are automatically migrated to the Customer Portal. And you can use both applications in production at the same time to further ease the transition.
Note: Customer Portal is available as a purchasable feature and is not included in the SaaS hosting fee. A fully functional preview version of the application is available to all customers for evaluation; however, a message will be displayed on every page indicating the version is for preview only.
This article focuses on how to set up and administer the Customer Portal application.
Tours and FAQs
- FAQs – Answers to frequently asked questions.
- Quick Tours:
What’s New
| Version | Enhancements |
| 25.11 | New page for viewing and exporting customer portal users
The Administration menu has a new Users option that displays a page for viewing and exporting Customer Portal users. |
| 25.8 | Single Sign-On and Customizing the Portal View for Subscribers
This release provides enhancements to improve administrators’ and end-users’ overall experience:
Setup requirements for SSO are covered in the Customer Portal Administration section. To see how SSO works, refer to How SSO Works. Service Summary Export Subscribers can now export a list of their services and associated features directly from the Plans & Services page in the Customer Portal. This is equivalent to the functionality that has been available in OnlineBill. While this enhancement is provided with a Customer Portal platform deployment, it is still dependent on having IDI platform version 25.8. |
| 25.4 | Chat integration
Chat integration provides a way for subscribers to access support and reduce call volumes to support representatives. Note: Currently, TeamSupport is the only supported chat provider. If you need to configure a different provider, contact your Account Manager. Administrators can configure TeamSupport as the chat provider for a profile. Subscribers can use TeamSupport chat capability from within Customer Portal. |
| 25.3 | Traversing corporate structure on corporate accounts
The portal view for corporate accounts has been enhanced to facilitate traversing the entire corporate structure. The Account Summary page for any parent-level account (one that has child-level accounts) has a new navigation option for viewing the corporate structure. It opens a new Corporate Account page. From there:
Not Invoice Responsible (NIR) users will not have access to the Manage Wallet, Manage Autopay, and Make Payment pages. This restriction is in place to prevent misapplying payments, which could lead to issues requiring customer support. |
| 25.2 | Ticket integration and helpful links
These self-service enhancements can help you reduce call volume and related expenses for your service centers.
Account lock indicators for Port Outs and SIM Changes In support of FCC compliance guidelines, this lets subscribers indicate when SIM changes and/or port outs are prohibited on their accounts. This is similar to the account lock functionality for Customer Care provided in the 24.11 release. With this functionality:
Note: These settings and corresponding indicators are for information only to provide a warning not to perform these actions. They do not prevent users from performing these actions. For more on this, refer to the article on Account Lock Indicators for Port Out and SIM Changes in the IDI Knowledge Center. |
| 24.11 | Broadband labeling
In compliance with FCC order 22-86 for broadband service providers, the Plans & Services page in Customer Portal provides a visual indicator and a clickable link when a service has a broadband label. The link is named View Broadband Facts. Clicking it displays the corresponding broadband label. |
| 24.1 | Initial release |
Prerequisites
- The Customer Portal is a platform application, meaning it is not subject to versioning. The initial release is available as of January 2024. IDI platform version 24.1 and higher is required for administrative functions in Customer Care.
- Paymentus is the only supported payment processor for Customer Portal, so you’ll need to establish a relationship with Paymentus prior to deploying this functionality.
- Customer Portal requires you to have the Communications web module enabled to run in your system. If you don’t currently use Communications, contact your account manager to arrange for this.
Licensing
Customer Portal is available with two licensing options:
- Standard provides standard electronic bill payment and presentment. Existing OnlineBill licenses will automatically convert to this license option.
- Self-Service includes standard capability plus these self-service capabilities:
- Tickets integration
- Chat (Team Support)
- Manage Feature (future capability)
Using the portal in Preview mode (with no license) provides access to standard and self-service capabilities with a preview banner on the application.
Work with your account manager to arrange for a licensing to meet your requirements.
Setup
There are several security permissions related to managing Customer Portal functionality. In addition, you’ll need to set up a URL by which your subscribers will access the portal.
Permissions
Users responsible for managing profiles and subscriber accounts will require several permissions related to Customer Portal functionality.
| I need to … | Permission | Delivered Role |
| Log on to the portal as a subscriber.
Note: Existing OnlineBill users can log into Customer Portal with their existing OnlineBill credentials. Upon upgrade to IDI platform 23.12 or higher, the Customer Portal role will be added to existing OnlineBill users, so they will not require new credentials. |
|
Customer Portal User |
| Configure and customize profile(s) in Customer Care to meet appearance/behavior requirements for different markets.
Note: Both Customer Portal & Customer Care roles are required, if using delivered roles. You can create a single role that has all needed permissions. |
|
Customer Portal Administrator |
|
Customer Care Admin | |
| Manage customer portal accounts as a customer service representative (unlock account, reset password, edit bill notification, edit email address, disable user). |
|
Customer Care Admin |
| Impersonate a customer portal user |
|
Customer Portal Administrator |
| Create and manage notification templates related to Customer Portal |
|
Communications Admin |
URL for Subscriber Access
- For customers that are hosted in IDI’s SaaS data center, the URL to login to a customer portal environment will be:
https://myportal365.com/<environment name>/login
A service request can be opened to set an alias that can be used in place of the environment in the URL string. The service request should be assigned to the Networking (Saas) team using the Config Item on the Service Request form. This supports a more branded URL. For example: https://myportal365.com/IDIBillingSolutions/login
- For managed service customers, the URL will work the same way; however, a sub-domain specific to the customer will be required in the URL string, following this format:
https://<sub-domain>.myportal365.com/<environment name>/login. - For IDI production environments (for training and demo), the URL to login to a customer portal environment will be:
https://idi.myportal365.com/<environment name>/login
Profile-specific login URLs
When different login logos or color themes are being used in your Customer Portal profiles, the login URL will need a query string appended to properly display the profile-specific logo and button color. Start with your login URL and append ?loginProfile=<profile name>. Note that the URL cannot have spaces, so if there is a space in your profile name, replace the space with %20.
Note: If you’re coming from OnlineBill, this URL configuration takes the place of market and environment overrides that were available for these admin-level settings: Configuration Settings, Image Management, and Menu Configuration.
Examples:
- Login URL for Profile name ‘Southwest’ for environment ABC01_P_Production: https://myportal365.com/ABC01_P_Production/login?loginProfile=Southwest
- Login URL for Profile name ‘Southwest Broadband’ for environment ABC01_P_Production: https://myportal365.com/ABC01_P_Production/login?loginProfile=Southwest%20Broadband
- Login URL for Profile name ‘Southwest Broadband’ for alias ABCommunications (replaces environment): https://myportal365.com/ABCommunications/login?loginProfile=Southwest%20Broadband
If you have different profiles, but the logo and theme are the same across your profiles, the additional query string is not needed in the URL. Leaving a profile query string off the URL will show the login page with the logo and theme on the Default profile.
Prerequisite Setup for Single Sign-On – OpenID Connect Authorization Provider
SSO requires an OpenID Connect Authorization Provider to be set up in the Security web module in Authorization Provider configuration.
What is OpenID Connect (OIDC)
OpenID Connect is an identity layer built on top of the OAuth 2.0 protocol. It allows web applications to verify users’ identities and access basic profile information. Authentication is handled by an identity provider, such as Google, Microsoft, Ping, Okta, or Auth0.
Typical SSO Flow using OpenID Connect.
- A subscriber attempts to log in to Customer Portal using your preferred authorization provider.
- Customer Portal redirects them to the authorization provider.
- The subscriber authenticates with the provider (e.g., by entering their username and password).
- The provider authenticates the subscriber and sends an ID token to the Customer Portal, containing information about the subscriber.
- Customer Portal verifies the subscriber’s identity.
- If verification is successful, access to the Customer Portal is granted.
OpenID Connect Authorization Provider Setup
This must be done by an IDI associate. Submit a service request with the following information.
- OpenID Connect Authority URI: Base address for the OpenID Connect provider.
- IDI Customer Account Claim: This customizable claim identifies the IDI account number and links a customer portal user to the corresponding IDI account. It’s required if you want the system to automatically create a Customer Portal user upon their first login, provided one does not already exist. The value you use depends on whether your company uses a third-party application, such as Salesforce, where subscribers may move from that portal to the IDI Customer Portal. In such cases, use the key employed by the third-party provider for the IDI customer account number.
- Force Single Sign-out: Determines whether subscribers are directed to a confirmation page or directed to your organization’s sign-out page.
Important Considerations:
- You can have only one OpenID Connect provider.
- OpenID Connect providers are associated with a specific Customer Portal user domain to ensure secure and validated access. The system validates these providers for use with the IDI Customer Portal.
Guidelines for Seamless Log in to Customer Portal from Another Application
If you would like to have subscribers seamlessly log in to the Customer Portal from a third-party application, like Salesforce or your own app, redirect them to a URL similar to the following:
https://myportal365.com/{Environment Identifier}/api/v2/oidc/{Provider Identifier}
- Environment Identifier: This is the IDI environment you want subscribers to log in to. Typically, it follows the format of IDI01_P_PRODUCTION. However, you have the option to override this value when configuring the Customer Portal.
- Provider Identifier: This value is generated by IDI during the configuration of your Authorization Provider above. IDI can supply this value to you.
Customer Portal Administration
Your Customer Portal administrator configures and customizes the user (subscriber) experience by managing customer portal profiles. Profiles let you define the default user experience and optionally define alternate user experiences based on the subscriber’s market.
Customer Portal is delivered with a default profile with an out-of-box configuration that can be used for testing purposes without any additional setup. The out-of-box configuration on the default profile provides a user experience with IDI branding and coloring in the application. This lets any customer portal user log in and experience the portal without any configuration. The default profile can be edited, renamed, or copied. Note: It cannot be deleted.
In a simple implementation, the default profile can be edited and used for all subscribers.
When the customer portal needs to look or function differently for different user segments (distinguished by IDI platform Markets), additional profiles can be created and associated to a grouping of markets to override the default user experience.
You can create as many profiles as needed to accommodate your various markets. Access to profile setup is via the Customer Care MANAGE > Customer Portal Administration menu item.
Note: See Setup > Permissions for permissions needed to manage profiles.

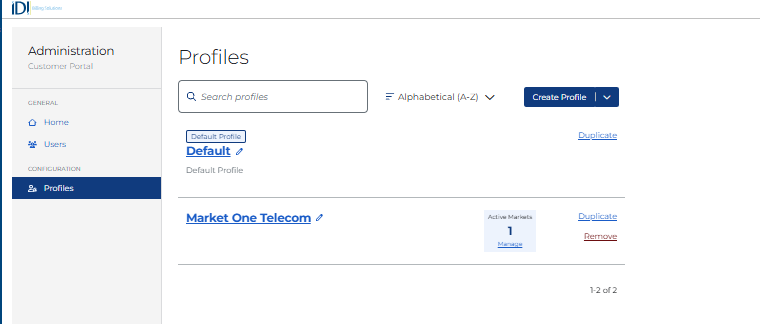
The Customer Portal Administration menu item opens the Administration page where you can see how many profiles currently exist.
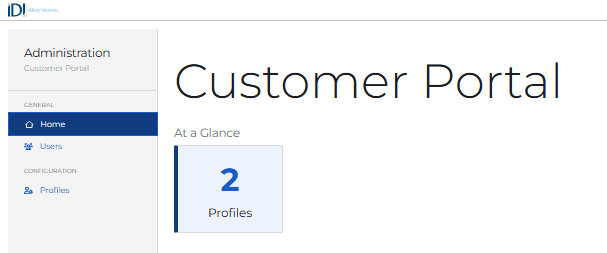
Clicking Profiles from the left navigation or clicking the tile displaying the number of profiles opens the Profiles page.
Clicking Users displays a page for viewing and exporting Customer Portal users.
Profile Administration Basics
The Profiles page provides an intuitive interface for you to view and manage your Customer Portal profiles. From here, you can:
- Create, edit and remove profiles
- Search and sort by profile
Creating New Profiles
You can create a new profile by starting with the out-of-box default configuration or by duplicating an existing profile.
- To start with the out-of-box default configuration, either choose Create New Profile from the Create Profile drop-down menu or simply click Create Profile.

This opens the New Profile page with default values. The logos, theme, top bar color, notification templates menu configuration, etc. will all be set to the out-of-box configuration with IDI branding. You’ll be required to step through each tab and finish by saving and completing the configuration on the Support Menu tab.
- To duplicate an existing profile, click the Duplicate link for the profile, or choose Duplicate Existing Profile from the Create Profile drop-down menu. Choosing Create Profile > Duplicate Existing Profile displays a dialog that lets you choose an existing profile from the drop-down menu or enter a text string to find the existing profile.

In this case, you’ll start with the exact configuration of the selected profile (except for the associated markets). This immediately creates a new profile and opens it for editing. You can go to each tab and edit information for the new profile as needed. Note: If you decide to discard the duplicated profile, you’ll need to go to the Profiles page and remove it by selecting the associated Remove option.
Completing Profile Configuration
When you choose to create a new profile or edit an existing profile, you begin on the New/Edit Profile page open to the Basic Info tab. Enter a unique name (required) and description (optional). Then click through the other tabs to complete the setup.
Notes:
- Each tab has a Continue to … button to facilitate moving to the next tab. For example, the Basic Info tab has a button for advancing to the Settings tab.
- The selections you make on each tab will persist as you advance from one to the next; however, they will not be saved and the profile will not be available in the Profiles list until you choose to do that by clicking Save & Complete.

Settings
The Settings tab lets you customize the look and feel of the portal and grant or block subscribers’ access to certain functions.
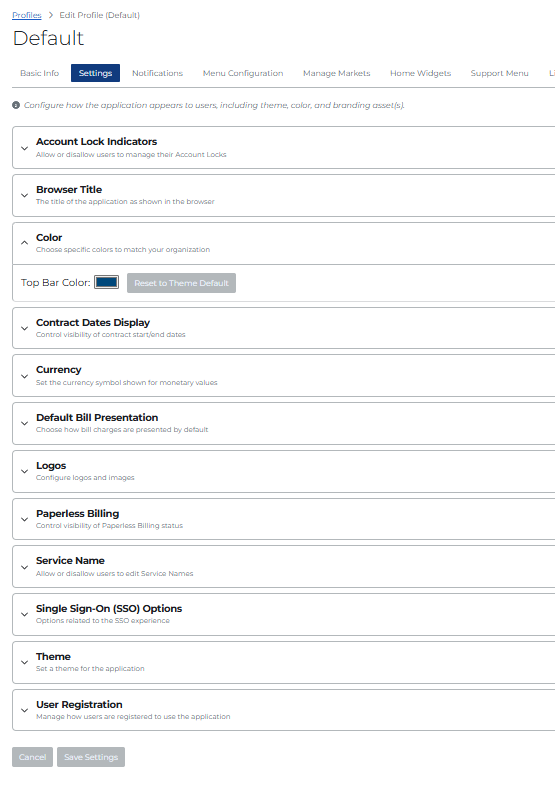
| Account Lock Indicators | This governs subscriber access to account lock settings. It defaults to disabled, preventing subscriber access. Toggle the setting to enable access for subscribers that use this profile. To toggle, click (expand) the setting to display a check box labeled Account Locks Manageable by Subscribers. Check the box to enable access. Uncheck it to disable access.
For more on this, refer to the article on Account Lock Indicators for Port Out and SIM Changes in the IDI Knowledge Center. |
| Theme | This lets you set the theme color for buttons, tabs, and labels. The default is blue. You can change the theme color to gray. The preview on the right lets you see what your chosen theme color will look like. |
| Color | This lets you set the color for the browser top bar. It defaults based on your selected theme color. It can be customized by manually adjusting the color gradient and clicking a pixel in the box, or by using the controls at the bottom. The controls at the bottom provide three options to type in the exact color:
If you change the color, the Reset button lets you revert back to the default color for your selected theme if necessary. |
| Browser Title | The browser title defaults to Customer Portal. You can customize the title by entering a new one in the text box. If you change the title, the Reset button lets you revert back to original one. |
| Logos | Select custom logos for the log-in form, top bar, and favicon (browser icon on the top bar that represents the brand). See Selecting Logos below for details. |
| Currency | Set the currency symbol as appropriate for the market. It defaults to no symbol. You can specify a symbol as needed. |
| Default Bill Presentation | The drop-down menu lets you specify how bill charges are arranged: Charges by Service (default) or Charges by Category. |
| Contract Dates Display | This lets you choose to show or hide contract start/end dates. It defaults to hide dates. |
| Service Name | This lets you choose to make service names editable by subscribers. The default is to not let subscribers edit service names. |
| Paperless Billing | This lets you choose to show or hide paperless billing status for the account. If you choose to show the status (default), you can specify opt in and opt out messages, and choose to let or not let subscribers change their paperless billing status. If you choose to not show the status, the other options are hidden (not available).
|
| User Registration | This lets you choose whether or not to let subscribers self-register. |
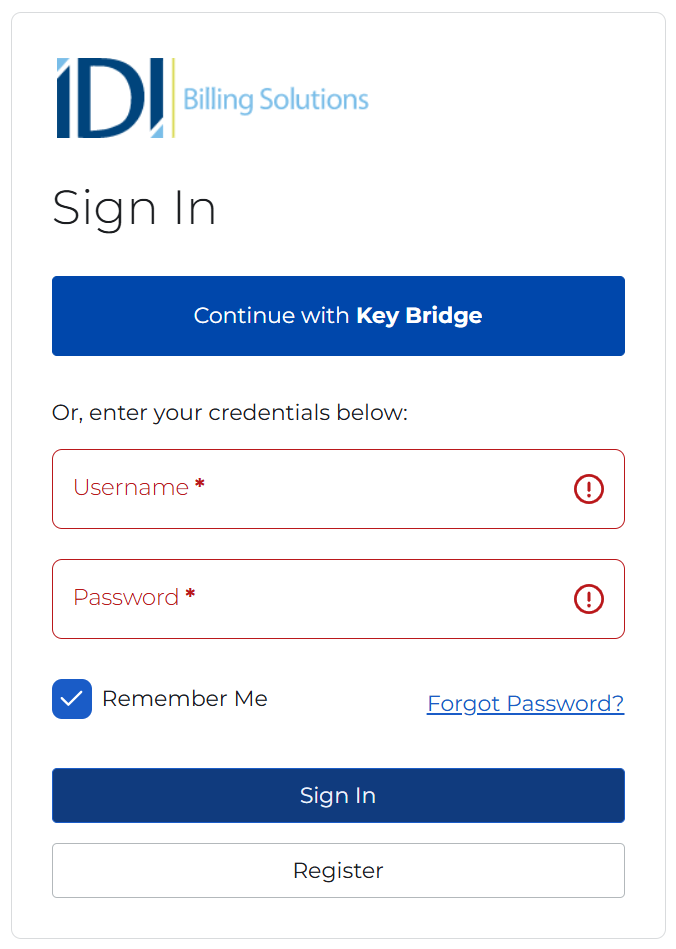
| Force Single Sign-On | These options let administrators force subscribers to log in with OpenID Connect provider credentials.
|


Selecting Logos
Note: You’ll need to store logo images where you can browse to and select them as applicable during profile setup. Follow these sizing guidelines for logo images.
| Logo | Max. Pixel Dimensions | Max. Size |
| Login | 64 X 250 | 2 MB |
| Top Bar | 64 X 175 | 2 MB |
| Favicon | Use a square image – 192 X 192 recommended | 2 MB |
Expanding the Logos option displays a dialog for selecting logos.
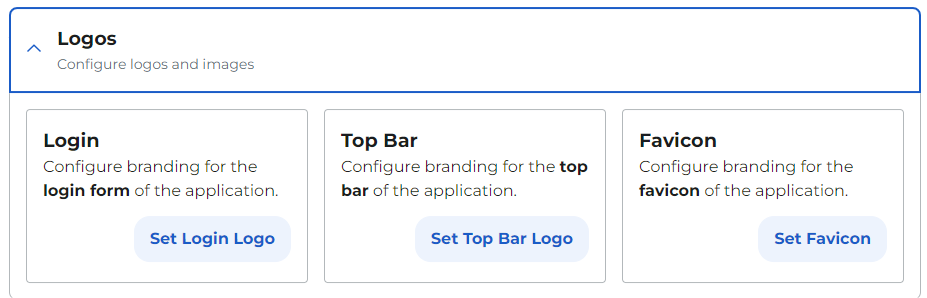
Clicking on any Set … Logo button displays a form with logo specifications and a button to upload a new logo image.
![]()
Clicking Upload New Logo displays a file explorer for browsing to the logo image.
Notifications
Email notifications are sent from Customer Portal to subscribers for:
- Account registration
- Request password reset
- Password changed
- Account information changed
Email formats and content are defined by notification templates set up in the Communications web module. System-defined templates are provided for you; however, you can create your own templates via the Communications web module as needed. The respective drop-down menus on the Notifications tab are populated based on the template type specified when the template is created in the Communications web module. This tab also provides a link for navigating to template configuration in Communications so you can configure new templates or edit/customize the default templates. Note: Managing templates requires Communications Admin permission.

Note: Customer Portal uses the IDI Desktop Client BackOffice Management OnlineBill Mailer wizard and templates for sending subscribers bill notifications when their online bills are available. Refer to the Send Billing Notifications article for details.
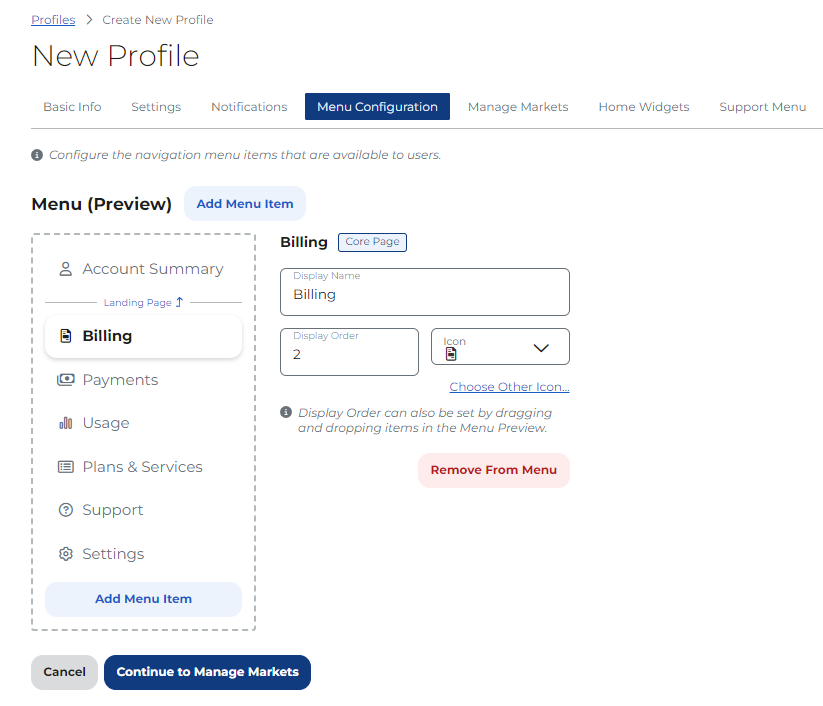
Menu Configuration
This tab lets you arrange the content of the left navigation pane (menu) in the Customer Portal subscriber view. You can see a preview of the default (or current) setup on the left. Clicking on a menu name in the preview provides a form on the right where you can:
- Change the menu name. Note: For menu items that have sub-menu items (for Example Billing > Bill History), you can only change the top level menu item (in this case Billing).
- Move the menu item up or down in the order. You can use the Display Order field or drag and drop the menu item. Note: The top menu item becomes the landing page. Below Account Summary will be the landing page.
- Select a different icon to represent the page the menu item displays. You can select an icon from the drop-down list or choose a new icon via the link (see below).
- You can also remove a menu item and make the associated page unavailable to subscribers. If you choose to remove a page, you can add it back using the Add Menu Item option. Note: If you remove a menu item with sub-menu items, those items are removed as well (and added back when applicable).
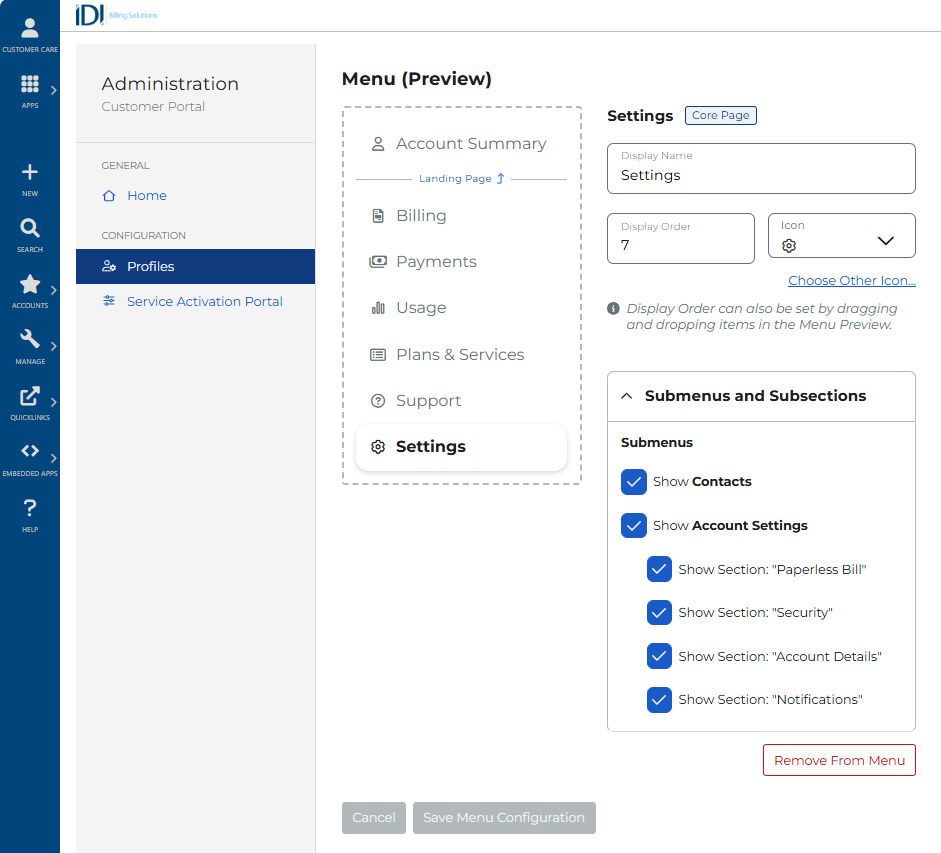
- The Settings section lets you tailor the subscriber’s Settings view on a profile basis by selectively showing/hiding these elements: Contacts and Account Settings submenus, and Paperless Billing, Security, Account Details, and Notifications subsections. See Customizing the Portal Settings View below for details.
Icon Selection
A subset of icons is provided in the Icon drop-down menu. If you don’t find a suitable one there, you can select a different icon by clicking the Choose Other Icon link. This displays a form for entering the icon code (Font Awesome identifier).
The example below shows the code for dollar sign ($). If you don’t know the code, click the available icon codes link to open an article on the subject in the IDI knowledge center.

Customizing the Portal Settings View
In the Setting menu configuration, administrators can enable/disable:
- Submenus:
- Contacts
- Account Settings
- Account Settings Subsections:
- Paperless Bill
- Security
- Account Details
- Notifications
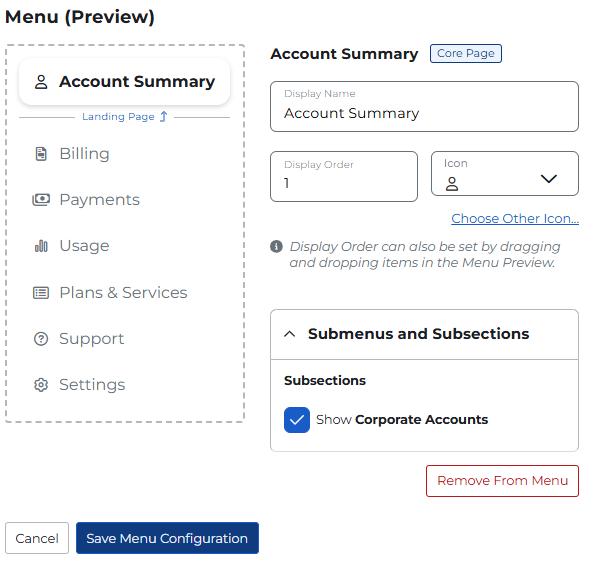
In Account Summary menu configuration administrators can enable/disable the display of corporate accounts.
Manage Markets
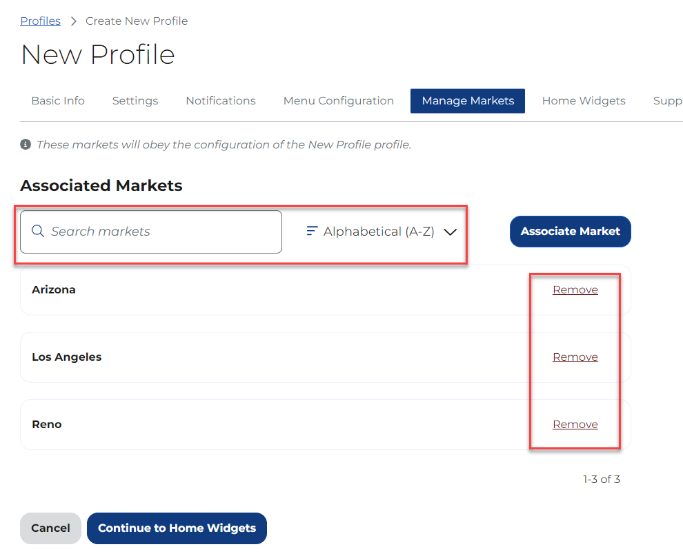
This lets you manage (add/remove) the markets on this profile. Markets are configured in IDI platform Admin Console > Data Management > Market Configuration.

To add (associate) a market to the profile, click Associate Market. This displays a form that lists active markets not already associated to the profile. Select a market then click Add.
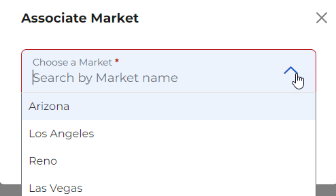
You can add as many markets as needed (one-at-a-time). The current markets are listed in the Associated Markets list. If the list is large, you can make it easier to find a specific market (or group of markets) using the search field. You can also toggle the sorting order (A-Z or Z-A) and remove markets as needed.
Home Widgets
This lets you choose the widgets to display on the portal landing page (top page as selected on the Menu tab). Click the associated toggle button to display or hide a widget. The preview on the right lets you see the adjusted presentation as you toggle widgets on or off.

Support Menu
This lets you set up contact/support information displayed on the top bar of every portal page and save the configuration when you’re done.
In the Messaging field enter the text for introducing the contact information displayed when you click the Need Help? Contact Support link. You can use the default text provided for you or override this text with your own.
Then enter the support web site, phone number, and email in the respective fields. You can preview the result on the right.
When you’re finished, click Save & Complete.

Tickets
This tab lets you define ticket types that correspond to support request types in the Customer Portal. See Integrating Tickets.
Links & Ticket Notes
This tab lets you select a journal type to support adding notes (journals) to existing support requests. It also lets you add links (URLs) on the Support page to give your subscribers quick access to helpful information. See the respective sections:
- Integrating Tickets
- Adding Helpful Links
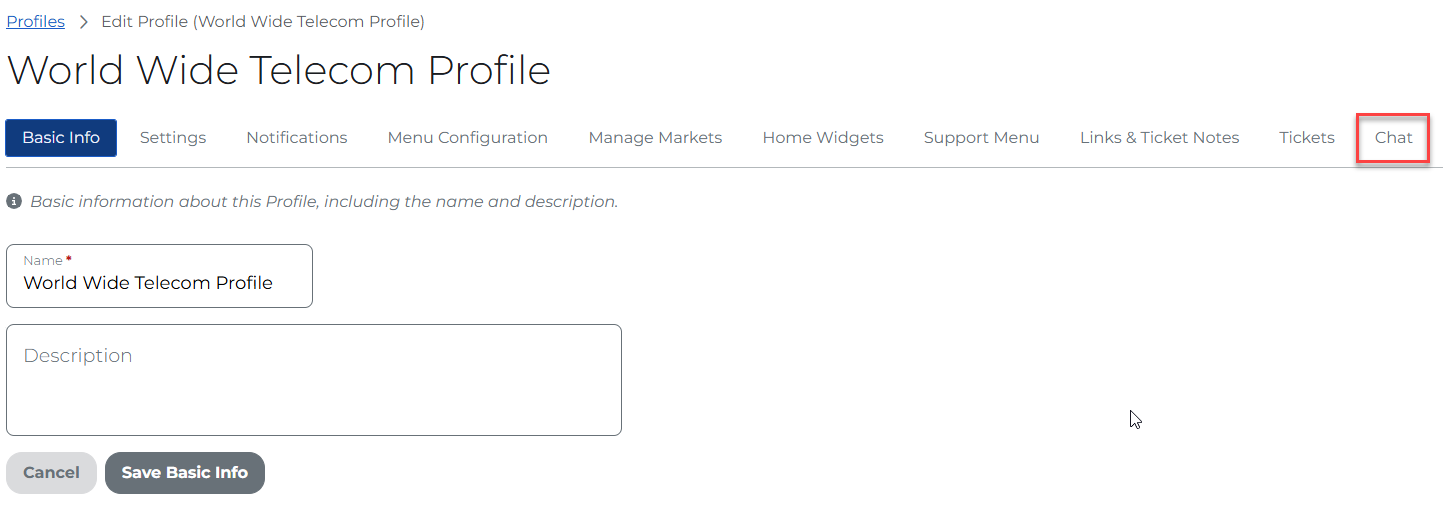
Chat
Chat integration lets subscribers access support and reduce call volumes to support representatives.
Administrators can configure TeamSupport as the chat provider for a profile. Subscribers can use TeamSupport chat capability from within Customer Portal. See Chat Integration later in this article.
Integrating Tickets
This is done on the Tickets and Links & Ticket Notes tabs. Some preliminary setup is required in Admin Console Data Management to specify which ticket types can be opened by subscribers. In addition, you may want to use workflow triggers in conjunction with the support request note functionality in portal profile configuration to send email notifications when notes are added to a request. For more on this, refer to the Email Notifications for Support Request Notes article in the IDI Knowledge Center.
Ticket Setup in Admin Console Data management
Specifying Which Ticket Types Can Be Opened by Subscribers
Administrators can specify one or more ticket types that subscribers can submit as a support request. Ticket types are configured in the Journal Types table with Journal Class = Trouble Ticket in Admin Console Data Management. Note: Only ticket types with the Use in OnlineBill property set to True (checked) will be viewable by subscribers in the Customer Portal.

Note: Other ticket-related parameters that must be set up in Admin Console Data Management include Journal Status and Ticket Category Configuration. This configuration is covered in the Tickets web module help.
Configuring Support Request Types
The Tickets tab lists existing support request types. From here you can manage the existing request types and add new ones. Each support request type has a badge indicating whether or not it is enabled. Disabled support request types will not be available for Customer Portal users to select from the drop-down menu to submit a new support request.
Selecting an existing support request type from the list in the left panel displays the current configuration in the right panel. From there you can edit the current configuration as needed. The Enabled check box lets you enable/disable individual support request types as needed.
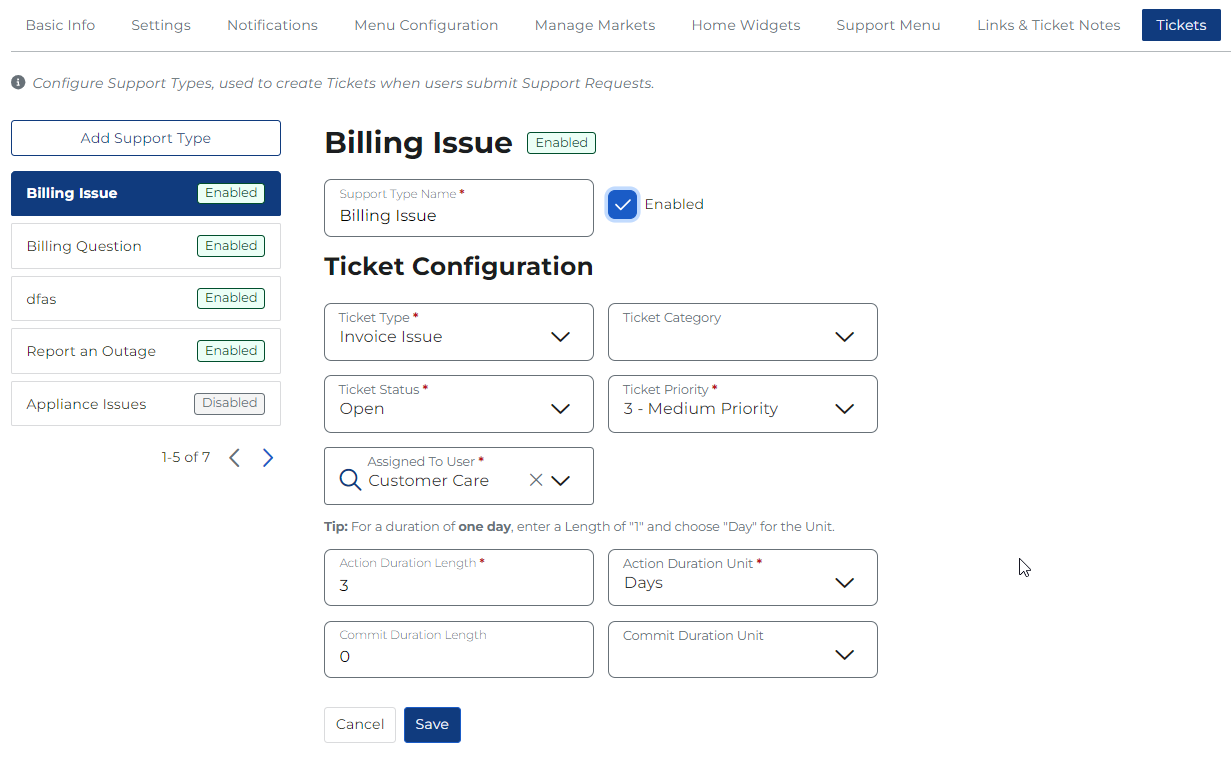
Adding a New Support Request Type
Click Add Support Type to open the New Support Type area.
Start by specifying a name for the new support type. You can choose to enable it (make available for subscribers to select) or leave it disabled at this time. After specifying the Name, proceed to Ticket Configuration. This configuration defines the values available to subscribers when they open a support request through their portal. Fields with red asterisk are required:
| Ticket Type | This selector is populated with journal types where journal class = Trouble Ticket and set up to Use OnlineBill in Admin Console Data management. |
| Ticket Category | This selector is populated with ticket categories as configured in Admin Console Data Management based on the selected ticket type. |
| Ticket Status | This selector is populated with journal statuses with journal class = Trouble Ticket in Admin Console Data management. |
| Ticket Priority | This selector is populated with ticket priorities in Admin Console Data Management based on the selected ticket type. The priority includes impact, urgency, and priority. |
| Assign To User | Select the support person/group responsible for tracking the ticket from submission through resolution. |
| Action Duration Length/Unit | The values in these fields are used to calculate the Action and Commit dates for the ticket. |
| Commit Duration length/Unit |
Click Save when you’re done. This brings you back to the Tickets tab with the new support type listed on the left.
Support Request Notes
The Links & Tickets Notes tab lets administrators select the journal type to use when a subscriber adds a note to a support request. Note: It is recommended to create a unique journal type specifically for this purpose (for the notes on the portal tickets).
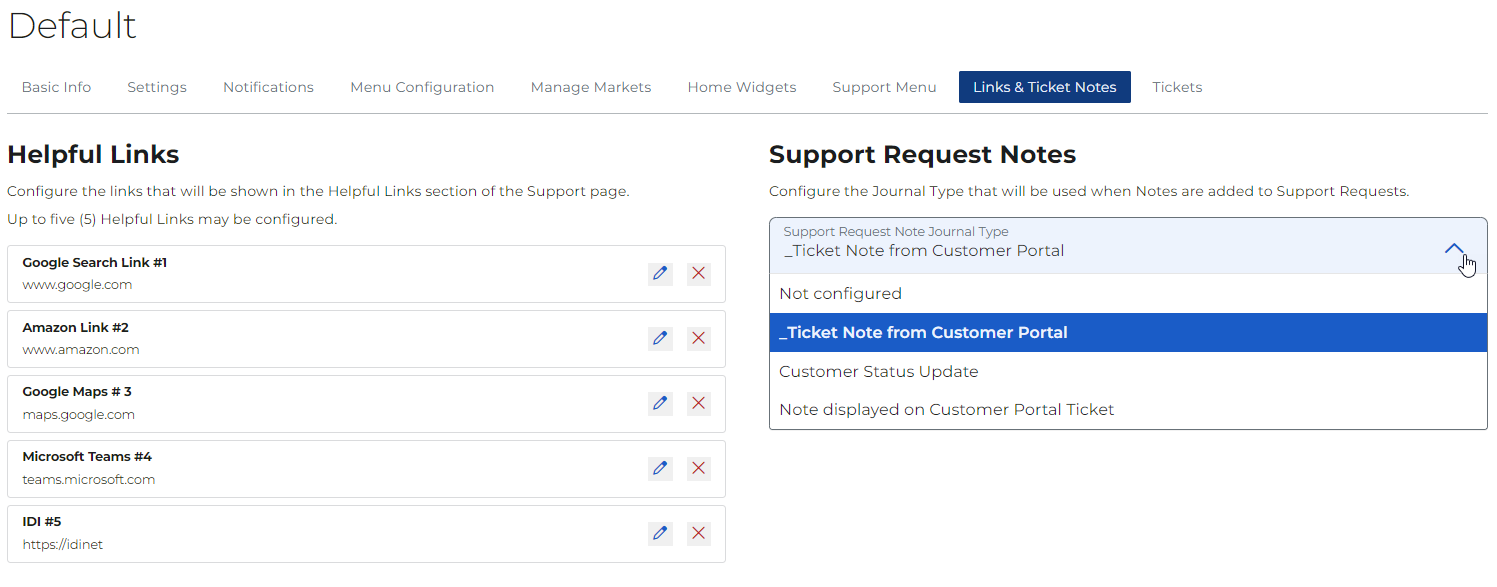
Selecting a Journal Type to Support Adding Notes
This is required to let subscribers add notes to support requests. The drop-down menu is populated with journal types configured in the Journal Types table in Admin Console Data Management where Journal Class = Trouble Ticket and the Use in OnlineBill property is True (checked).
Note: If a Support Request Notes journal type is not selected from the drop-down menu, subscribers will not be able to add notes to support requests.

Email Notifications for Support Request Notes
IDI recommends you use workflow triggers in conjunction with the support request note functionality in portal profile configuration to send email notifications when notes are added to a request. This is covered in the Email Notifications for Support Request Notes article in the IDI Knowledge Center.
Adding Helpful Links
You can add up to five links to be displayed on a subscriber’s Support page. Subscribers can then use these links to access a web site with helpful information.
This is done on the Links & Ticket Notes tab in the profile configuration. To add a new link, click Add Helpful Link. This button is only available when there are less than five existing links.

To edit an existing link, click the associated edit (pencil icon in the left panel).
In either case the add/edit dialog is displayed for specifying the link text and URL.

Integrating Chat in Customer Portal
You can integrate chat capability in Customer Portal on an individual profile basis. Note: Currently, TeamSupport is the only supported chat provider. If you need to configure a different provider, contact your Account Manager.
Below describes how to set up chat integration via Customer Portal Administration in Customer Care. Complete details regarding Customer Portal are available here:
Customer Portal – Knowledge Center
Chat Provider Configuration
A new Chat tab is available in the Customer Portal Profile setup page. This tab lets you specify a chat provider and provides the applicable chat provider configuration fields. Note: This setup is only available on existing (previously saved) profiles. The tab is visible but not functional until the profile is saved.
To set up chat functionality for an existing (saved) profile, click the Chat tab. Start by selecting a chat provider.
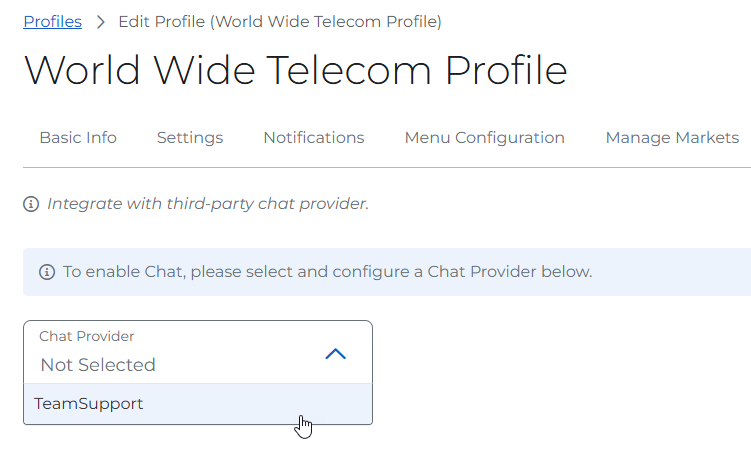
Making this selection displays additional fields as needed to configure the selected chat provider. For TeamSupport, these fields let you specify widget IDs (unique identifiers) that correspond to URLs for displaying a chat bubble on portal pages.
You can specify separate IDs (and thus different URLs to display the chat) for authenticated pages available after you log-in and non-authenticated pages available before log-in (i.e., user registration, log-in, and forgot password).
Note: The base URLs for TeamSupport integration are pre-configured and managed by IDI. They can be updated by IDI as needed.

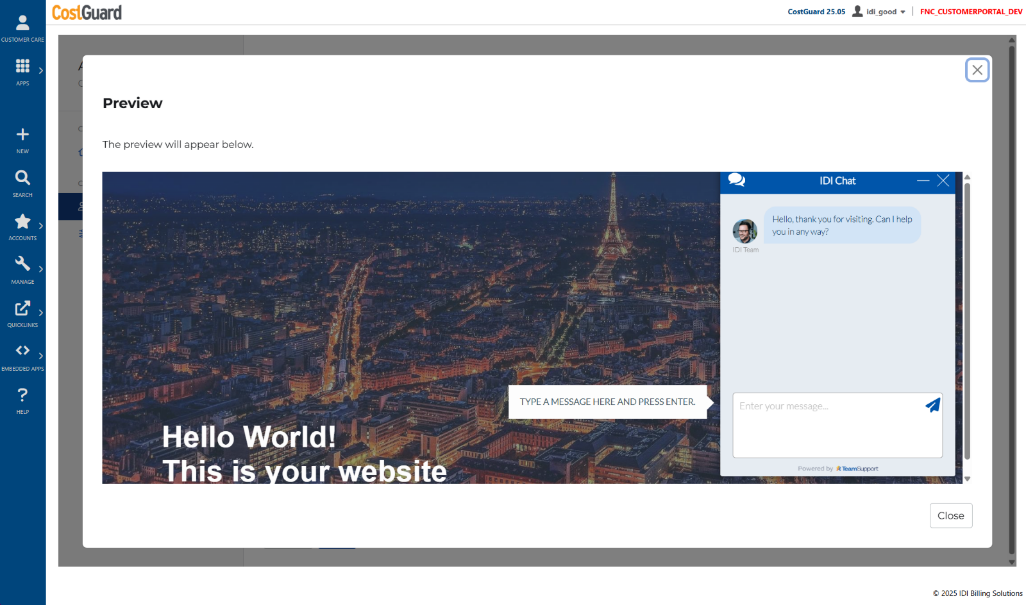
Enter a TeamSupport Widget ID in the field directly under the Chat Provider Settings header. This ID corresponds to the URL to display the chat on authenticated pages (for logged in users). Your TeamSupport administrator can retrieve Widget IDs from the TeamSupport (snapengage) web site. The Click here for help link provides instructions for this.
When you enter the Widget ID, the system verifies that it produces a valid URL before saving it. You’ll see a confirmation when the ID has been successfully verified, and the Preview button at the far right of the field will be enabled.

Clicking Preview will show you a preview of the chat.
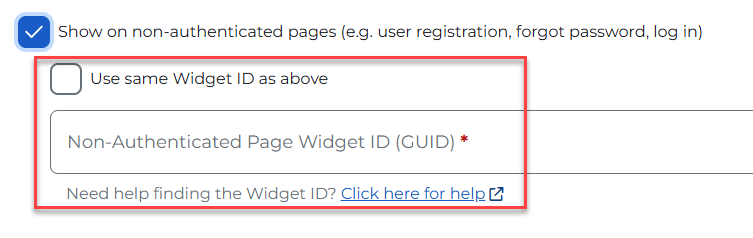
The Show on non-authenticated pages checkbox lets you choose whether or not to display a chat on non-authenticated pages (as well as authenticated pages) and is checked by default. This gives you the option to either use the same ID for non-authenticated pages or specify a different ID to point to a different URL for non-authenticated pages.
- If you want to point to the same URL for authenticated and non-authenticated pages, leave both the Show on… and Use Same Widget as above checkboxes checked.
- To point to a different URL for non-authenticated pages, leave the Show on… checkbox checked and uncheck the Use Same Widget as above checkbox. This displays an additional field for entering a different widget ID. This field operates the same as the above widget ID field with respect to validation and preview.
Validation Notes:
- If both Widget IDs produce valid URLs, you can save the TeamSupport configuration without issues.
- If either Widget ID results in an invalid URL:
- A clear error message appears, telling you which Widget ID is incorrect.
- You cannot save the configuration until the issue is fixed.
Disabling TeamSupport Chat Provider
When TeamSupport is set up as your chat provider on a profile, you can disable it by clicking the red Disable TeamSupport button. Note: This completely removes the configuration from the profile. All fields (selected provider and widgets) will be cleared. To reconnect, you’ll need to re-enter all configuration settings

TeamSupport Chat Features for Portal Users
Chat Access for Logged-in Users
When TeamSupport is configured for a profile, the subscriber (and customer service reps pretending to be the subscriber) can see and use the TeamSupport chat on every page in the Customer Portal.

Clicking the bubble opens the chat.

When you start a chat, TeamSupport receives:
- Your Account Number (the one tied to the account you’re viewing; this varies if a corporate account is being impersonated).
- Your Name (first and last name as shown in the Customer Portal).
- Your Email Address (the one displayed in the Customer Portal).
Chat Access for Guests (Not Logged In)
When TeamSupport is set up for non-logged-in users in a profile, the chat bubble is available for:
- Login
- Forgot Password
- Registration
Clicking the bubble opens the chat.

Viewing and Exporting Users
Clicking the Users option from the Administration menu displays a page that you quickly view and export all Customer Portal users.

Example Export:

SSO Login Options
Logging In with Single Sign-On
How this works depends on:
- Whether this is the first-time login and the subscriber does not yet have a corresponding IDI Customer Portal account.
- Whether the subscriber is already logged in with OpenID Connect credentials.
- The subscriber’s Customer Portal profile Force Single Sign-On setting.
Note: Corporate account browsing is not impacted by single sign-on.
First Time Login
If the subscriber is accessing the IDI Customer Portal for the first time and their identity is not yet linked to a Customer Portal account, the system will automatically create an account for them. The system will check if their organizational identity is already linked to a Customer Portal account. If no link is found, the system will create a new Customer Portal account using information from their organizational identity. The incoming identity must have a value provided in the Customer Account Claim parameter as set up in the Security module Authorization Provider configuration. The subscriber will then be automatically logged into the IDI Customer Portal.
Subscriber Already Logged in with OpenID Connect Credentials
If the subscriber is navigating from the external application and is already logged with the OpenID Connect provider credentials, they’ll be automatically redirected to the IDI Customer Portal without having to re-enter credentials regardless of the Force Single Sign-On setting.
Force Single Sign On Enabled
In this case, the standard IDI Customer Portal Login page is not available. If the subscriber is not yet logged in with OpenID Connect credentials, they will first be redirected to your organization’s login page and then redirected to the IDI Customer Portal upon successful login.

Force Single Sign On Not Enabled
In this case, subscribers who are not yet logged in with OpenID Connect credentials will have the option to either log in with their IDI Customer Portal credentials or continue with your organization’s login and use their OpenID Connect credentials.
Logging Out
The Customer Portal provides a Log Out option for subscribers authenticated via OpenID Connect. How this works depends on the Force Single Sign-Out parameter as set up in the Security module Authorization Provider configuration:
- If Force Single Sign-Out is enabled, the subscriber will be redirected to your organization’s sign-out page.
- If Force Single Sign-Out is not enabled, the subscriber will be signed out of the Customer Portal and shown a confirmation page.
Error Handling During Login
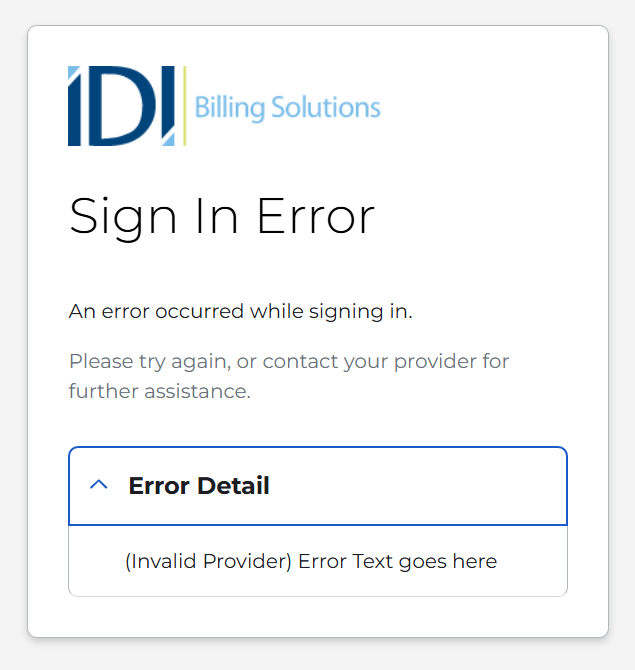
The system will display a clear error message if an issue occurs during the single sign-on process. This message provides information on why the login failed.
Managing Subscriber Accounts in Customer Care
Subscriber accounts are managed via the Account > Customer Portal Users menu in Customer Care.

This displays the Customer Portal Users page.

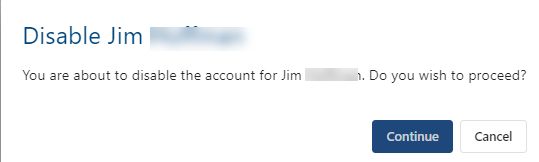
This page lists users in the current environment. You can page through the list if there are more users than fit on one page and adjust the number of users listed per page. The ellipsis button in the right column of a user row lets you:
- Toggle the account status (Enable/Disable) – This prompts you to confirm before changing the status.
- Reset the account’s password – this sends instructions to the account email.

- Toggle bill notifications on or off (Enable/Disable) – This prompts you to confirm, similar to when toggling the account status.

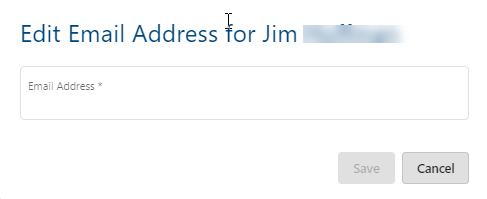
- Edit the email address
- Impersonate a Customer Portal user – This opens the portal to the subscribers welcome page. See A Quick Look at the Subscriber View. While impersonating, you can view but not manage account information. For example, view payment history but not make a payment.
Note: See Setup > Permissions for permissions required to perform some of these functions.
A Quick Look at the Subscriber View
Click here for A Quick Tour of the subscriber experience.