For service providers using the new Provisioning web application, the Bulk update capability supports updating provisioning properties on an order efficiently and accurately, reducing service delivery timeframes and improving revenue recognition. The functionality can help on smaller orders with numerous provisioning properties or large enterprise orders with hundreds of services. Bulk update capability can save considerable time and help reduce order entry mistakes. You now have two methods for bulk updating provisioning properties:
- In the Orders web module, the Order Details page provides bulk updating capability during order assembly.
- The Bulk Data module supports a new CSV file specification for bulk updating provisioning properties. Note: The Orders module also supports exporting and importing CSV files as a file-based bulk update method during order assembly. You can export order details items, update the provisioning property values in excel, and import the CSV file to update the properties.
This section describes bulk updating provisioning properties (either manually or file-based) during order assembly. Managing the CSV file for use via the Bulk Data module is covered in Bulk Import Provisioning Properties File Specification.
The Order Details page has a new icon to Update Provisioning Properties in Bulk.

Clicking this icon pauses the order and displays the Filter Order Items page as the starting point for updating provisioning properties. This page lets you create a filtered list of order items with provisionable objects and then proceed to update the values in bulk, or import/export CSV files. The manual update steps are listed across the top of the page.

Filtering
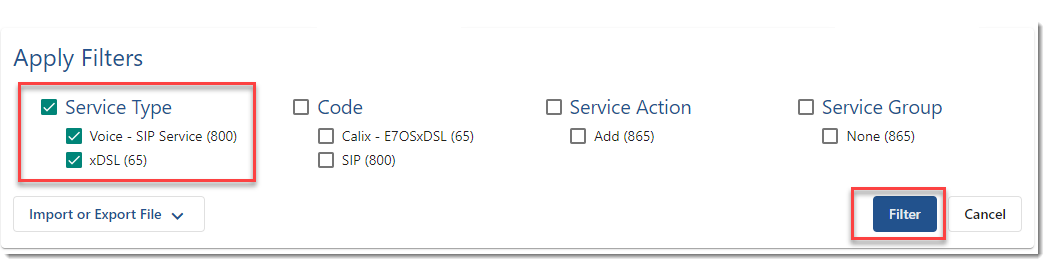
Use the Filter Order Items page to create a subset of provisioning properties to update, or you can work with the complete set of properties on the order. Whether your team is only responsible for updating a subset of values, or you are looking to exclude previously updated properties, the filter page is a great way to limit the values available for update. The filter selections apply whether you are performing updates via the new Update Properties Page or the file-based export/import method. To create a filtered list of items, select (check) the items you want to include in the list. Items are organized by:
- Service Type – Type of service (e.g. IP Voice, DSL, Wireless)
- Code – The SKU-like description assigned to the provisionable object during configuration.
- Service Action – Action to be performed on the service (e.g. Add or Disconnect)
- Service Group – Means of classifying different services
If applicable, two additional filter options will be available. The filters will only appear if there are order line items that match the scenario:
- Included Locked Items – Refers to items already processed by the Billing System Update workflow action, meaning they exist in the CostGuard system for billing purposes.
- Include Account Level Items – Provisionable objects assigned to the account level.
The number of properties on each item is indicated in parentheses. Note: Choosing to Include locked or account-level items will alter the values in parentheses as more items’ properties are being included for updates.

Note: Not checking any items is the same as selecting ALL items (no filtering).
After the filtering criteria have been selected you have two options for updating properties:
To use the Update Provisioning Properties page, click Filter. Then refer to the section on Using the Update Provisioning Properties Page.
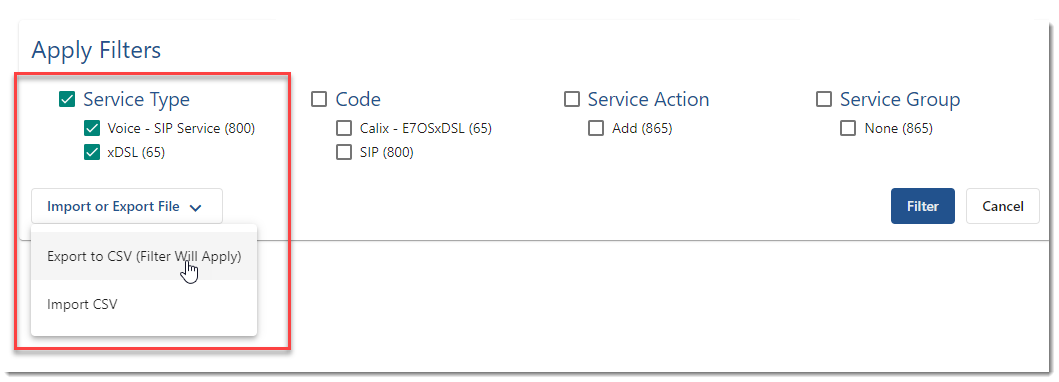
To create a filtered (or unfiltered) export file, choose Export to CSV from the Import or Export File drop-down menu. Then refer to the section on Bulk Import/Export During Order Assembly.
Using the Update Provisioning Properties Page
When you click Filter to proceed with a manual update, your filtered (or unfiltered) list is presented on the Update Provisioning Properties page.
Page Overview
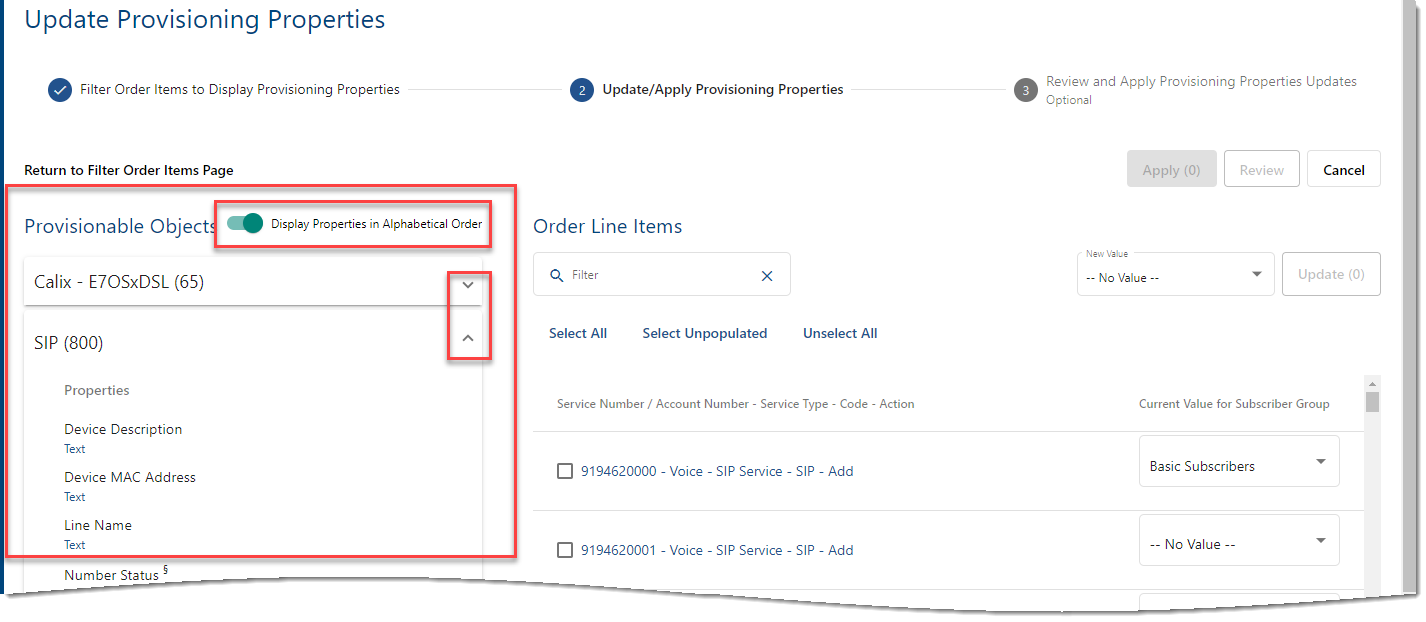
This page is organized in two panels:
- The left panel lists the provisionable objects based on your filtered list (for example Calix – E7O7SxDSL and SIP). The provisioning properties are listed under their associated provisionble objects (for example Subscriber Group)
- The right panel displays the order line items associated with the provisioning property selected on the left. The order line items display the service number or account number, the service type, the code for the provisionable object, service order action, and currently assigned provisioning value (if any).

You can adjust the properties presentation to facilitate finding specific properties.
The button next to the Provisionable Objects heading in the left panel lets you list the properties alphabetically rather than the default order set by the provisionable object configuration. You can also use the associated ^ button to expand/collapse the properties list for a given provisionable object.
You can filter the Order Line Items list in the right panel to find an item (or subset of order line items). The filter button will filter on service number, service type, code, or order action.
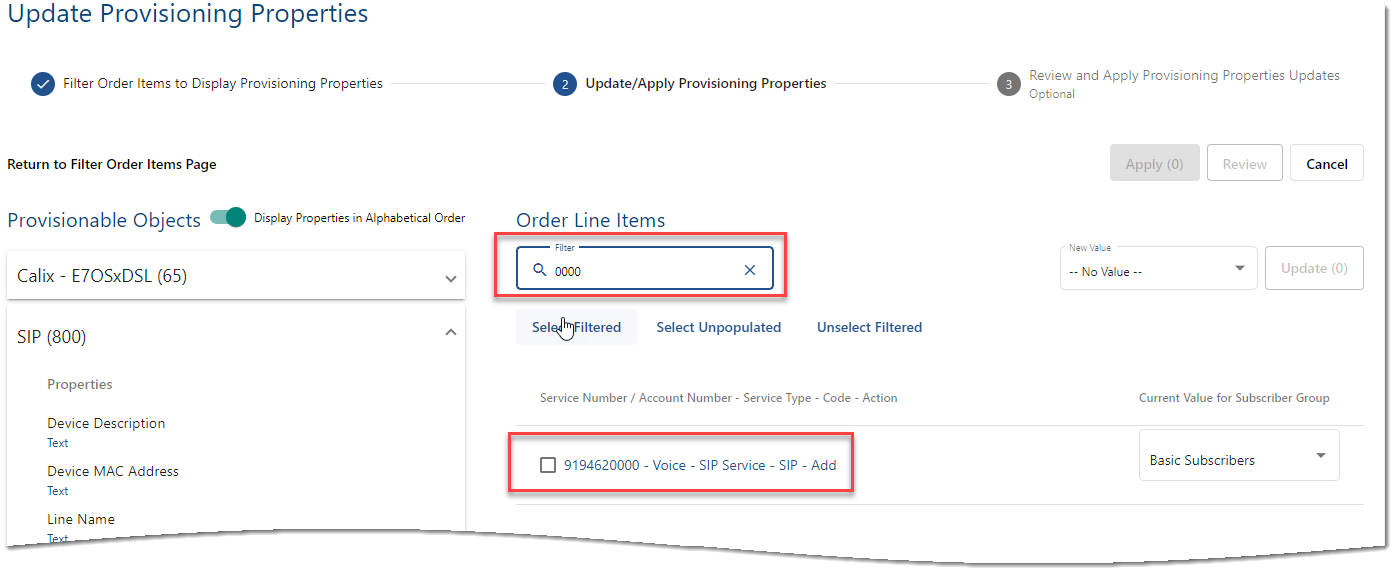
You can return to the Filter Order Items page by clicking the link above the Provisionable Objects list in the left panel. Note: This will result in losing any updates that have not yet been applied.

As on the Orders Detail view, properties marked with an icon indicate properties that are required to be updated prior to sending the provisioning request.

Updating Properties
The Update Provisioning Properties page lets you update property values in two ways:
- You can update all the selected order line items to the same value.
- You can individually update each order line item to a unique value.
Both options start with selecting a provisionable object in the left panel to display the properties. Then select the property you want to update and select instances to update.
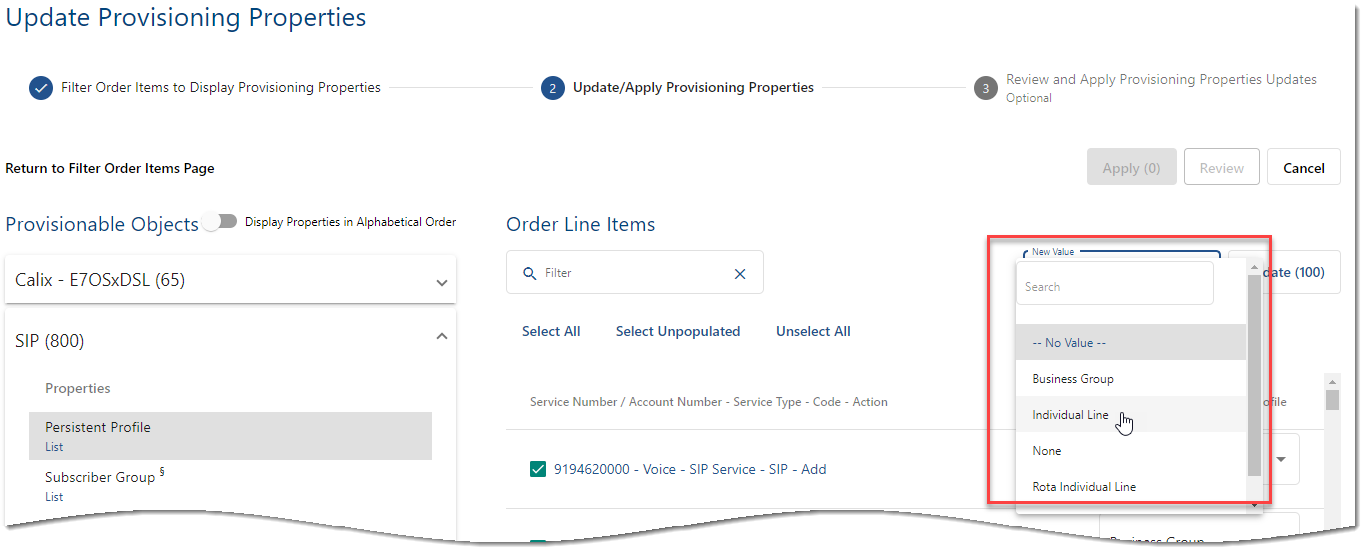
- If all property instances need the same value, you can Select All instances.
- You can Select Unpopulated instances to filter for instances that are missing values.
- You can manually select individual instances by checking the associated check boxes.
- Or you can Deselect All and start over as needed.

Once the order line items are selected, the check boxes will turn green and display a check mark.
The Update button in the right panel indicates the number of updates to be made based on the instances you’ve selected.

Enter a new value for the selected property instances. Depending on the property data type, this field may be a drop-down menu, a date picker, or an editable field.
If you want to update the property values individually for each order line because each value is unique, instead of using the New Value field option, simply enter the values in the Current Value field assigned to the order line item.
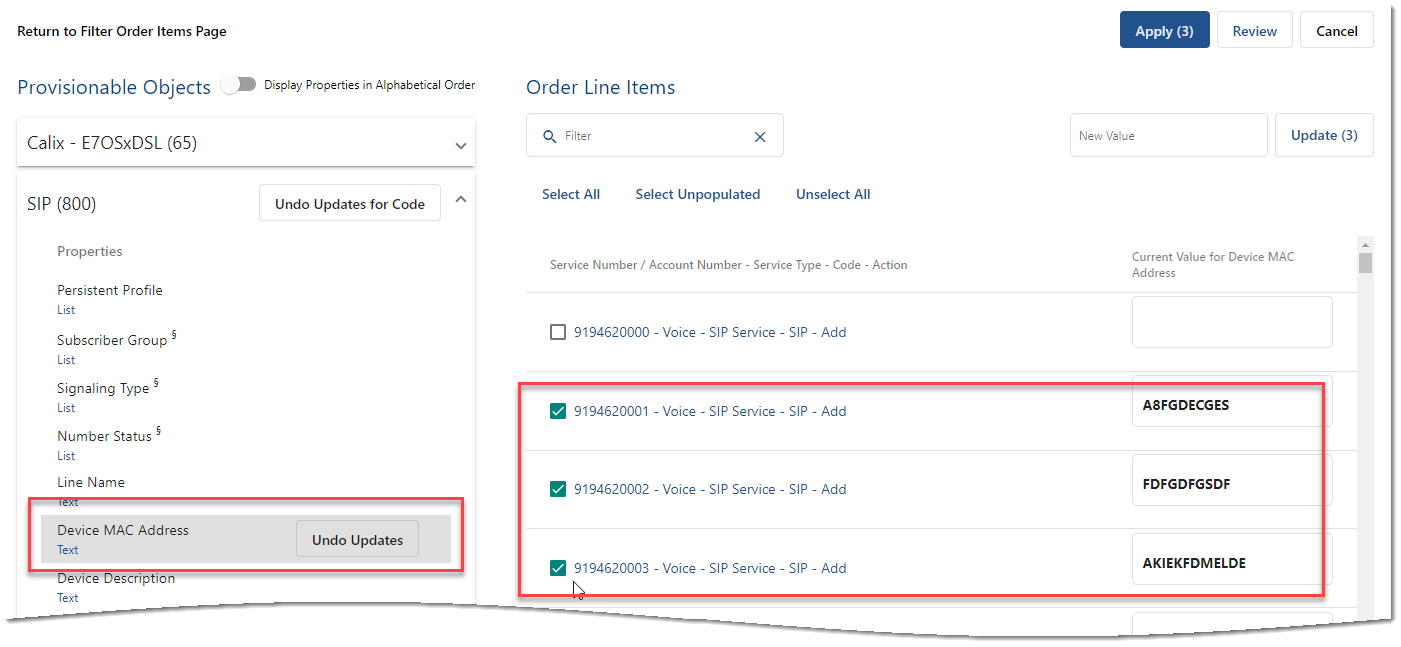
Click Update in both cases. This makes an Undo Updates button available next to the selected provisionable object and property in the left panel. This lets you undo the updates if needed. For each provisionable object and property where you’ve made updates, the Undo button will continue to be available until you apply or cancel updates.
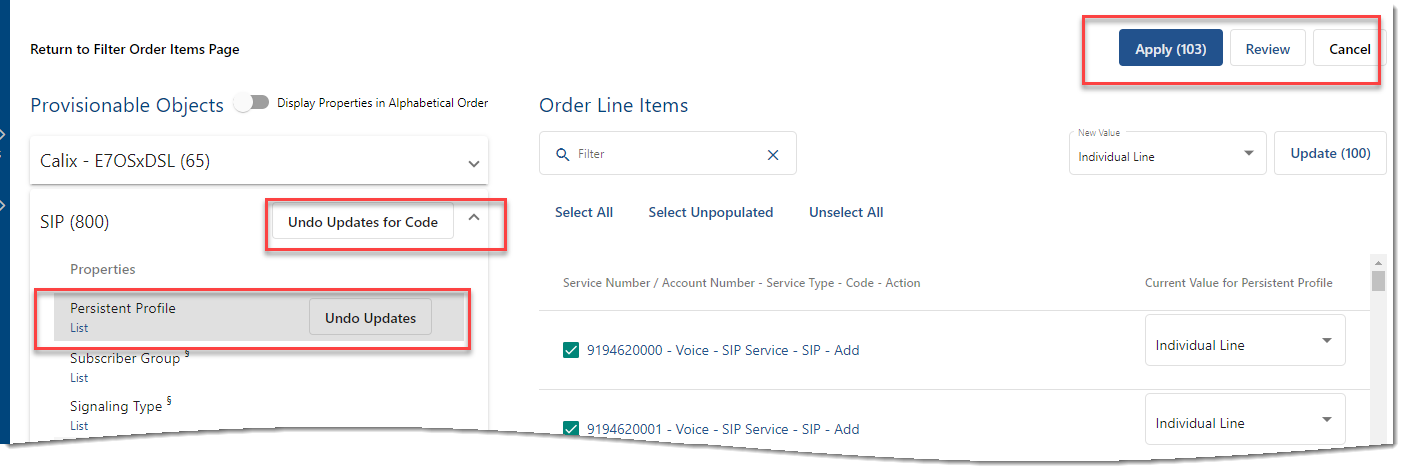
From here you have several options to proceed:
You can defer applying the current updates and continue to update additional properties by repeating the prior steps.
- If the number of updates you need to make are few, and you are confident the updates you’ve made to this point are correct, you can click Apply. This commits the updates immediately and leaves you on the Update Provisioning Properties page where you can continue to update additional properties if needed. Note: Once applied you can no longer undo the updates on this page. If you selected Update in error or made a mistake, you can select the property again and update it to correct value. The updates are editable until the provisioning request is sent.
- If you need to back out of all updates you’ve made to this point, rather than undoing the updates individually you can click Cancel. This cancels all updates and returns you to the Order Details page.
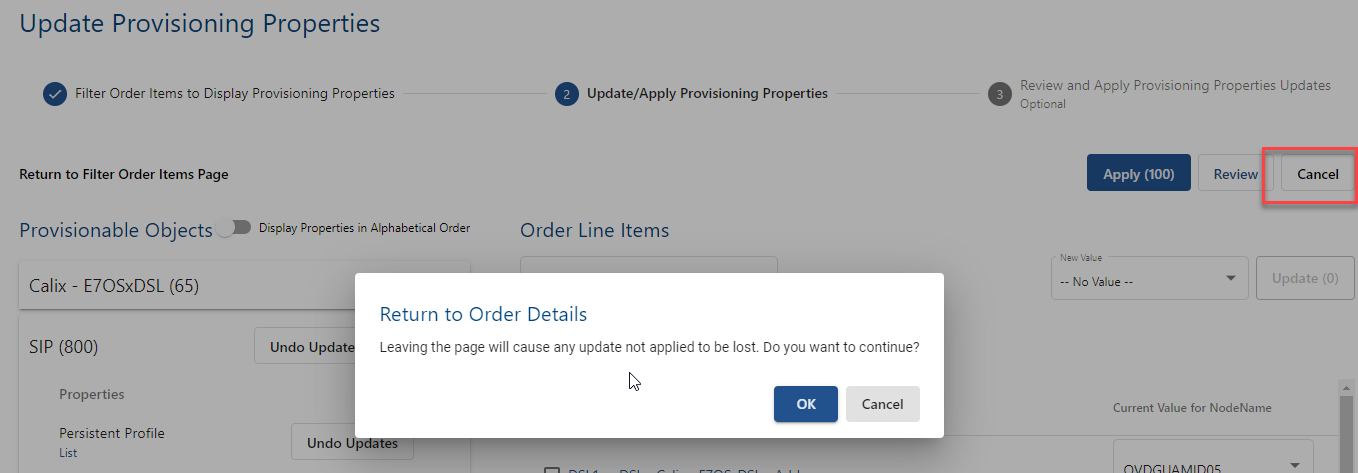
- If you’ve updated a large number of properties and would like to review the updates prior to applying, click Review. This lands you on the Provisioning Property Review page.
Reviewing Updates
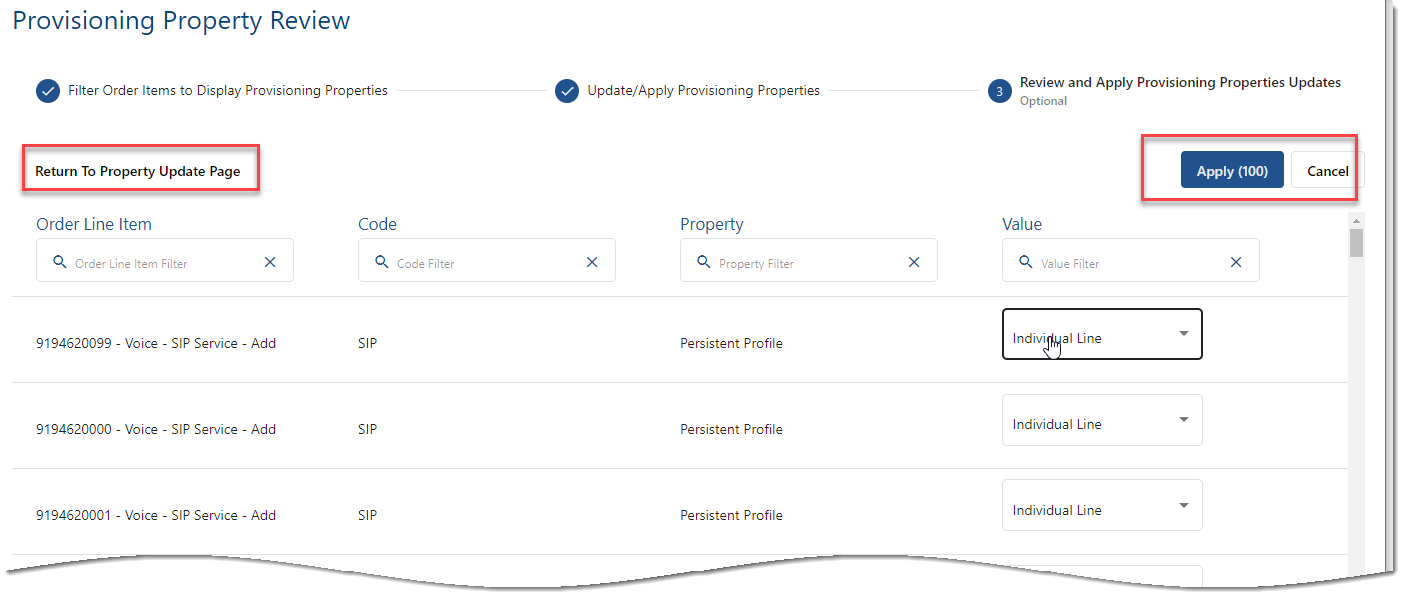
The Provisioning Property Review page lets you review your changes before applying the updates. It displays the Order Line Item, Code, Property, and Value for updates made on the Provisioning Property Update Page.
You can use the filter options under the Order Line Item, Code, Property, and Value fields to review individual updates.

When you’re done reviewing you can:
- Apply these updates now by clicking Apply. This applies the updates and returns you to the Order Details page.
- Make adjustments to the updates by clicking Return to Property Update Page (on the left above the Order Line Item column). Note: The Undo option for any provisionable objects that you’ve updated will still be available on the Update Provisionable Properties page if you need to selectively back out of certain updates.
- Back out of all yet to be applied updates by clicking Cancel. Canceling returns you to the Order Details page without applying the updates (i.e. updates will be lost).
Bulk Import/Export During Order Assembly
If you are more comfortable updating data via a spreadsheet, the file export/import solution lets you to filter, copy and paste from other sources, or use advanced macros to update the data. You can create and manage bulk import file specifications via the Bulk Data module as described in Bulk Import Provisioning Properties File Specification, or you can do this as part of order assembly using the Import or Export File drop-down menu on the Filter Order Items page.

Exporting
The export file provides all the pertinent order line item and provisioning information necessary for you to successfully identify the correct provisioning instance, so that you can sort and filter to find the correct provisioning properties. This makes it easy to input the updated provisioning data into Value fields prior to import.
Start by creating a filtered list of order items as described in the previous section on Filtering. Then choose Export to CSV. This downloads a CSV file for properties based on the filter criteria with their current values.

From the download location you can move the file to another location. The file name will have the following naming convention:
BulkPODProperties_<OrderID>_<Date>¬_<Time>
It is recommended that you rename the file to reflect the content (e.g. DSL provisioning_date – time).
The export file contains the following fields:
| Field | Description |
| OrderID | Unique Identifier of the Order. |
| ServiceInformationItemID | Unique Identifier of the service on the order. |
| IsAccountLevel | Yes or No indicates if the provisioning properties are the account level |
| ServiceAction | Service order action if the provisioning properties are assigned to a service |
| FeatureAction | Service order action if the provisioning properties are assigned to a feature |
| ServiceNumber | Service Number to which the provisioning properties are associated |
| ServiceType | Service type of the service to which the provisioning properties are associated. |
| Code | Unique identifier assigned to the Provisionable Object |
| DataType | Data type of the provisioning property |
| ProvisioningPropertyName | Name of the provisioning property |
| Value | Value assigned to the provisioning property |
Updating the File
The following are general rules to follow when updating the CSV file:
- Use the Value field to update the provisioning properties.
- You can update values to blank (NULL)
- The values should match the data types associated with the provisioning properties; otherwise, the record may error upon import.
- For List properties the system will validate that the value matches the values contained in the configured list.
- Dates should be in ISO 8601 format. Example: YYYY-MM-DD
- The system will update all records in the file. The number of records does not have to match the originally exported file. Meaning, you can delete records from the export file.
Importing a CSV File
The solution supports importing a CSV to update provisioning properties. It’s recommended, but not required, to use the file that was exported from the order. If records error during the import, an error file will be provided. You can correct the errored records and resubmit the file.
General Format:
- The following general characteristic apply to the Provisioning Properties Import File:
- File Name Convention must be *.csv
- A header record is not required if importing through the Orders application.
- The file must have one or more comma delimated records.
- The columns are not required to be in a specific order.
- You do not have to include all the columns in an import file.
Importing the File:
Choosing Import CSV displays a dialog for browsing to the file you want to import.
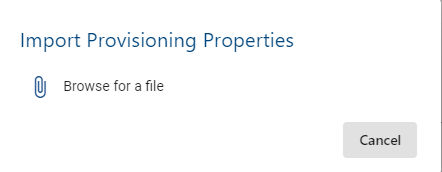
Click the paperclip icon to open Windows Explorer and navigate to the file.
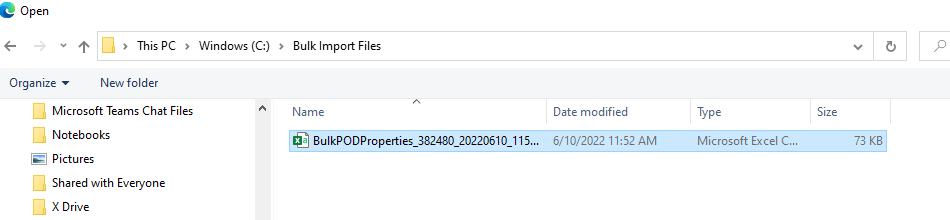
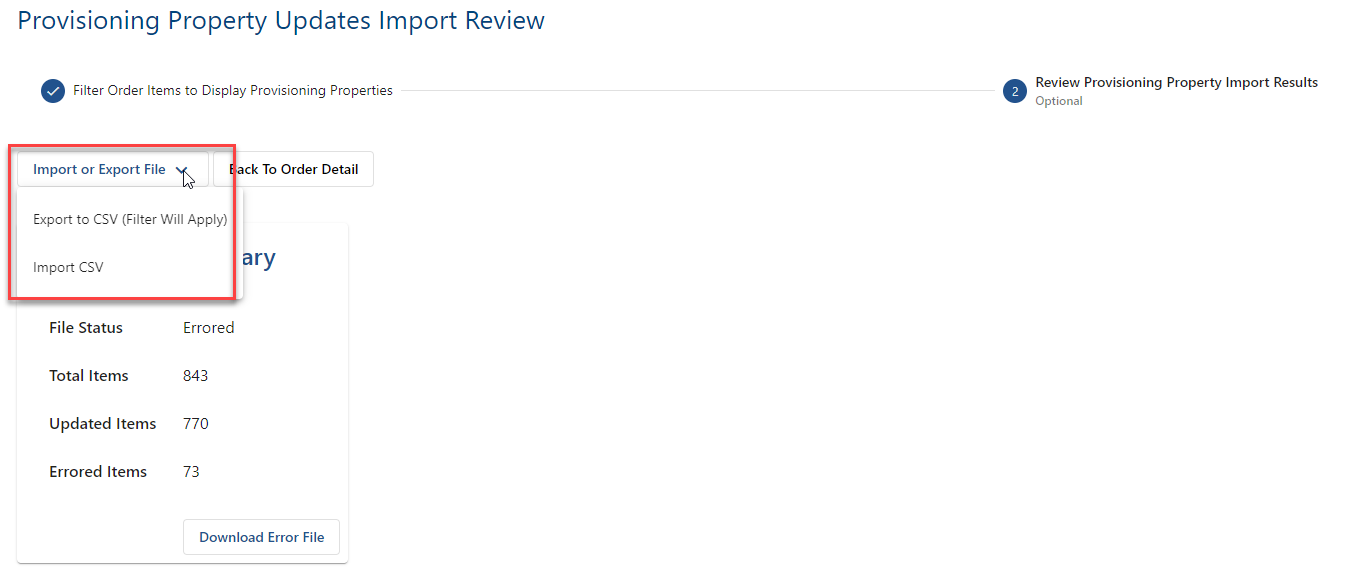
After you select a file, the dialog will indicate the import is in progress, and then display a summary of the results when the import is complete.
Also, the Back To Order Detail button is provided to return to the order when you’re done reviewing the import results.

Working with Errored Records
If the import file has errored records, the file status will be Errored, the number of errored records will be displayed, and an error file will be generated.

Click Download Error File. Then open the file to review the errored records. Column A, IDI-ErrrorMessage field, will indicate the reason for the error.

You can correct the error directly in the Error File. No additional formatting is necessary. You can re-upload the file from the Import Summary page or the Filter Order Items page.