Many service providers offer their customers device protection plans (service contracts) that help customers mitigate the expense when a device is lost or damaged. These plans can also provide a source of revenue for service providers. For some time, the IDI platform has supported the sale of handset insurance as a monthly recurring charge product (MRC). With version 21.7 and later, the IDI platform provides a comprehensive solution for configuring, selling, and managing protection plans.
- Configuration and Setup
- The Product Catalog web application lets you set up protection plan profiles that establish rules for processing (including provisioning) different plans.
- The Product Catalog in the IDI Desktop Client lets you set up protection plan products for sale. You can set up billing products to sell on a recurring charge (MRC) basis, or retail products to sell on a pay-up-front basis.
- Sales – The Orders web application and POS Make Sale in IDI Desktop Client support selling protection plans on a monthly recurring charge (MRC) basis or as a one time charge assessed at the time of sale.
- Managing Plans – Customer Care lets you add, view, search and manage protection plans on an account.
Benefits of this solution include:
- Charging for plans at point of sale (pay up front) or billing on a recurring basis.
- Performing real time eligibility checks with the third-party plan adminitrator during the Sale/Fulfillment.
- Enrolling equipment in a plan with or without a line of service.
- Selling a plan in a fulfillment model where the equipment ID is not known at the time of sale. In this case an eligibility check must occur at the time of fulfillment.
- Enforcing cancelation and refunding rules as may be required by the third-party administrator.
- Disconnecting, hotlining or suspending a line of service without losing coverage for the device.
Adding and Managing Protection Plan Profiles
Protection plan profiles specify rules for processing protection plans, including provisioning settings if needed. Profiles are set up in the Product Catalog web application. Note: Set up profiles before configuring protection plan products in the IDI Desktop Client Product Catalog as the protection plan profiles must be specified when you configure the products.
To begin, access the Product Catalog web application via the web Apps tray.

In Product Catalog navigate to the Protection Plan Profiles page by choosing MANAGE > Protection Plan Profiles.

The Protection Plan Profiles page lists the existing profiles and lets you:
- add new profiles
- display a detail view where the selected profile can be edited
- enter search criteria to filter the profile list and make it easier to navigate

Adding a New Profile
A profile consists of a Name, Description, Type, and Provisioning Settings. Click +NEW PROFILE to display the New Protection Plan Profile dialog.
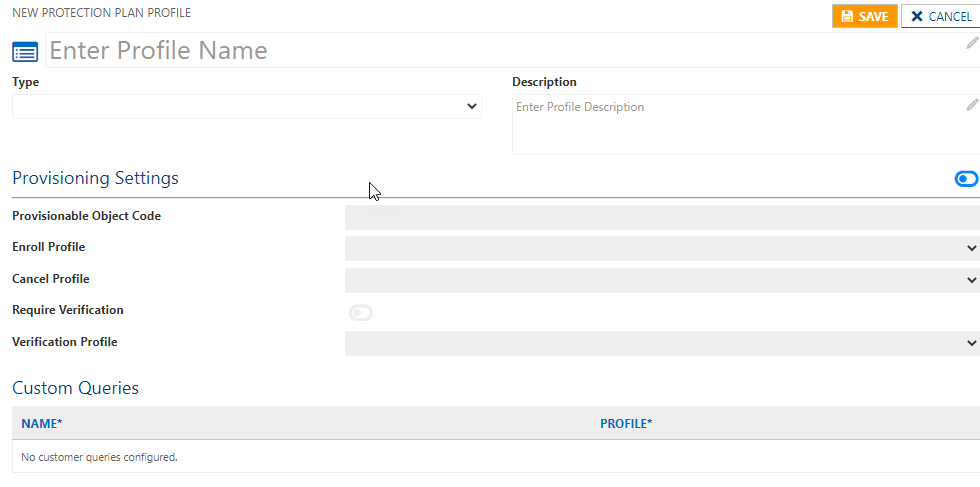
Use this dialog to specify:
- Profile Name – This is the only required field.
- Description – This is optional.
- Type – This can drive downsteam functionality as may be required by a plan covering a specific device (e.g. fields that may be needed to complete enrollment). The drop down menu defaults to blank (null entry) which sets the Type to Generic. Apple Care is also available as a Profile Type. Note: Other Profile Types can be created via the Adaptive Request process.
- Provisioning Settings – These settings only apply if you’re using CostGuard Provisioning to provision the plan. These settings are disabled by default. To enable the fields (only if needed), toggle the enable/disable button at the far right (shown enabled).
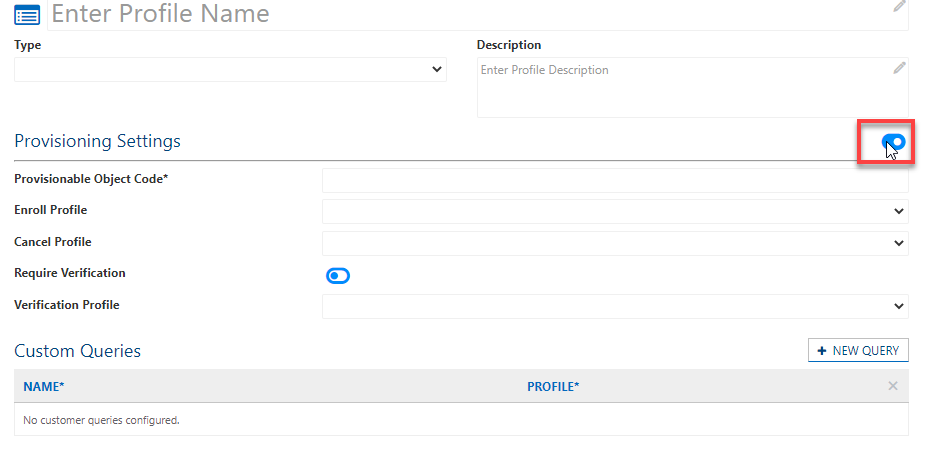
Once enabled you can specify the following:
-
- Provisionable Object Code – Enter the provisionable object code that was configured in the Provisioning application.
- Enroll Profile – This is the provisioning profile (as configured in Provisioning) to use on provisioning request to enroll a device in a plan.
- Cancel Profile – This is the provisioning profile to use on canceling a plan.
- Require Verification – If you choose to require verification, any protection plan that uses this profile must be verified by the 3rd party plan adminsitrator before you add the plan to a customer’s account and enroll the customer in the plan. Use the Require Verification button to toggle this functionality on/off. When on, the Verification Profile drop down menu is enabled and a profile must be selected. The verification step is completed when you add/sell a plan using this profile.
- Verification Profile – This is the provisioning profile (as configured in Provisioning) to use when the verify provisioning request is sent.
- Custom Queries – This section lets you add provisioning actions (in addition to Enroll and Cancel) as may be required by your third-party protection plan administrator. Enter a unique NAME. This field does not allow spaces. Use the underscore in lieu of a space. Then select a Provisioning Profile (configured in the Provisioning web app) from the PROFILE drop-down menu. Any custom queries you add will be available in the Actions drop-down menu on the protection plan’s Detail view in Customer Care. Note: The NEW QUERY button is only available when Provisioning Settings is enabled.
- Provisionable Object Code – Enter the provisionable object code that was configured in the Provisioning application.

Viewing/Editing Profile Details
You can display a detail view for an existing profile by clicking the on the Name link.

The detail view is equivalent to the New Plan Profile dialog and lets you edit profile parameters.
Setting up Protection Plan Products in the IDI Desktop Client Product Catalog
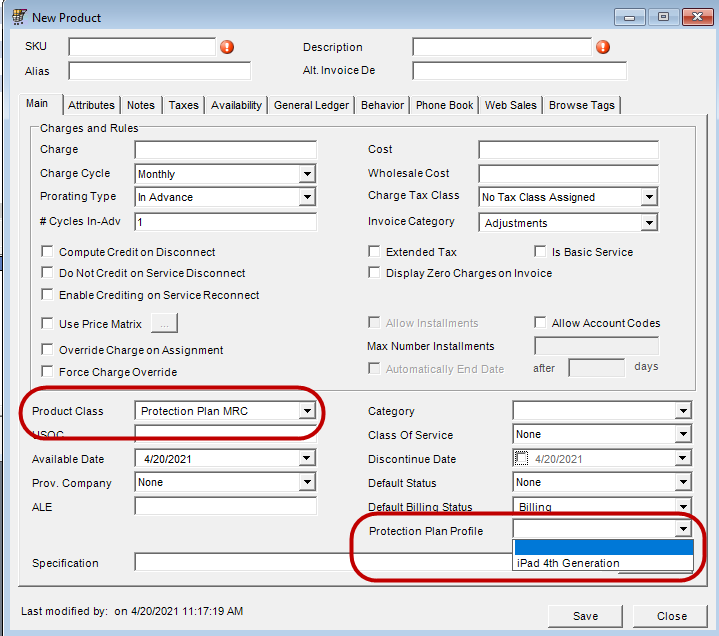
You can set up recurring charge and pay-up-front protection plans in the IDI Desktop Client Product Catalog. Pay-up-front plans are configured as retail products. Recurring charge plans are configured as billing products (or packages). In both cases, the products must be assigned to a Protection Plan Product Class and be associated to a specific Protection Plan Profile.
Configuring a Pay Up Front Plan
To set up a pay up front plan:
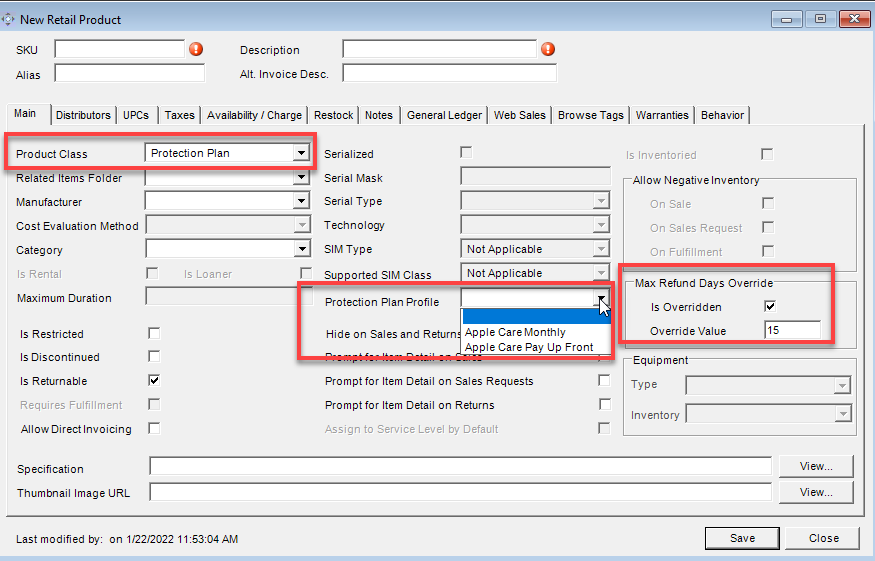
- Create a new retail product.
- Set the Product Class to Protection Plan.
- Select the profile from the Protection Plan Profile drop down menu (enabled when Product Class = Protection Plan).
As an option you can also override the Register Policy setting for Refund Days Limit as may be required when your third-party plan administrator’s rule for refunds (number of days limit) differs from your business rules.
The Override Value is only editable and observed when Is Overridden is checked (enabled). The value can be any integer greater than or equal to 1.
When an override is specified, the logic that observes Max Refund Days in CostGuard Client, Order Placement and Catalog Service web services will observe the override rather than the Register Policy setting.
Configuring a Plan for Recurring Billing
To set up a recurring charge plan:
- Create a new billing product or package.
- Set the Product Class to Protection Plan.
- Select the profile from the Protection Plan Profile drop down menu.
Selling Protection Plans in the Orders Web Application
You can add products or packages marked with a Product Class of Protection Plan to an order just like you would any other item (Orders Web App > New > select customer > Add Item). Note: Add the monthly recurring charge product at the customer account level. This lets subscribers disconnect their line of service and still maintain a protection plan agreement.
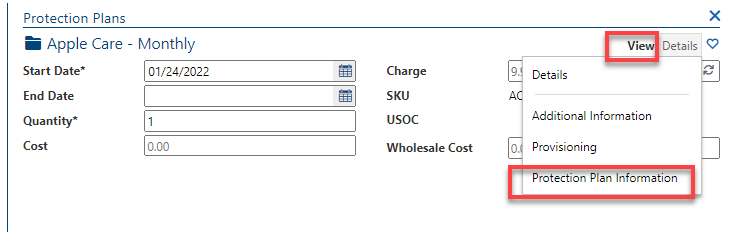
When items with Product Class = Protection Plan are staged, you can use the View menu to select Protection Plan Information to enter the information required to enroll in the plan.
Fields for Serial Number, Activation Date, Cancellation Date and Contact Information are common to all protection plans. Additional information may be required depending on the profile on which the plan is based, for example Apple Care Information as shown below. An asterisk (*) denotes a required field, and any required fields left NULL will highlight yellow if you attempt to click ADD TO ORDER, and the item will not be added.

If you add a package that has protection plan packages or products within it, all protection plans will stage, along with the root-level package itself:
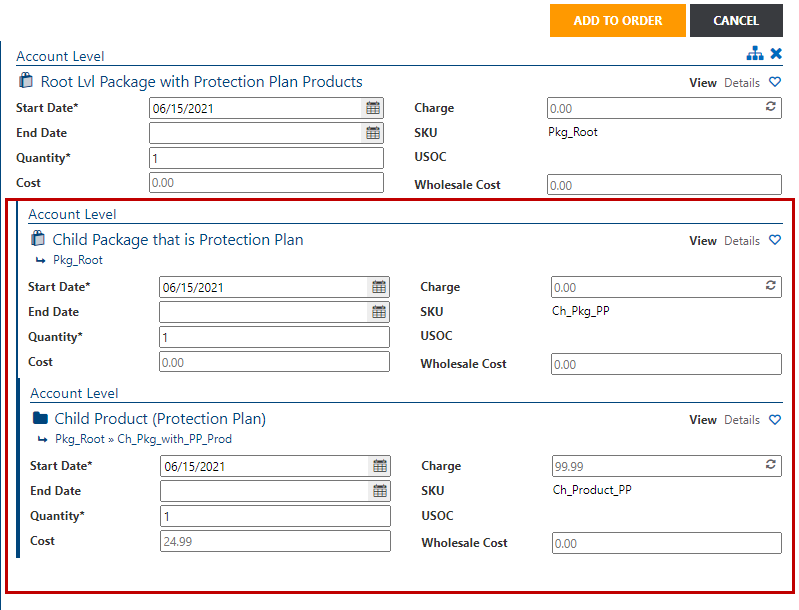
Only items with Product Class = Protection Plan will have Protection Plan Information available in the View menu, and any required information must be filled in for all staged items before ADD TO ORDER will proceed with adding all items currently staged.
Once added to an order, you can still make changes to the protection plan information by re-staging it (clicking on the item) and clicking the Edit icon. The item can also be taken out of the order with the Remove icon. This can be done as many times as necessary prior to submitting the order.
Note: Once the order is complete, the protection plan will be listed on the Protection Plans page on the account in Customer Care.
Verifying a Protection Plan through Orders
If verification is required for the selected protection plan profile, the protection plan cannot be added to the order until verification has completed successfully. Similarly, if verification was completed, but then information on the form was changed, the protection plan cannot be added until the information is re-verified successfully.
VERIFY button state changes:
- If verification is allowed but has yet to occur, the icon on the button will be black and white
![]()
- Once verification has successfully been completed, the icon will convert to a green shield with a check mark
![]()
- If the selected protection plan profile is configured to require verification and verification has yet to occur (or information on the page was changed since the last successful verification), the shield will be red to indicate requires verification.
![]()
Note: If the protection plan being added has a protection plan profile that allows verification (a Verification Profile is configured), the VERIFY button will be available; even if a protection plan is unchanged and verification was successful. You can always re-verify. The last verification must have been successful for the protection plan to be added to the order.
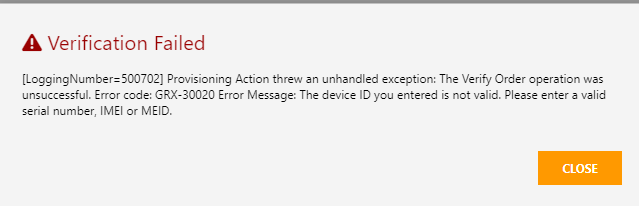
If verification fails in the Orders web application, the system will produce an error message.
Disconnecting an Account with Active Protection Plans
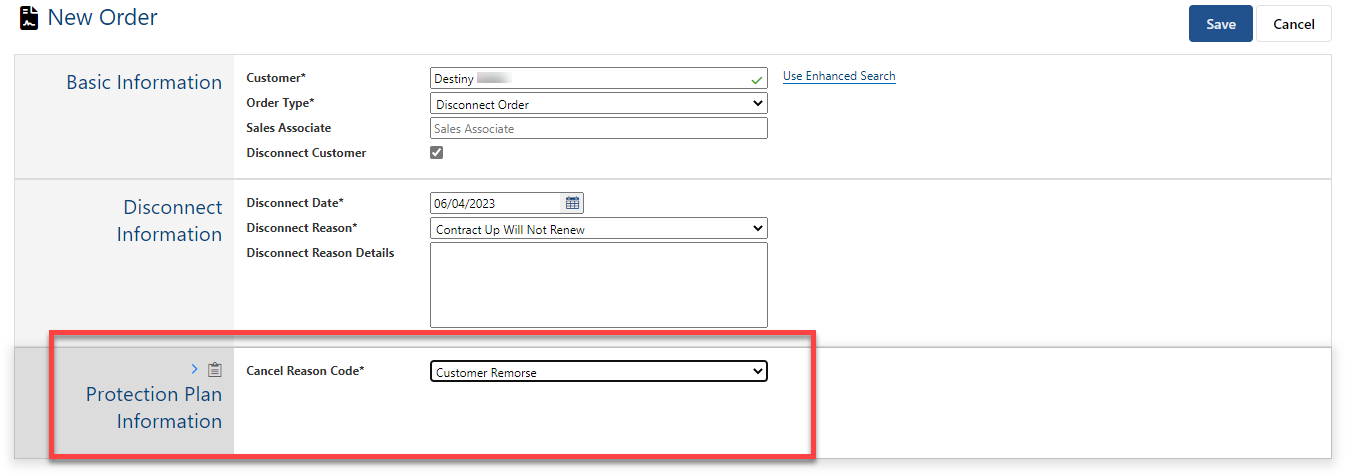
The Disconnect Customer transaction facilitates applying a cancel reason code for all active protection plans on an account when you submit a customer disconnect order. It saves you from having to individually cancel protection plans and specifying cancel reasons prior to disconnecting the customer.
When you begin a customer disconnect order (by clicking the Disconnect Customer check box), if the account has one or more active protection plans, the New Transaction page provides an additional field for selecting the protection plan cancel reason code. This is a required field, so you will not be allowed to proceed with (save) the order until this step has been completed.
The selected code will apply to all active protection plans on the account. Note: You can override the value on an individual protection plan by manually adding the protection plan SKU to the order and selecting a different cancel code value.
From this point, the order will proceed like any other order, and you can apply other actions as may be needed during order assembly. The cancel reason will be displayed along with other disconnect information on the review transaction page.
Selling Protection Plans In POS Make Sale
When a product, package, or retail product with Product Class = Protection Plan is sold through POS, the Make Sale Wizard includes an additional Protection Plan Information page with required and optional fields be filled in before proceeding. Serial Number, Activation Date, Cancellation Date, and Contact Information fields are common to all plans. Additional field may be displayed depending on the associated protection plan profile. For example, if the plan’s associated profile type is Apple Care, the Apple Care Information fields will also display with the Language Code, POC Delivery Preference, and POC Language Code being required.
Note: The serial number will be auto-populated if a serialized handset was sold earlier in the Make Sale flow.

If the protection plan profile is configured to allow verification (a Verification Profile is assigned), the Verify button will be available, and you cannot proceed to the next page without Verification if the has not completed successfully.
The verification on this screen follows the same business rules as verification in Orders and Customer Care, in that if required, you cannot proceed until a successful verification, and if information on the screen is changed between successful verification and proceeding to the next page, the plan must be successfully verified again to continue.
If verification fails in POS, hover over the red X to review the error message.

Adding and Managing Protection Plans on an Account
Customer Care lets you add and manage protection plans on an account independent of POS or web-based Orders. Management functions include enrolling and canceling. Other options may also be available, depending on the profile configuration. This functionality is available by selecting Account > Protection Plans from the Customer menu.

This displays the Protection Plans page.

Whether or not the plan is active is indicated in the far left column:
- Green check = active (enrolled)
- Red X = inactive (canceled)
- Blank = no actions have been performed on this plan

From the Protection Plans page you can add a new plan, display a detail view for a selected plan where you can submit an enroll or cancel request, or export the Protection Plans list.
Adding a New Plan
Note: There is no associated charge when adding plans to an account in this manner. If you need to collect revenue for the plan, it is recommended to create an order.
To add a new plan, click +NEW PROTECTION PLAN in the upper right side. This displays the New Protection Plan dialog.

From here specify:
- Protection Plan Profile – Select a protection plan profile from the drop down menu. This field is required.
- Serial Number – Enter the device serial number. This field is required.
- Enroll Now – You can choose to enroll the device in the plan on a specified activation date by checking this box, or defer enrollment until later. An enrollment action is available via the Plan Detail view if you choose not to enroll now.
- Activation Date – This field is enabled when you check the Enroll Now check box. Select a date on which to enroll in the plan. If Enroll Now is not checked this field is disabled.
- Contact Information – You may fill in the individual fields to specify a contact other than the customer or click COPY CUSTOMER ADDRESS to auto-fill using the customer information.
Note: If the selected protection plan profile has been configured to require verification, you won’t be permitted to save and submit an enroll request on the account until you verify the profile by clicking the VERIFY button in the upper right corner.

If the verification is successful, you’ll see a green banner to indicate success.

Additional Apple Care Fields
The following required fields are displayed when the associated profile type is Apple Care:
- Language Code
- POC Language Code
- POC Delivery Preference
- Cancel Reason Code
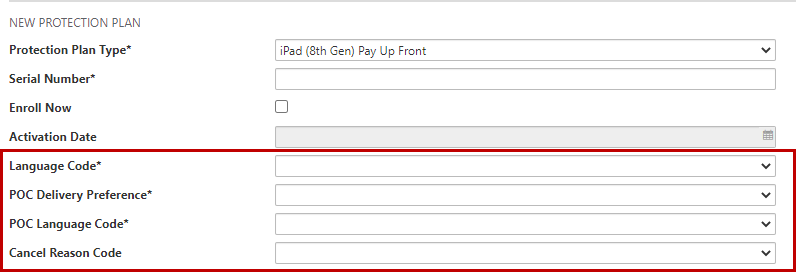
The values in these drop-down menus are driven by Workflow Management configuration.
Viewing/Editing Plan Details
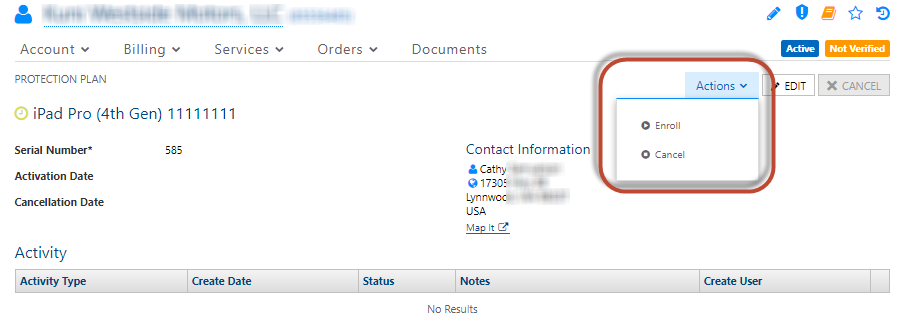
The detail view lets you edit information entered when the plan was added. It provides a history of provisioning actions for the plan. The Actions menu lets you initiate provisioning actions. To display the detail view for a plan, click the Serial Number link.

The content of the Actions menu depends on the plan’s current enrollment status as well at the profile configuration.
The Actions menu provides both Enroll and Cancel options when no requests have been submitted yet. Note: Cancel may apply here because the plan may have a pending activation date (set up using the Enroll Now option).
If the plan is currently enrolled (indicated by a green check) the only option available is Cancel. Likewise, if the plan has been canceled (indicated by a red X) the only option is to Enroll.
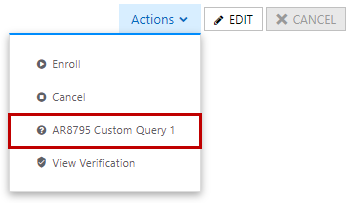
Additional options are provided if the associated profile has custom queries configured to support custom provisioning actions.
The Activity history grid lists all Enroll and Cancel requests.

When provisioning is required, the Status is Pending until the request is completed. The Activity history for a plan can be exported to a spreadsheet by clicking the Export link below the list.
Enrolling in a Plan
If you deferred enrollment when the plan was added, or if you subsequently canceled the plan, you can enroll/re-enroll via the detail view. To do this choose Actions > Enroll. This displays a dialog to specify an Activation Date (defaults to today).

Canceling a Plan
To cancel an active plan, choose Actions > Cancel. This displays a dialog for specifying the cancelation date.

Custom Provisioning Actions
The Actions menu provides additional provisioning actions if the profile associated to the selected plan has custom queries configured.
Each menu option will invoke the query operation with the name of the query, wait for the provisioning request to complete, then display the contents of the response once completed.
This is similar to existing Switch Query functionality, which is available on the Services and Features page in Customer Care under the Query menu (in the right pane when you select an item in the left pane).
Note: You won’t be permitted to initiate another activity if one is currently in process.
Protection Plan Search
The OmniSearch in Customer Care has an option to search on Protection Plan Activity.

The basic search lets you enter an account or serial number. More Options provides additional criteria including activity, profile type, modify date and provisioning status.
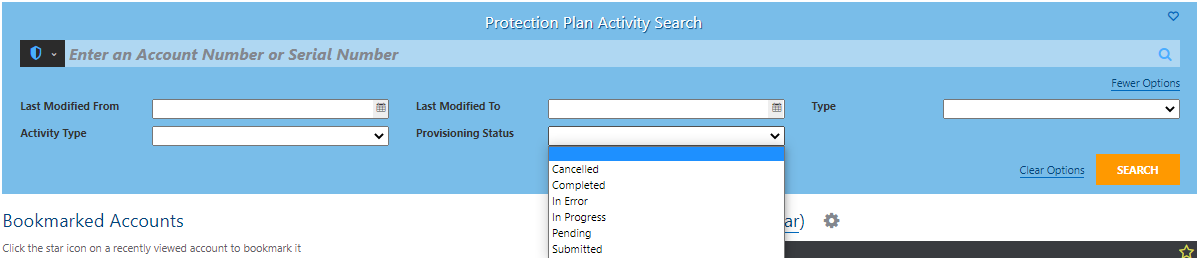
The results list details for matches found. Clicking a link in the Account Number column opens the applicable customer account. Clicking the link in the Status column opens a new tab showing the applicable provisioning request in the Provisioning web application.

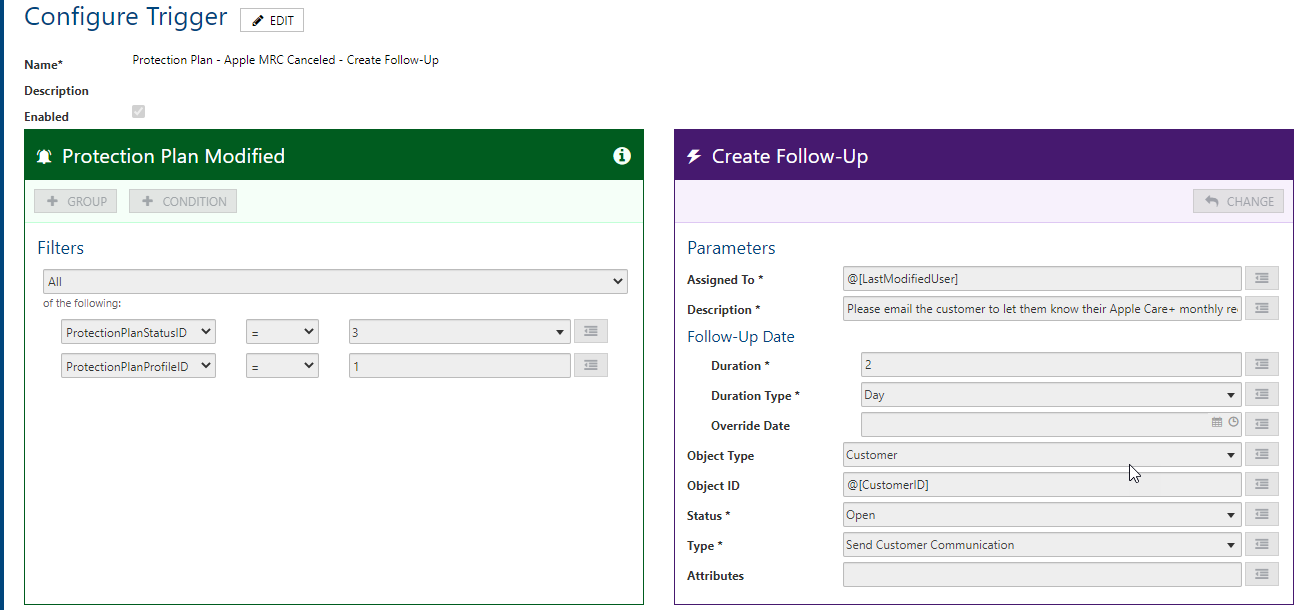
Trigger Support
When a Protection Plan is Created, Canceled, Enrolled, or Updated, triggers are now supported such that a Workflow can be configured to fire an action when one of these events occurs.
To be clear, these triggers are not to Create, Cancel, Enroll, or Update a Protection Plan, but rather when those activities occur on a Protection Plan, a Workflow can be configured such that an event will fire off to send an email, create a follow-up, or any other trigger-induced action.
Configurable Trigger Information:
- Protection Plan ID
- Protection Plan Profile ID
- Activation Date*
- Cancellation Date*
- Customer ID
- Protection Plan Status ID*
- Protection Plan Request Status ID*
- Auditable Fields
*Include ‘_Old’ (ex. There will be ‘ActivationDate’ as well as ‘ActivationDate_Old’)
Example: