This article describes how to configure, sell and manage enhanced retail installment plans in IDI Desktop Client.
To learn how to use equivalent functionality in IDI web modules (Orders and Customer Care, refer to the applicable knowledge article here.
If this functionality is not yet enabled in your system, or you want a quick overview of the functionality, refer to Getting Started with Enhanced Retail Installment Plans.
Setup
Enhanced retail installment plan functionality requires the following setup:
- Configure General Ledger for correct posting of the sale and billed installments.
- Configure a Billing Product – At least one Billing product is required.
- Set up installment agreements in IDI Desktop Client Product Catalog.
- Configure and assign Permissions for:
- Installment plan profile setup in Product Management.
- Selling a product on installments when the product is not assigned a profile.
- Allow/disallow skip service agreement.
- Allow/disallow override configured rules during a sale.
- Allow/disallow access to the exchange wizard.
- Set up installment plan profiles – At least one is required.
- Assign profiles to retail products that you intend to sell on installment.
- Set up credit classes to allow or not allow installment plans.
- Set the offset payment posting date – By default, the posted date of a pay-in-full transaction is set to the same day as the transaction. This may result in crediting the payment prematurely. Admin Console settings let you delay when the payment posts to ensure system processes are not affected due to premature crediting.
General Ledger Setup for Installment Plans
There are two GL posting processes for retail installment plan sales – one to post the full installment amount for the sale and one to post billed installments as they occur. Both processes should be set up to use the same GL account. The process for posting installment plan sales is driven by the respective POS locations where installment plan sales are tendered. This setup is covered below. GL setup for billed installments is driven by installment plan billing products and is covered in the section which covers all aspects of billing product setup.
GL Setup for Posting the Full Installment Amount for the Sale
It is recommended that for all store locations where retail installment plan sales are tendered, you select a specific GL Account to suit your business process. IDI recommends using an Accrued Accounts Receivable account. To do this, at each location you need to override the default GL account for the Retail Cash General Ledger Property on the Future Installment Tender Type and select your designated installment plan GL account.
In the IDI Desktop Client:
- Choose Applications > POS Back Office > Locations.

- Right-click on the store location and choose Edit.

- On the Location Configuration form:
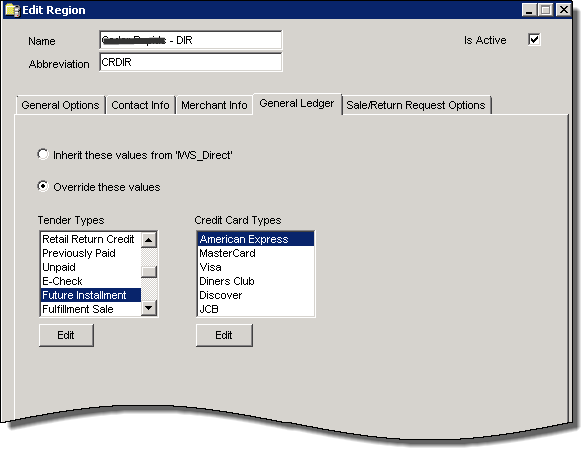
- Select the General Ledger tab.
- Select the Override these values option.
- Select the Future Installment Tender Type and click Edit.
- On the Edit Tender Type form click Edit.
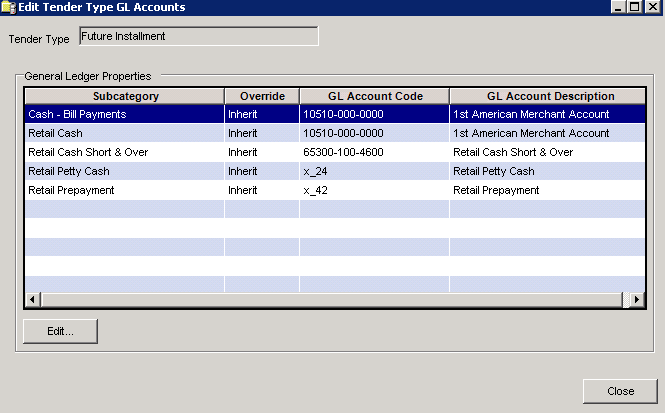
- On the Edit Assigned GL Accounts form, for the Retail Cash subcategory select Override from the Override drop-down menu and then choose the designated GL account (Accrued Accounts Receivable recommended).

- Click Save.
- Close the Edit Tender Type GL Accounts form.
- Click Save on the Edit Location form.
Setting Up the Billing Product
At least one billing product must be set up in the IDI Desktop Client Product Catalog. This billing product is associated to the retail product being sold on an installment plan. The product is simply a marker to drive scheduled payments after the sale. It does not establish any of the parameters related to installment plans such as number of installments, down payment amount, and so on. The price is set on the retail product. All other variables (number of payments, down payment, whether to require a 1st payment…) are set on an Installment Plan Profile which is then associated to the retail product. The billing product is also specified on the Installment Plan Profile.
Although only one such product is required, you may want to configure multiple billing products. The content of the Description (or Alt Invoice Description) field is used as the description for the corresponding line item on the invoice. Therefore, if you need to distinguish between different installment payments on an invoice, multiple billing products would need to be created and named accordingly.
GL Setup for the Billing product
This GL setup accounts for the posting of billed installments. You have two options for GL setup on the billing product. You can either set up the GL on a Product Category, and then assign the Product Category to the billing product, or you can set up GL directly on the billing product. It is good practice to have a Product Category associated to all products in the Product Catalog, so this method is recommended. The GL configuration process for Product Category and billing product is the same as the respective forms look and operate the same way. This section covers the Product Category method.
Product Categories are added via Product Management (Product Management > Product Categories).

This displays the Product Category form.
To create the Product Category:
- Right-click in the grid on the Product Categories form and choose New from the context menu.

- Assign the new Product Category a meaningful name such as Installment Plans.

- Click Edit. This displays the Edit Assigned GL Accounts form.
- On this form find the Earned and Billed Revenue Subcategory.
- Set the Override column to Override.
- Then set the GL Account column to the same GL account as specified for GL posting of installment plan sales covered in the section on General Ledger Setup for Installment Plans. As indicated in that section, an Accrued Accounts Receivable GL account is recommended.
- Click Save.

- Click Save on the Add Product category form.
How to assign the Product Category to billing products is described in Configuring the Billing Product below.
Note: If you’re using both the enhanced retail and older billing product-based installment plans, and there is a need to GL them separately, separate Product Categories should be set up and assigned to the respective billing products. It is recommended that you contact IDI for assistance with this setup.
Configuring the Billing Product
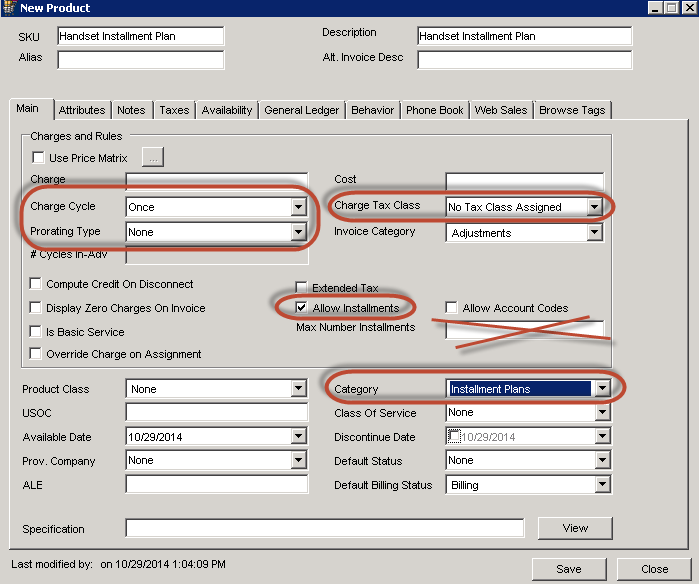
The following parameters must be properly configured to enable the billing product to be selected on a profile (to be present in the corresponding drop-down menu on the profile):
- Charge Cycle must be set to Once to enable the Allow Installments check box.
- Prorating Type must be set to None.
- Charge Tax Class = No Tax Class Assigned.
- Allow Installments must be checked. Note: Do not enter a value for Max Number of Installments This field on the New/Edit Product form is ignored when enhanced installment plan functionality is enabled in the system.
The following setup is also required:
- General Ledger setup for the billing product can be accomplished either via the General Ledger tab on the product, or by selecting the designated and properly configured Product Category as shown below.
- The entry in Description (or Alt Invoice Desc) determines the line item description on the invoice.
Permissions
Product Management – Installment Plan Profiles
Permissions for access to installment plan profiles must be enabled in the permission profiles of users charged with managing installment plan profiles. The path is: Application > CostGuard Client > Product Management > Installment Plan Profiles.

POS Permissions Governing Client-based Sales
These permissions control:
- Whether users can right-click on a retail product during the sale to add an installment plan when the profile makes installment plans optional.
- Whether users can override the rule that prevents installment plans based on credit class.
Application> CostGuard Client> POS> Front Office> Sales and Returns> Apply Retail Installment Plans
Note: The Edit and New permissions are NOT functional and have no effect on users’ ability to add or edit an installment plan during a sale.

Users having the Apply Retail Installment Plans permission disabled can only sell installment plans when the profile makes an installment plan mandatory on the retail product. If the profile makes an installment plan optional, users will not have the ability to add an installment plan during the sale. Users having the Apply Retail Installment Plans permission enabled can sell installment plans in either case.
Users having the Override Do Not Allow Installment Plan permission disabled will not be permitted to sell an installment plan when the customer’s credit class dictates that installment plans are not allowed. Only users with this permission enabled can allow such a sale to go forward.
Permissions for Installment Agreements on Client-based Sales
Existing permissions that controlled Service Agreements in POS Make Sale now apply also to Installment Agreements. These permissions are to allow/disallow skipping signing an Installment Agreement and to allow/disallow using a test signature.
The branch has been renamed to convey the permissions apply to installment agreements.
Path: Applications/CostGuard Client/POS/Front Office/Sales and Returns/Service & Installment Agreements
These permissions are disabled by default.

An additional Installment Agreement permission controls whether users can view Installment Agreements via IDI Desktop Client.
Path: Applications/CostGuard Client/Customer Management/Customers/Catalog Items Installment Agreements
This permission is disabled by default.

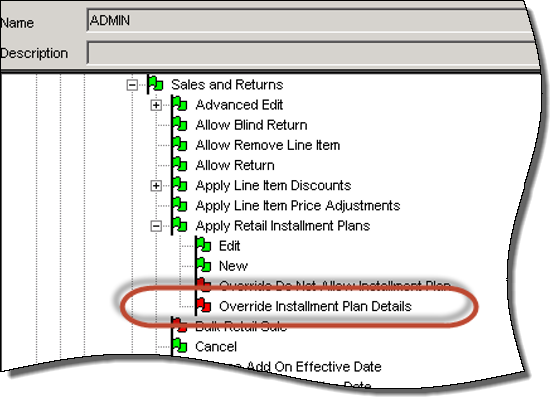
Permission for Manager Override During a Client-based Sale
The ability to perform Manager Override of an Installment Plan’s Rules in POS Make Sale is regulated by the Override Installment Plan Details permission.
- Application > CostGuard Client > POS > Front Office > Sales and Returns > Apply Retail Installment Plans, Note: This permission is disabled by default.
Allow Installment Plan Exchange
The Allow Installment Plan Exchange permission is required to perform an Installment Plan exchange via the Exchange wizard. This permission is disabled by default and must be enabled as needed. The permission is available in Admin Console > Security > Profiles > Permission Profiles under:
Application> CostGuard Client> POS> Front Office> Sales and Returns (for POS Make Sale transactions)

Setting Up Installment Plan Profiles
Installment plan profiles are set up via Product Management independent of retail products. This facilitates configuration and maintenance. You can associate a profile with multiple retail product types as needed. When a change is needed, you only need to edit the profile rather than having to edit multiple retail products.
The menu item below displays the Installment Plan Profile grid.


From this grid users can view, add, edit, and delete installment plan profiles.
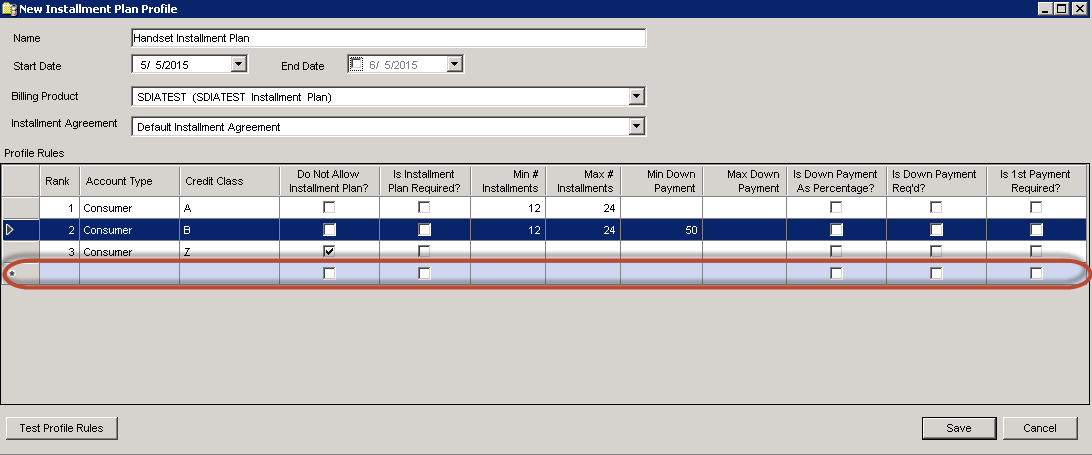
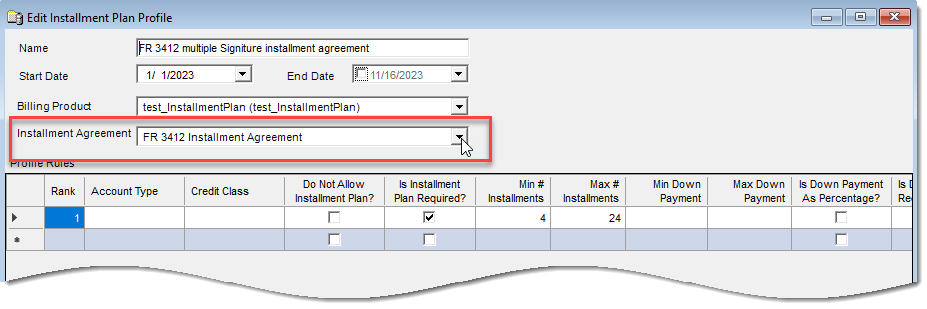
Choosing to add or edit a profile displays the Add/Edit Installment Plan Profile form.

The upper portion provides fields for specify these profile-level parameters.
| Parameter | Description |
| Name | Profile name listed in the drop-down menu on the Retail product. |
| Start & End Date | These are standard date controls. Start Date defaults to today. End Date can be enabled (checked) or disabled (ignored) as needed. |
| Billing Product | The drop-down contains all products configured to allow installments and whose Charge Tax Class = No Tax Class Assigned. |
| Installment Agreement | The drop-down lists Installment Agreements installed by the IDI and custom kits
IDI installs a default agreement. The custom kit can install one or more custom agreements |
The Profile Rules section is an in-line editable grid for adding, editing, ranking, and deleting profile rules based on Credit Class and Account Type. This grid lets you define these parameters.
| Parameter | Description |
| Rank | Order of Precedence. See Ranking Rules. |
| Account Type | See Selecting Credit Class and Account Type. |
| Credit Class | See Selecting Credit Class and Account Type. |
| Do Not Allow Installment Plan | Whether or not to allow installment plans for this account type/credit class combination. See Do Not Allow Installment Plans. |
| Is Installment Plan Required | Checked – product must be sold on installments.
Unchecked – allow authorized users to choose whether or not to sell product on installments at time of sale. |
| Min. & Max. Number of Installments |
|
| Min. & Max. Down Payment |
|
| Down Payment As Percentage |
|
| Is Down Payment Required | Checked – down payment required at time of sale.
Unchecked – users may choose at time of sale. |
| Is First Payment Required | Checked – first payment required at time of sale.
Unchecked – users may choose at time of sale. Note: If this option is selected, the first invoiced installment will, in effect, be the second installment and be dated accordingly. |
Ranking Rules
You can rank the rules within an Installment Plan Profile to set the order of precedence if more than one rule applies to a customer. Rank can be adjusted by dragging and dropping a row up or down in the order. The rank number changes accordingly. Note: The rules grid does not support filtering or sorting so as not to impact ranking.
Selecting Credit Class and Account Type
The Credit Class and Account Type columns convert to drop-down menus when you click on a cell. The Credit Class menu lists all defined credit classes except those marked in Data Management to not allow installment plans. The menu also lets you choose no credit class. The Account Type menu lists all defined account types. The menu also lets you choose no account type.
Notes:
- If a subscriber does not match one of the rules (credit class/account type combination), the subscriber will not be permitted to make a purchase with an installment plan. You can avoid this by setting up a catch all rule with no credit class or account type and ranking it at the bottom of the order.
- The system will not allow more than one rule to be defined for a credit class/account type combination.
Do Not Allow Installment Plan Option
When a rule is based on credit class, the Do Not Allow Installment Plan check box on the grid only applies if the Do Not Allow Installment Plan check box on the Credit Class form in Data Management is not checked (meaning installment plans are allowed for the credit class).
The setting in Data Management should only be used to always disallow installment plans for a particular credit class (for all installment plan profiles). This saves you from having to set up a do not allow installment plan rule for the credit class in every profile.
Not checking the check box in Data Management lets you have a do not allow installment plan rule for the credit class for some profiles and not for others.
Adding New Rules
There is always a blank row marked with an asterisk at the bottom of the grid for entering new rules.
As an alternative you can select an existing row and choose to duplicate it. This is handy if you want to create a new rule, but you only need to change one or two parameters (for example if you only need to establish a different down payment range for another credit class). Note: If you use this feature, you must change either the credit class or account type or both since each credit class/account type combination can only have one rule.
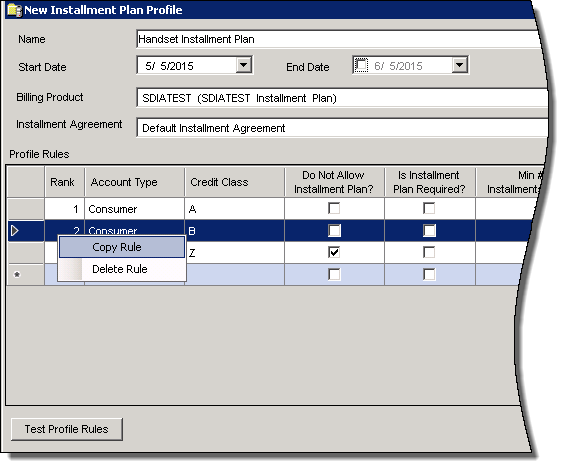
Deleting Rules
Existing rules can be deleted as needed.

Testing Rules
From the Add/Edit Profiles form you can test your rules by clicking the Test Profile Rules button.
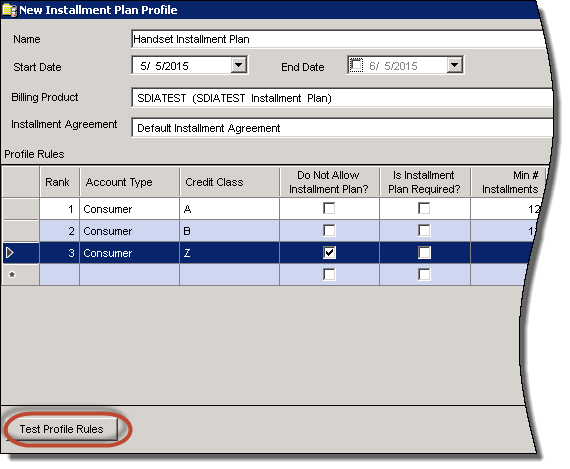
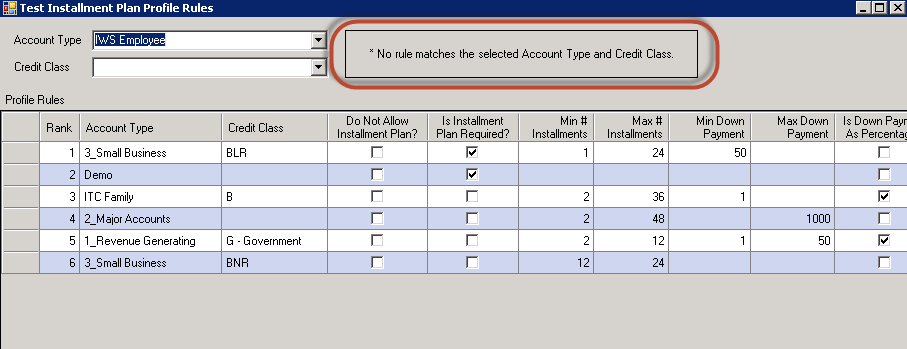
This displays the Test Installment Plan Profile Rules form. To use this form, simply select the account type and credit class (none is a valid selection for credit class). The form will then highlight the applicable rule.

Note: If the form cannot find a rule that matches the selected account type/credit class combination, the warning shown below will be displayed. This means that if a catch-all rule (any account type/credit class) is not added, any subscriber whose account type and credit class does not have a matching rule will not be permitted to make a purchase with an installment plan.
Assigning a Profile to a Retail Product
Each retail product that may be sold on installments must have an installment plan profile assigned. The Installment Plan Profile drop-down menu contains a list of all active profiles configured in the system. The menu filters out (does not include) profiles whose Start Date is in the future or whose End Date has passed.
Note: Retail installment plans can only be sold on serialized retail products. Therefore, the corresponding drop-down will not be enabled unless the product is marked as Serialized.
The menu defaults to None. For products that will not be sold on installments, leave the menu at the default None. This will ensure that users will not have the option to sell the product with an installment plan.

Allow or Disallow Installment Plans by Credit Class
Users can configure whether to allow or disallow installment plans on a credit class basis. This is done via the Add/Edit Credit Class form in Data Management. Note: During a sale, if the customer’s credit class precludes purchases on installments, authorized users can override the Credit Class rule with a Manager Override.

Offset Payment Posting Date
By default, the posted date of an installment plan pay-in-full transaction is set to the same day as the transaction. This may result in crediting the payment prematurely, exempting the account from certain processes. This may also confuse both carriers and subscribers by not accurately reflecting the account balance for the interim until the bill period is processed.
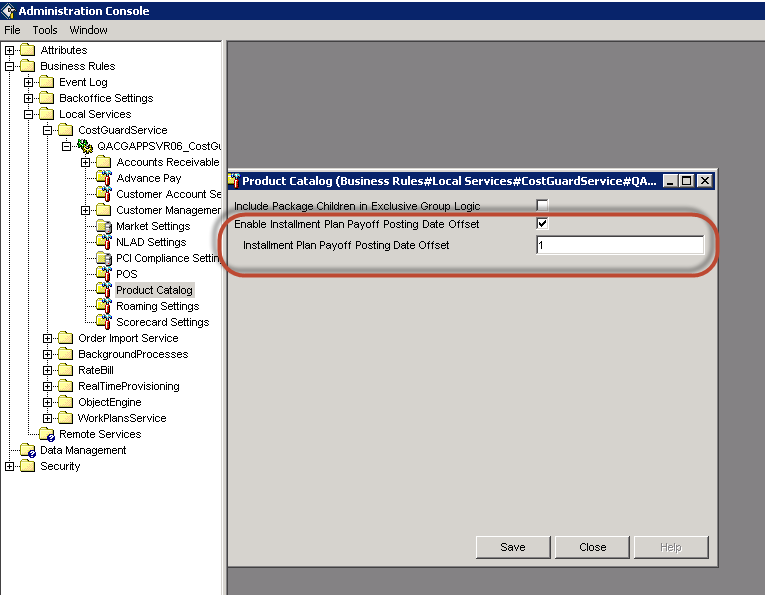
Admin Console settings let you delay when the payment posts as a function of days prior to the end of the current bill period. This provides an accurate indication of account balance prior to the specified (delayed) posted date. Also, other system processes will not be affected due to premature crediting. Note: The on/off setting defaults to disabled (off). When disabled, there is no impact to existing functionality (pay-in-full transactions are posted the day of the payment).
The delay is specified as number of days before the next invoice date. This is done via two new settings in Admin Console Business Rules (Local Services/CostGuard Service/Product Catalog). First check Enable Installment Plan Payoff Posting Date Offset, then enter the offset as number of days before the next invoice date. The valid range is 1 to 14 days.
When enabled, the applied posted date of the payment is the number of days per the configured value before the customer’s last day of the current bill period. The result is that a payment will be created as an unposted transaction and not applied to the account balance until the specified Posted Date. If the defined number of offset days puts a Posted Date in the past (earlier than the current date), the current date is used.
Selling an Installment Plan
Prerequisite for Installment Agreements
As a prerequisite, your IDI Desktop Client Product Catalog must have retail products with installment agreements available to include in a sale.
An installment agreement is associated to a serialized retail product by first associating an agreement to an installment plan profile in Product Management > Installment Plan Profiles.
And then associating an installment plan profile to the retail product in the IDI Desktop Client Product Catalog.

Selling an Installment Plan via a Client-based Order
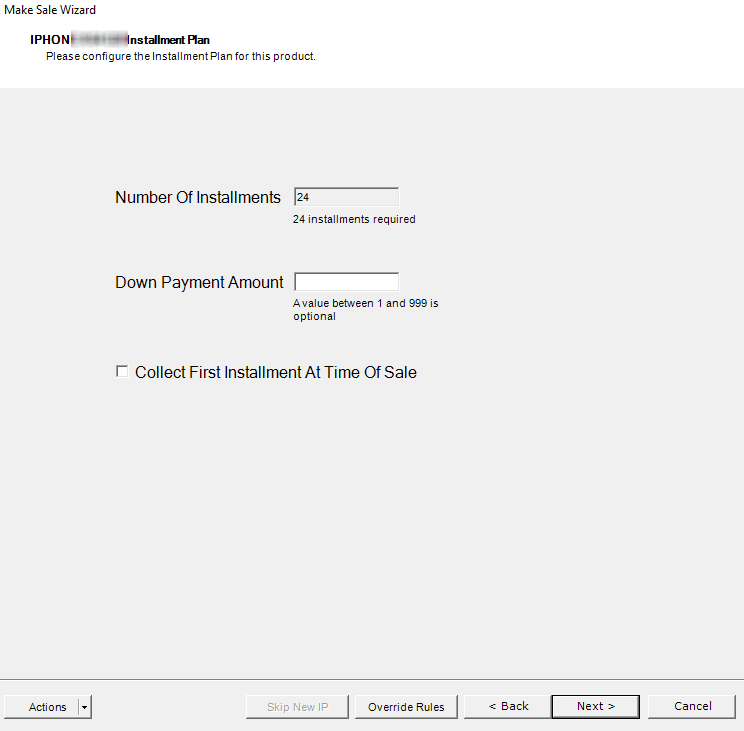
If a retail product is added to the order that MUST be sold with an installment plan, the POS Make Sale wizard will display a form for viewing/specifying installment plan options.
Note: The Down Payment field label indicates Currency or Percent (of retail price), depending on the profile configuration.
If a retail product is added to the order that allows, but does not require an installment plan, users have the option to right-click on the product to add an installment plan. This displays the same form for viewing/specifying installment plan options.
The right-click option to add an installment plan is not available on Retail Products that do not have an Installment Plan Profile assigned.
The rules governing installment plan options are described below.
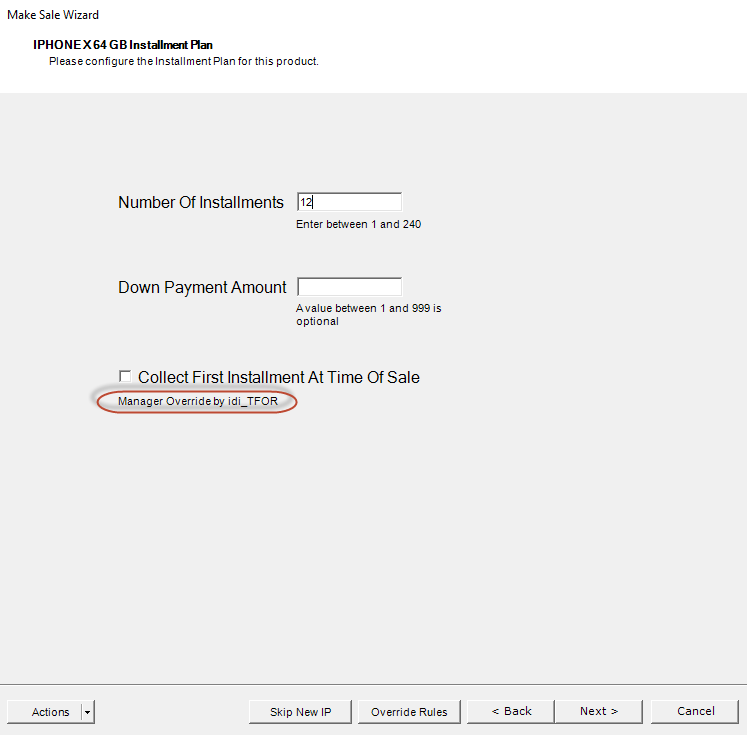
Number of Installments
If the number of installments is fixed by the profile, the form indicates the number of installments, and the value cannot be changed. If the number of installments can be set by the user at the time of sale, the form indicates the range. The value defaults to the maximum as set by the profile, and users can enter any value within the indicated range. The absolute maximum number of installments is 240.
Down Payment
The label on this field indicates whether the down payment is entered as a currency amount or as a percentage of the product’s retail price.


If the profile requires a down payment and fixes the amount to a specific (not editable) value, the form indicates the down payment amount, and the value cannot be changed. If the profile requires a down payment and the amount can be set by the user at the time of sale, the form indicates the range. The value defaults to the minimum as set by the profile, and users can enter any value within the indicated range.
Note: The down payment cannot exceed the retail price of the product. If the price is discounted, the down payment cannot exceed the discounted retail price.
If the profile does not require a down payment, and you choose not to require a down payment at the time of sale, leave this field blank.
First Payment
This check box is checked and disabled if the product’s profile makes the first payment at time of sale mandatory. The check box is enabled and unchecked by default if the product’s profile allows users to choose whether to require the first payment at the time of sale. The first payment amount is calculated when the order is tendered by subtracting from the handset price any down payment and/or discount as applicable and then dividing by the number of installments.
Note: If this option is selected, the first invoiced installment will, in effect, be the second installment and be dated accordingly. Also, when the first installment is paid at the time of sale, that installment is not represented on the Installment Details view in Customer Management.
Overriding Profile Rules
The Override Rules button lets you modify a configured installment plan profile rule. For example, if the Installment Plan Profile’s rule was configured to require 24 payments, and you want to set the payments to 12 for a specific sale, click the Override Rules button.
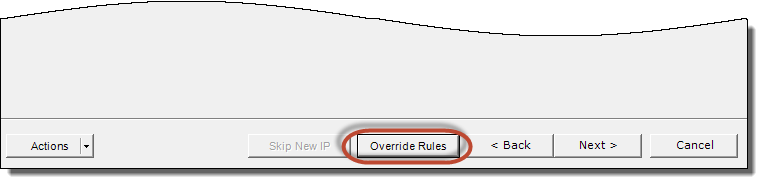
This displays a message indicating that only users with permission to Override Installment Plan Details can perform this process. If the current user has this permission, clicking Manager Override will allow the user to proceed. If not, the Manager Login window is displayed and will require a user with Override Installment Plan Details permission to log in.


On overriding a configured value, the form will indicate which user performed the Manager Override.
Disallowing an Installment Plan Due to Credit Class
If a product is to be sold with an installment plan but the customer’s assigned credit class does not allow installment plans, the system will display an error message and prevent the sale from moving forward until this condition is addressed.
- If the installment plan is optional, the message will be displayed on making the selection to pay on installments.

The system will allow the sale to go forward without an installment plan if the customer chooses to do so.
- If the installment plan is required, the prompt will be displayed at the time the product is selected.

Note: In both cases, the Credit Class rule can be overridden by an authorized user with a Manager Override.
Tendering, Receipts, and Installment Agreement
Tender Form
The tender screen indicates remaining balance due on an installment plan as a single line item. If the sale includes multiple items sold with installment plans, each item has a separate line for remaining balance due.
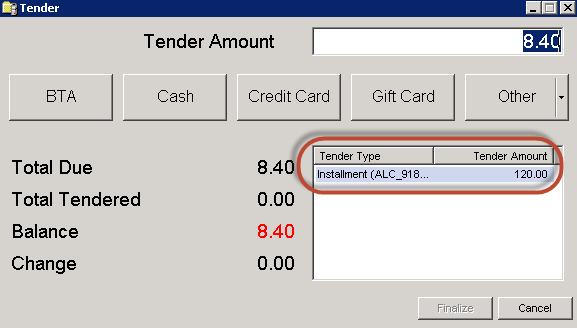
Sales tax on any product sold on installments is due in full at the time of sale.
The down payment and first payment, if applicable, are included in the total amount due at the time of sale. The first payment amount is calculated by subtracting from the handset price any down payment and/or discount/price adjustment as applicable and then dividing by the number of installments.
Note: If the sale results in a negative remaining balance due on the installment plan (for example, down payment + discount exceed the retail price), the tender screen will display an error and not allow the sale to be completed. At that point, users can backtrack to make adjustments to complete the sale.
4-inch Receipt
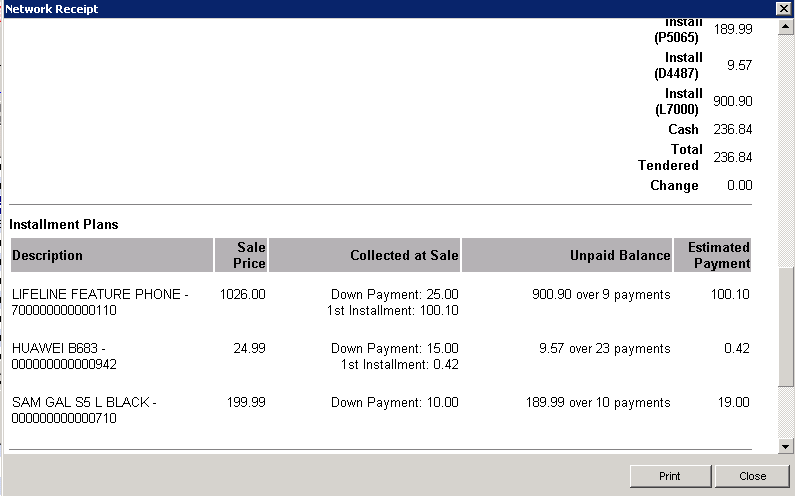
For each Retail Installment Plan on the order the four-inch receipt provides a block of information related to the Installment Plan comprising:
- Product Catalog Description and Equipment ID
- Amount collected at time of sale with the following broken out separately (or omitted if not applicable):
- Down Payment
- 1st Installment collected at the time of sale
- Unpaid Balance – This is the remaining amount due after accounting for down payment and 1st payment at time of sale.
- Number of Payments – This is the number of payments as specified by the profile unless the first payment was collected at the time of sale. In that case the number of payments is decremented by one.
- Estimated Installment Amount – This is the amount due with each installment (balance/number of payments). This is estimated as the calculation may not result in whole pennies (e.g., $2.166). In this case last installment may be slightly higher or lower.

Network Receipt
For each Retail Installment Plan on the order the network receipt provides a row of information equivalent to what’s provided on the 4-inch receipt.
POS Complete Sale Form
The Complete Sale form provides the same summary presentation as the Network Receipt.
Installment Agreement
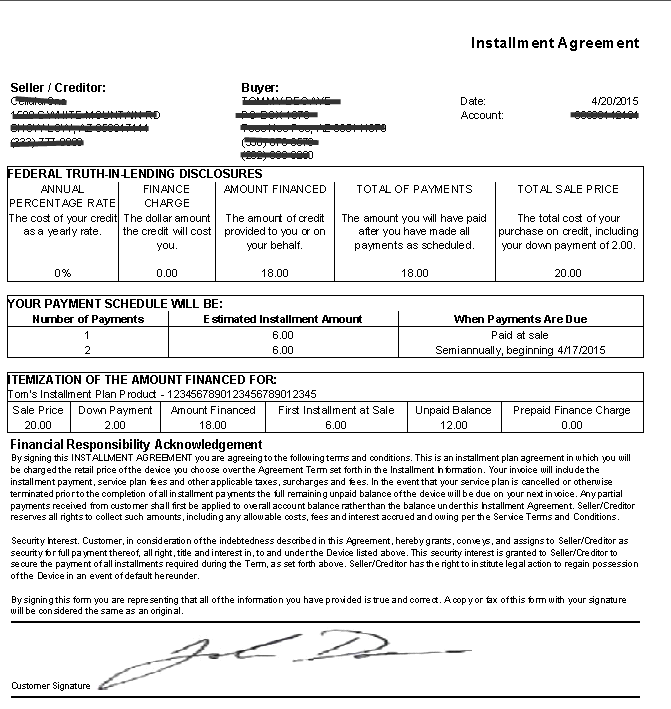
A new Installment Agreement form is printed the end of the sale for each Installment Plan sold on the order. The Installment Agreement is associated to the retail product via the product’s Installment Plan Profile.
Installment Agreements are stored in Document Storage as other similar documents. They can be accessed from two locations in Customer Management:
- The Retail Installment Plans Grid
- The associated billing product

The agreement comprises for basic sections:
| Header |
|
| Federal Truth in lending Disclosure |
|
| Payment Schedule |
|
| Itemization of Amount Financed |
|
| Financial Responsibility Acknowledgement |
|
Billing Product
The Billing Product associated to the installment plan is transparent during the sales process to ensure users cannot remove the product from the sale.
Managing Installment Plans
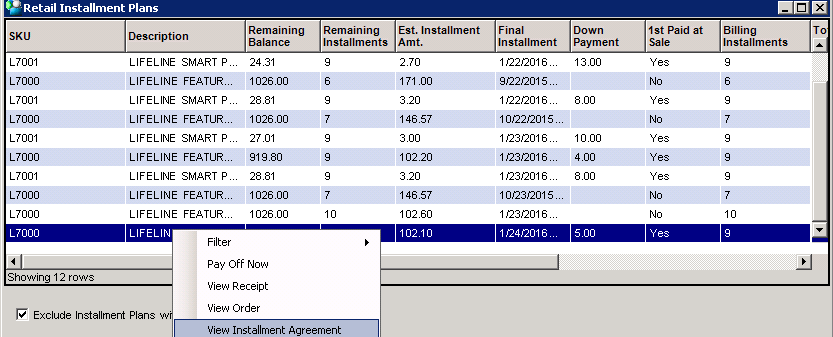
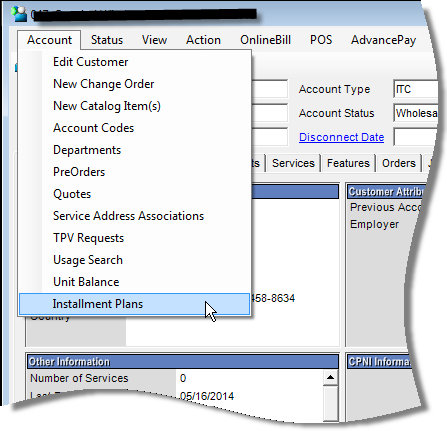
In Customer Management, the Account > Installment Plans menu option on the Customer form displays a form for tracking retail installment plans on the account.

You can choose whether to show or hide inactive (disconnected) installment plans in this view. For each plan listed, the following information is provided:
- Retail product’s SKU and Description.
- Remaining balance.
- Number of installments yet to be invoiced .
- Estimated installment amount.
- Final installment date.
- Down payment amount (if applicable).
- Whether or not the first payment was collected at the time of sale.
- Billing Installments – Total number of installments to be invoiced after the sale.
- The total installment amount due after the sale.
- Service Number (if the plan is associated to a service).
- Sale date and receipt
From this view, you can select an installment plan and choose to:
- Display the receipt from the sale.
- View order information.
- Pay In Full – this takes you to the Tender Bill Payment form with the selected installment plan auto-populated.
- Initiate an exchange (for authorized users).
Pay In Full – Tender Bill Payment Form
The Tender Bill Payment form provides the option to pay in full the balance of any installment plan on a specified account. The Pay-in-Full process creates an order to disconnect the installment plan. Users do not have the option to create a Make Sale order (where the payment amount could be edited). The subsequent invoice will include the remaining amount due with a credit from this payment to offset that amount.
You can access this form via the Tender Bill Payment option in POS Front Office, or by selecting the pay in full option on the Installment Plan History form or Installment Plan Detail form in Customer Management. The form’s behavior varies depending on whether it is displayed by invoking the pay in full option or by the Tender Bill Payment option.

The Payment Allocation section on this form has been modified to support paying off installment plans. Note: These changes only apply when Installment Plan Enhancements are enabled in the system; otherwise, the form behaves as it did prior to the new functionality.
When the new Payment Allocation check box is checked, the Apply to options are enabled and you can select whether to apply the payment to an invoice (existing functionality) or an installment plan. The corresponding drop-down menu label changes accordingly and is populated with invoices or installment plans for the specified account. Note: When coming to this form via the Pay in Full option, the Payment Allocation section is auto-populated with the selected installment plan. In this case you cannot choose to apply the payment to an invoice, nor can you select a different customer.
To pay off an installment plan, check Payment Allocation and then select Installment Plan. Then select the installment plan from the drop-down menu. An account may have several installment plans. To help you distinguish between plans, each is listed with the service number (if the plan is associated to a service), retail product SKU (may be abbreviated depending on length), and the remaining amount due.
On selecting the installment plan, the remaining balance is auto-populated in both the Pay Off Amount and Payment Amount fields and cannot be edited. The SKU field is auto-populated, and the serial number, if applicable, is displayed in the Description field.
Invoicing
The line item description comes from the Description or Alt Invoice Desc field on the associated billing product.
The first installment will be invoiced in the current bill period unless it is collected at the time of sale. In this case the first invoiced installment is pushed out to the next bill period. On the Installment Detail view, it will have the date that the second installment would have had, if the first installment were not paid at the time of sale.
Handling Extra Payments or Non-Payments
Extra (over) payments are not directly applied to the installment plan, but rather are applied as credits to the subscriber’s account and reduce the total amount due on the next invoice accordingly.
If a customer fails to pay the installment amount due on an invoice, that amount is carried over and added to the total amount due on the next invoice.
Returning a Product With an Installment Plan
Returns observe the Location’s Register Policy configuration for the Refund Days Limit.
If a product is returned within the configured Refund Days Limit, the customer receives a credit for any down payment, invoiced installment payments and sales tax collected, and the billing product is disconnected.
If the return is voided or canceled, the previous credit is reversed, and the billing product is reconnected.
Waiving Remaining Balance Due on Upgrades
You can excuse customers from having to pay the remaining balance due on a Pay-in-Full transaction (for example, as an incentive to upgrade). This requires you to set up a special tender type that offsets the remaining balance due without having to tender a payment.
Ending Service Before the Installment Plan is Fully Paid
If a customer terminates service prior to fully paying off an installment plan, the system will calculate the remaining balance and put that balance as a line item on the next invoice.
Exchanging Plans
The Exchange Wizard in POS Make Sale facilitates exchanging (or returning) serialized retail products assigned to an active Enhanced Installment Plan (EIP). This functionality improves the experience for you and your customers by reducing time and stress when performing exchanges.
Overview
The exchange proceeds in either of two modes, depending on whether the installment plan has been billed. If the installment plan has not yet been billed, the exchange proceeds in the Restart mode. This supports changing equipment and/or the installment plan sold at the initial time of sale and provides an opportunity to regenerate installment plan agreements for signature. This addresses the following use cases that lead to an exchange:
- Incorrect original sale (e.g., wrong IP details).
- Out of box issues with equipment.
- Subscriber remorse, return of trial offerings (e.g., I want phone B instead), etc.
If the installment plan has been billed at least one time, the exchange proceeds in Continue mode. This supports changing the equipment sold at the initial time of sale, AND continues the existing liability, meaning, regardless of whether you use the same or different equipment SKU, the money owed on the installment plan will remain the same. It will not be adjusted up for more expensive equipment, or down for less expensive equipment. This addresses the following use cases that lead to an exchange:
- Incorrect original sale (e.g., wrong IP details or Subscriber Remorse) and was billed.
- Equipment issues needing a replacement: Warranty, Insurance, Dog Ate it.
Note: Users do not select Restart or Continue mode. This selection is made automatically by the system, depending on whether the installment plan being exchanged has been billed.
To perform an exchange via the Exchange wizard, users must have the new Allow Installment Plan Exchange permission enabled in their permission profile.
Basic Flow
The basic flow is similar for a Restart or Continue mode exchange, except that the Restart mode displays the form for specifying installment plan options. This lets you change the original terms of the installment plan, if so desired. In either case, the wizard will merge back into the standard Make Sale flow for downstream steps as usual.
Launching the Installment Plan Exchange Wizard
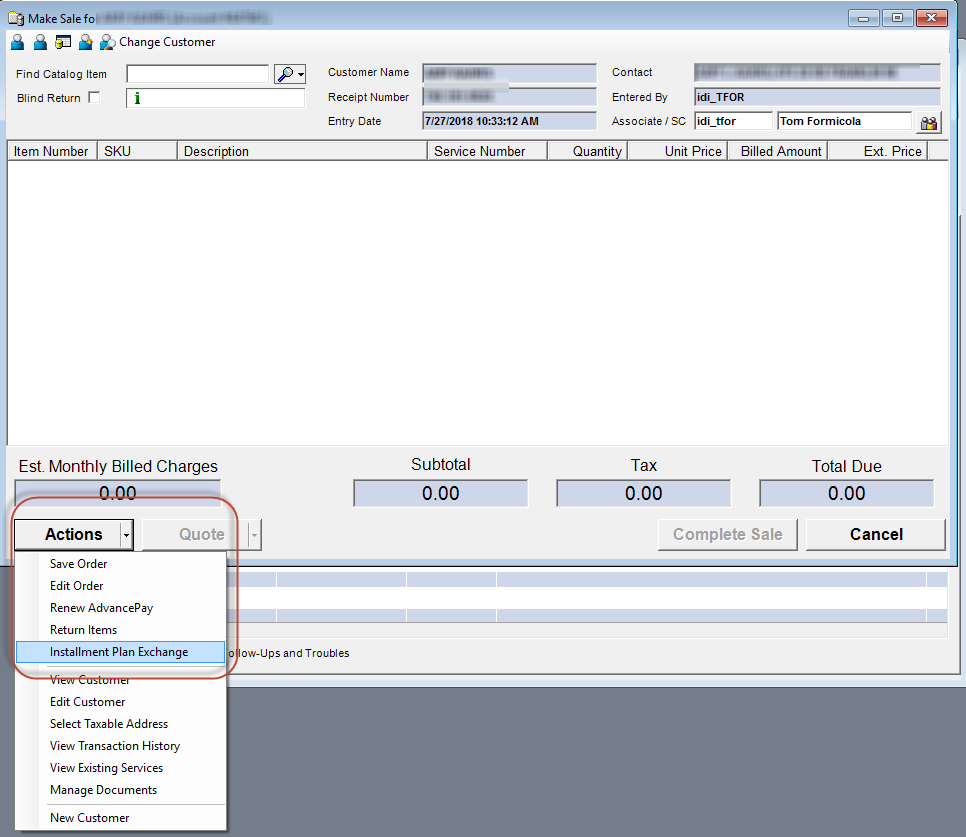
You can launch the wizard via the Installment Plans window on the customer’s account (Account > Installment Plans), or the Actions menu on the POS Make Sale Wizard.
If you use the Installment Plans window, right click on the plan to be exchanged and choose Installment Plan Exchange. Note: This option is only enabled for active plans.

To use the Actions menu, select Installment Plan Exchange from the drop-down menu.
Note: If the account has multiple installment plans that may be exchanged, choosing this option will display Installment Plans window for the account where you’ll need to make a selection.
Selecting Restart or Continue Mode
You are not required to select the mode of operation for the Exchange wizard. The system will automatically start the wizard in the appropriate mode (Restart or Continue), depending on whether the installment plan has been billed at least once.
Using the Exchange Wizard
For both Restart and Continue, the wizard starts with the Item Details form. At a minimum, you’ll be required to select a Return Reason.

Following that, you’ll see the Restart or Continue options form (depending on the mode). In both cases, you can choose to proceed with the same equipment SKU or a different equipment SKU.
Restart:

Continue:

If you choose to proceed with a different SKU, the system will display the Make Sale form for selecting a different SKU. Note: If you select a different SKU in Continue mode, the money owed on the installment plan will remain the same. It will not be adjusted up for more expensive equipment, or down for less expensive equipment.

If you choose to proceed with the same SKU, the following form is displayed. Here you can either continue with the same Equipment ID or enter a different one if needed.

Note: The above forms illustrate the Restart mode; however, the same forms apply when in the Continue mode (except for verbiage denoting the difference in mode).
Following this step is where Restart and Continue modes diverge. If you’re in Restart mode, the wizard will display the form for specifying installment plan options. This lets you enter new specifications if necessary. The form defaults to the settings as defined by the applicable installment plan profile rule (as occurs in a standard Make Sale transaction with an installment plan).

In Continue mode, you’ll proceed directly to the Make Sale Summary form.
Impact on Retail Sales and Inventory Management
The Installment Plan Exchange wizard contains pages/steps where additional setup could be required to best complement existing business processes. The following identifies these specific wizard’s moments and the possible action item(s) to consider prior to deploying/using the new solution.
| # | POS Function | Action Item(s) to consider |
| 1 | Inventory Status | The wizard assumes the returned equipment is present. When displayed for a return, the wizard observes the Retail Product’s configured Return Inventory Status (Behavior Tab). |
| 2 | Return Reason | The wizard assumes the returned equipment is present. When displayed for a return, the wizard observes the Location’s configured Require Return Reason setting (General Options Tab). |
| 3 | Register Policy – Returns | The wizard assumes that the defined rules (e.g., Max Days Allowed) are not applicable to equipment being returned in the exchange.
The wizard will always assume/apply the originally sold price to equipment being returned in the exchange. |
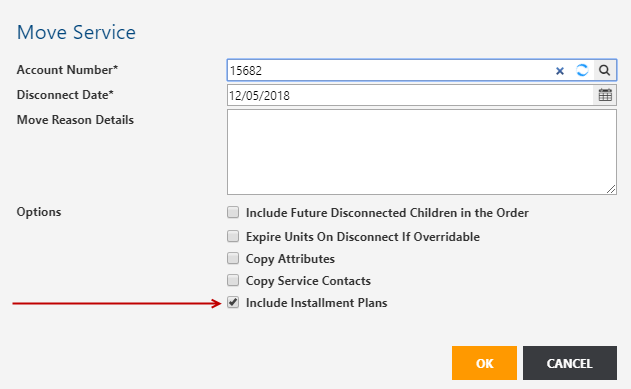
Moving an Installment Plan With Its Service
When a service is moved to a different account and you opt to move the installment plan, the retail installment plan information will move with the service to the new account. This lets you view the original POS receipt and the installment agreement on the moved-to account.
Note: Returns on a moved retail installment plan are not supported from the Moved-To Account. The original POS transaction is tied to the original account. A return can either be done against the original account, or a blind return can be done.
How it Looks
When a service is moved to a different account and you opt to move the installment plan, the retail installment plan information will move with the service to the new account.
Moved-From Account
When viewing the retail installment plan on the moved-from account:
- The remaining Balance will be zero
- The payoff option is not available
- Final Installment Date will be the date the plan was moved
- The account the plan was moved to is displayed
When viewing the retail installment plan on the moved-from account, a new Note column provides the account that the installment plan was moved to.


Moved-To Account
When viewing the retail installment plan on the moved-to account:
- The account the plan was moved from is displayed
- Users can view the Billing Order for the move service order
- The Receipt Number of the original POS transaction for the installment plan is displayed
- Users can pay off the installment plan
When viewing the retail installment plan on the moved-to account, the Note column provides the account that the installment plan was moved from.


Reports
There are four standard reports in Report Explorer to support the enhanced installment plan functionality. They’re located in the Installment Plans folder under Customer Care & Management.

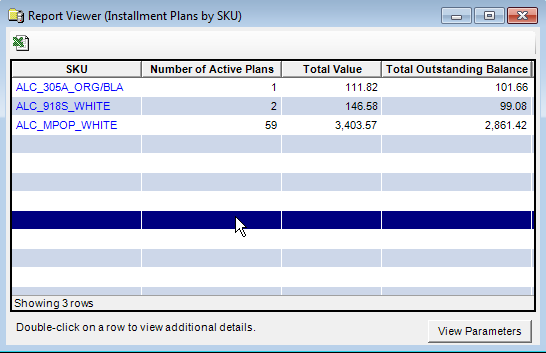
Installment Plans By SKU
This report presents the following information related to installment plans by SKU:
- Number of active plans.
- Total value (number of plans * price).
- Total outstanding balance (yet to be invoiced).
You can run this report for a single SKU or all SKUs. Double-clicking a row (a specific SKU) runs the By Accounts report and returns all accounts that have the selected SKU.
Installment Plans By Account
This report lists accounts with equipment purchased on an installment plan. You can run the report for:
- A specific account number.
- Accounts with a specific SKU where plan is still active.
- All accounts.
You can choose to include or not include (filter out) disconnected installment plans. For each account, this report returns:
- Account number.
- Retail product SKU.
- Date of the sale.
- Receipt number.
- Whether or not the first installment was paid at the time of sale.
- Down payment amount (if applicable).
- Total installment amount.
- Number of installments (Label as Installments After Sale).
- Installment amount (amount owed each bill period).
- Number of installments remaining.
- Remaining balance.
- Service number (if applicable).
In addition to running the report directly from the Report Explorer, you can also run this report as a drill-down from the Installment Plans By SKU report by double-clicking on the row for a specific SKU. In this case the report returns all accounts that have the selected SKU.

Installment Plan Sales Detail
This report provides details to audit how an installment plan (when sold with an applicable serialized retail product) was applied and if it was done correctly according to your business process.


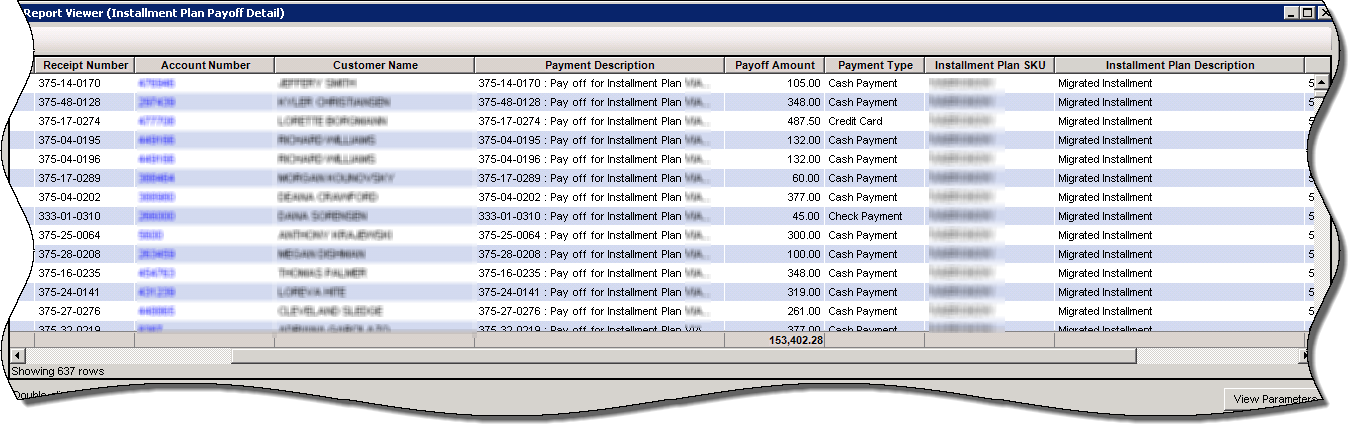
Installment Plan Payoff Detail
This report provides details on performed installment plan payoffs (in one list) to review, and if the POS transaction was done correctly according to your business process.